Importing Logs with Humio Log Collector
Getting Started
For this how-to guide, we’ll walk through how to use the Humio Log Collector to collect and send log events to your CrowdStrike Falcon® LogScale repository. Although the log shipper supports several types of log sources (see the list here), we’ll cover the use case of collecting log events from journald.
To get started, just make sure you already have a Falcon LogScale, previously known as Humio, instance up and running, whether that’s self-hosted or through Falcon LogScale Cloud. We’ll use Falcon LogScale Cloud with a Falcon LogScale Community Edition (LCE) account. If you don’t have a free LCE account yet, you can sign up for one here. Typically, your account request will be approved within two business days.
Step 1: Add a New Repository
Once you’ve logged into Falcon LogScale, the first thing you will need to do is create a repository. This will be the “bucket” where we’ll ship our log data. Navigate to Repositories and Views and click + Add New.

Fill out the required fields, and then save the repository configuration. We’ll keep it basic for now, but more info on repository configuration can be found here.
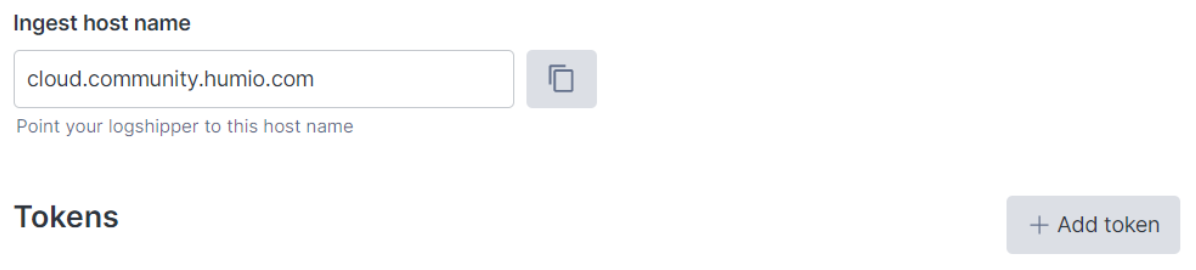
Step 2: Create an Ingest Token
Now that the repository is created, we need an ingest token for Humio Log Collector to use when authenticating. In your repository, navigate to Settings, and then to Ingest Tokens. Click on + Add Token.
For our demo, we’ll name our token test-ingest and use the syslog parser because it generally tries to parse RFC 3164 and RFC 5424 formats. We’ll be ingesting logs from journald. Since the syslog parser is pretty liberal in what it parses, this makes it a good candidate for ingesting logs from journald. If you’re not sure what parser to use for your case, the list of built-in parsers can be found here.
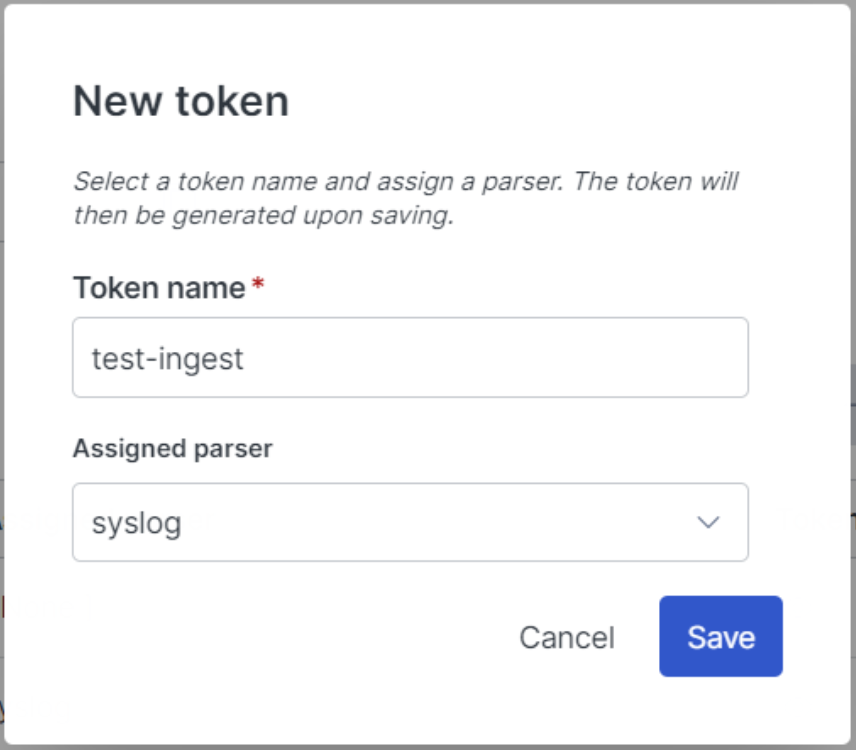
With the ingest token created, we click on the “show” icon and copy its value to a safe place. We’ll be using this in a few moments.
Step 3: Download and Install Humio Log Collector
Now that we have a place to store our data and a token to authenticate our log collector, we need to download our log shipper. We navigate to Organization Settings, Log Collector. There, we follow the steps to download and install the Falcon LogScale Log Collector.
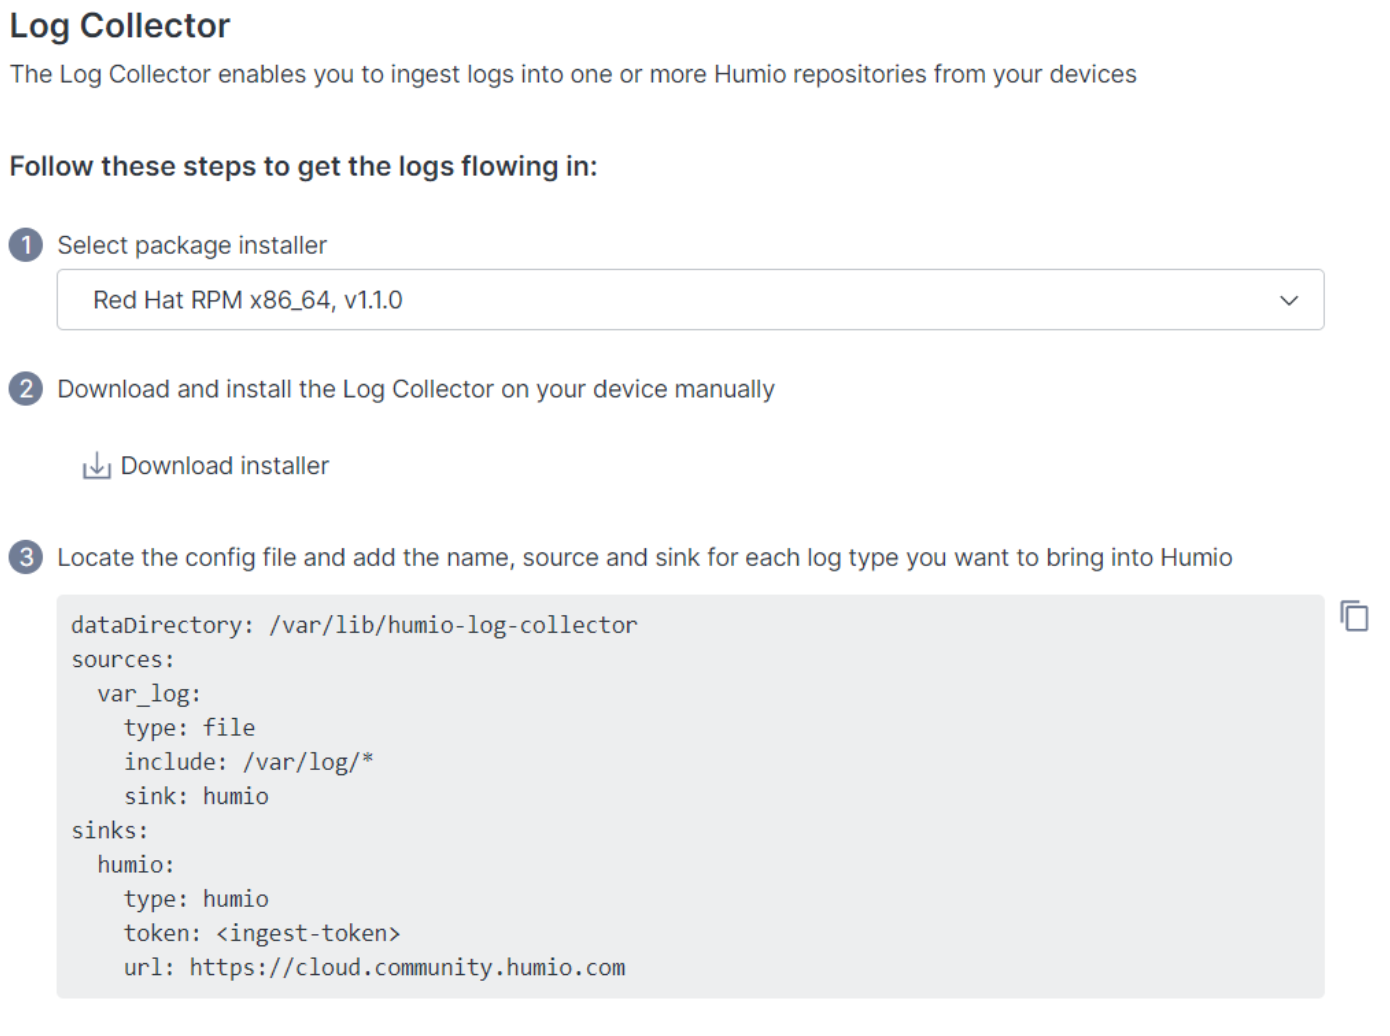
First, we select the package that matches our environment, and we click Download installer. In our case, we’ll install the log collector on a Fedora virtual machine, so we’ve selected the Red Hat RPM option.
With the RPM located in our Downloads/ folder, we run the install.
$ cd ~/Downloads
$ sudo rpm -i humio-log-collector_1.1.0_linux_amd64.rpm
Pretty simple!
At this point, the Humio Log Collector isn’t running, but it is installed. Installation completes a few tasks for you, such as creating a Falcon LogScale user and a directory under /etc that contains a sample configuration. Let’s verify these pieces.
Verify the user creation
$ sudo cat /etc/passwd | grep humio
humio-log-collector:x:980:976:humio-log-collector service account:/var/lib/humio-log-collector:/sbin/nologin
Verify the directory and sample config creation
$ sudo ls -d1 /etc/humio-log-collector/
/etc/humio-log-collector/
$ sudo ls -1 /etc/humio-log-collector/
config.yaml
EULA.txt
Excellent. All of the expected pieces are in place.
Step 4: Configure and Run Humio Log Collector
By default, the Humio Log Collector will look for your configuration in /etc/humio-log-collector/config.yaml. The sample configuration that’s included upon installation is fairly close to what we need, but we will have a few modifications to make. In particular, we want to have the log collector read from the journal. We do this with the following configuration:
dataDirectory: /var/lib/humio-log-collector
sources:
  journal:
    type: journald
    directory: /var/log/journal
    sink: mylogsink
sinks:
  mylogsink:
    type: humio
    token: <INGEST-TOKEN-GOES-HERE>
    url: https://cloud.community.humio.com
There isn’t anything too magical going on here, but it’s worth a quick explanation.
Instead of using the var_log source from the sample configuration, we’re using the journald source and pointing it to the default journal location of /var/log/journal. The journal location may vary depending on your operating system. Before going further, it’s worth checking your system to know for sure what value to use for directory.
Also, we need to paste in the ingest token from our repository which we copied before. The url
for Falcon LogScale will depend on the type of Falcon LogScale account you have. LCE account users will use the URL shown in the example configuration above. If you have a different type of account, you can reference the endpoints documentation from Falcon LogScale for the exact endpoint to use.
Set up permissions for Falcon LogScale Log Collector
We have one more step to go through, which will make sure that the Falcon LogScale Log Collector can see everything it needs to see. We need to give the log collector process special permissions to read the journal of other units that would normally require elevated permissions.
In order to do this on Fedora and RHEL systems, we add AmbientCapabilities to the systemd service file. Start by editing the systemd service file for the log collector; this should be /usr/lib/systemd/system/humio-log-collector.service. We add a single line (highlighted) under the [Service] section. The resulting file should look like this:
[Unit]
Description=Humio Log Collector
After=network.target

[Service]
EnvironmentFile=/etc/default/humio-log-collector
ExecStart=/usr/bin/humio-log-collector -cfg ${CONFIG_FILE}
WorkingDirectory=/var/lib/humio-log-collector
User=humio-log-collector
Group=humio-log-collector
AmbientCapabilities=CAP_DAC_READ_SEARCH

[Install]
WantedBy=multi-user.target
Start the collector
Now that our configuration is in place and the service has the right capabilities, it’s time to start the Humio Log Collector!
$ sudo systemctl start humio-log-collector.service
To have the service start on boot, you can also enable it:
$ sudo systemctl enable humio-log-collector.service
As a quick health check, we use the systemctl status command to check the log collector service.
$ sudo systemctl status humio-log-collector.service

● humio-log-collector.service - Humio Log Collector
Loaded: loaded (/usr/lib/systemd/system/humio-log-collector.service;
disabled; vendor preset: disabled)
Active: active (running) since Sun 2022-07-31 01:45:59 UTC; 13min ago
Main PID: 8845 (humio-log-colle)
Tasks: 7 (limit: 19155)
Memory: 18.2M
CPU: 498ms
CGroup: /system.slice/humio-log-collector.service
└─8845 /usr/bin/humio-log-collector -cfg
/etc/humio-log-collector/config.yamlJul 31 01:45:59 fedora systemd[1]: Started humio-log-collector.service - Humio Log Collector.
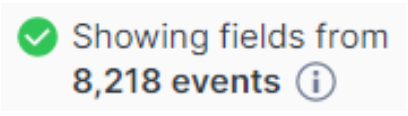
Check the repository for data
Now that we can see the service running successfully, it’s time to check our repository for logs. We navigate to the repository that we created in Step 1. We can see a list of events that have been ingested.
In addition to the event count, we also see a list of events that can be queried immediately. For example, we can execute a search to see commands that landed in the audit journal:

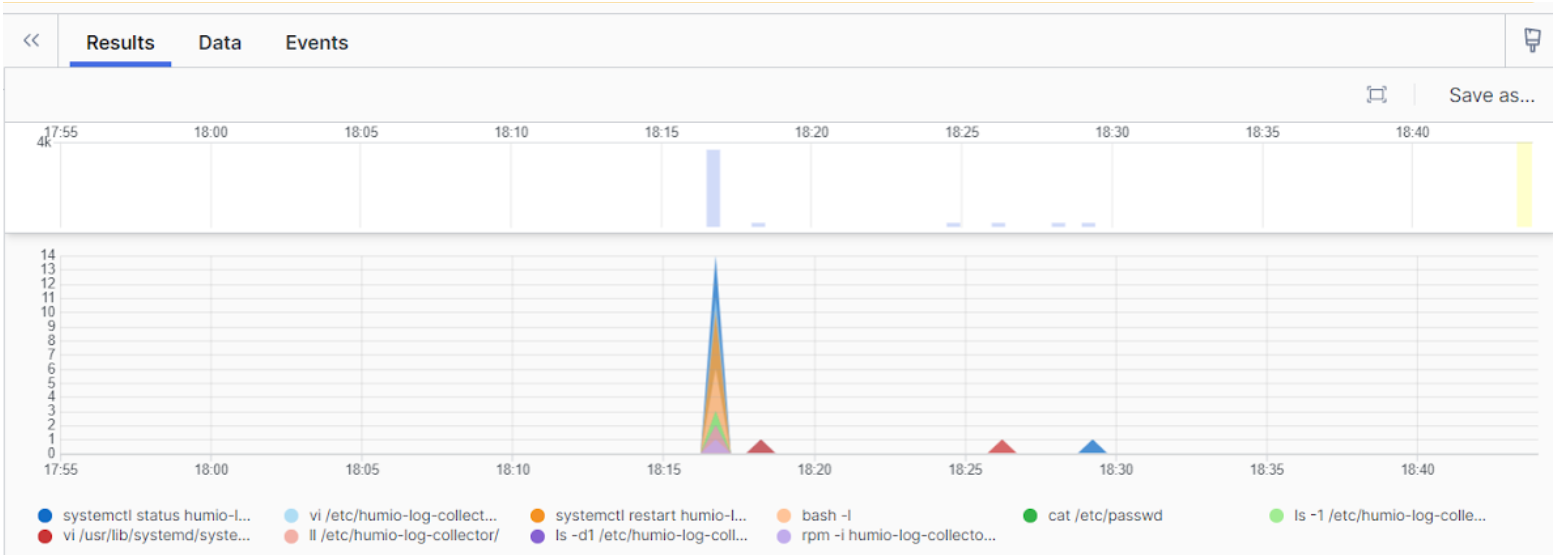
Some of those commands will look familiar! Falcon LogScale ingested all of the audit events related to commands we’ve used throughout this tutorial, including elevating permissions to install the log collector and modifying the log collector configuration.
Wrapping Up
Now that we’ve created a repository and successfully ingested logs with the Humio Log Collector, the next steps to take depend on your next goal. Some good ideas are to check out the options for Humio Log Collector Configuration and details about ingesting data. If you’re already satisfied with the configuration, a good next step might be to check out how to query data in Falcon LogScale.
Happy logging!
Additional Resources
- Read why CrowdStrike Falcon Insight XDR is the next frontier for detection and response.
- See how CrowdStrike is driving the convergence of security and observability with Falcon LogScale and Falcon Complete LogScale.
- Watch a Falcon Insight XDR demo.
- Get a full-featured free trial of CrowdStrike Falcon Prevent™ and see for yourself how true next-gen AV performs against today’s most sophisticated threats.
- Contact us to learn more about Falcon Insight XDR and Falcon LogScale.