Installing a New Falcon Sensor
Hi there. Today we’re going to show you how to get started with the CrowdStrike Falcon® sensor. We will show you how to download the latest sensor go over your deployment options and finally show you how to verify that the sensors have been installed.
So, let’s get started. Now, in order to get access to the CrowdStrike Falcon® sensor files, you’ll first need to get access to your Falcon instance. This access will be granted via an email from the CrowdStrike support team and will look something like this. Now, once you’ve received this email, simply follow the activation instructions provided in the email. This will include setting up your password and your two-factor authentication.
Now, once you’ve been activated, you’ll be able to log into your Falcon instance. We recommend that you use Google Chrome when logging into the Falcon environment. Once you’ve logged in, you will initially be presented with the activity app. In the left side navigation, you’ll need to mouse over the support app which is in the lower part of the nav and select the downloads option.
You’ll then be presented with all your downloads that are pertinent to your Falcon instance – including documentation, SIM connectors, API examples, and sample malware. You’ll also find copies of the various Falcon sensors. Find the appropriate OS version that you want to deploy and click on the download link on the right side of the page. In our example will be downloading the Windows 32-bit version of the sensor. So, I’ll click on the download link and let the download proceed.
We are also going to want to download the malware example which we will use towards the end of this video to confirm that our sensors are working properly. Once the download is complete, you’ll see that I have a Windows MSI file. The file itself is very small and light- and once it’s installed it will actually connect to our cloud and download some additional bits of information so that it can function properly. Now, you can use this file to either install onto a single system like we will in this example, or, you can deploy to multiple systems via group policy management such as active directory.
So let’s go ahead and install the sensor onto the system. Installation of the sensor will require elevated privileges which I do have on this demo system, so I’ll launch the Installer by double-clicking on it and I’ll step through the installation dialogue. You will want to take a look at our Falcon sensor deployment guides if you need more details about some of the more complex deployment options that we have- such as connecting to the CrowdStrike cloud through proxy servers or silent mode installations. These deployment guides can be found in the docs section of the support app.
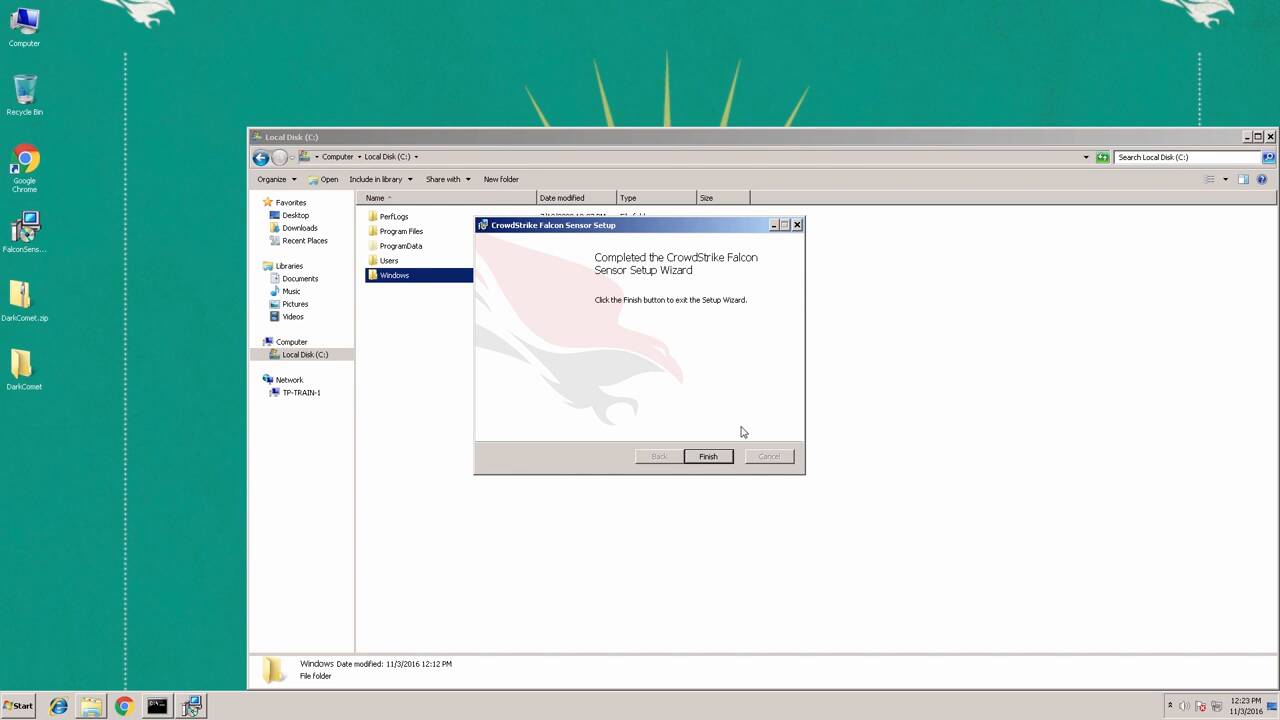
Okay let’s get back to the install. I’ve completed the installation dialogue and I’ll go ahead and click on finish to exit setup wizard. Now, at this point, the sensor has been installed, and it is now connecting to the CrowdStrike cloud to pull down additional data. Now that the sensor is installed, we’re going to want to make sure that it installed properly- and there are several different ways to do this.
First, you can check to see if the CrowdStrike files and folders have been created on the system. I’m going to navigate the C drive- Windows – System32 – drivers – and in here you should see a CrowdStrike folder. If you navigate to this folder soon after the installation, you’ll note that files are being added to this folder as part of the installation process. Ok, so this is one way to confirm that the installs happened.
Another way is to open up your systems control panel, and take a look at the installed programs. You’ll see that the CrowdStrike Falcon® sensor is listed.
Another way you can check the installs is by opening a command prompt. Type in “sc query csagent”. This will return a response that should hopefully show that the services state is running.
Ok, so everything seems to be installed properly on this end point. Let’s go into Falcon and confirm that the sensor is actually communicating to your Falcon instance. Once you’re back in the Falcon instance, click on the Investigate app. Along the top bar you’ll see the option that will read “Sensors”. Click on this, and then click on the “Newly Installed Sensors”. This will show you all the devices that have been recently installed with the new Falcon sensors.
So let’s take a look at the last 60 minutes- and you can see my endpoint is installed here. Now, let’s verify that the sensor is behaving as expected. Earlier, I downloaded a sample malware file from the download section of the Support app. The file is called “DarkComic.zip”, and I’ve already unzipped the file onto my system. So, let’s go ahead and launch this program. Ok, now let’s take a look at the activity app on the Falcon instance. As you can see here there does seem to be some detective activity of my system related to the DarkComet remote access tool. The tools caught and my endpoint was protected- all within just a few minutes without requiring a reboot.
Thanks for watching this video.