


![Helping Non-Security Stakeholders Understand ATT&CK in 10 Minutes or Less [VIDEO]](https://assets.crowdstrike.com/is/image/crowdstrikeinc/video-ATTCK2-1?wid=530&hei=349&fmt=png-alpha&qlt=95,0&resMode=sharp2&op_usm=3.0,0.3,2,0)
![Qatar’s Commercial Bank Chooses CrowdStrike Falcon®: A Partnership Based on Trust [VIDEO]](https://assets.crowdstrike.com/is/image/crowdstrikeinc/Edward-Gonam-Qatar-Blog2-1?wid=530&hei=349&fmt=png-alpha&qlt=95,0&resMode=sharp2&op_usm=3.0,0.3,2,0)


?wid=2048&hei=1350&fmt=png-alpha&qlt=95,0&resMode=sharp2&op_usm=3.0,0.3,2,0)


This blog was originally published Nov. 12, 2020 on humio.com. Humio is a CrowdStrike Company.
Running distributed stateful systems on Kubernetes can be a challenge -- but it doesn’t have to be. The Humio Operator facilitates the configuration and deployment, and eases the management of your Humio clusters running on Kubernetes. In our previous blog post, we introduced the Humio Operator. In this second of a two-part series, we walk you through how to use the Humio Operator to run Humio on Kubernetes. To run Humio on Kubernetes, you needApache ZooKeeper
and
Apache Kafka. For full end-to-end instructions on preparing and installing Humio on Kubernetes, see the
Operator Quick Start Guide. For simplicity’s sake, we will create a Humio Cluster using Persistent Volumes, we assume we have Zookeeper and Kafka, and we will use ‘port-forward’ to connect to our cluster.
Install CRDs
Before the Humio Operator can be installed, we must create our Custom Resource Definitions. The CRDs define the resources that the Humio Operator will manage, which include HumioClusters, HumioExternalClusters, HumioIngestTokens, HumioParsers, and HumioRepositories. Find the version of the Humio Operator that we want to install, and create the CRDs:export HUMIO_OPERATOR_VERSION=0.1.1
kubectl apply -f https://raw.githubusercontent.com/humio/humio-operator/humio-operator-${HUMIO_OPERATOR_VERSION}/config/crd/bases/core.humio.com_humioclusters.yaml
kubectl apply -f https://raw.githubusercontent.com/humio/humio-operator/humio-operator-${HUMIO_OPERATOR_VERSION}/config/crd/bases/core.humio.com_humioexternalclusters.yaml
kubectl apply -f https://raw.githubusercontent.com/humio/humio-operator/humio-operator-${HUMIO_OPERATOR_VERSION}/config/crd/bases/core.humio.com_humioingesttokens.yaml
kubectl apply -f https://raw.githubusercontent.com/humio/humio-operator/humio-operator-${HUMIO_OPERATOR_VERSION}/config/crd/bases/core.humio.com_humioparsers.yaml
kubectl apply -f https://raw.githubusercontent.com/humio/humio-operator/humio-operator-${HUMIO_OPERATOR_VERSION}/config/crd/bases/core.humio.com_humiorepositories.yamlInstall the Humio Operator
The Humio Operator can be installed withHelm. First add the helm repo:
helm repo add humio-operator https://humio.github.io/humio-operatorhelm install humio-operator humio-operator/humio-operator --version="${HUMIO_OPERATOR_VERSION}"installation documentation.
Create a Humio Cluster
A HumioCluster resource can now be created. The HumioCluster will start up our Humio pods. We need to point this cluster to our existing ZooKeeper and Kafka clusters.cat <<EOF | kubectl apply -f -
apiVersion: core.humio.com/v1alpha1
kind: HumioCluster
metadata:
name: example-humiocluster
spec:
autoRebalancePartitions: true
tls:
enabled: false
dataVolumePersistentVolumeClaimSpecTemplate:
storageClassName: standard
accessModes:
resources:
requests:
storage: 10Gi
environmentVariables:
- name: "SINGLE_USER_PASSWORD"
value: "develop3r"
- name: "HUMIO_JVM_ARGS"
value: "-Xss2m -Xms256m -Xmx1536m -server -XX:+UseParallelOldGC -XX:+ScavengeBeforeFullGC -XX:+DisableExplicitGC -Dzookeeper.client.secure=false"
- name: "ZOOKEEPER_URL"
value: "<zookeeper url>"
- name: "KAFKA_SERVERS"
value: "<kafka brokers url>"
EOF
humiocluster.core.humio.com/example-humiocluster created
Once the HumioCluster is created, it will go into the state of Bootstrapping until all Humio pods are up:
kubectl get humiocluster
NAME                   STATE           NODES   VERSION
example-humiocluster   Bootstrapping
kubectl get humiocluster
NAME                   STATE     NODES   VERSION
example-humiocluster Running 3 1.16.0--build-293562267--sha-39bbd8579eba9d6527e8b1579cdb9504a426a411kubectl port-forward. For production installations, we would rely on Ingress.
kubectl port-forward svc/example-humiocluster 8080
Forwarding from 127.0.0.1:8080 -> 8080
Forwarding from <::1>:8080 -> 8080
Handling connection for 8080
Handling connection for 8080http://localhost:8080
and login using the username “developer” and password “develop3r”, which we set during the cluster creation. When we go to the Cluster Administration under the settings button in the top right corner, we see the list of our pods and that the digest and storage partitions have been balanced:
Create a Repository, Parser, and Ingest Token
Now that we have a running cluster, we can create some other resources that are managed by the Operator. Let’s start with a Repository.cat <<EOF | kubectl apply -f -
apiVersion: core.humio.com/v1alpha1
kind: HumioRepository
metadata:
name: logs
spec:
managedClusterName: example-humiocluster
name: logs
description: "Logs repository"
retention:
timeInDays: 30
ingestSizeInGB: 50
storageSizeInGB: 10
EOF
humiorepository.core.humio.com/logs createdcat <<EOF | kubectl apply -f -
apiVersion: core.humio.com/v1alpha1
kind: HumioParser
metadata:
name: fluentbit-parser
spec:
managedClusterName: example-humiocluster
name: fluentbit-parser
repositoryName: logs
parserScript: |
case {
kubernetes.pod_name=/fluentbit/
| /\<(?<@timestamp><^\>>+)\>/
| /^(?<@timestamp>.*)\.*/
| parseTimestamp(format="yyyy/MM/dd' 'HH:mm:ss", field=@timestamp);
parseJson();
* | kvParse()
}
EOF
humioparser.core.humio.com/fluentbit-parser createdcat <<EOF | kubectl apply -f -
apiVersion: core.humio.com/v1alpha1
kind: HumioIngestToken
metadata:
name: fluentbit-ingest-token
spec:
managedClusterName: example-humiocluster
name: fluentbit-ingest-token
repositoryName: logs
parserName: fluentbit-parser
tokenSecretName: fluentbit-ingest-token
EOF
humioingesttoken.core.humio.com/fluentbit-ingest-token createdexport INGEST_TOKEN=$(kubectl get secret fluentbit-ingest-token -o template --template '{{.data.token}}' | base64 -D)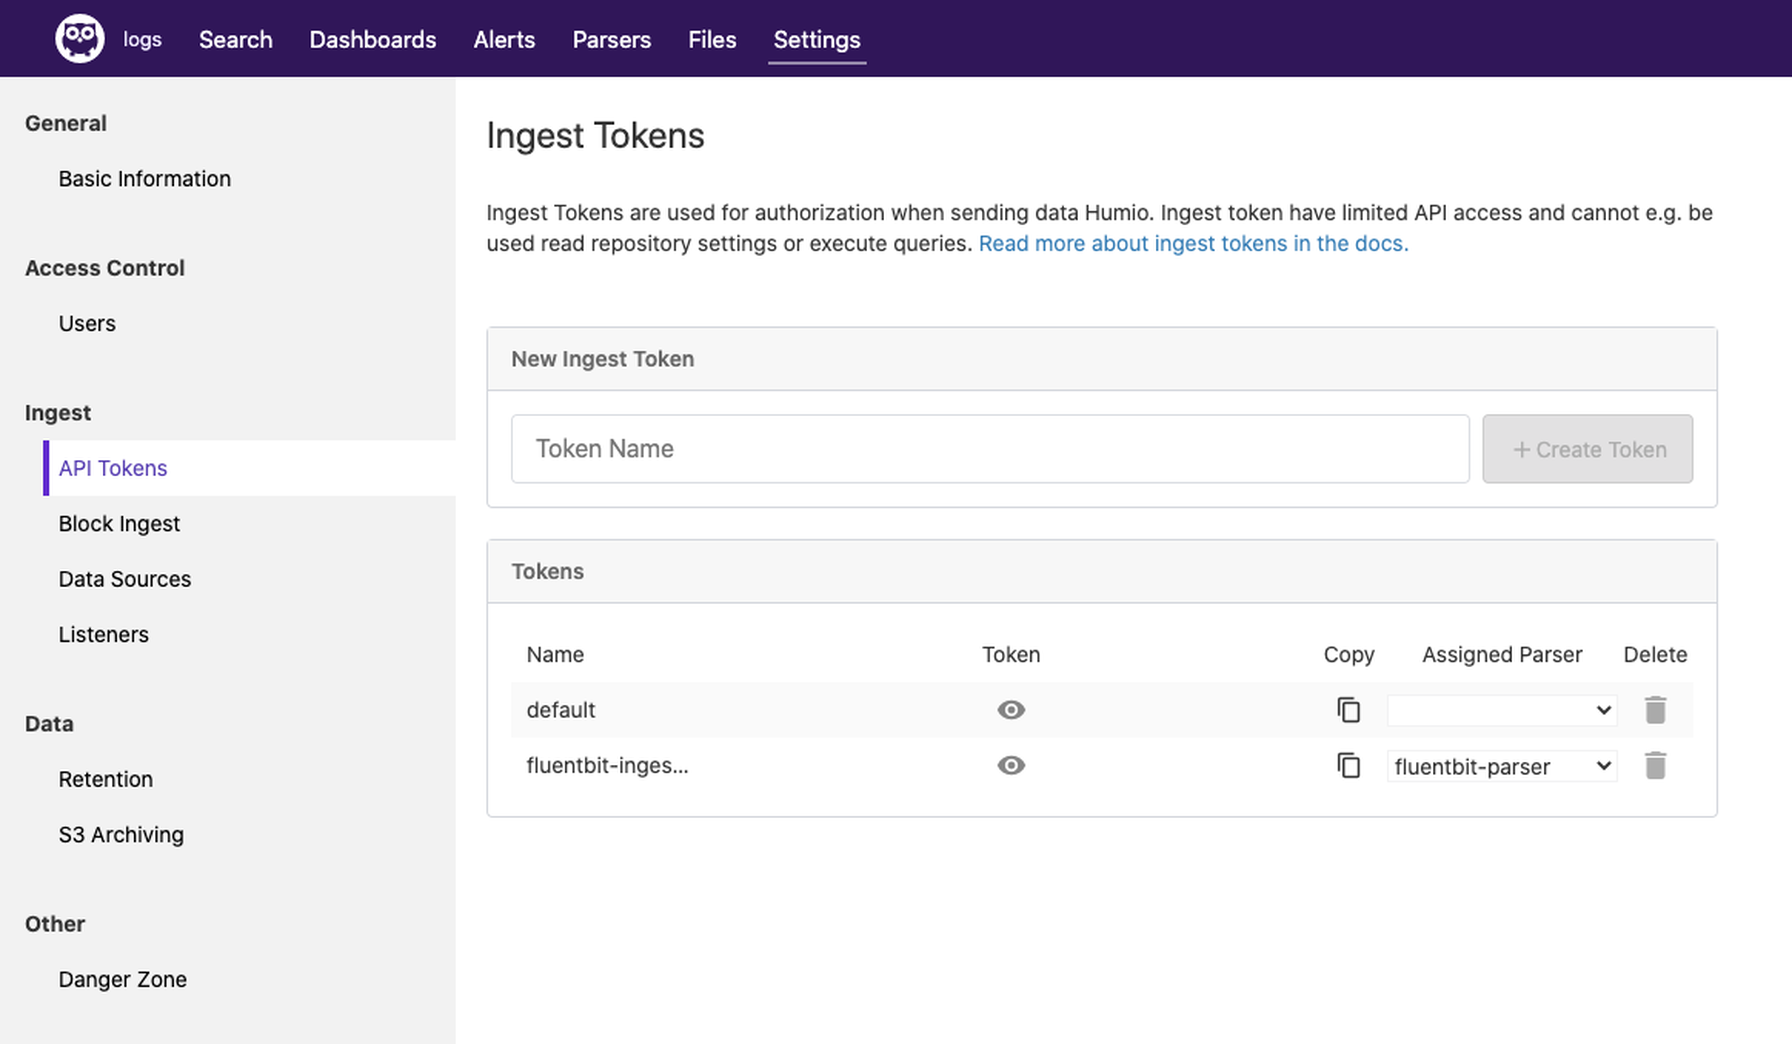
Ingest Logs
Logs can now be sent to the cluster using the ingest token extracted from the previous step. To gather logs from the cluster, we install Fluent Bit using the Humio Helm Chart: First, add the Helm repo:helm repo add humio https://humio.github.io/humio-helm-charts
helm repo updatecat >> humio-agent.yaml<<EOF
humio-fluentbit:
enabled: true
humioHostname: example-humiocluster
es:
inputConfig: |-
Name tail
Path /var/log/containers/*.log
Parser docker
# The path to the DB file must be unique and not conflict with another fluentbit running on the same nodes.
DB /var/log/flb_kube.db
Tag kube.*
Refresh_Interval 5
Mem_Buf_Limit 512MB
Skip_Long_Lines On
resources:
limits:
cpu: 100m
memory: 1024Mi
requests:
cpu: 100m
memory: 512Mi
EOFhelm install humio humio/humio-helm-charts --set humio-fluentbit.token=$INGEST_TOKEN -f humio-agent.yaml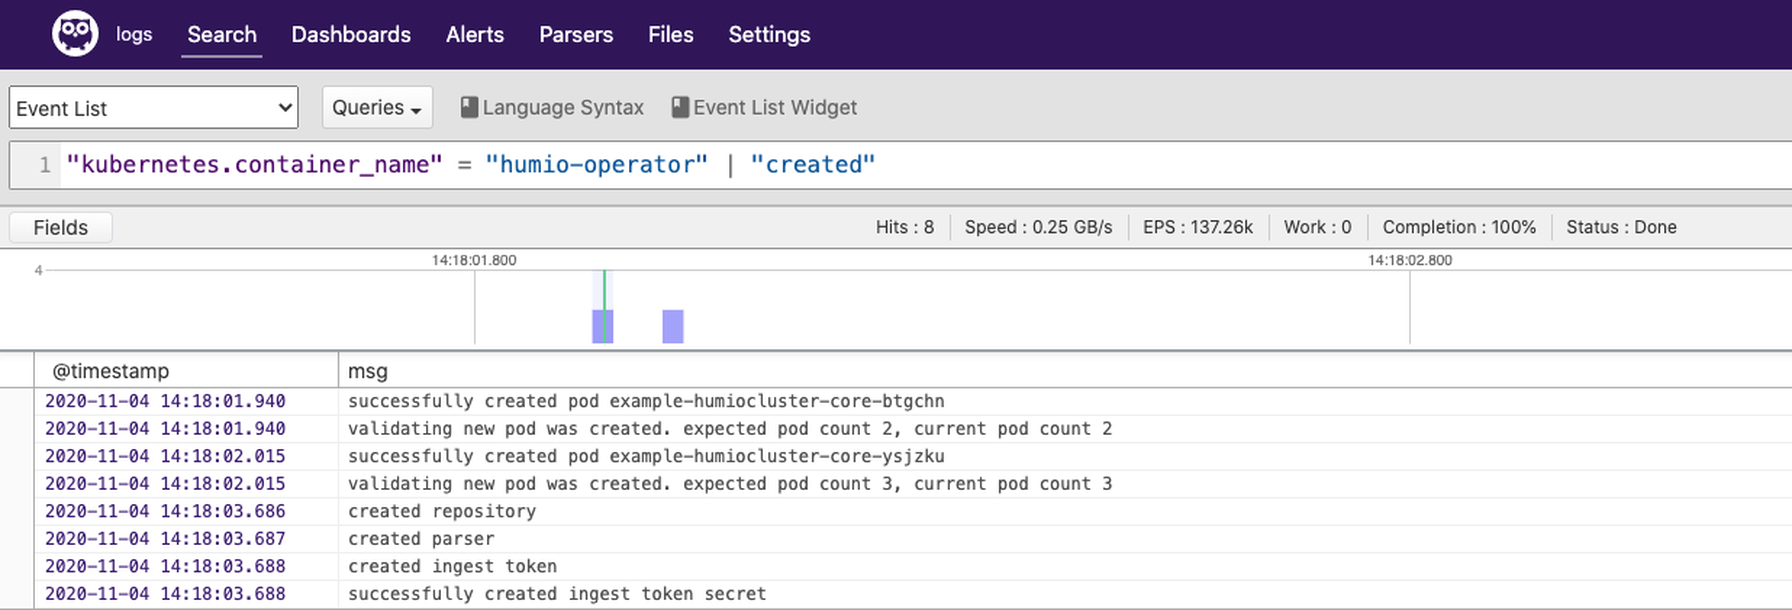 We aren’t able to go over every capability of the Humio Operator in this blog as there is just too much to cover, but we hope you found this blog post a useful introduction to help you get started running Humio on your Kubernetes environment. More information is available in our Humio Operator
installation documentation
in addition to
documentation
that covers how to migrate an existing Humio deployment that utilized our previous Helm based deployment. We also encourage you learn more by watching our on-demand webinar on
Running Humio on Kubernetes with the Humio Operator. You’ll learn best practices for leveraging the Humio Operator to maintain Humio resources, tips for making the best use of your cloud environment’s storage options, and more.
Additional resources
- Get started with a
free trial
of cloud-hosted Humio. - Get hands-on help setting up Humio and have your questions about Humio answered live by attending our
Quick Start Workshop. - Get an overview of the features of the Humio Operator by reading
Introduction to the Humio Operator for Kubernetes. - Done setting up your clusters? Start extracting immediate business insights out of Humio using our flexible
query language.
