


![Helping Non-Security Stakeholders Understand ATT&CK in 10 Minutes or Less [VIDEO]](https://assets.crowdstrike.com/is/image/crowdstrikeinc/video-ATTCK2-1?wid=530&hei=349&fmt=png-alpha&qlt=95,0&resMode=sharp2&op_usm=3.0,0.3,2,0)
![Qatar’s Commercial Bank Chooses CrowdStrike Falcon®: A Partnership Based on Trust [VIDEO]](https://assets.crowdstrike.com/is/image/crowdstrikeinc/Edward-Gonam-Qatar-Blog2-1?wid=530&hei=349&fmt=png-alpha&qlt=95,0&resMode=sharp2&op_usm=3.0,0.3,2,0)


?wid=2048&hei=1350&fmt=png-alpha&qlt=95,0&resMode=sharp2&op_usm=3.0,0.3,2,0)


This blog is primarily aimed at software development engineers in test (SDETs) who are testing Java applications, specifically focusing on how they can tackle an encapsulated, tightly coupled project that requires in-depth testing through code introspection.
Imagine being tasked with writing some automated tests for a complex Java application with multiple features and functionalities. Testability may not have been a primary objective when the app was initially built. And to throw another curveball, imagine the app grew organically resulting in lots of tightly coupled components. This situation can arise from time to time, especially in the field of data science where rapid prototype-to-product cycles need to be balanced with long-term maintainability.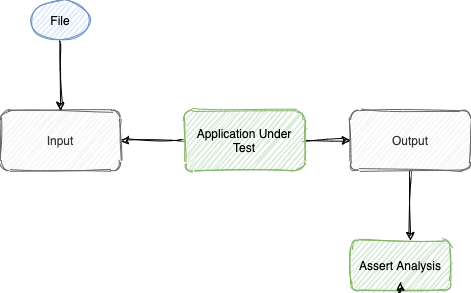 Figure 1. Black Box Testing Scheme
We would have to submit an arbitrary file through the AUT’s input, patiently wait for the magic to happen, grab the results and run our assertion against the expected results.
Figure 1. Black Box Testing Scheme
We would have to submit an arbitrary file through the AUT’s input, patiently wait for the magic to happen, grab the results and run our assertion against the expected results.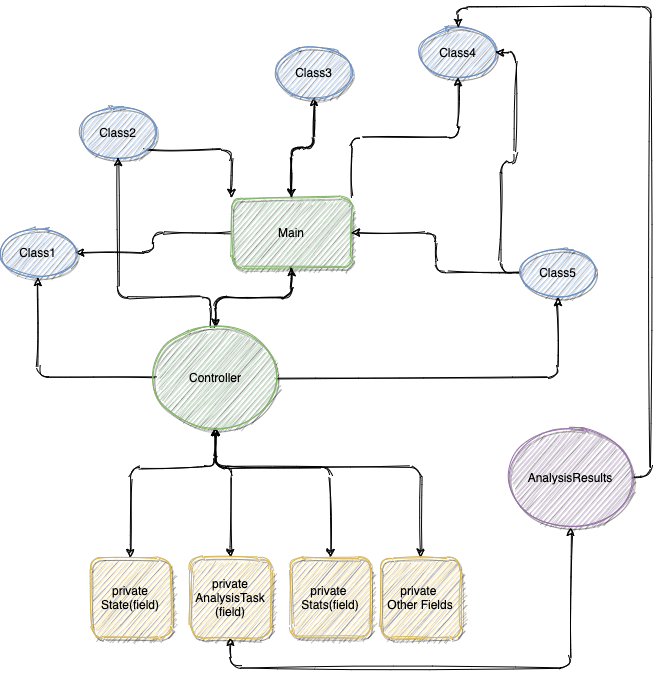 Figure 2. AUT (File Analysis) Architecture Scheme
In the interest of keeping the diagram easy to follow, I’ve highlighted in green and yellow the logic flow that we are interested in testing. All of the green, blue and purple geometric shapes are classes that hold logic that is coupled with the controller.
In our case, the Controller holds the logic of handling the File Analysis feature, while the main information about the file undergoing analysis can be found inside the private encapsulated fields (properties): State, AnalysisTask, Stats and others.
Once all the data of a file has been collected, it is sent to the AnalysisResults class, which acts as a parser to organize and beautify the data in order for it to be outputted.
For this discussion, we are only interested in the key fields of interest that are implemented inside of the Controller class.
Figure 2. AUT (File Analysis) Architecture Scheme
In the interest of keeping the diagram easy to follow, I’ve highlighted in green and yellow the logic flow that we are interested in testing. All of the green, blue and purple geometric shapes are classes that hold logic that is coupled with the controller.
In our case, the Controller holds the logic of handling the File Analysis feature, while the main information about the file undergoing analysis can be found inside the private encapsulated fields (properties): State, AnalysisTask, Stats and others.
Once all the data of a file has been collected, it is sent to the AnalysisResults class, which acts as a parser to organize and beautify the data in order for it to be outputted.
For this discussion, we are only interested in the key fields of interest that are implemented inside of the Controller class.
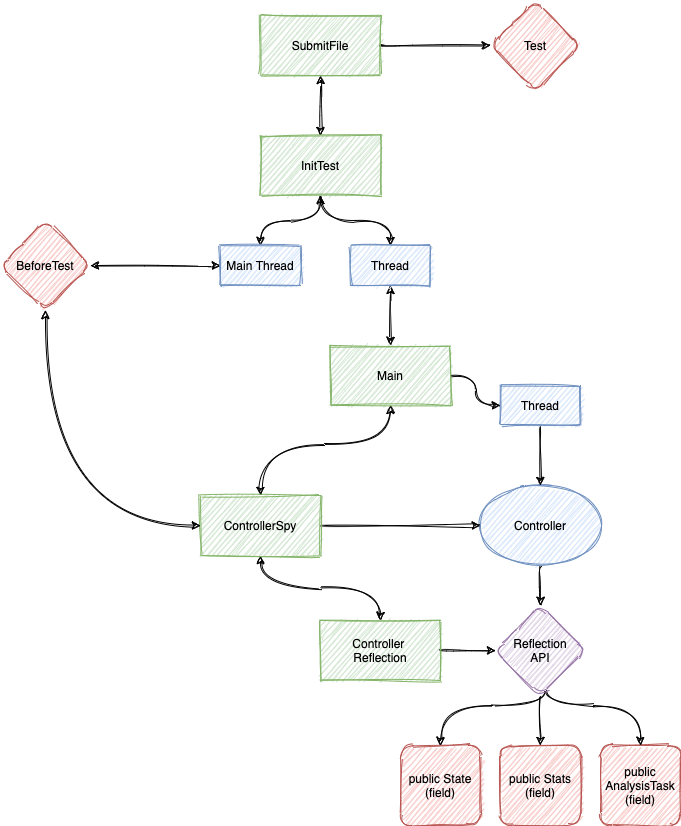 Figure 3. White Box Testing Overview Architecture Scheme
Figure 3 Legend:
Figure 3. White Box Testing Overview Architecture Scheme
Figure 3 Legend:
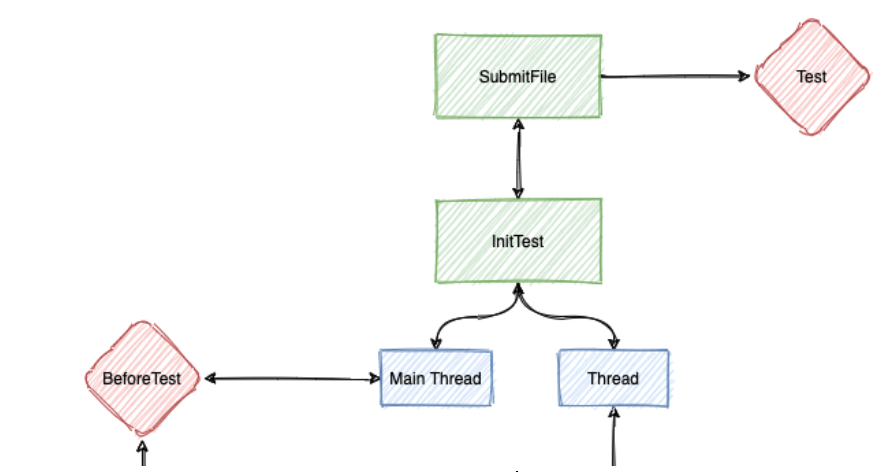 Figure 4. Setting Up the Test Logic Before Running the AUT
In order to launch the Main class’s main method (starting the app) so that we can properly test it, we need to create a wrapper for it. The purpose of the wrapper is not to directly start the Main class from the Main thread, but rather starting the AUT on a separate thread and poll for assertions on the Main thread which is controlled by a Test Framework (e.g TestNG/JUnit).
Figure 4. Setting Up the Test Logic Before Running the AUT
In order to launch the Main class’s main method (starting the app) so that we can properly test it, we need to create a wrapper for it. The purpose of the wrapper is not to directly start the Main class from the Main thread, but rather starting the AUT on a separate thread and poll for assertions on the Main thread which is controlled by a Test Framework (e.g TestNG/JUnit).
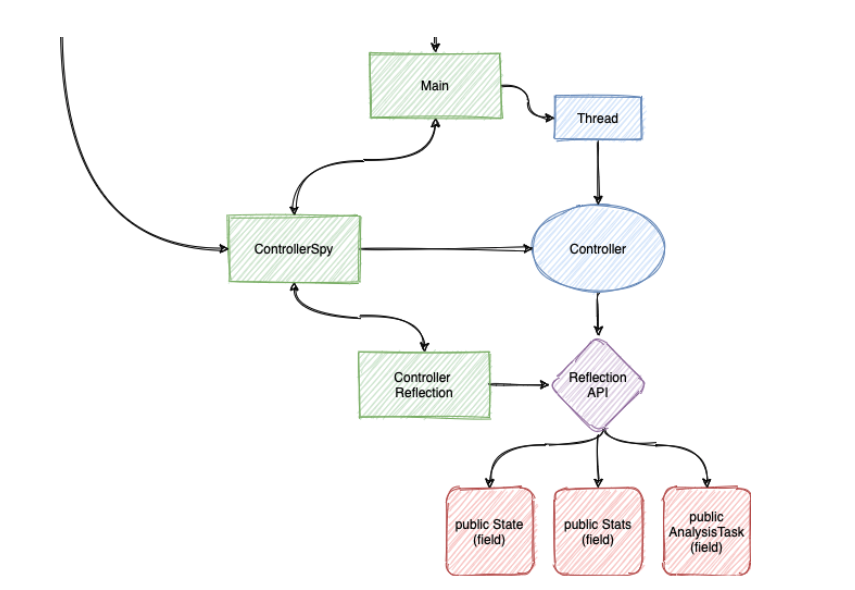 Figure 5. Running our Test Logic Alongside the AUT
Let’s start by describing an arbitrary feature in such an app that is critical for your business. We will tackle this first, specifically addressing one of our backend systems used to rapidly analyze incoming files for possible threats and triage. The File Analysis feature is used extensively by our clients. They use it to get detailed reports about the metadata, structure, static analysis and other analysis indicators.
Our task is an open one, we have to make sure the feature respects the logic path as it is currently implemented and does not introduce any functional bugs in the app. So how can we start testing it?
Black Box Testing Approach
In a black box testing approach, the AUT (application under test) schematic overview would look somewhat like this: Figure 1. Black Box Testing SchemeThis testing approach does not bring any value to the development team since we cannot establish what exactly went wrong inside the AUT. As a result, our bug tickets will look extremely vague and uninformative to the dev team.
Let’s explore another, more involved option.
White Box Testing Approach
The white box testing approach requires implementing our tests into or alongside the AUT, peeling off the layers of the encapsulated code. In order to better understand the test strategy proposed in this article, it is best to start by creating a schematic of how the application being tested is designed. Figure 2. AUT (File Analysis) Architecture SchemeTest Strategy Overview
With a rough overview of how our AUT is implemented, we can start working on our approach for testing the Controller’s logic to make sure that the same logic flow is respected on new versions of the AUT.Here is how the finished overview schematic of our testing plan will look:
Figure 3. White Box Testing Overview Architecture Scheme- Green and blue highlights represent Classes.
- Red diamond highlights represent Methods.
- Red squares highlights represent Fields (Properties).
Deep Dive
Figure 4. Setting Up the Test Logic Before Running the AUTSubmitFile
As the schematic shows, this class is the entry point to our test architecture, it holds the logic for the actual test in the Test method. It makes sure that the Controller receives valid data through its State, Stats and AnalysisTask fields when a file is submitted via the Main method, it also extends the InitTest class.InitTest
The logic held by this class is to run the main method of the Main class through a separate thread and poll for data inside the Controller class via the AnalysisTask field. The polling is done every 500ms (it can be any expected arbitrary time) through the BeforeTest method. Once the data has been found, the BeforeTest method will break out of its loop and allow the Test method from the SubmitFile class to run. Figure 5. Running our Test Logic Alongside the AUTMain
This is the Main class of the application we are trying to test, it exposes the Controller class that we are trying to analyze.Depending on how the Main class is implemented, you may have to clone the class, inject some minimal code into it and use it as a substitute for the actual Main class. Let’s imagine that is the case for us too.
Before the Main class can start the controller on a separate thread, we need to pass the Controller instance to the ControllerSpy class to properly start implementing the introspection.
Please note: The level of tinkering and code injection that you might be required to implement into the AUT is directly correlated with how tightly coupled and encapsulated the project is. Regardless of the level of code injection you implement, it shouldn’t negatively impact in any way the functionality of the app.
ControllerSpy & ControllerReflection
The ControllerSpy class takes in as a parameter the Controller instance and creates a new class called ControllerReflection which holds the three fields we are trying to assert (State, Stats and AnalysisTask).The magic happens inside the ControllerReflection class, which uses the Reflection API
to set all of the private fields of interest that normally are not accessible to the public at runtime. They are then deep-copied to the local fields of the ControllerReflection class. Thus, when the Test (SubmitFile class) method runs, the assertions and other analysis logic, does not directly use the Controller instance fields but rather the cloned ones that have been copied over to the ControllerReflection class in order not to introduce functionality/performance issues that may have been caused by code introspection.
Conclusion
The Reflection API can be a powerful tool for an SDET when tackling “untestable” code in Java. With such power comes great responsibilities, deciding when and how to use it is crucial when developing your test automation solution. I hope this post has inspired you to build more elaborate, safe and optimized solutions for your next challenging test project.Additional Resources
- Read Using Java Reflection by Glen McCluskey
- Learn more about the CrowdStrike Falcon®
platform by visiting the product webpage. - Test CrowdStrike® next-gen AV for yourself. Start your free trial of Falcon Prevent™ today.


