


![Helping Non-Security Stakeholders Understand ATT&CK in 10 Minutes or Less [VIDEO]](https://assets.crowdstrike.com/is/image/crowdstrikeinc/video-ATTCK2-1?wid=530&hei=349&fmt=png-alpha&qlt=95,0&resMode=sharp2&op_usm=3.0,0.3,2,0)
![Qatar’s Commercial Bank Chooses CrowdStrike Falcon®: A Partnership Based on Trust [VIDEO]](https://assets.crowdstrike.com/is/image/crowdstrikeinc/Edward-Gonam-Qatar-Blog2-1?wid=530&hei=349&fmt=png-alpha&qlt=95,0&resMode=sharp2&op_usm=3.0,0.3,2,0)


?wid=2048&hei=1350&fmt=png-alpha&qlt=95,0&resMode=sharp2&op_usm=3.0,0.3,2,0)


One of the most tedious tasks in malware analysis is to get rid of the obfuscated code. Nowadays, almost every malware uses obfuscation to hinder the analysis and try to evade detection. In some cases, the obfuscation is not complex and is trivial to remove. An example of a trivial technique is the encryption of the strings with a hardcoded key. In other cases, the obfuscation can be very complex to remove, and time spent on analysis might easily become unsustainable. An example of an advanced obfuscation technique is the usage of a software Virtual Machine or Control-Flow Obfuscation.
The decision to adopt a specific technique is mostly driven by weighing the complexity of the implementation versus its effectiveness. This trade-off might assume a very different weight according to the technology used to develop the malware and the available tools used to analyze the malware binary. Two relevant examples, where this trade-off assumes very different values, are the analysis of an unmanaged binary versus the analysis of a managed binary. An unmanaged binary is a program written in a language, such as C/C++, that is compiled directly to native code. Conversely, a managed binary is written in a high-level language such as C# or F#, and compiles to an intermediate language.
An advantage of unmanaged programs over managed programs is that the latter are easier to port to another system. A clear example of this is the .NET Core technology, which supports the execution of the same binary on different operating systems (OSs). However, this advantage has a drawback from a security point of view. In order to execute the binary on a different OS, it is necessary to include, inside the file, a conspicuous amount of metadata that describes how the binary is structured. These metadata are at the base of the reflection concept, a characteristic supported by programming language such as C#, F# or Java.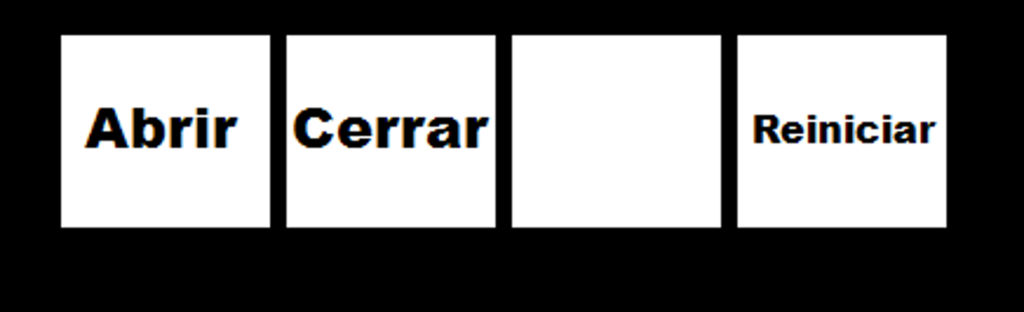 Figure 1. Ploutus menu activated by tapping on an ATM touch screen
Ploutus accepts commands from the keypad too. An example of a command used to start the Jackpotting attack is the sequence
Figure 1. Ploutus menu activated by tapping on an ATM touch screen
Ploutus accepts commands from the keypad too. An example of a command used to start the Jackpotting attack is the sequence 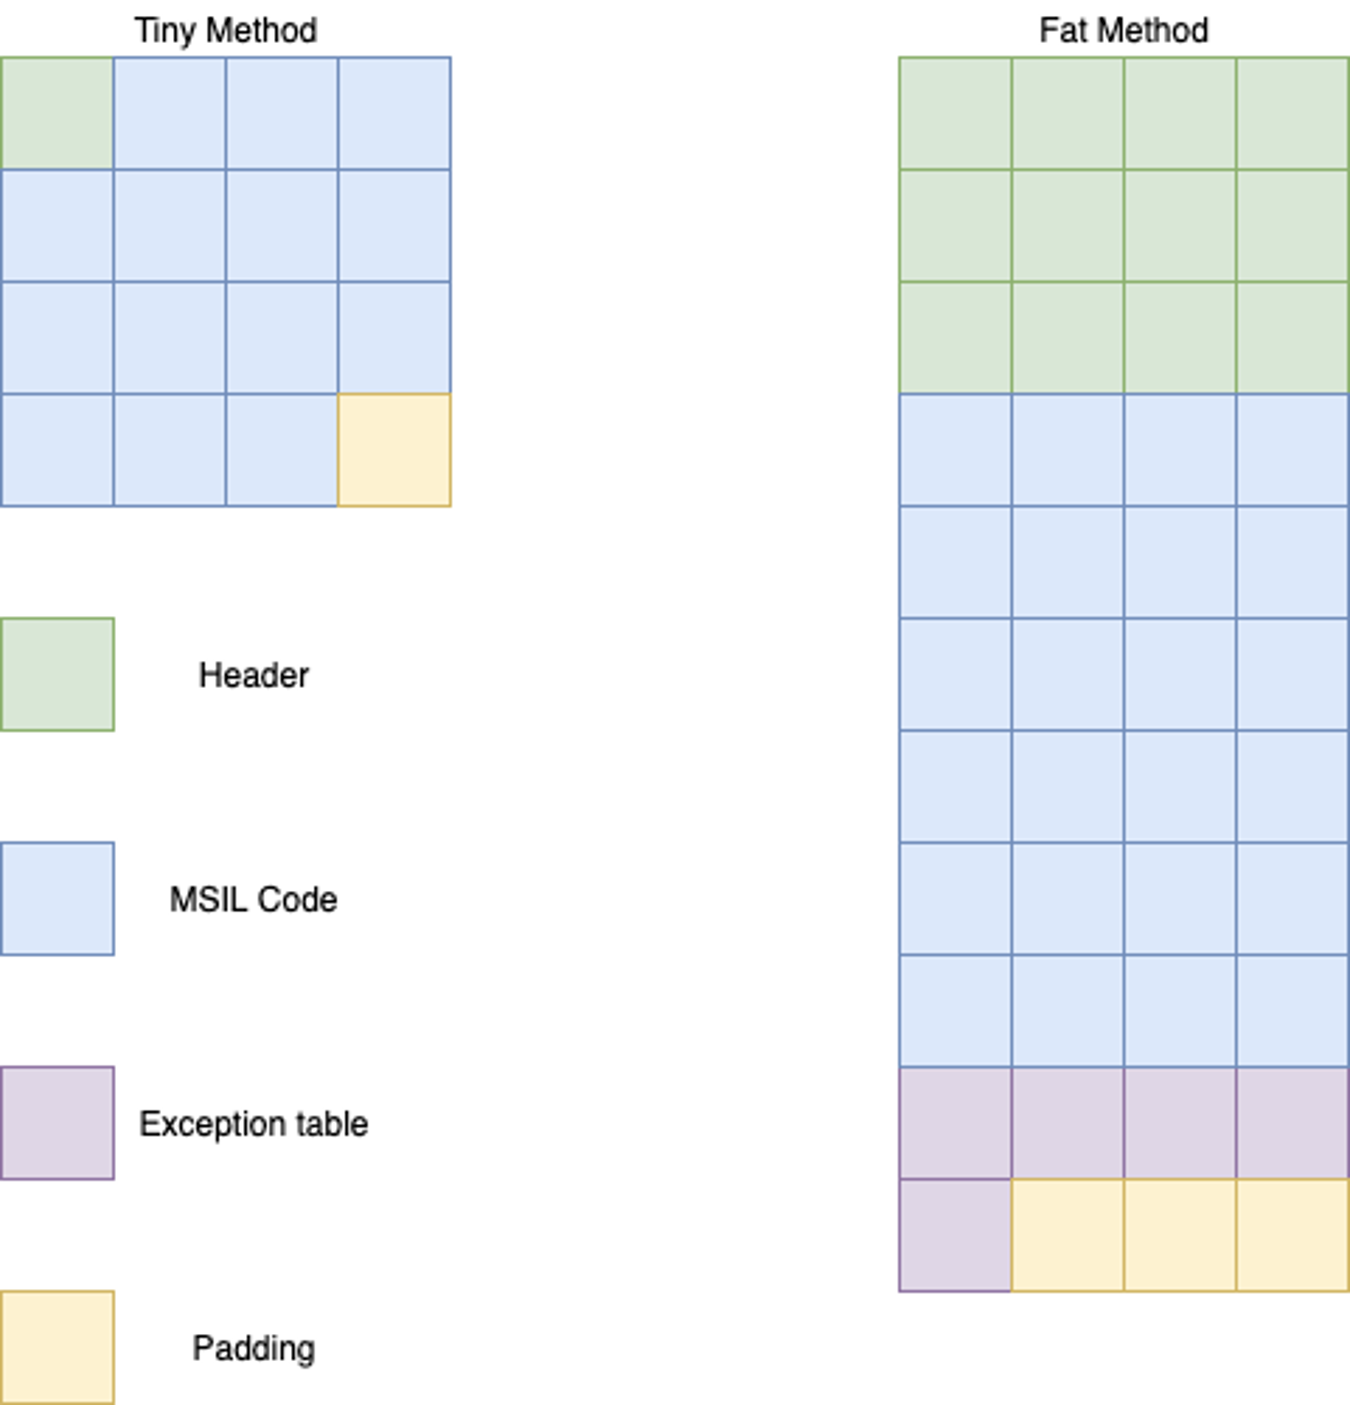 Figure 6. Tiny method and fat method layout
Once the real method bodies and headers are obtained, it is possible to patch the binary with the real content.
Figure 6. Tiny method and fat method layout
Once the real method bodies and headers are obtained, it is possible to patch the binary with the real content.

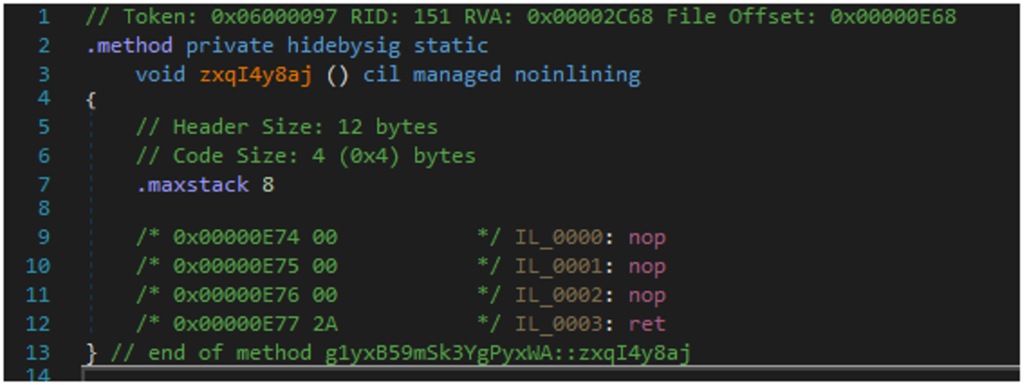 Figure 12. Example of obfuscated code
Figure 13 shows the same function after the deobfuscation. The function code contains now valid instructions, such as a Windows registry operation.
Figure 12. Example of obfuscated code
Figure 13 shows the same function after the deobfuscation. The function code contains now valid instructions, such as a Windows registry operation.
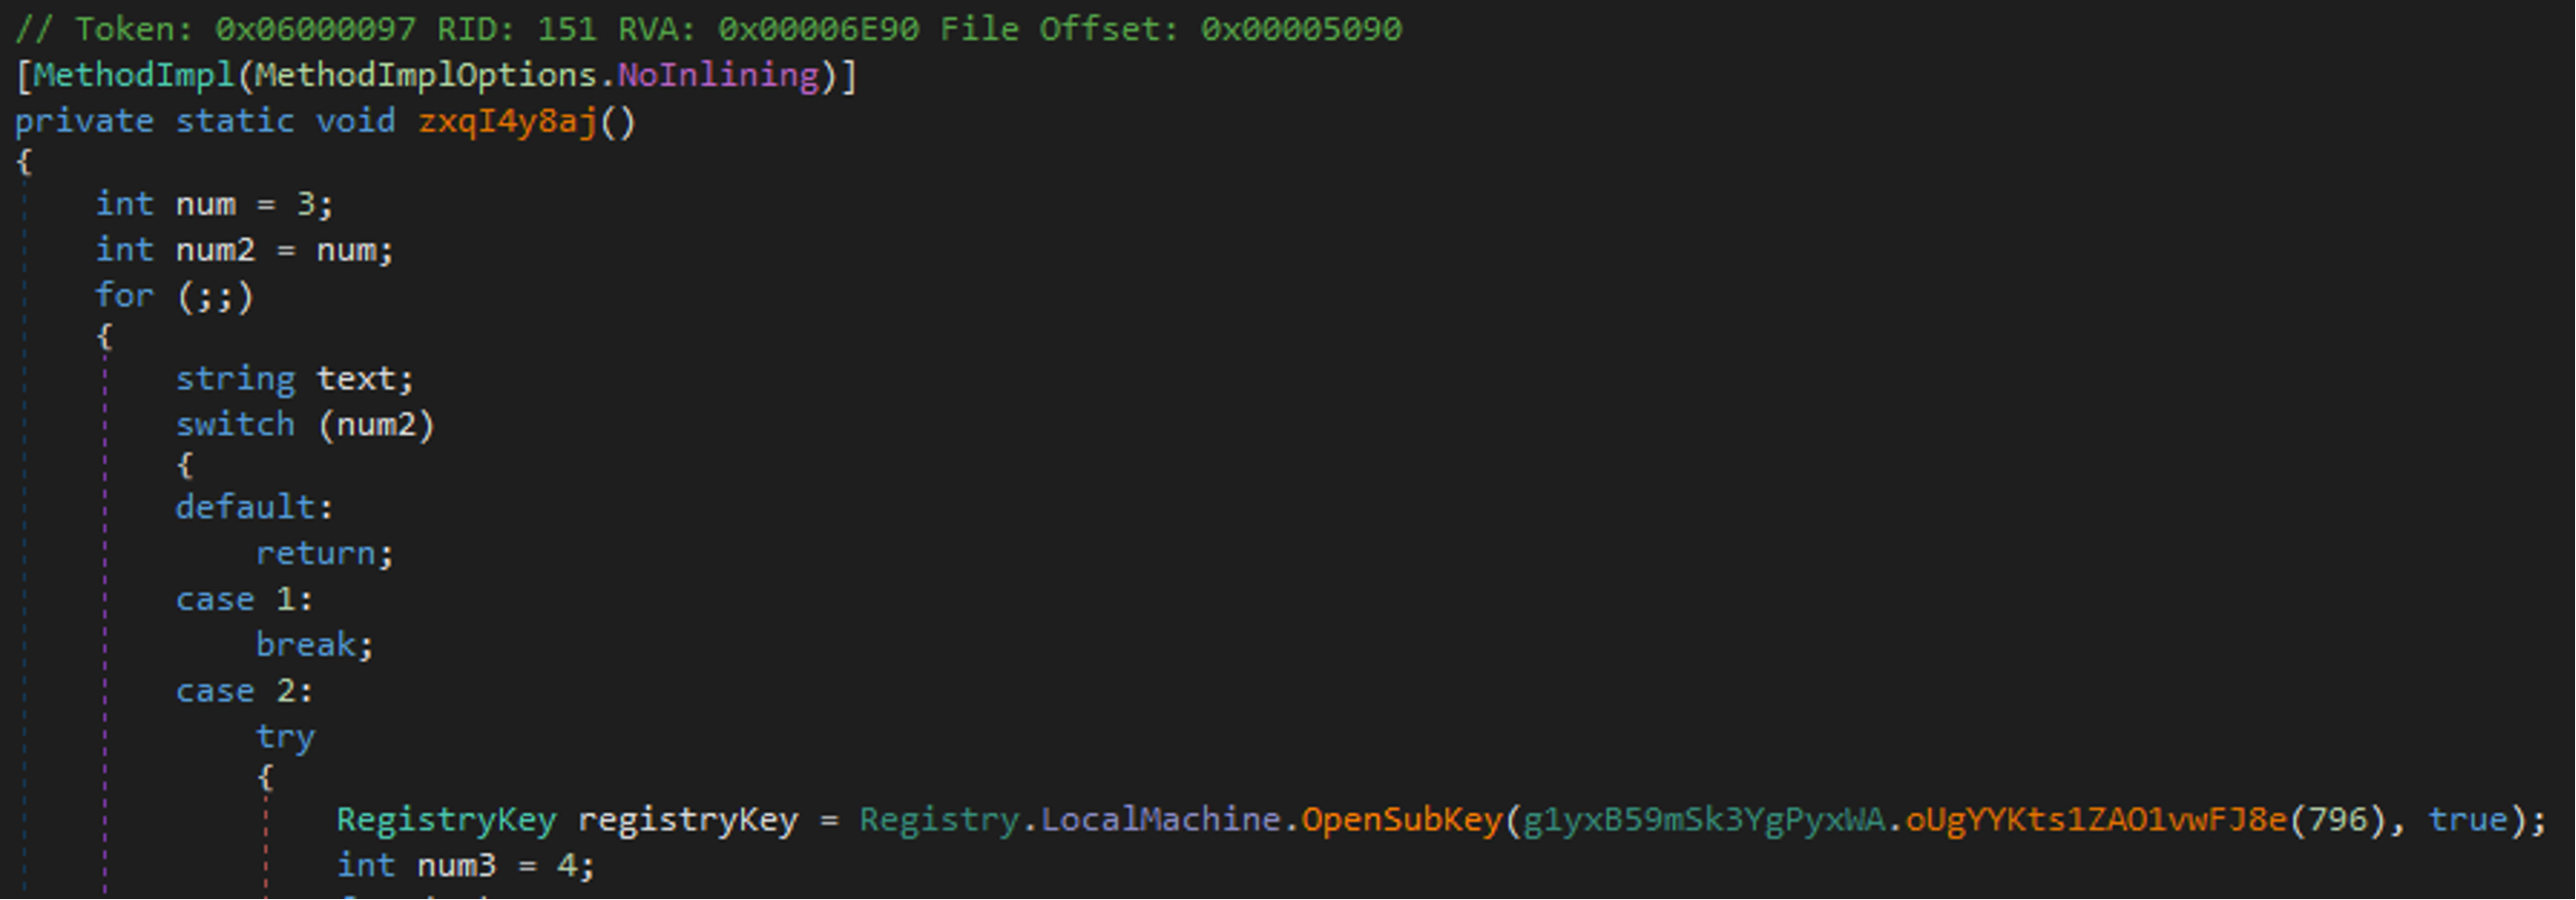 Figure 13. Example of deobfuscated code (Cklick to enlarge)
After removing this deobfuscation layer, it is possible to run additional deobfuscators, such as de4dot, to further clean the binary.
Figure 13. Example of deobfuscated code (Cklick to enlarge)
After removing this deobfuscation layer, it is possible to run additional deobfuscators, such as de4dot, to further clean the binary.
Reflection allows a program to query the metadata of a managed binary in order to extract information related to the program structure. An example of usage of reflection is to dynamically resolve a method implemented in the examined binary. Many tools leverage the reflection concept, and the abundance of metadata information, to decompile managed binaries. The decompilation output almost resembles the original source code. An example, and first of such decompilers, is .NET Reflector. Thanks to the availability of these tools, the analysis of managed binaries became very easy. With the proliferation of decompilers, another type of software started to spread: managed code obfuscators. These tools are created with the intent to protect intellectual properties (such as proprietary algorithms). As a consequence, malware developers took advantage of obfuscators and started to obfuscate the malware code, making the decompiled code very hard to read or even impossible to obtain. Ploutus malware protects its code with a commercial obfuscator named .NET Reactor.
Ploutus ATM Malware
Ploutus is a malware family that targets ATMs and is able to perform ATM jackpotting — an attack that causes the ATM to dispense all bills stored within the ATM cassettes. Ploutus was first discovered in 2013 in Mexico. In March 2021, a new version was identified targeting ATMs in the Latin American (LATAM) region. The malware is implemented using the Microsoft .NET framework, a technology that allows for effective code decompilation. The deployment of the malware is typically achieved by connecting an external device to the ATM to trigger execution of the malware. Once executed, Ploutus interacts with the operator using the function keys and mouse. The interaction with the mouse was likely introduced to allow the operator to easily interact with ATMs supporting a touch screen. The communication with the ATM is performed by using an XFS (extensions for financial services) middleware such as KAL Kalignite.The supported UI is very minimal; this choice was likely adopted to allow the malware to run on a wide variety of ATM devices. An example of UI is shown in Figure 1. This screen is displayed after the operator taps five times on each corner of the screen.
Figure 1. Ploutus menu activated by tapping on an ATM touch screenF8F1F2F3F4.
Historically, the Ploutus binary is strongly obfuscated, making analysis difficult. In particular, Ploutus uses multiple obfuscation techniques, such as string encryption, function name obfuscation, methods proxying, control-flow-graph (CFG) obfuscation and method encryption.
Ploutus Obfuscation
As mentioned, the obfuscation techniques implemented by Ploutus are the result of the usage of the commercial obfuscator .NET Reactor. Some of these techniques are easy to deobfuscate, such as the string encryption; others, instead, might significantly slow down the analysis process. Control flow obfuscation and method proxying are two examples of techniques that slow down the debugging of malware. These techniques hide relevant information, such as the name and signature of the function called (this information is generally available in the debugger view), or they make the debugging session much harder by making the execution flow not linear and forcing the analyst to execute a lot of jump instructions. Of the mentioned techniques, method body encryption is the one that makes analysis most difficult. The concept is based on encrypting the method body with a fake or empty one, and only when the method is compiled to native code, the real method body is passed to the compiler instead of the fake one. The impact of this technique on the analysis process is to be unable to see the real method instructions and, as a consequence, to be unable to correctly debug the process in a managed debugger such as dnSpy. The .NET Reactor website mentions the encryption of the method body, using a feature named Necrobit. The next section provides an in-depth analysis of this obfuscation technique.Method Body Encryption Obfuscation
As described, the method's fake body is replaced with the real one at execution time. This is achieved by hooking thecompileMethod function, which is in charge of compiling the Microsoft Intermediate Language (MSIL) code to native code. MSIL is the standardized intermediate language used by the .NET framework. An example of MSIL is shown in Figure 2.
IL_0000: ldarg.0
IL_0001: call instance int32 System.Random::InternalSample()
IL_0006: ret
Figure 2. Example of MSIL code
ThecompileMethod method is not directly exported by the .NET framework and needs to be resolved by calling the exported function getJit. This function is exported by the mscorjit.dll library (or by the clrjit.dll in the most recent .NET framework versions). Once executed, the function returns a pointer to a ICorJitCompiler class — a virtual table whose first method is the compileMethod. Microsoft is well aware of obfuscators that use this technique to protect the code, as also reported in the function comment shown in Figure 3 (the comment was removed in the latest .NET source code).
// compileMethod is the main routine to ask the JIT Compiler to create native
code for a method. The
// method to be compiled is passed in the 'info' parameter, and the
code:ICorJitInfo is used to allow the
// JIT to resolve tokens, and make any other callbacks needed to create the
code. nativeEntry, and
// nativeSizeOfCode are just for convenience because the JIT asks the EE for
the memory to emit code into
// (see code:ICorJitInfo.allocMem), so really the EE already knows where the
method starts and how big
// it is (in fact, it could be in more than one chunk).
//
// * In the 32 bit jit this is implemented by code:CILJit.compileMethod
// * For the 64 bit jit this is implemented by code:PreJit.compileMethod
//
virtual CorJitResult __stdcall compileMethod (
    ICorJitInfo *comp, /* IN */
    struct CORINFO_METHOD_INFO *info, /* IN */
    unsigned /* code:CorJitFlag */ flags, /* IN */
    BYTE **nativeEntry, /* OUT */
    ULONG *nativeSizeOfCode /* OUT */
) = 0;
Figure 3. compileMethod function definition
compileMethod hook uses the info argument to replace the fake MSIL code with the real code. The info field is of type CORINFO_METHOD_INFO, described by thestructure reported in Figure 4.
struct CORINFO_METHOD_INFO
{
    CORINFO_METHOD_HANDLE ftn;
    CORINFO_MODULE_HANDLE scope;
    uint8_t * ILCode;
    unsigned ILCodeSize;
    unsigned maxStack;
    unsigned EHcount;
    CorInfoOptions options;
    CorInfoRegionKind regionKind;
    CORINFO_SIG_INFO args;
    CORINFO_SIG_INFO locals;
};
Figure 4. CORINFO_METHOD_INFO structure
compileMethod hook, the content of the fields info->ILCode and info->ILCodeSize with the real values. Interestingly, this process causes the debugger to behave in an unexpected way and, in some cases, to lose the debugging session.
The obfuscation technique stores the real method body inside a .NET resource in an encrypted format. The encryption algorithm is not complex, but the addition of other obfuscation techniques — in primis the Control-Flow Obfuscation — makes its analysis quite hard. Its design is based primarily on XOR and ADD operations between a key and the blob containing the encrypted methods body. The key is computed at runtime by XOR’ing two arrays of bytes. The content of these two arrays is also computed at runtime in order to conceal their content from static analysis. The method’s body decryption algorithm uses four constants to modify the iteration key in the decryption loop. The value of these constants is computed by applying a constant unfolding obfuscation technique. This concept is based on decomposing a constant by using multiple arithmetic operations such as add, or, shift, and eXclusive OR. These operations are executed at runtime to obtain the real constant values.
The values of the key and of the four constants vary among the identified samples. Computing these values at runtime makes the creation of a static extractor more difficult, since it is necessary to create an instruction emulator. An excerpt of code computing the four constants is provided in Figure 5.
uint num37 = num32;
uint num38 = num32;
uint num39 = 1037012658U;
uint num40 = 443628764U;
uint num41 = 1523807635U;
uint num42 = 1126448412U;
uint num43 = num38;
uint num44 = 1126272645U;
num41 -= num40;
uint num45 = ((num39 >> 7) | (num39 << 25)) ^ num42; uint num46 = num45 & 252645135U; num45 &= 4042322160U; num39 = (num45 >> 4) | (num46 << 4); ulong num47 = (ulong)(1502774316U * num41); if (num47 == 0UL) { num47 -= 1UL; } num40 = (uint)((ulong)(num40 * num40) % num47); if (num42 == 0.0) { num42 -= 1U; } uint num48 = (uint)(1891538677.0 / num42 + num42); if ((short)num41 == 0) { num41 -= 1U; } num42 = (uint)((uint)(num41 / (double)((short)num41)) - num48 + num41); uint num49 = num44 & 16711935U; uint num50 = num44 & 4278255360U; num49 = ((num49 >> 8) | (num50 << 8)) ^ num41;
num44 = (num44 << 12) | (num44 >> 20);
num2 = 269;Figure 5. Constant unfolding code example
The highlighted code is the most relevant and shows the update of the interaction key through a series of operations between the byte to decrypt (num43) and the four constants (num40, num42, num44, and a transient value computed from variables num39, num41 and num42).
After this first layer of obfuscation is completed, an additional obfuscation layer is included. This second layer is based on an additional loop with a step of eight bytes. In each iteration, the first four bytes are XOR’ed with a static constant.Once the content is decrypted, it is processed as two separate parts: the first contains the real method headers, and the second contains the real method bodies (the content used by the hook function as described above). The method header is a fundamental concept of the .NET framework and contains, among other information, details on the exception handlers used by the methods. If the information related to the exception handlers is ignored, the program may crash at runtime due to an apparently unhandled exception. To extract the exception handler information, it is necessary to know how the method header is structured. The header can be of two types: a fat header or a tiny header. The exception handler data is only present in methods with a fat header. On the contrary, when the method does not have any exception handler, and its size is less than 64 bytes, a tiny header is used. An example of the layout of the fat and tiny methods is shown in Figure 6.
Figure 6. Tiny method and fat method layoutImplementing a Deobfuscator
This section describes an implementation of a deobfuscator that decrypts the real method bodies and creates a new binary with the correct values. The implementation contains some technical challenges that are the result of design choices taken by the obfuscation tool’s developer. In particular, a clever choice was to use only local variables and to scatter the decryption code among various instructions inside the static constructor, instead of calling a function dedicated to the decryption. In the latter case, extracting the information needed for the decryption would be a trivial task by using a managed debugger like dnSpy — it would be enough to set a breakpoint on the decryption routine and read the values of its input arguments. By using only local variables, it is not possible to apply this strategy, and we are forced to extract the values manually or by creating a MSIL code emulator. Considering the effort involved in creating an MSIL code emulator, the deobfuscator requires this information as input values; it is the analyst’s duty to extract them. The implementation uses the dnLib library to patch the original binary and create the deobfuscated one. The code implements the decryption functions described above and then patches the obfuscated methods by identifying them through their metadata tokens (a value associated to each method and referenced by the .NET framework during the compilation process). As a final step, the deobfuscator removes bad MSIL instructions that causes dnLib to crash.Deobfuscation Walkthrough
The accompanying code provides the fundamentals to perform a binary deobfuscation but needs specific information in order to perform the deobfuscation. This information can be obtained by debugging the code as demonstrated in this section.To make this post practical, this section provides an example of dynamic analysis, with the purpose of providing specific indication on how to identify the relevant code patterns that contain the information needed for the deobfuscation. The information needed is the following:
- The key used to decrypt the method body. This information is an array of bytes and is stored in an obfuscated format.
- The XOR array used to deobfuscate the above key.
- The values of the four constants used in the decryption of the method bodies.
- An additional key used to decrypt the method headers.
.cctor) implementing the deobfuscation code, it is possible to identify the first piece of information by searching for the pattern ^=. The interesting instructions are those executing the XOR operation between two arrays. On each identified spot, a new breakpoint is added. An example of such code is reported in Figure 7.
num2 = 413;Figure 7. Example of code used to extract the decryption method body array key
When the breakpoint hits, the values of the two arrays need to be extracted (before the XOR operation).array15 contains the obfuscated key used to decrypt the method bodies, and array5 is the byte array used to deobfuscate the key. For our case, the assumed values are reported in Figure 8.
array15 | 0x19 0x10 0xC3 0x47
0x33 0x77 0x32 0x13
0xCC 0xFC 0x74 0xA6
0x87 0x5F 0xBD 0xCA
0x68 0xFC 0x5A 0xBA
0xD3 0x45 0x16 0xFA
0xC4 0x65 0xA2 0x57
0x5E 0xFE 0x23 0x01 |
array5 | 0x70 0x36 0xC5 0x87
0x86 0x91 0x3B 0xE7
0x33 0xCD 0xBA 0xA9
0x2F 0xB0 0xB4 0x24 |
Figure 8. Value of the keys used to decrypt the method bodies
The other information is extracted using a similar approach. In particular, the four constants are identified by searching for the code pattern<< 21. An example of such a pattern is shown in Figure 9.
num43 ^= num43 >> 2;
num43 += num40;
num43 ^= num43 >> 9;
num43 += num42;
num43 += num44;
num43 = (((num39 << 13) - num41) ^ num42) + num43;
num32 = num37 + (uint)num43;
num2 = 269;
Figure 9. Example of pattern used to extract the constant values
A breakpoint needs to be set on the last line in order to execute the code that computes the constant values. From the debugger UI, it is possible to extract the values of the four constants, which are stored innum40, num42, num44, and the transient value obtained from variables num39, num41 and num42. For our sample, the assumed values are shown in Figure 10.
num40 | 0x78AFDD10 |
num42 | 0xFD3F1E37 |
num44 | 0x18E85432 |
<transient value> | 0x99e0d97e |
Figure 10. Values assumed by the constants used in the deobfuscation process
The final information is the one used to decrypt the method headers. The pattern to search for is again ^=. This time the instruction to look for is a XOR operation with a hard-coded constant. An example of such code is shown in Figure 11.
num2 = 250;0x32a60468. With the collected information, it is possible to run the deobfuscator. Figures 12 and 13 provide an example of deobfuscation results. The obfuscated function code is shown in Figure 12. As can be noticed, the decompiled function code is empty, and its MSIL code does not perform any meaningful action.
Figure 12. Example of obfuscated code Figure 13. Example of deobfuscated code (Cklick to enlarge)Conclusion
As demonstrated throughout this post, Ploutus obfuscation represents a real challenge for the analyst. The obfuscation of the method’s body can hinder both static and dynamic analysis. Deobfuscating this technique requires a good understanding of the inner functionality of the .NET framework and its core structures. Writing a full deobfuscator requires a considerable amount of time, in particular due to some design choices adopted by the developer (such as using only local variables without referencing external methods). Nevertheless, it is possible to create a deobfuscator that takes in input information that can be extracted by debugging the code, obtaining as a result a binary with the real method’s body.Additional Resources
- Learn how CrowdStrike CROWDSTRIKE FALCON® INTELLIGENCE combines automated analysis with human intelligence, enabling security teams, regardless of size or skill, to get ahead of the attacker's next move.
- CrowdStrike Falcon® Intelligence Premium adds threat intelligence reporting and research from CrowdStrike experts — enabling you to get ahead of nation-state, eCrime and hacktivist attacks.
- CrowdStrike Falcon® Intelligence Elite expands your team with access to an intelligence analyst to help defend against threats targeting your organization.
- Learn how to stop adversaries targeting your industry — schedule a free 1:1 intel briefing with a CrowdStrike threat intelligence expert today.