Build API Integrations with Falcon Fusion SOAR HTTP Actions
Need to call external APIs from your Falcon Fusion SOAR workflows? You don’t need to build a custom Falcon Foundry app. HTTP Actions let you integrate with any REST API directly from your workflows in minutes. No code. No custom app deployment. No weeks-long development cycle.
A custom Falcon Foundry app with an API integration typically takes a couple hours to build, test, and deploy. An equivalent HTTP Action workflow can be configured and tested in 10 minutes. For straightforward API integrations, HTTP Actions eliminate the development bottleneck entirely.
This post shows you how to use HTTP Actions to integrate with external APIs, authenticate with OAuth 2.0 or API keys, handle responses with conditional logic, and build production-ready workflows. We’ll walk through a complete example using Microsoft Graph to investigate user accounts.
Table of Contents:
- When to Use HTTP Actions vs Falcon Foundry Apps
- Understanding the Three Types of HTTP Actions
- Quick Start: Your First HTTP Action in 5 Minutes
- Configuration Deep Dive
- Example Implementation: Microsoft Graph
- Troubleshooting Common Issues
- Next Steps: From HTTP Actions to Full Falcon Foundry Development
Prerequisites:
- Falcon Fusion SOAR
- Falcon Next-Gen SIEM
When to Use HTTP Actions vs Falcon Foundry Apps
Use the decision tree below to choose the right approach for your API integration needs.
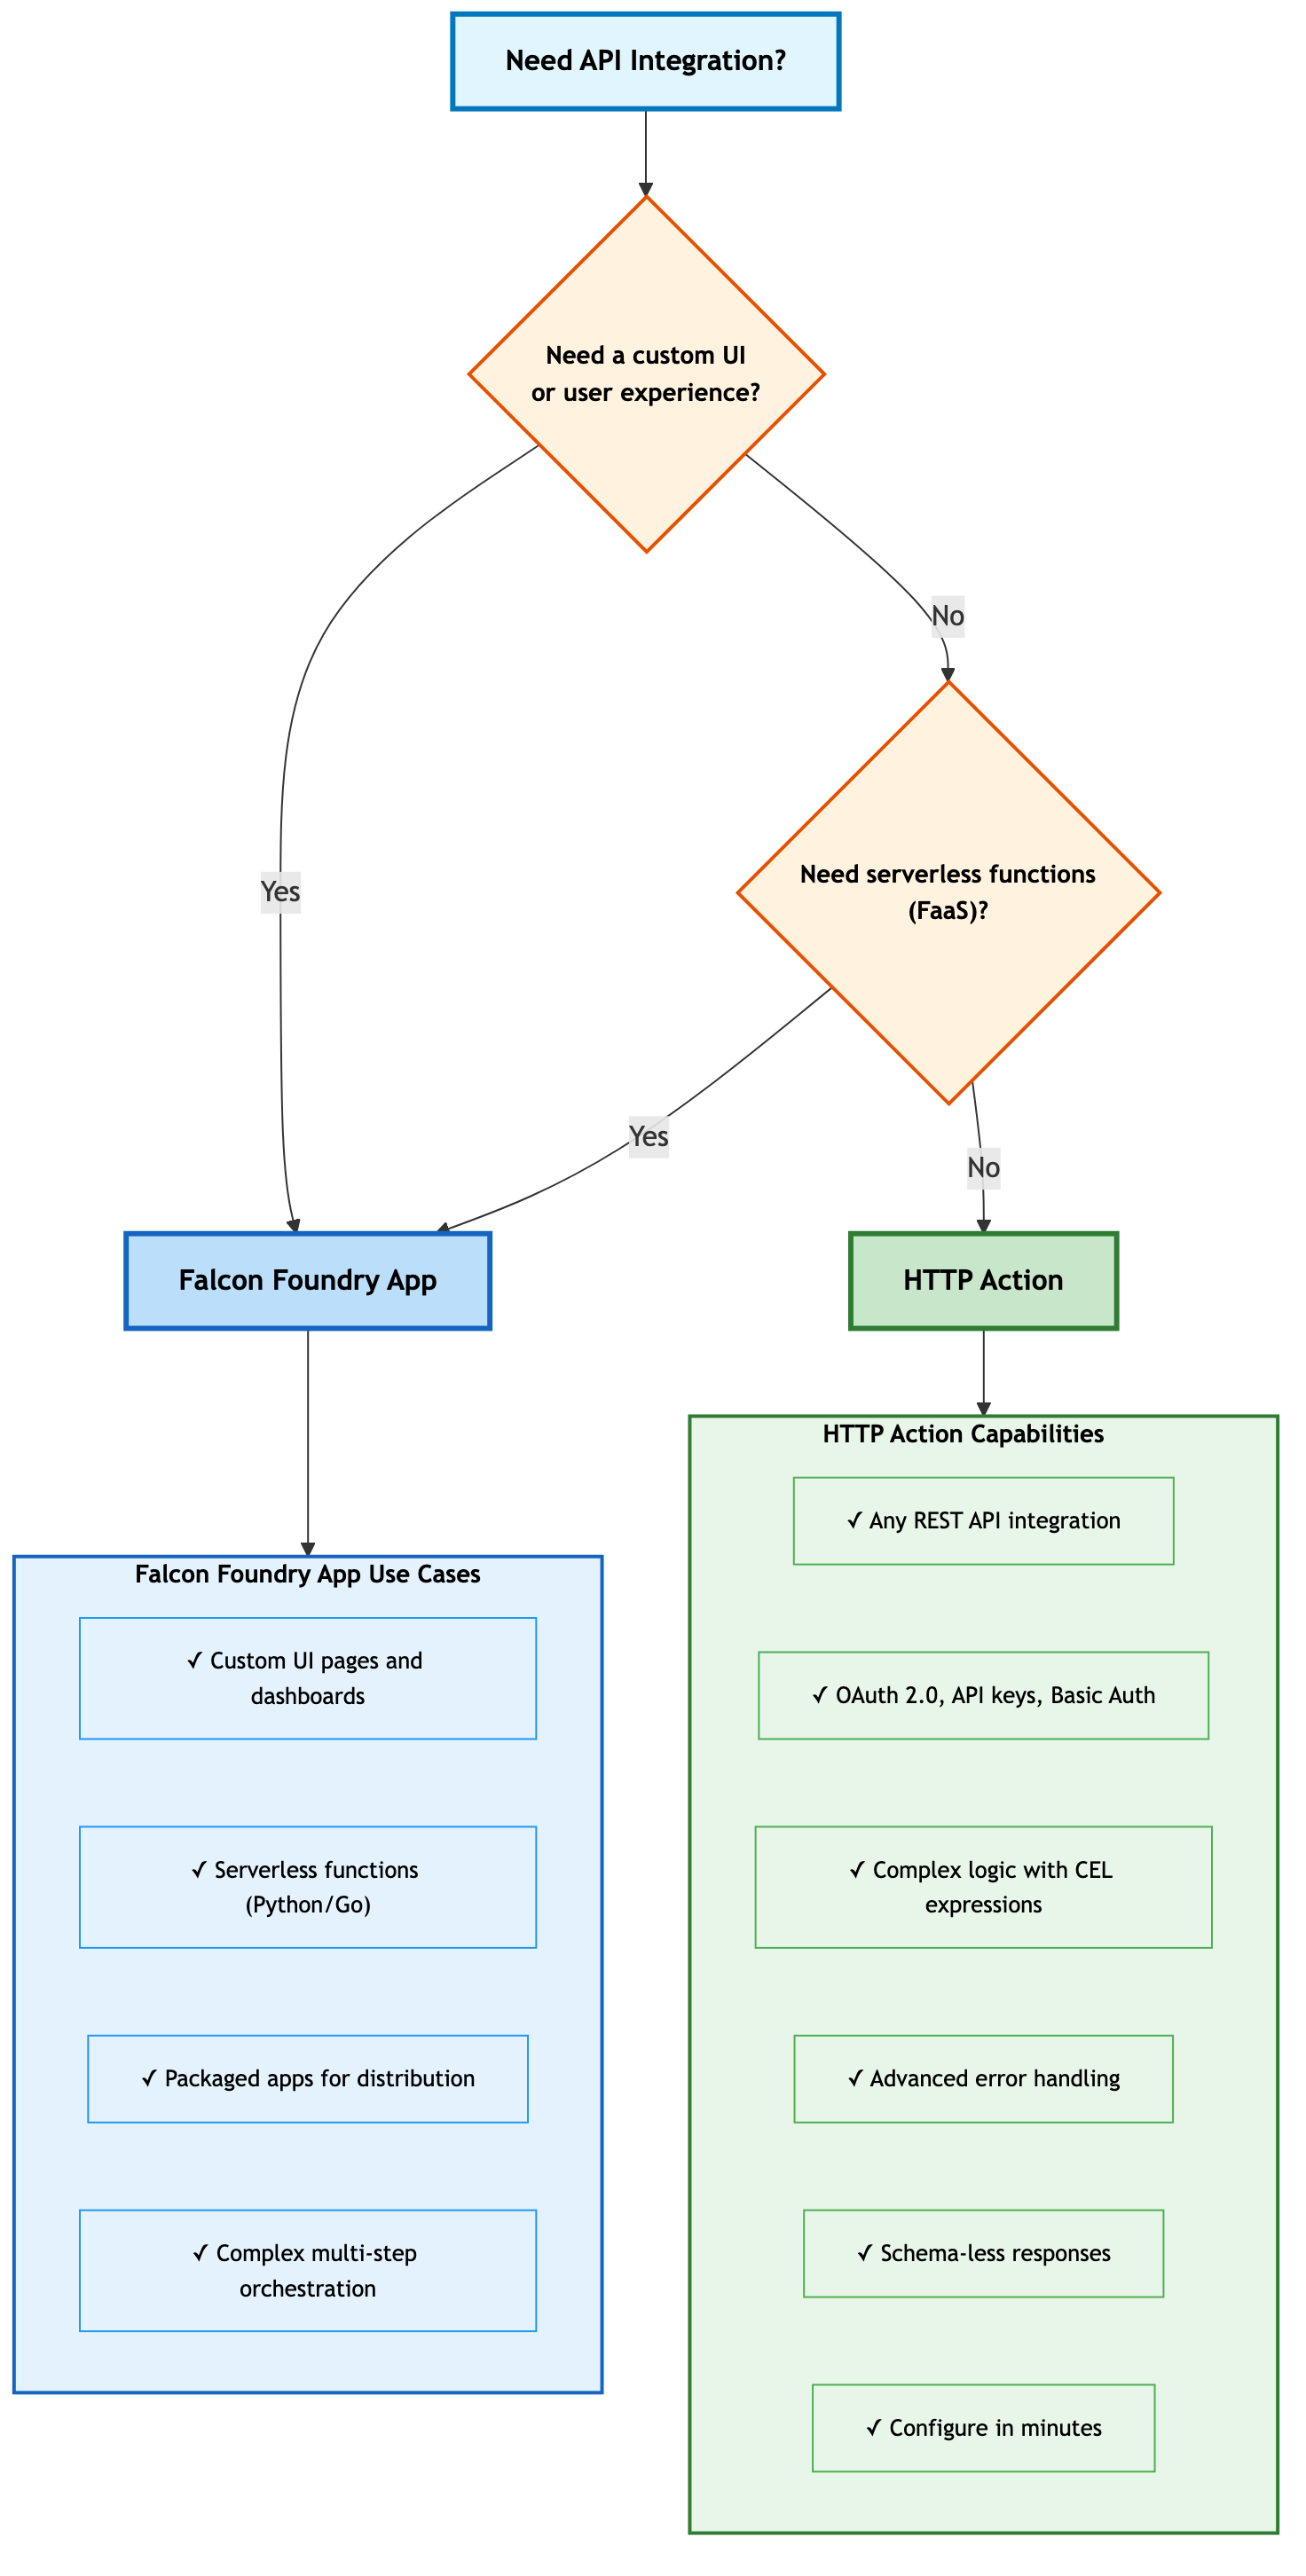
HTTP Actions handle the vast majority of API integration needs, from simple API key authentication to complex OAuth 2.0 flows, with advanced error handling and CEL expressions for complex logic. You only need a Falcon Foundry app when you want a custom UI experience or need serverless functions.
Understanding the Three Types of HTTP Actions
Falcon Fusion SOAR provides three types of HTTP Actions, each designed for specific integration scenarios. Here’s how they compare:
| HTTP Action Type | Use Case | Authentication | Network Access |
| Cloud HTTP Request | External/internet APIs (Slack, PagerDuty, Microsoft Graph, VirusTotal) | API Key, Basic Auth, OAuth 2.0 | Public internet from Falcon platform |
| CrowdStrike HTTP Request | CrowdStrike Falcon APIs | Tenant context (automatic) or API key | CrowdStrike endpoints |
| On-Premises HTTP Request | Internal/restricted APIs behind firewalls | API Key, Basic Auth, OAuth | Internal network via host group |
Let’s look at each type in detail.
Cloud HTTP Request
Cloud HTTP Requests call external, publicly accessible APIs like Slack, PagerDuty, Microsoft Graph, or VirusTotal. These requests execute from the Falcon platform environment, so you don’t need special network configuration or firewall rules. If the API is accessible from the public internet, Cloud HTTP Requests work out of the box.
You’ll typically use these for threat intelligence enrichment (VirusTotal, AlienVault OTX), team notifications (Slack, PagerDuty, Microsoft Teams), or data enrichment (user lookups, domain reputation checks, email validation).
CrowdStrike HTTP Request
CrowdStrike HTTP Requests call Falcon APIs and are available to all Falcon Fusion SOAR users at no additional cost. For many Falcon endpoints, Falcon Fusion SOAR automatically provides authentication based on your tenant context. No credentials required. When you need specific API scopes or permissions, create dedicated API clients with OAuth client credentials (client ID and secret) in the Falcon console.
Common endpoints include /devices/combined/devices/v1 for device queries, /detects/queries/detects/v1 for detection queries, and /incidents/queries/incidents/v1 for incident queries.
When you need OAuth credentials, map the API endpoint to the required scope. The section header in the API documentation tells you which scope to enable when creating your API client in the Falcon console (Support and resources > API clients and keys). For example, /devices/combined/devices/v1 maps to the hosts section header, which requires the hosts scope with read permission.
On-Premises HTTP Request
On-Premises HTTP Requests call internal APIs behind firewalls or in restricted network environments. These requests route through your static host groups, giving them access to internal networks while maintaining security boundaries. You can configure HTTP/HTTPS proxies if needed and trust custom certificates or handle SSL termination.
Use static host groups only (dynamic host groups aren’t supported). Limit configurations to 20 hosts as a best practice, and configure proper firewall rules for the APIs you need to access.
For detailed configuration steps, see the Falcon Fusion SOAR HTTP Actions documentation.
Quick Start: Your First HTTP Action in 5 Minutes
Before diving into the full configuration details, let’s build a simple VirusTotal integration to get you up and running. This example uses API key authentication, the simplest auth method.
What you’ll need:
- A VirusTotal API key (get one free here)
- A Falcon Fusion SOAR workflow
Steps:
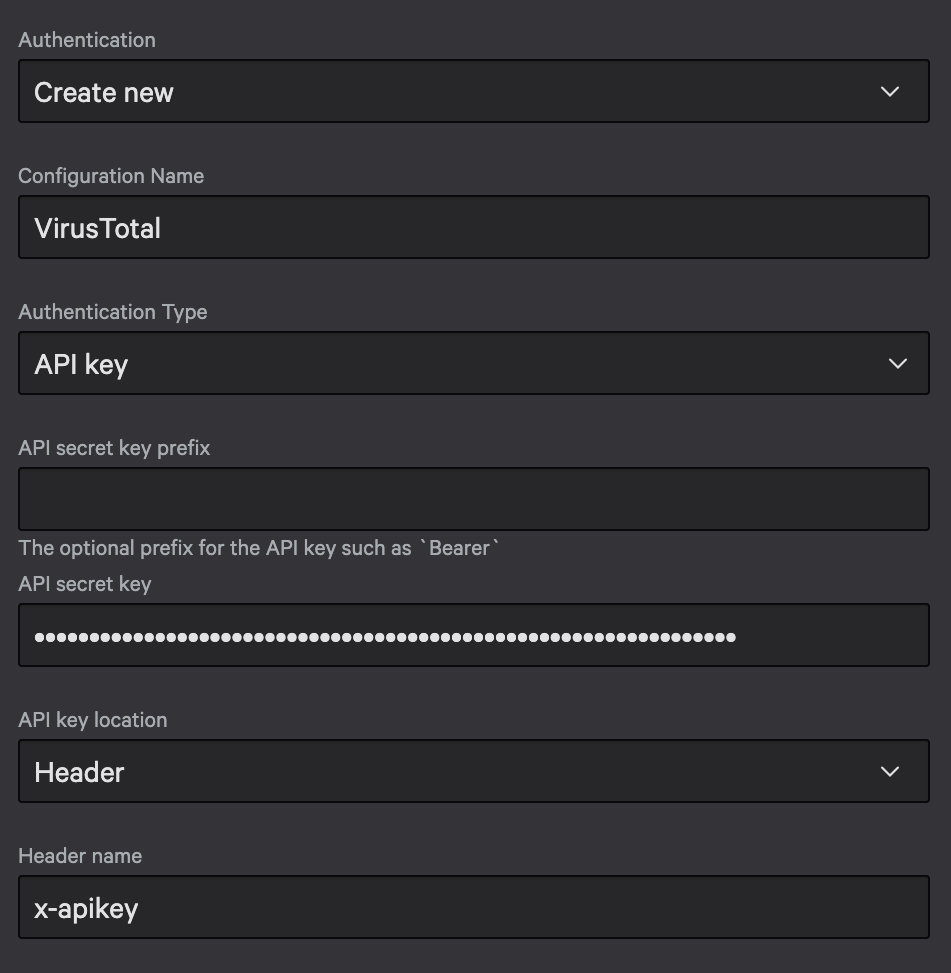
- In your workflow, add a Cloud HTTP Request action
- Configure authentication:
- Authentication:
Create new - Configuration Name:
VirusTotal - Authentication Type:
API key - API secret key:
<your-virustotal-api-key> - API key location:
Header - Header name:
x-apikey
- Set the request:
- Method:
GET - URL:
https://www.virustotal.com/api/v3/ip_addresses/8.8.8.8
- Click Test to verify it works
- Click Generate schema to create the response schema
- Save and add to your workflow
Below is a screenshot of what the results of clicking Test looks like:
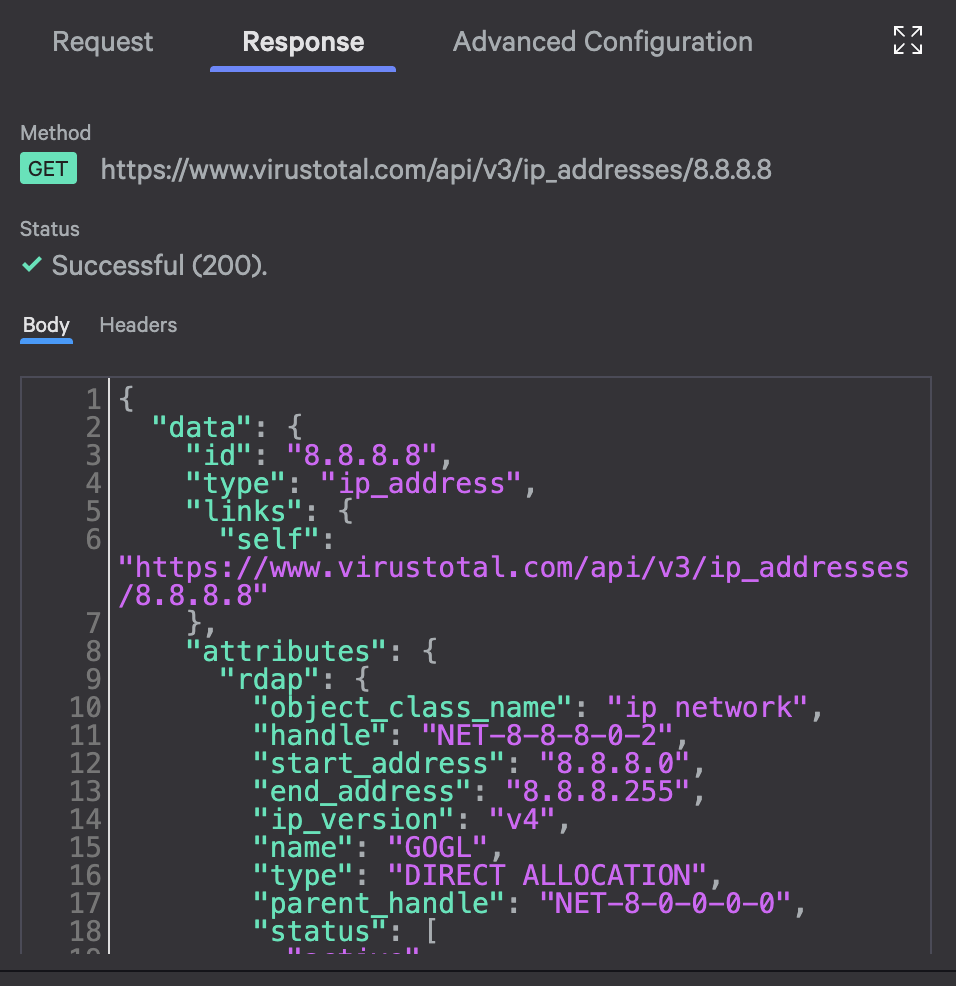
You now have a working API integration that checks IP reputation in VirusTotal. The entire workflow can reference this data using ${activity_name.HTTP.body.data.attributes}.
Now let’s dive into the complete configuration options and a more complex example.
Configuration Deep Dive
Now that you know which HTTP Action type to use, let’s walk through configuration. We’ll start with authentication, then move to request and response handling.
Authentication Patterns
HTTP Actions support three authentication methods: API keys, OAuth 2.0, and CrowdStrike-specific authentication. Let’s look at each one.
API Key Authentication
API key authentication is the most common pattern for external APIs. You provide a key in a header (usually with a Bearer prefix), and Falcon Fusion SOAR includes it with every request:
Bearer <your_API_key>
You can configure it once, and use it in multiple HTTP Actions. You can’t change authentication after you create it, so double-check before saving. Falcon Fusion SOAR stores keys securely and doesn’t expose them in logs.
TIP: Many APIs use Authorization: Bearer <token> format. If your API docs show this, your header name is Authorization and your header value is Bearer your_actual_key_here (include the word “Bearer” and a space).
When you configure API key authentication, specify the header name (e.g., Authorization, X-API-Key, or api-key) and header value (e.g., Bearer abc123, or just abc123 depending on the API). Check your API’s documentation for the exact header format.
OAuth 2.0 Authentication
OAuth 2.0 is the preferred method for modern APIs. It gives you automatic token refresh, better security than static API keys, and standardized permission scopes. Use it for modern APIs that support OAuth 2.0 client credentials flow, services like Microsoft Graph, Okta, Auth0, and Google Workspace, or any API where you want automatic token refresh.
For a basic OAuth setup, you’ll need three pieces of information from your API provider: the token URL (where to request access tokens), a client ID (application identifier), and a client secret (store this securely). Falcon Fusion SOAR handles the rest, requesting tokens, refreshing them before expiration, and including them in every API call.
For Microsoft Graph (which we’ll use in the complete example later), the configuration looks as follows:
- Token URL:
https://login.microsoftonline.com/{tenant-id}/oauth2/v2.0/token - Scope:
https://graph.microsoft.com/.default - Grant Type:
Client Credentials
Replace {tenant-id} with your actual Entra ID tenant ID from the Azure Portal (Microsoft Entra ID > Overview).
The .default scope grants your application all permissions configured in your app registration. This is convenient for application permissions, but requires careful permission management in Entra ID. Only enable the API permissions you actually need.
Request Configuration
Once authentication is configured, set up your HTTP request: URL, HTTP method, headers, query parameters, and request body.
URL and Variable Injection
Specify the full URL for your API endpoint. HTTP Actions support dynamic variable injection using ${variable_name} syntax. For example, https://graph.microsoft.com/v1.0/users/${userPrincipalName} prompts for a userPrincipalName value at execution and substitutes it at runtime.
Important: Variables prompt at workflow execution time, not during testing. When testing, replace variable placeholders with actual test values.
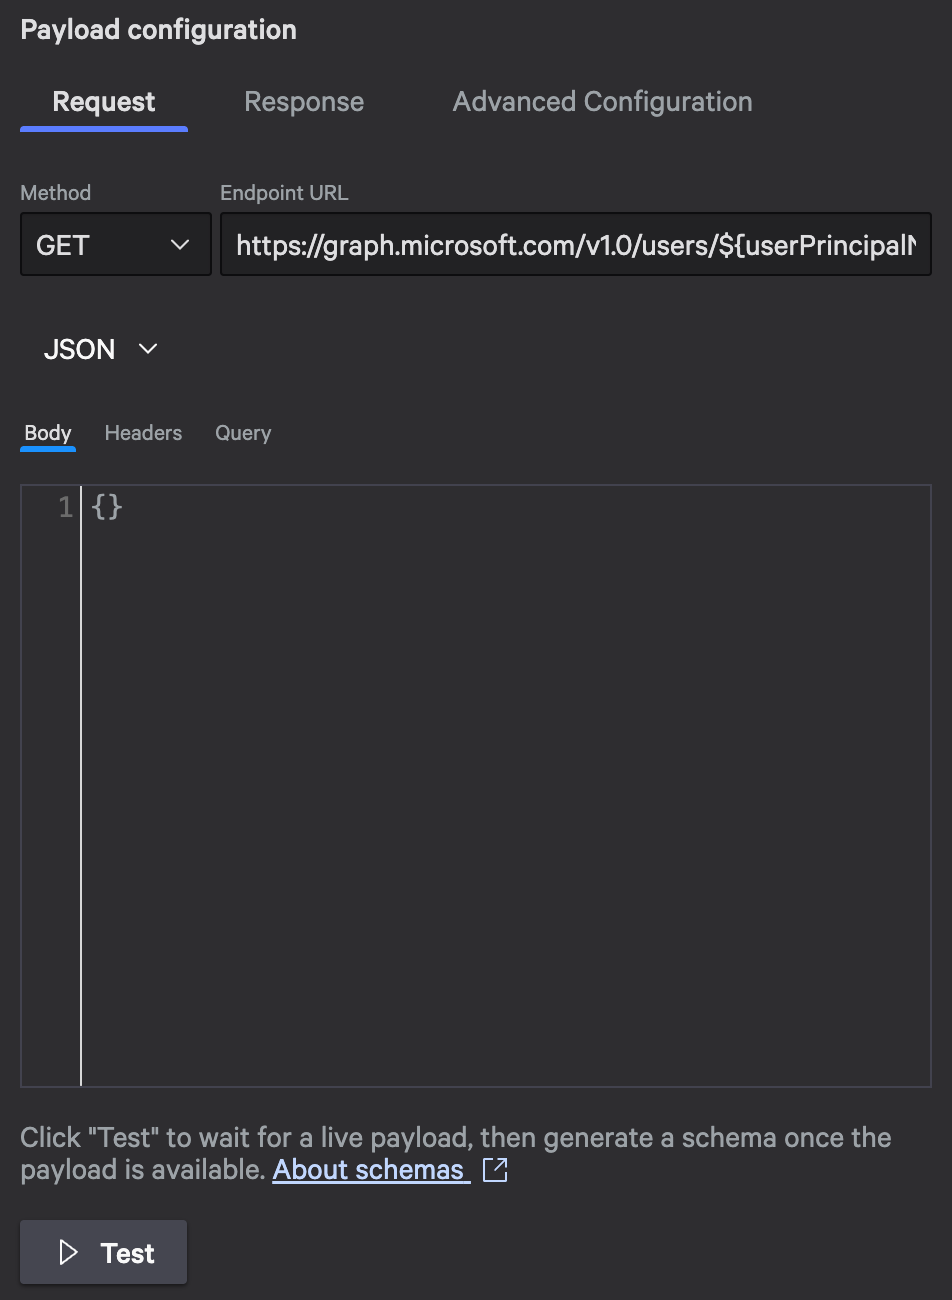
The URL field supports ${variable} syntax for dynamic value injection
Request Body
HTTP Actions support JSON, plain text, CSV, or no request body. Here’s an example JSON body with variables:
{
  "accountEnabled": true,
  "displayName": "${displayName}",
  "mailNickname": "${mailNickname}",
  "userPrincipalName": "${userPrincipalName}",
  "passwordProfile": {
    "password": "${temporaryPassword}"
  }
}
This example shows a Microsoft Graph request to create a user. Each variable gets replaced at runtime with values you provide.
Headers
Authentication headers are configured separately. Add custom headers using the Headers tab.
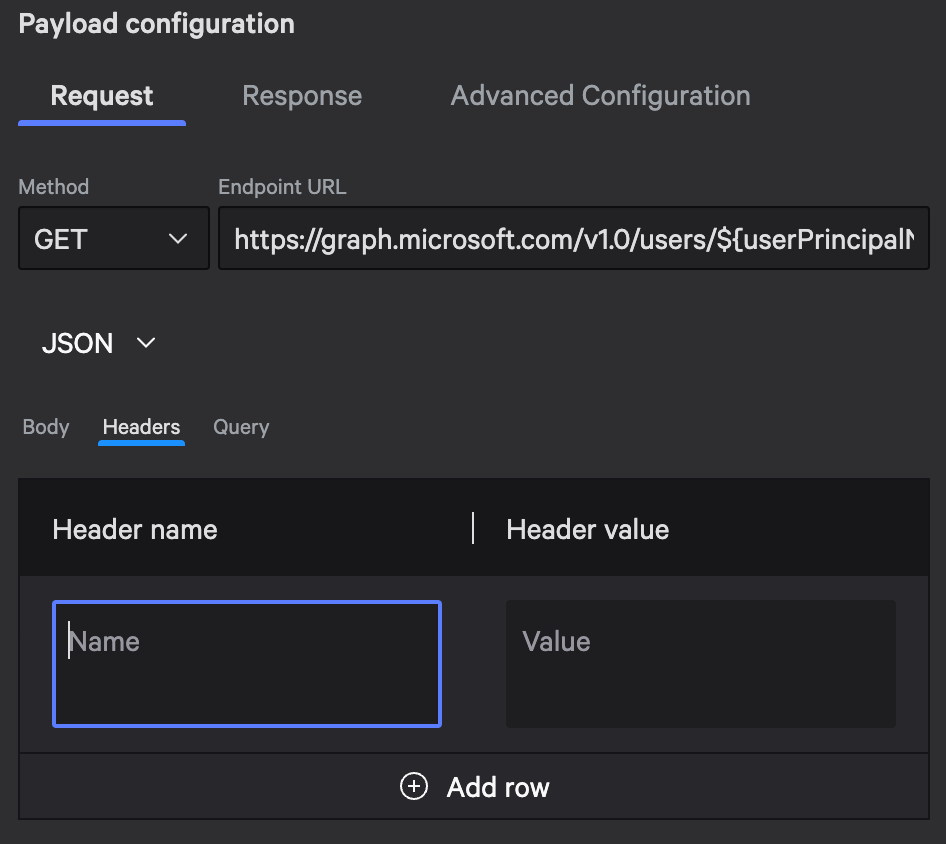
Click the Headers tab to add headers to the request
Query Parameters
Use the Query tab instead of manually building query strings. It handles proper encoding and makes configuration more maintainable.
Query parameters example:
Name: $select      Value: displayName,mail,jobTitle,department
Name: $filter      Value: startswith(displayName,'${searchTerm}')
Name: $top         Value: 10
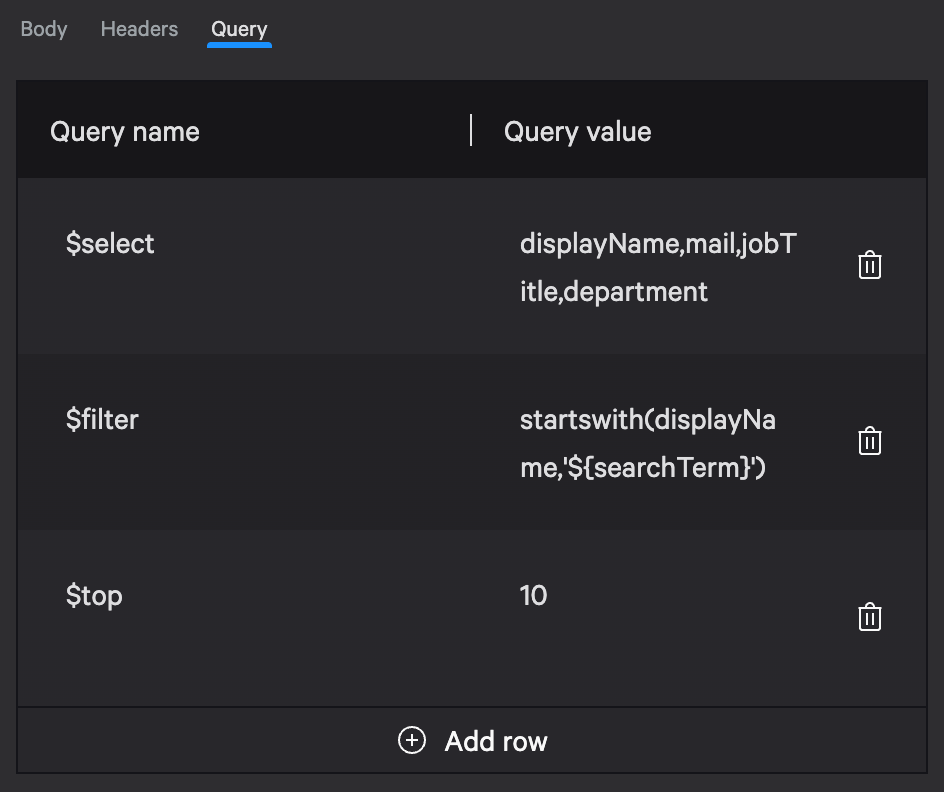
This builds the following query string:
?$select=displayName,mail,jobTitle,department&$filter=startswith(displayName,'${searchTerm}')&$top=10
The $select, $filter, and $top parameters are part of OData query syntax that Microsoft Graph uses. Your API may use different parameter names, so check its documentation.
Response Handling
HTTP responses in Falcon Fusion SOAR include header information and the response body (maximum 10 MB, must be a JSON object not an array). Access values in later workflow steps using the activity output reference, like ${activity_name.HTTP.response_status_code}.
Schema Management
Falcon Fusion SOAR uses JSON schemas to validate response structures. Generate from a sample response (recommended) or manually define the schema.
Testing and Validation
Test your HTTP Action before using it in production:
- Replace variables with actual test values
- Click the Test button
- Review the response (status code and body)
- Generate the schema from the test response using Generate schema
- Verify the timeout (30 seconds maximum) works for your API
Replace variables with values, then use the Test button to verify your configuration
On-Premises Configuration Details
On-Premises HTTP Actions route through static host groups to reach internal APIs behind firewalls. Its key requirements:
- Use explicit host names or IDs (dynamic host groups are not supported)
- Limit to 20 hosts as a best practice for maintainability
- Configure proxy settings if your network requires proxies for outbound connections
- Set certificate trust options for handling self-signed certificates or TLS termination
For example, if you have an internal CMDB API that uses a self-signed certificate, you’d:
- Select the appropriate static host group
- Enable certificate trust for the specific certificate
- Optionally configure a proxy URL if required
For complete setup instructions and advanced scenarios, see the Falcon Fusion SOAR HTTP Actions documentation.
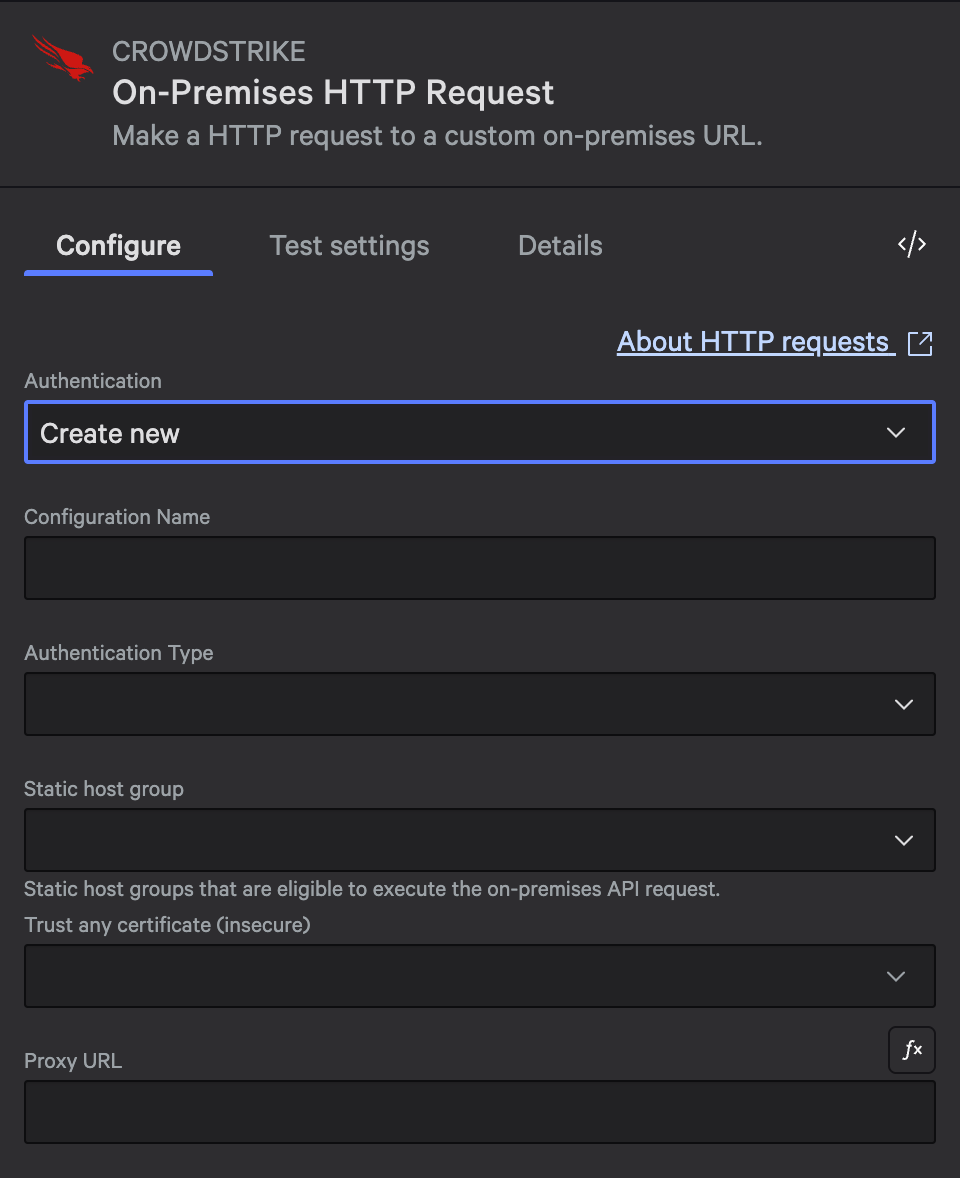
On-premises actions require static host group selection and optional proxy/certificate settings
Example Implementation: Microsoft Graph
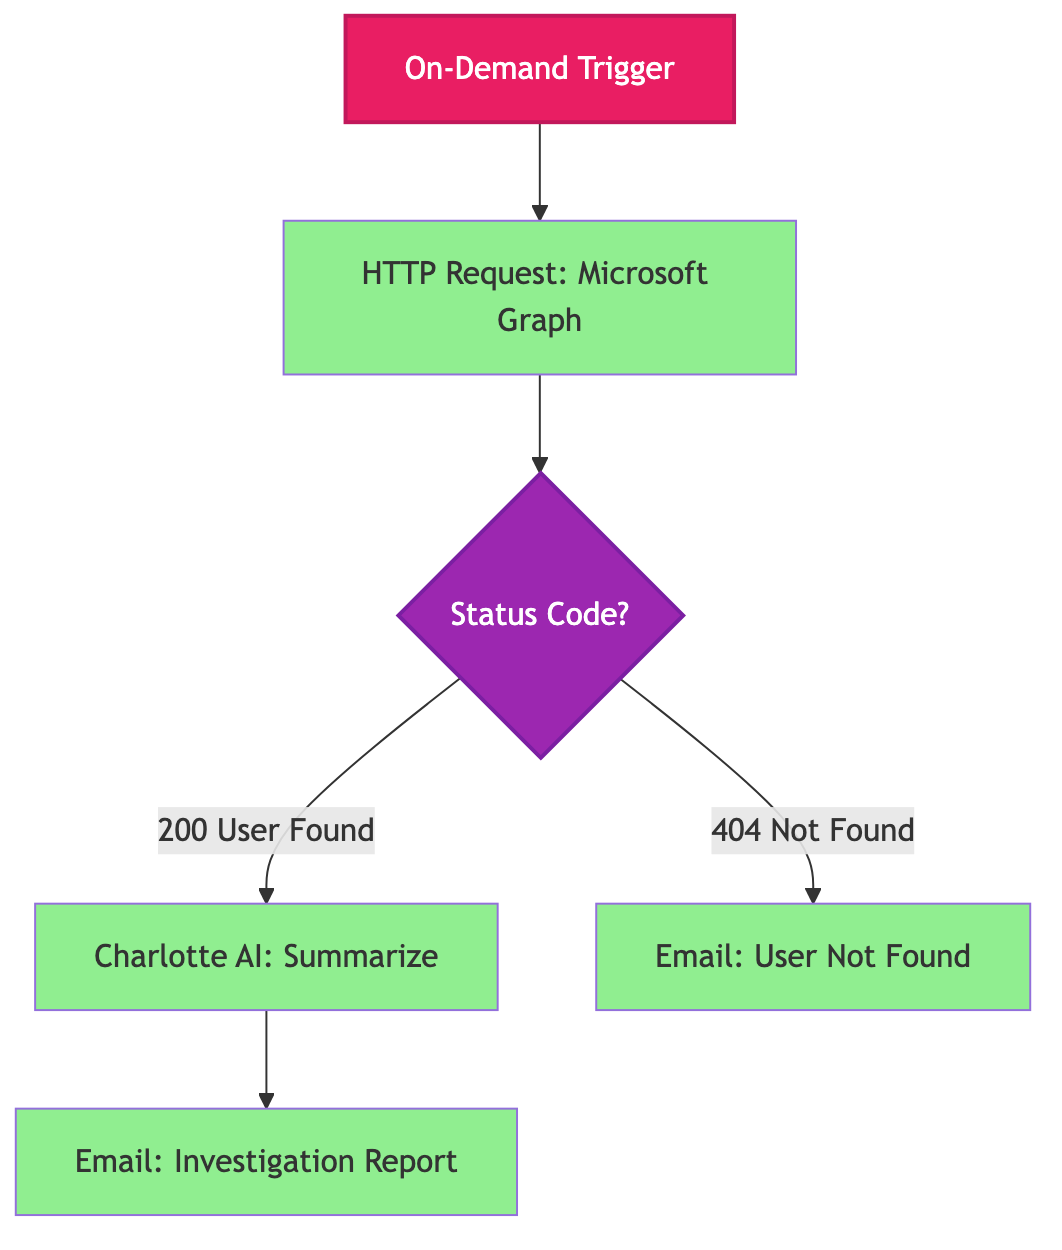
Let’s build a workflow that looks up user account details in Microsoft Entra ID via the Microsoft Graph API, generates an AI-powered investigation summary, and emails the results to your security team. This demonstrates Cloud HTTP Requests with OAuth 2.0, conditional branching, and Charlotte AI integration.
Workflow Architecture
Step 1: On-Demand Trigger
Configure the trigger to accept two email inputs: the user to investigate and who to notify.
{
  "type": "object",
  "properties": {
    "userPrincipalName": {
      "type": "string",
      "format": "email",
      "title": "User Principal Name to Investigate"
    },
    "recipient": {
      "type": "string",
      "format": "email",
      "title": "Email to Notify"
    }
  },
  "required": ["userPrincipalName", "recipient"]
}
This schema creates two input fields:
- User Principal Name to Investigate: The email address of the user you’re looking up
- Email to Notify: Where to send the investigation report
Both fields are required and validate email format, so Falcon Fusion SOAR won’t let you proceed without valid email addresses.
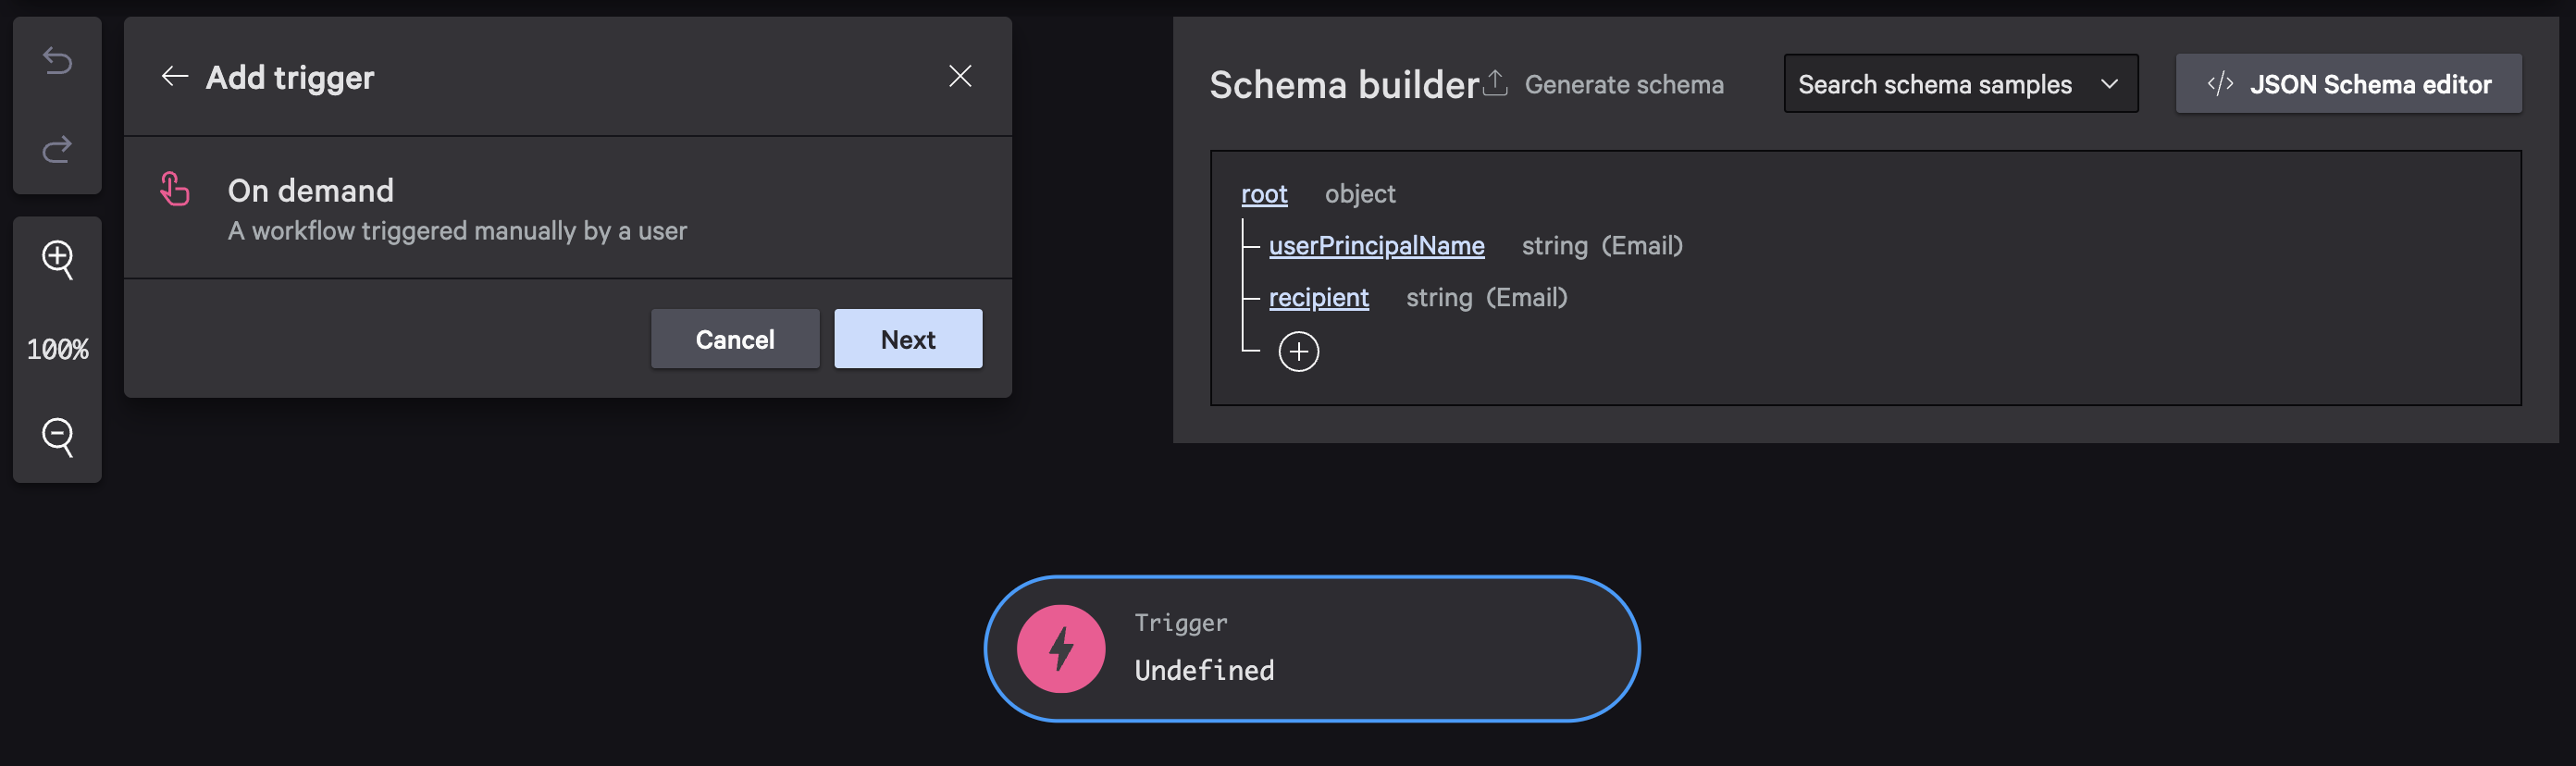
Configure the trigger with On Demand type and define your input schema
When you execute this workflow, you’ll see a prompt like this:
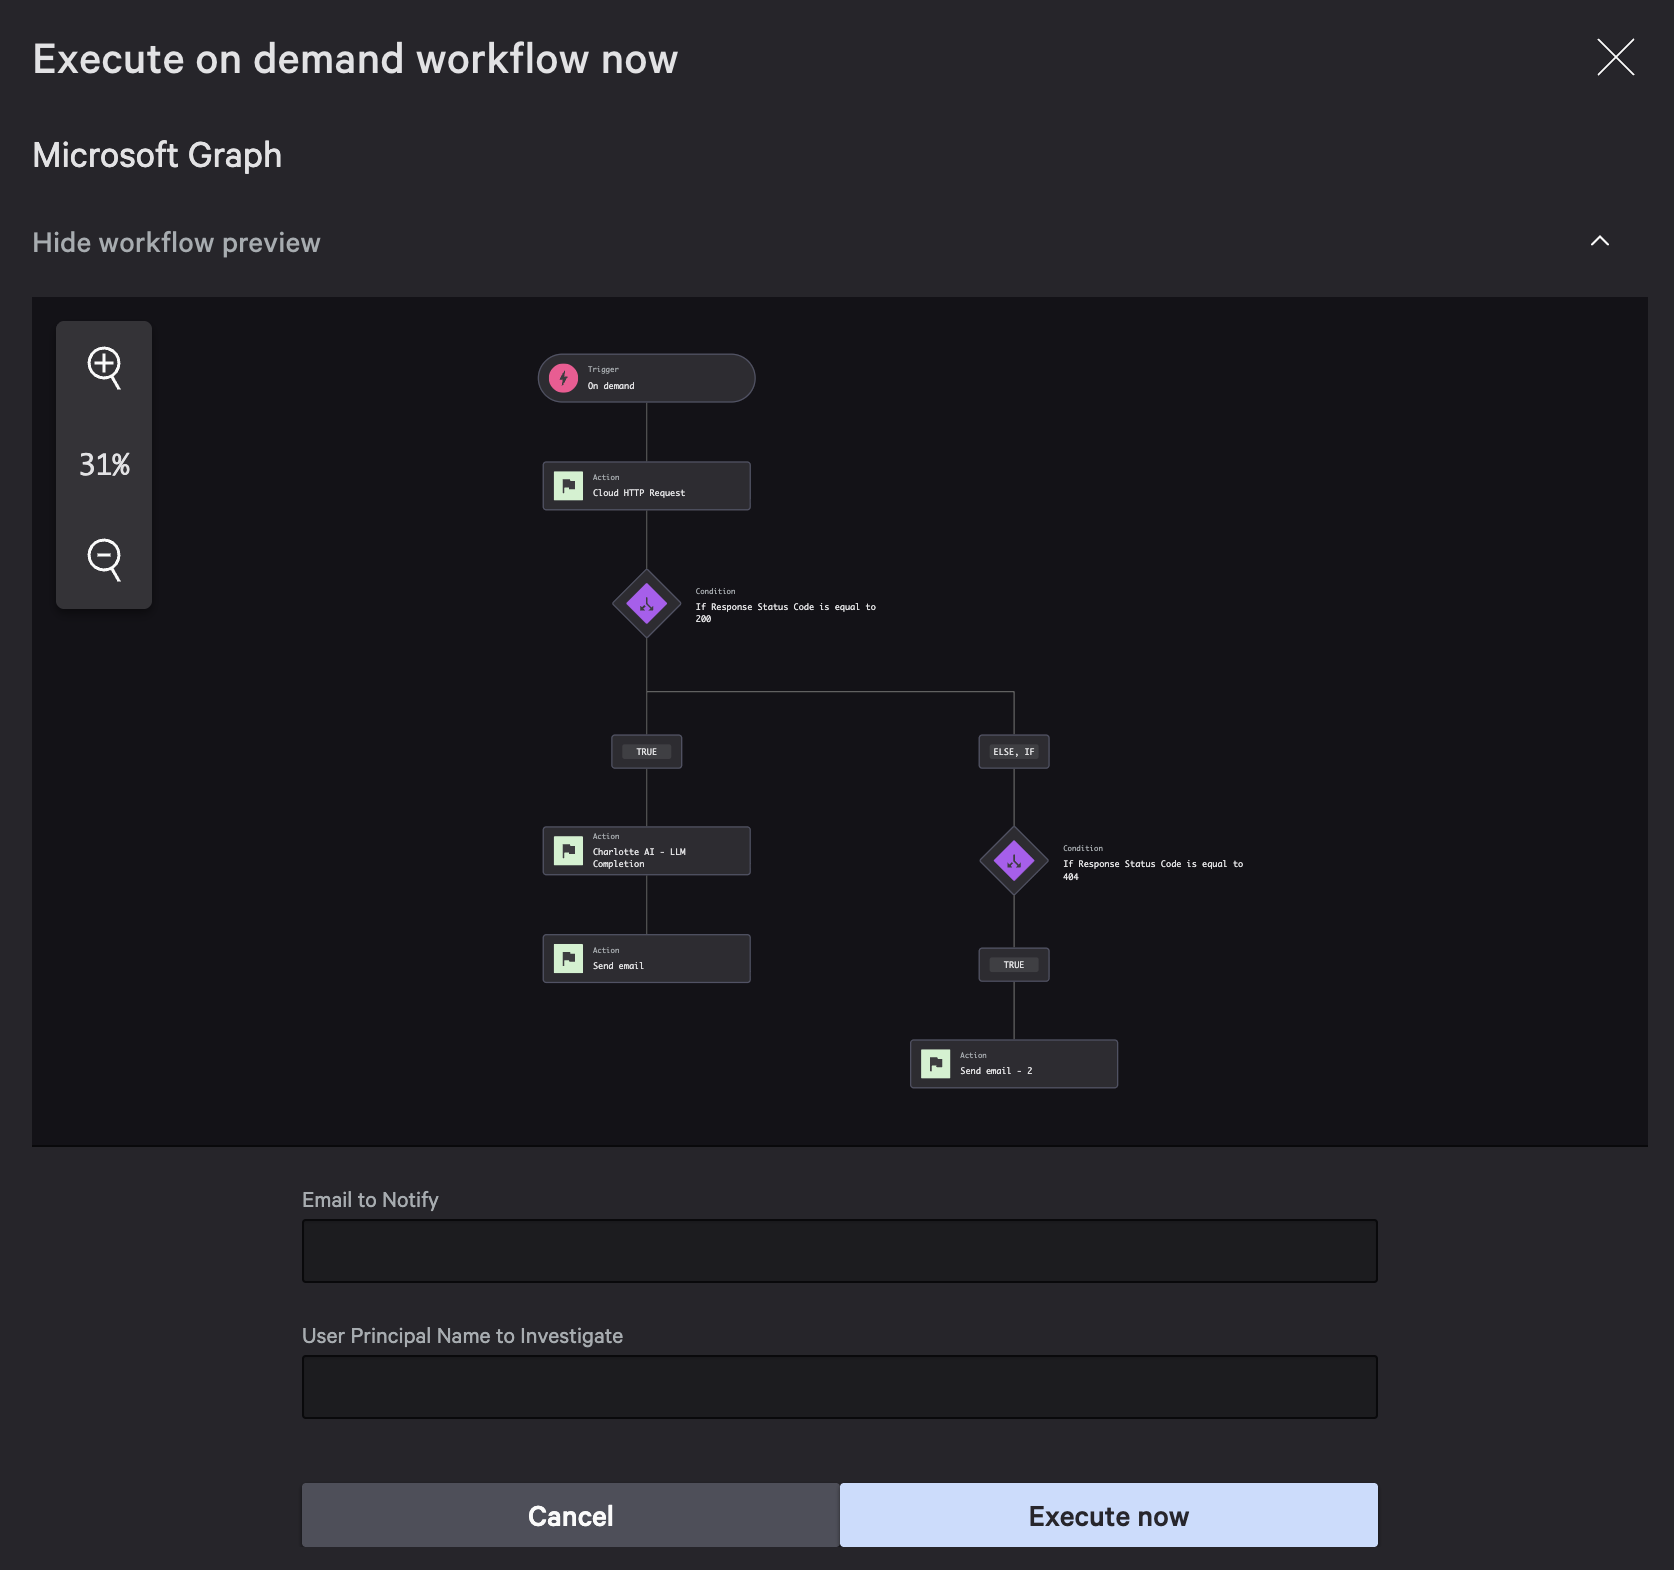
Falcon Fusion SOAR prompts for the required inputs before starting the workflow
Step 2: Cloud HTTP Request Action
Next, add the HTTP Request action that calls Microsoft Graph to look up the user.
Action configuration:
- Action name:
HTTP Request Microsoft Graph(descriptive names help later when you reference outputs) - HTTP Action type:
Cloud HTTP Request - Authentication:
OAuth 2.0 - Method:
GET
OAuth 2.0 authentication setup:
- Authentication:
OAuth 2.0 Client Credentials - Token URL:
https://login.microsoftonline.com/{tenant-id}/oauth2/v2.0/token - Client ID:
{your-client-id} - Client Secret:
{your-client-secret} - Scopes:
https://graph.microsoft.com/.default
Replace {tenant-id}, {your-client-id}, and {your-client-secret} with your actual Entra ID values. You can create them in the Azure portal:
- Go to Microsoft Entra ID > App registrations
- Click New registration
- Give it a name like “Falcon Fusion SOAR User Investigation” and click Register
- Under API permissions, add Microsoft Graph > Application permissions > User.Read.All
Security note: User.Read.All grants read access to all user profiles in your Entra ID tenant. For production deployments, evaluate whether you need directory-wide access or if a more restrictive permission like User.ReadBasic.All would suffice for your use case.
- Click Grant admin consent (this is required for application permissions)
- Under Certificates & secrets, create a new client secret with a name like “Falcon Fusion SOAR”. Use the value for your client secret.
- Navigate to Overview. Copy the Application ID to use as your client ID.
Request configuration:
- Method:
GET - Endpoint URL:
https://graph.microsoft.com/v1.0/users/${userPrincipalName} - Content type:
JSON - Query name:
$select - Query value:
displayName,mail,jobTitle,department,accountEnabled,userPrincipalName,id
The ${userPrincipalName} variable references the input field from your trigger. Falcon Fusion SOAR automatically makes trigger inputs available as variables in all subsequent actions.
The $select query tells Microsoft Graph to return only the fields we care about, making the response smaller and faster.
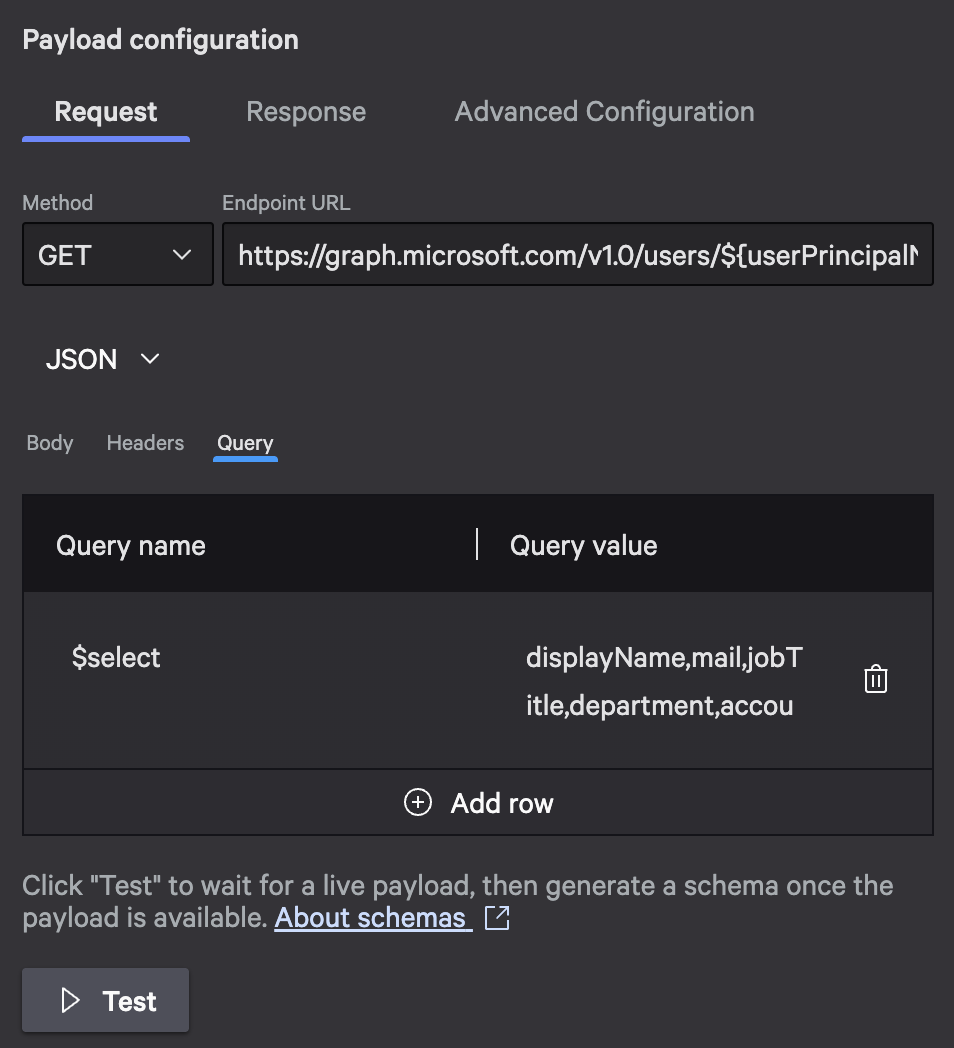
Configure the request URL with variable injection and query parameters
Inline Testing
Before you save this action, test it to make sure everything works:
- Replace the variable with a real test email address. For example, use
AdeleV@contoso.com(if your tenant has Microsoft’s test data) or a real user from your Entra ID. - Click Test and watch the response panel.
- Review the status code. You should see
200for success. - Check the response body. It should contain user information.
Example success response (HTTP 200):
{
  "@odata.context": "https://graph.microsoft.com/v1.0/$metadata#users(displayName,mail,jobTitle,department,accountEnabled,userPrincipalName,id)/$entity",
  "displayName": "Adele Vance",
  "mail": "AdeleV@contoso.com",
  "jobTitle": "Retail Manager",
  "department": "Sales & Marketing",
  "accountEnabled": true,
  "userPrincipalName": "AdeleV@contoso.com",
  "id": "87d349ed-44d7-43e1-9a83-5f2406dee5bd"
}
Example not found response (HTTP 404):
{
  "error": {
    "code": "Request_ResourceNotFound",
     "message": "Resource 'AdeleV@contoso.com' does not exist or one of its queried reference-property objects are not present."
  }
}
If you see errors, double-check:
- Your tenant ID in the token URL
- Your client ID and secret
- API permissions are granted and consented
- The test email address exists in your directory
Once you see successful responses, click the Generate Schema button below the response to generate the JSON schema from your test response.
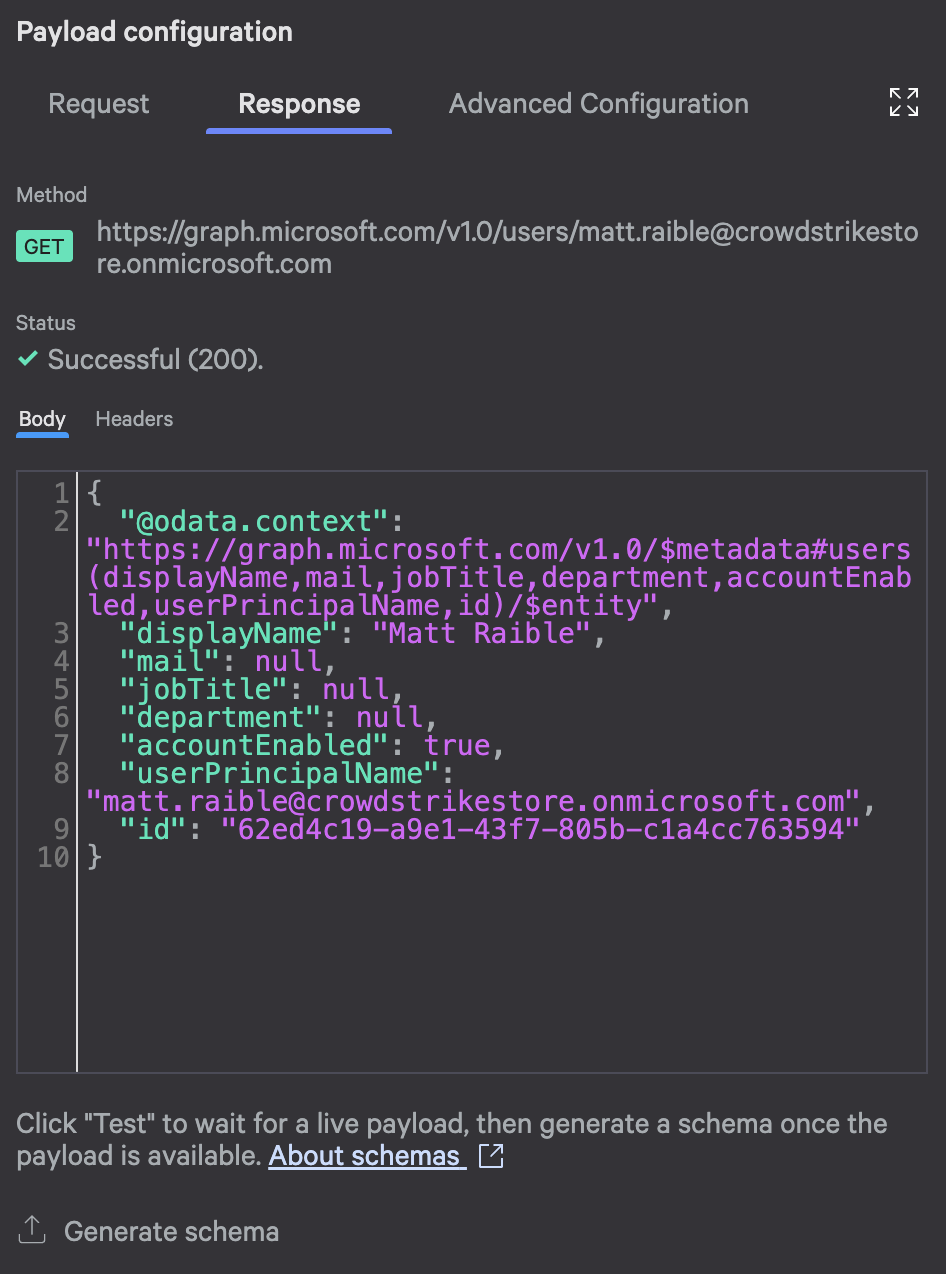
The test interface shows the complete response, making it easy to verify your configuration
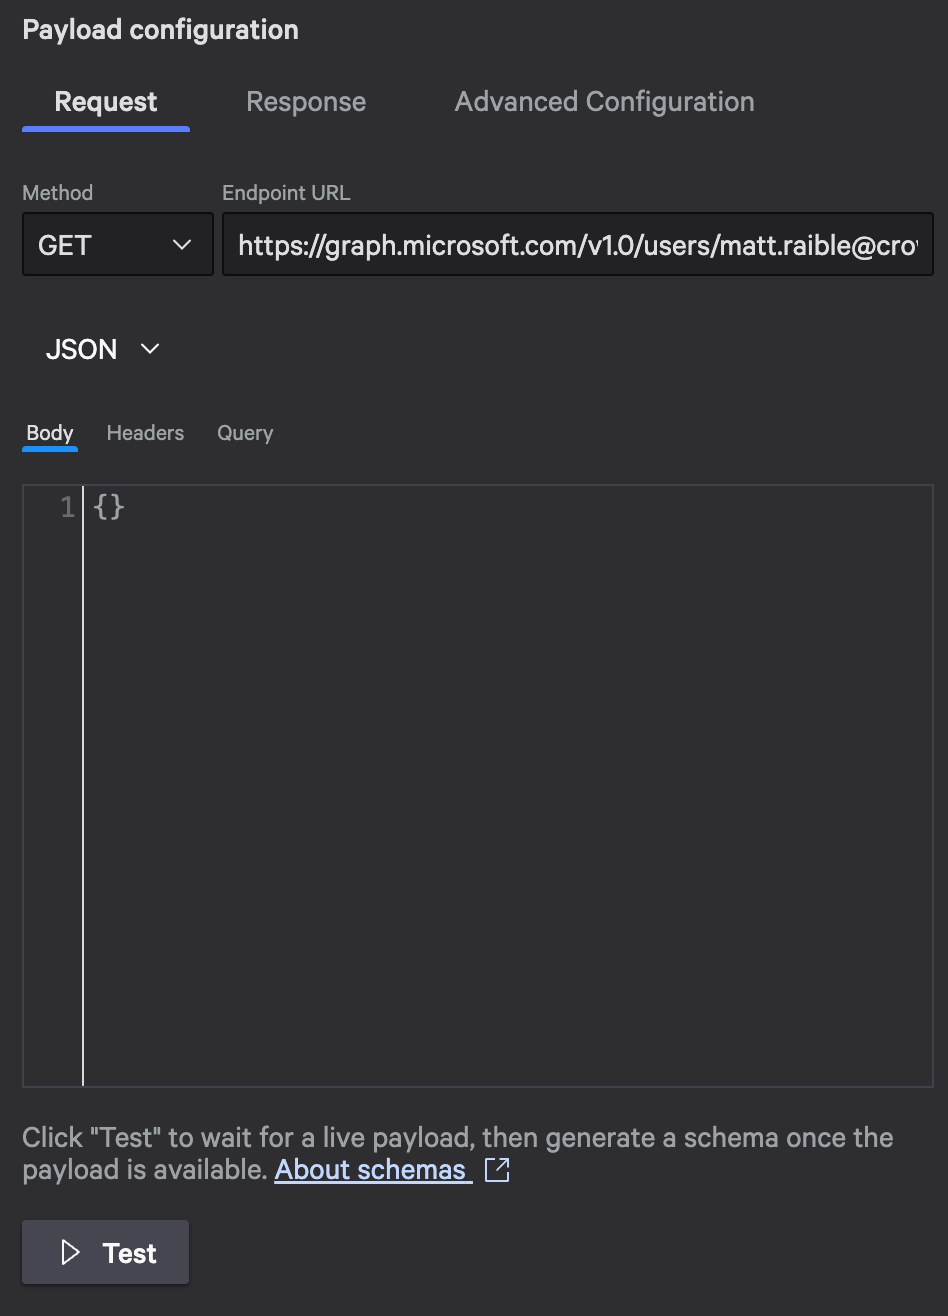
Before you click Next to save this action, replace the test email in the request’s Endpoint URL with ${userPrincipalName}.
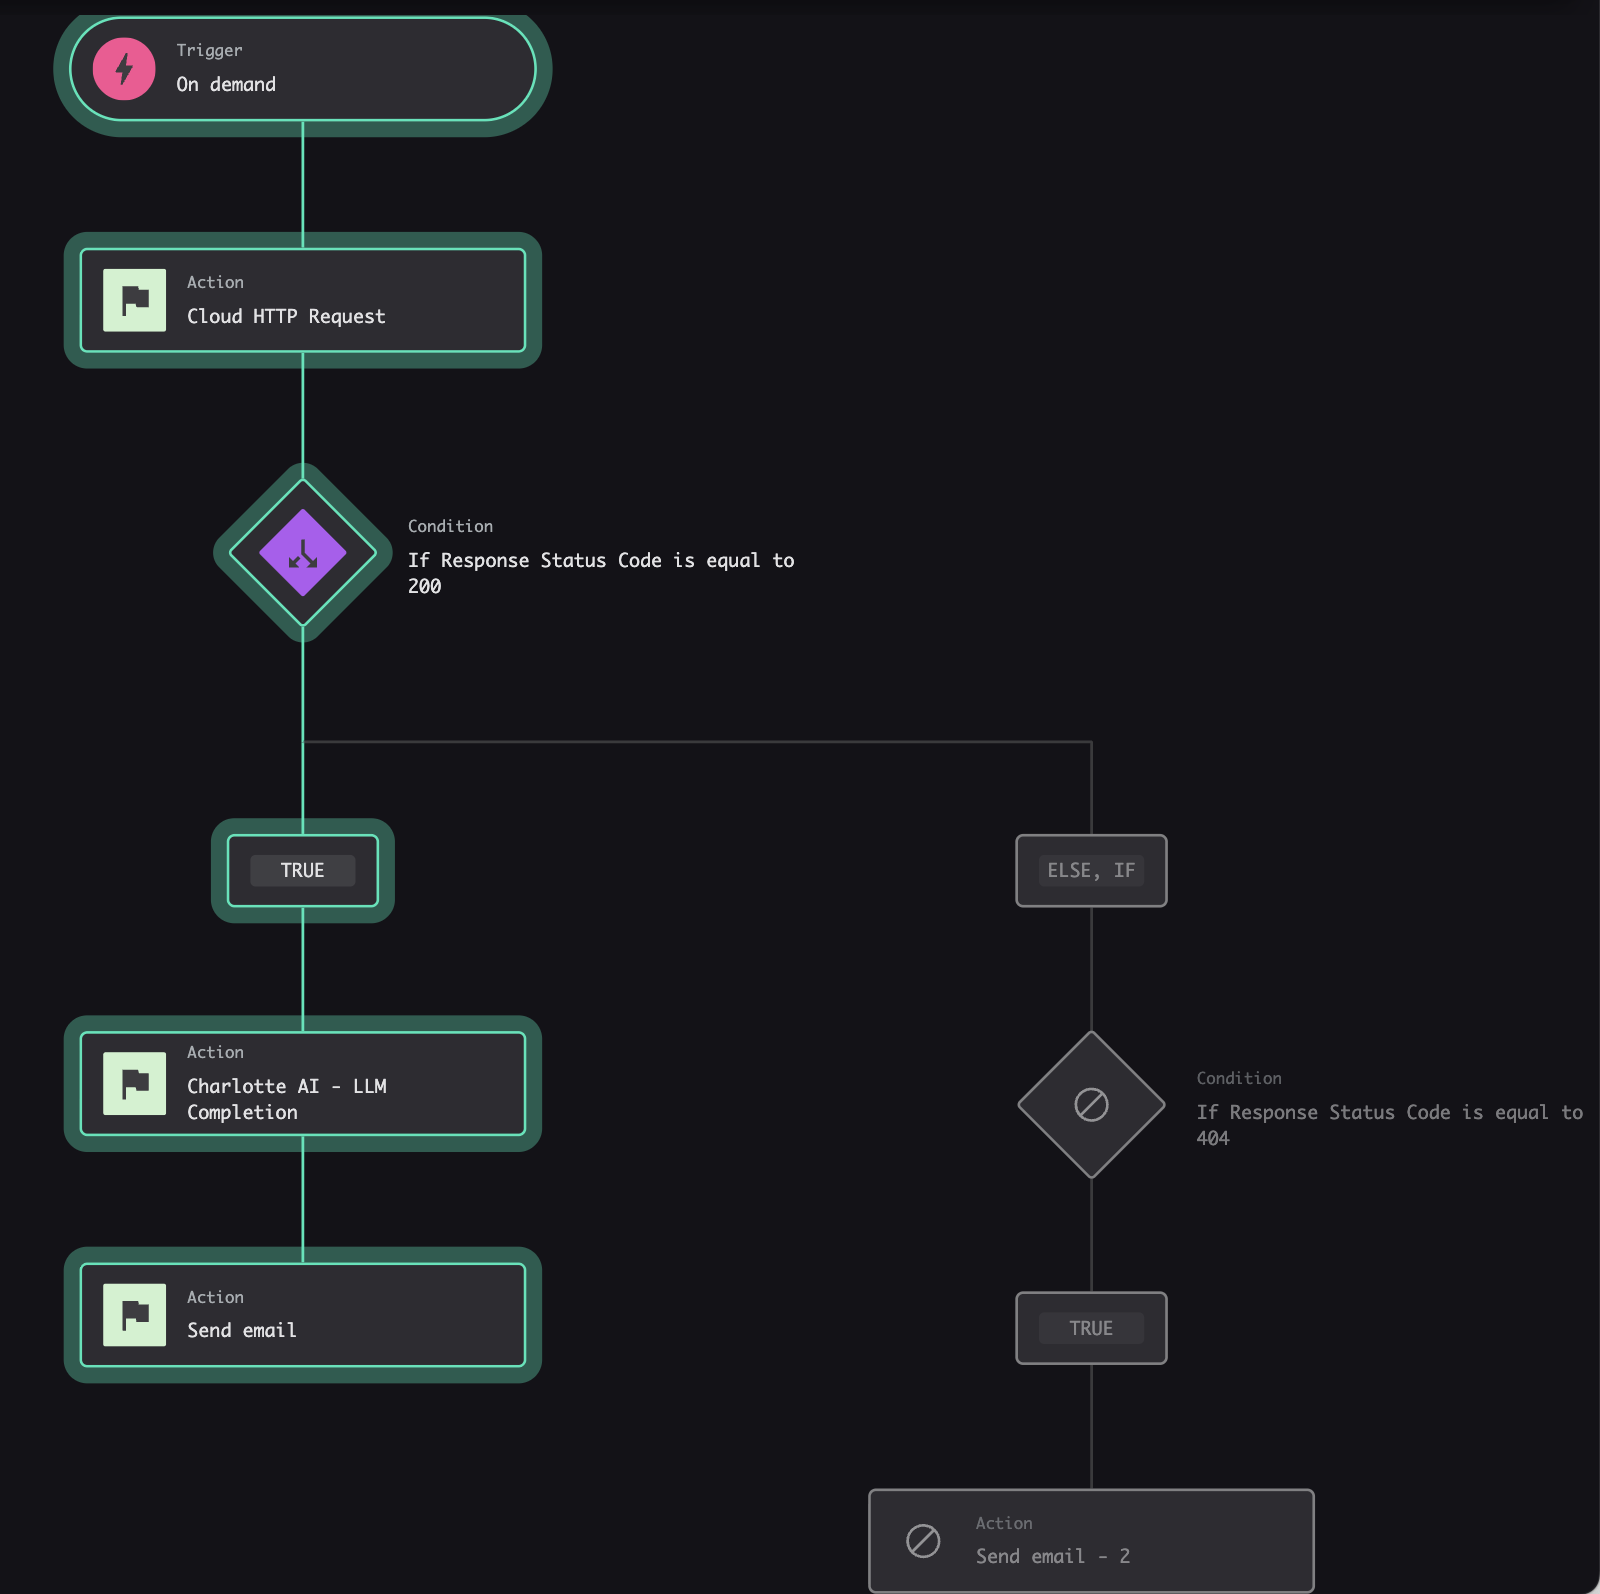
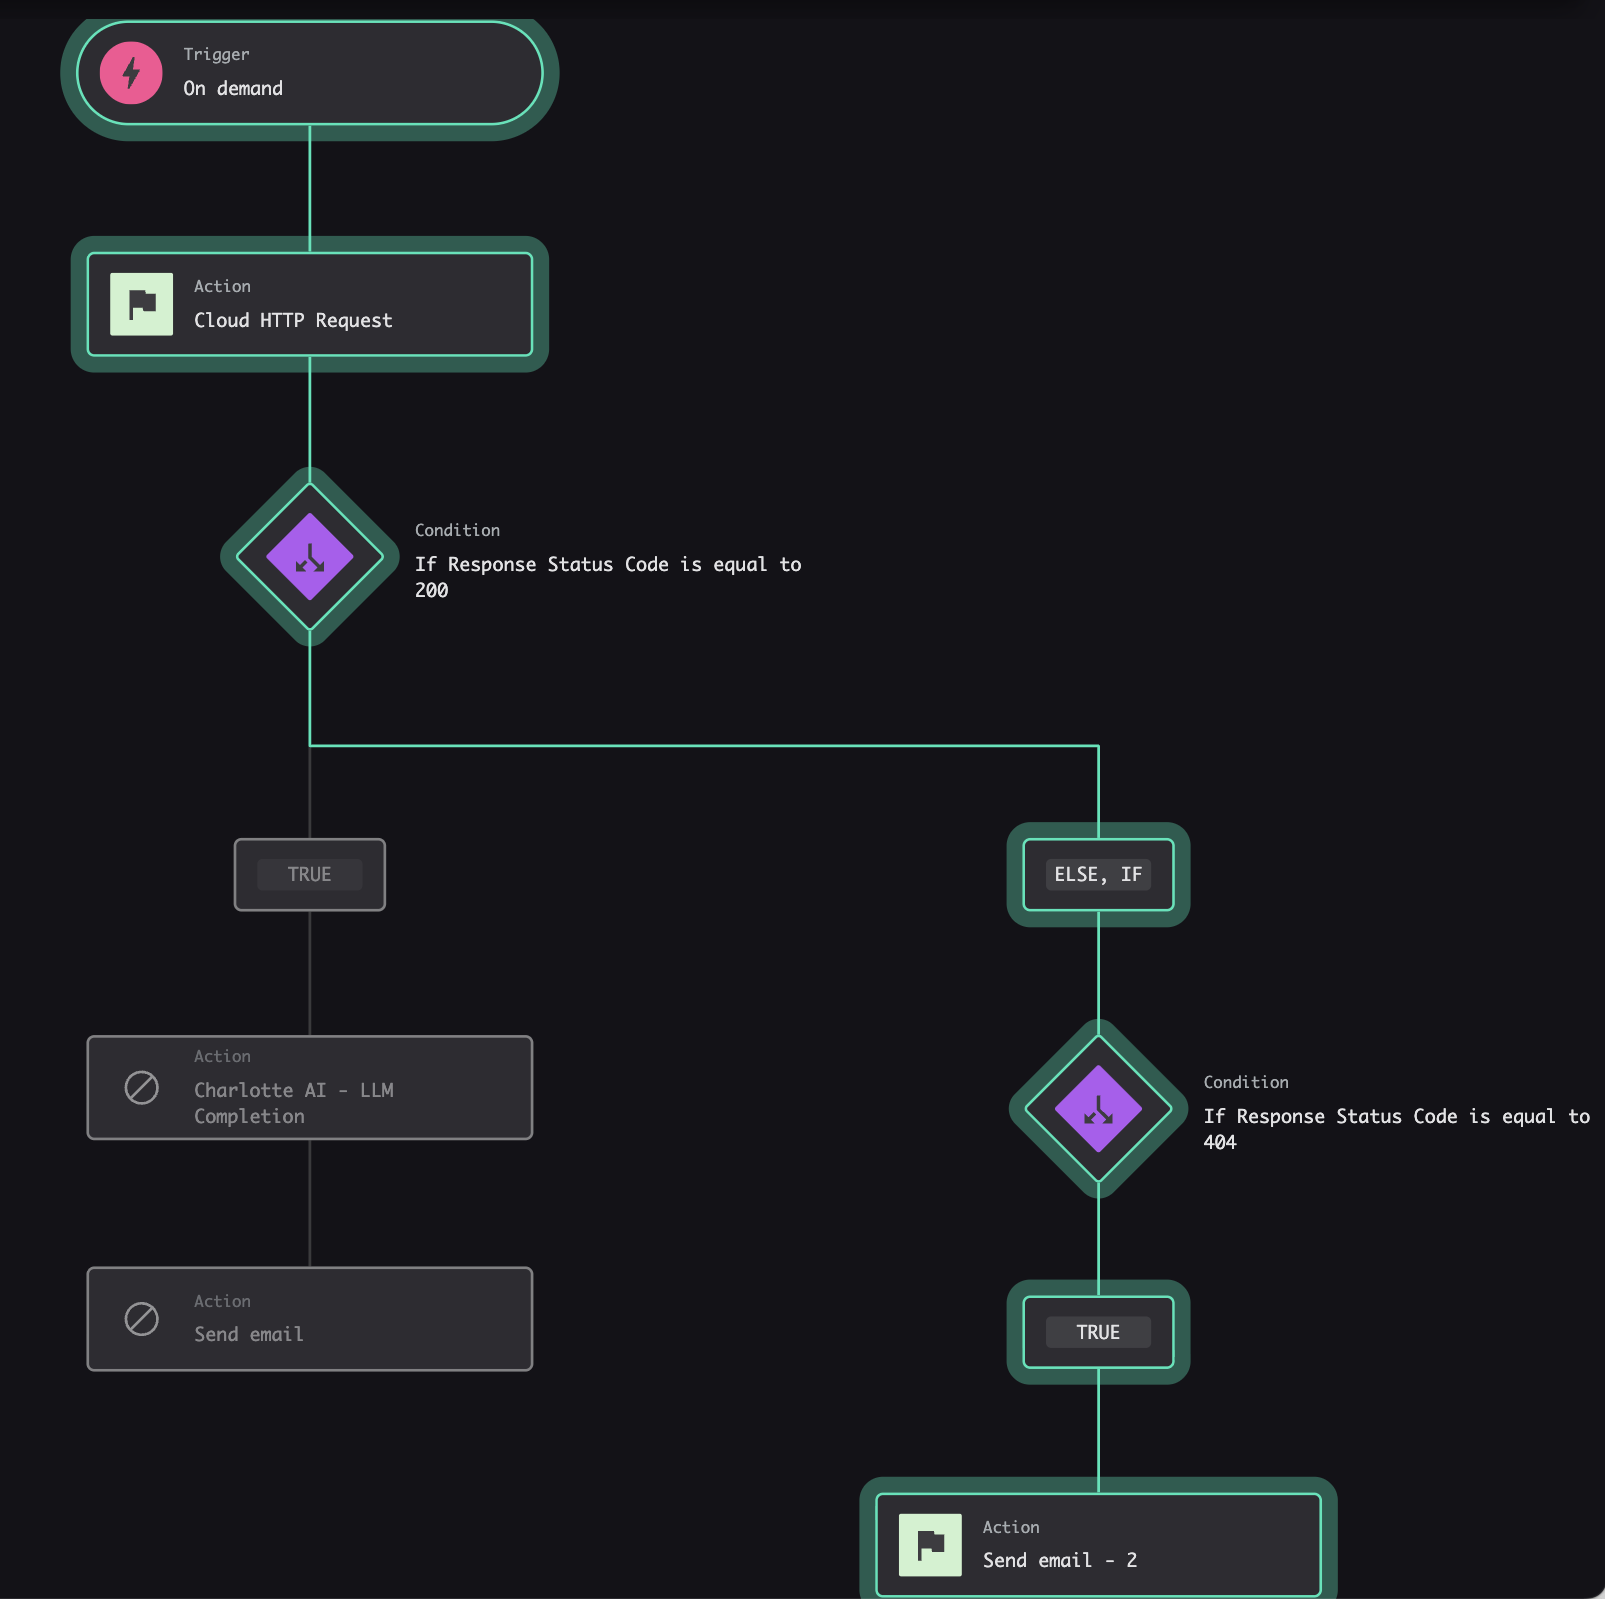
Step 3: Conditional Logic (Branching)
Next, add conditional logic to route your workflow based on the API response status code. We’ll handle two scenarios: user found (200) and user not found (404).
Why check status codes? Because the Microsoft Graph API returns different status codes depending on whether the user exists:
- 200 (OK): User found, proceed with analysis
- 404 (Not Found): User doesn’t exist, send appropriate notification
By checking these codes, we can provide different outputs for different scenarios.
Condition 1: Status 200 (User Found)
First, add a condition that checks for successful responses.
Condition configuration:
- Parameter: Response Status Code (from the HTTP Action output)
- Operator: is equal to
- Value: 200
Behavior:
- If true: Continue to Charlotte AI for summarization, then send investigation email
- If false: Check the next condition
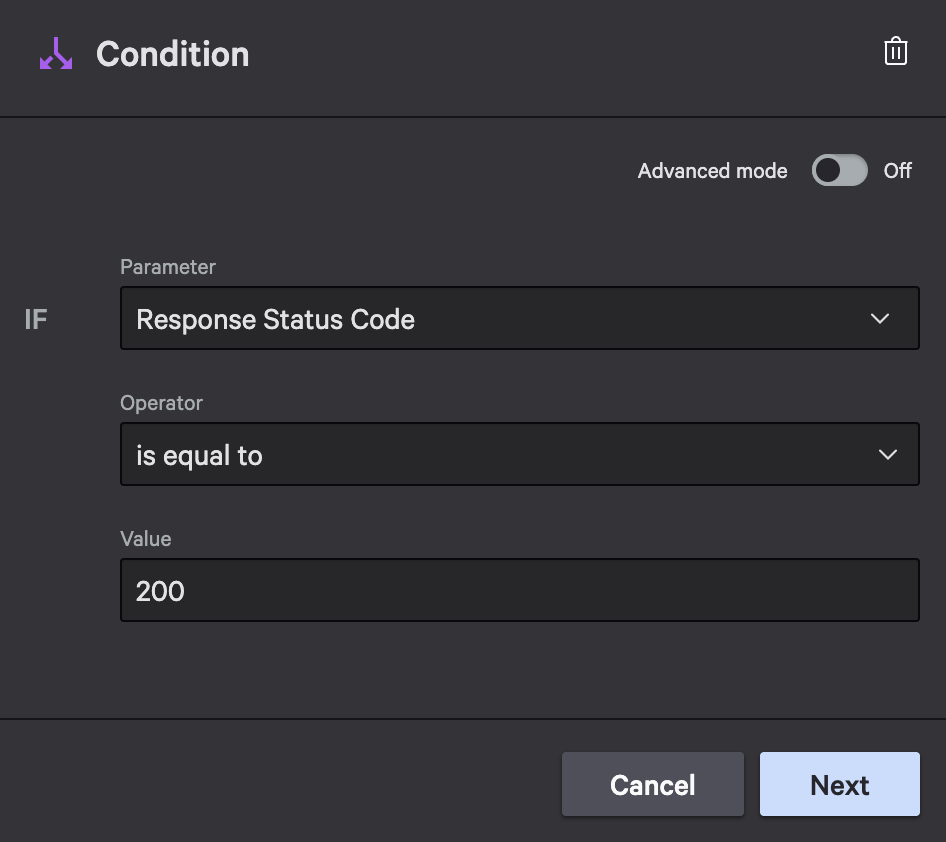
Configuration for response status == 200
Condition 2: Status 404 (User Not Found)
Add a second condition (on the “else” branch of the first condition) to handle not found scenarios.
Condition configuration:
- Parameter: Response Status Code
- Operator: is equal to
- Value: 404
Behavior:
- If true: Send “user not found” email
- If false: Optionally handle other error codes (500, 429, etc.)
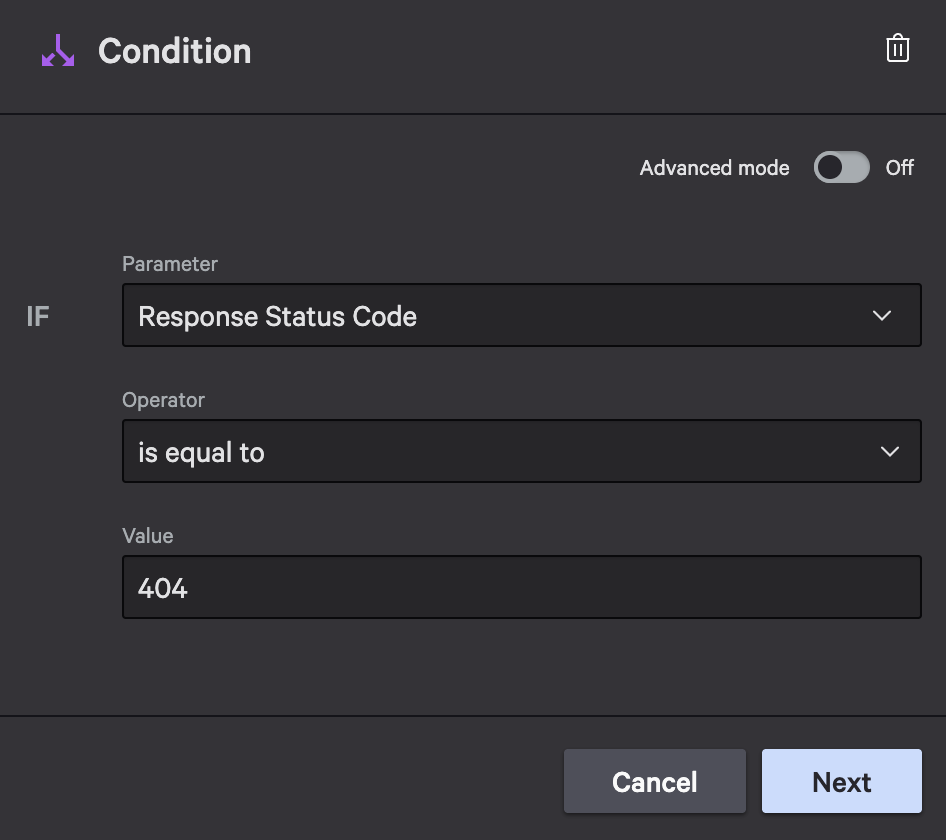
Configuration for response status == 404
Step 4: Charlotte AI Action (Summarization)
On the “user found” branch (status 200), add a Charlotte AI action to generate a human-readable investigation summary.
Action configuration:
- Action: Charlotte AI – LLM Completion
- Model: Claude Latest (gets the most capable model automatically)
- Temperature: 0.1 (low temperature for consistent, factual outputs)
Charlotte AI prompt:
Summarize the user account information for ${User Principal Name to Investigate} based on the following response from Microsoft Graph.

Create a concise security investigation summary including:
- User's full name and role
- Department and contact information
- Account status (enabled/disabled)
- Any notable details relevant for security investigation

Response:
${Raw Response Body}
This prompt instructs Charlotte to extract the key details and format them for a security investigation context. The ${Raw Response Body} variable contains the JSON response from Microsoft Graph.
Example AI output:
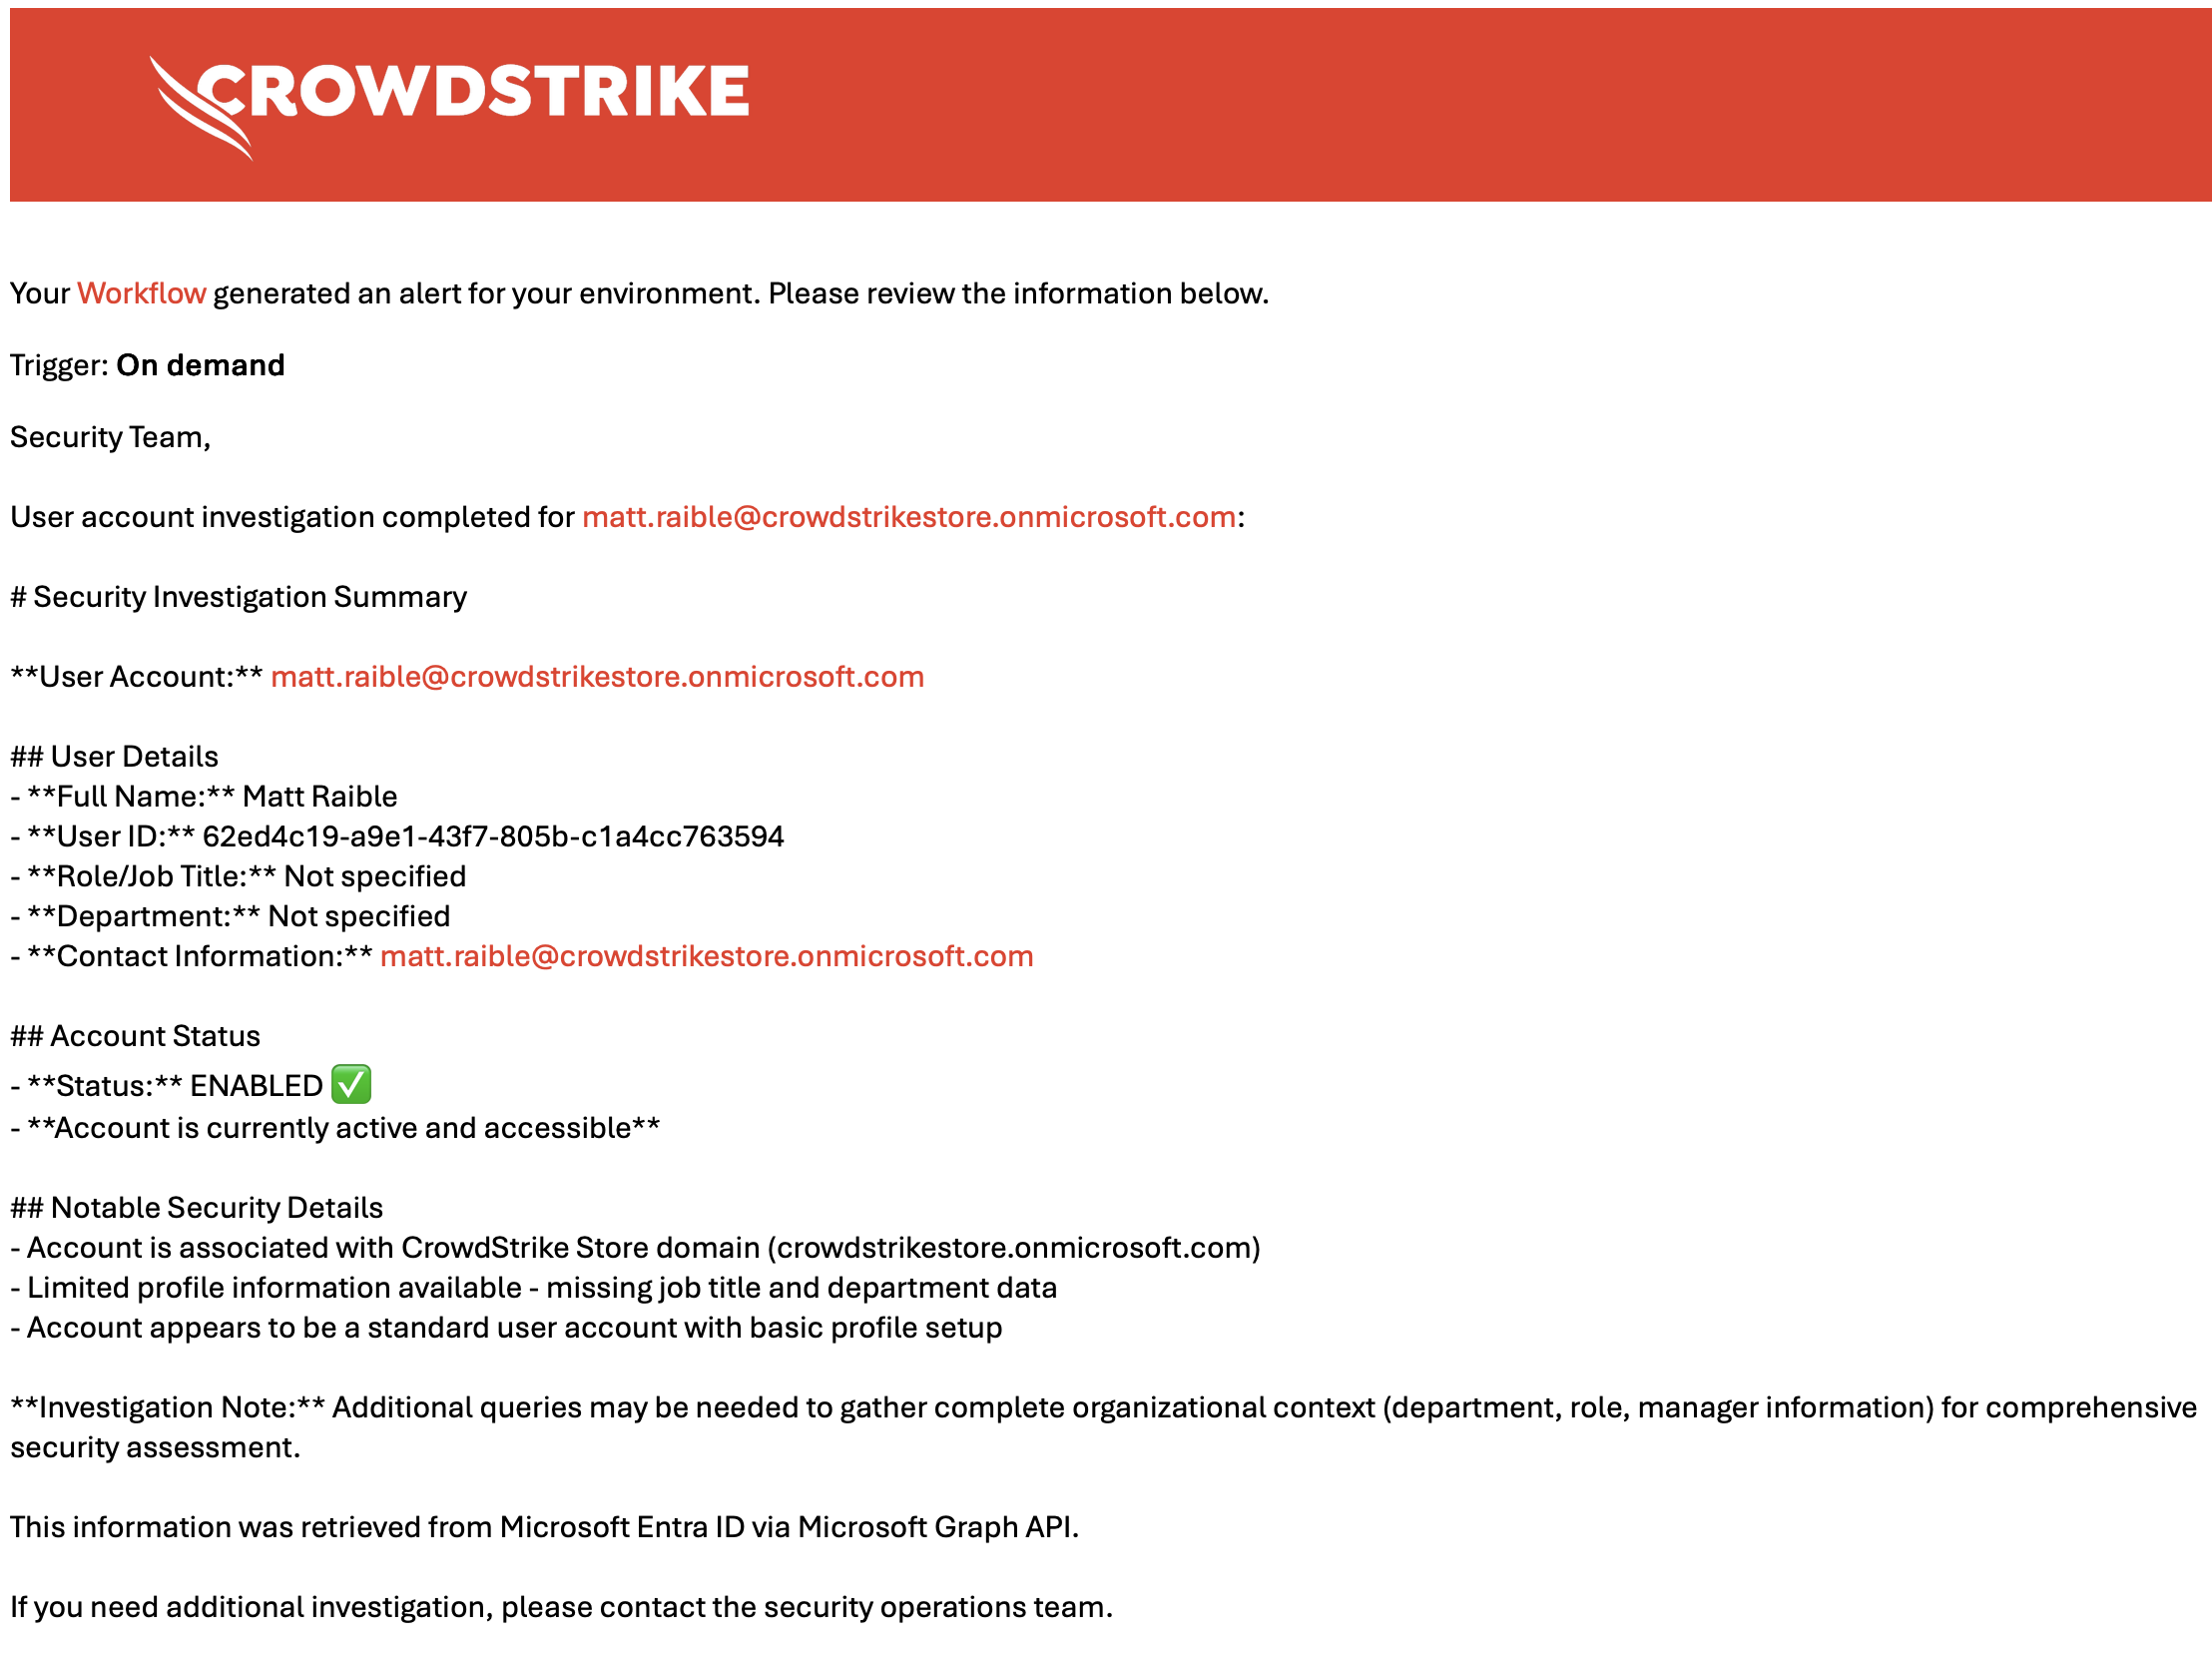
User Account Summary for AdeleV@contoso.com:

Name: Adele Vance
Role: Retail Manager
Department: Sales & Marketing
Email: AdeleV@contoso.com
Phone: +1 425 555 0109
Office: 18/2111

Account Status: Active (Enabled)

This appears to be a standard active user account with no immediate security concerns based on the profile information.
Charlotte AI transforms the raw JSON into a readable summary that your security team can quickly review. The low temperature (0.1) ensures consistent, factual output without creative variations.
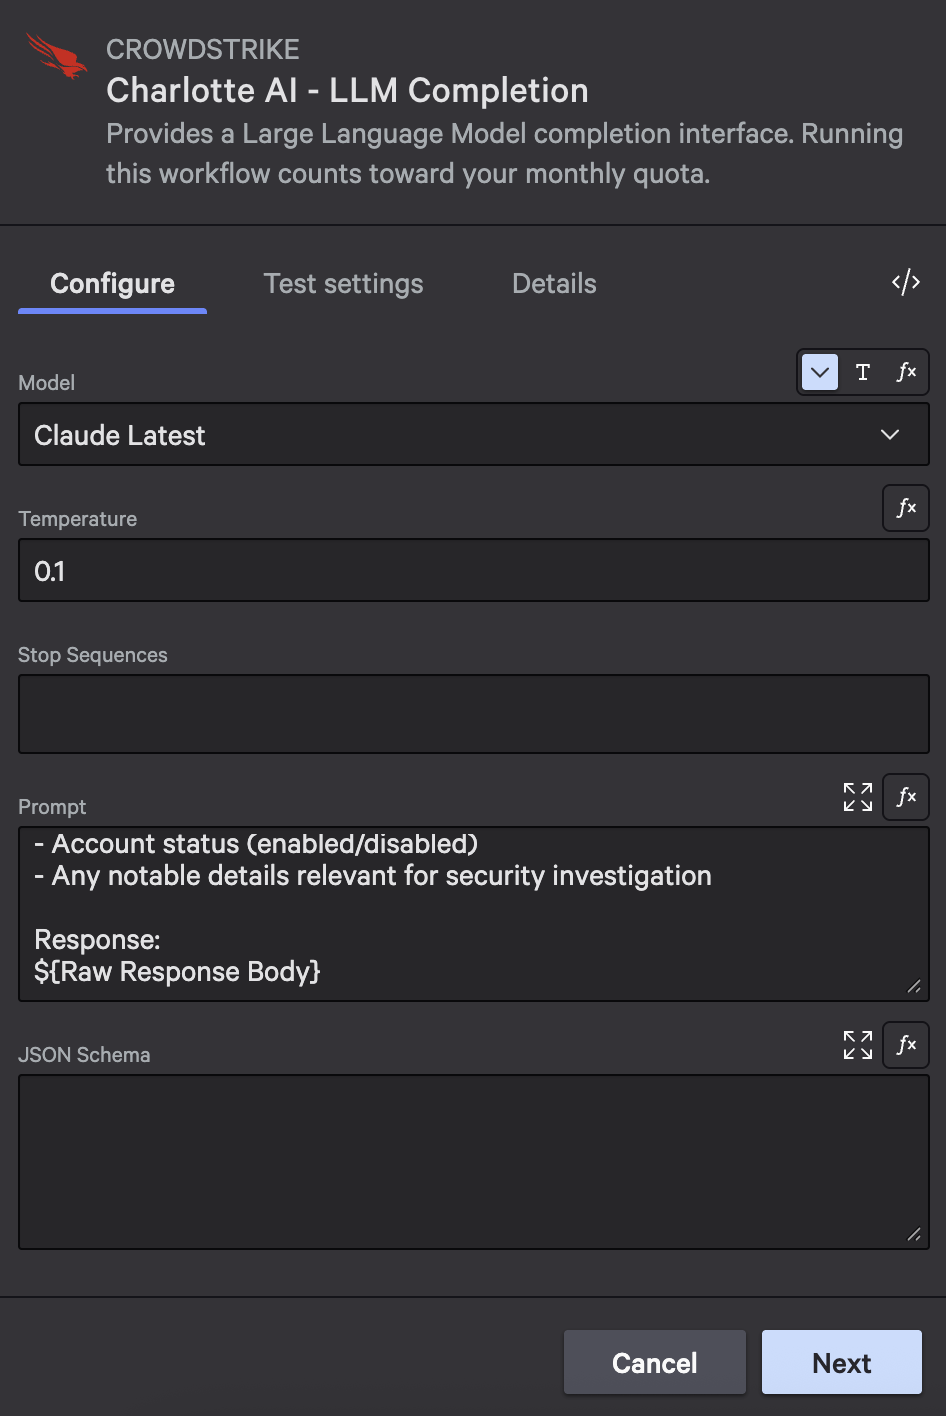
Configure Charlotte AI with the Claude Latest model and a low temperature for consistent summaries
Step 5: Email Actions (Notifications)
Finally, add Send email actions to send investigation reports. You’ll need two email actions: one for the “user found” path (after Charlotte AI) and one for the “user not found” path (after the 404 condition).
Path A: User Found Email (Status 200)
Add this email action after the Charlotte AI step.
Action configuration:
- Action: Send email
- Subject:
User Investigation Report for ${User Principal Name to Investigate} - Message:
Security Team,

User account investigation completed for ${User Principal Name to Investigate}:

${Completion}

This information was retrieved from Microsoft Entra ID via Microsoft Graph API.

If you need additional investigation, please contact the security operations team.
- Recipients:
${Email to Notify}
The ${Completion} variable references the Charlotte AI output, so you’ll see the formatted summary in the email body.
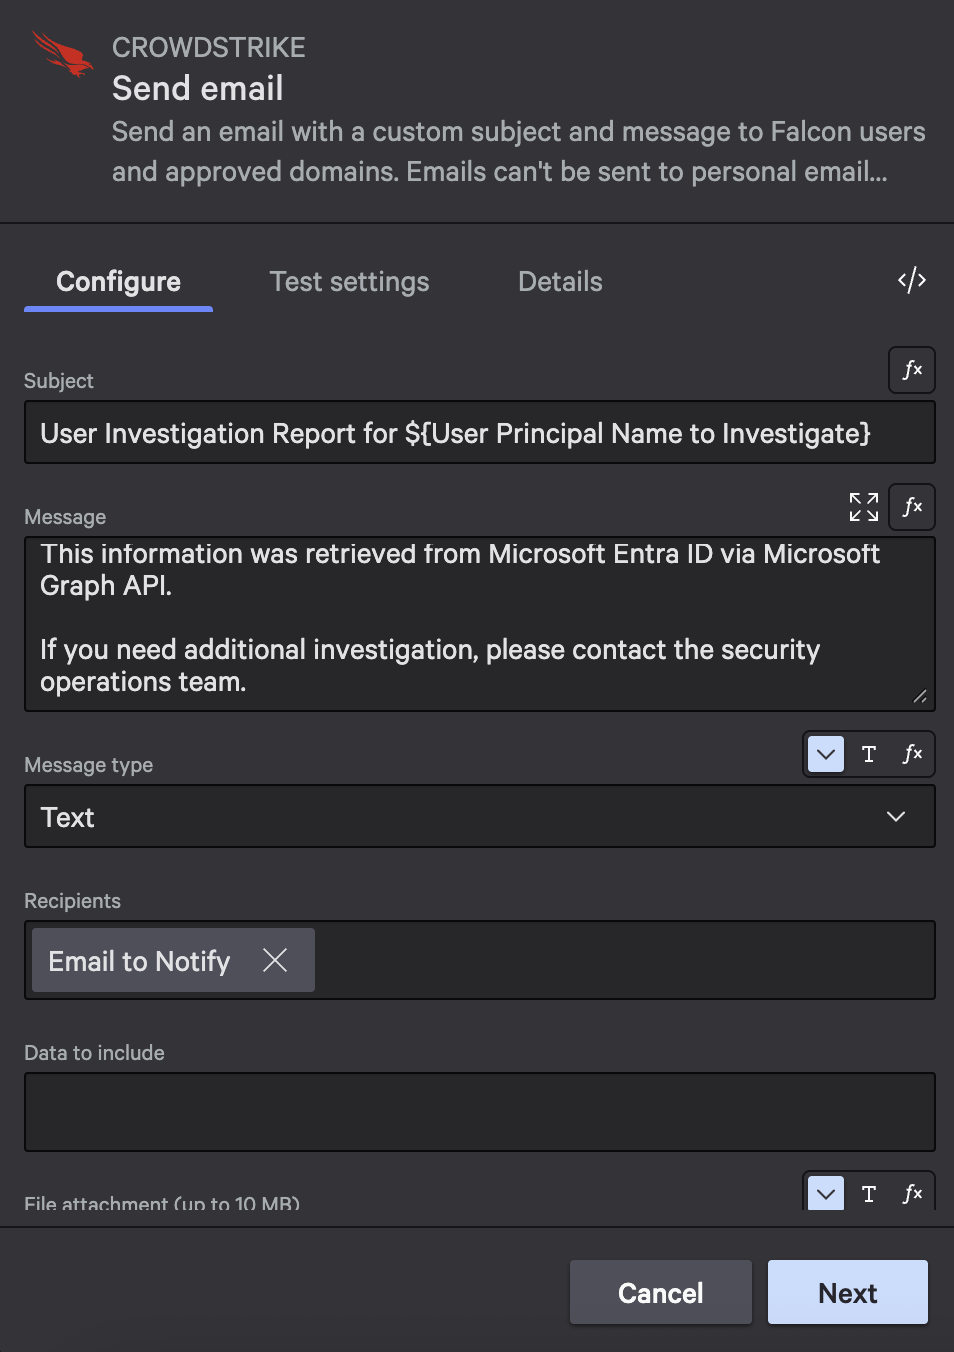
Configure the email with variable references to include dynamic content
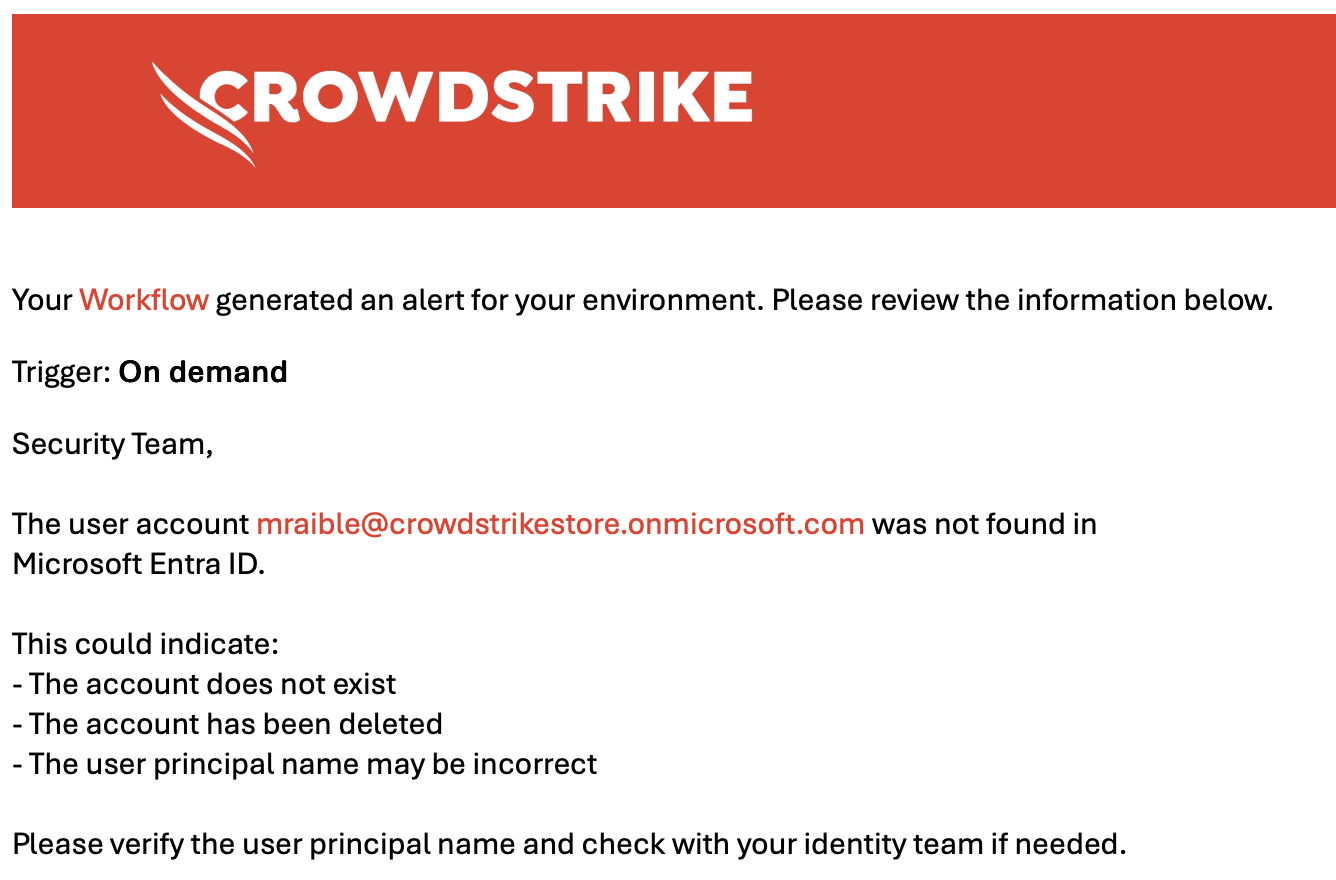
Path B: User Not Found Email (Status 404)
Add this email action after the 404 condition.
Action configuration:
- Action: Send email
- Subject:
User Investigation Report for ${User Principal Name to Investigate} - Message:
Security Team,

The user account ${User Principal Name to Investigate} was not found in Microsoft Entra ID.

This could indicate:
- The account does not exist
- The account has been deleted
- The user principal name may be incorrect

Please verify the user principal name and check with your identity team if needed.
- Recipients:
${Email to Notify}
This email provides context about what the 404 status means and suggests next steps for the security team.
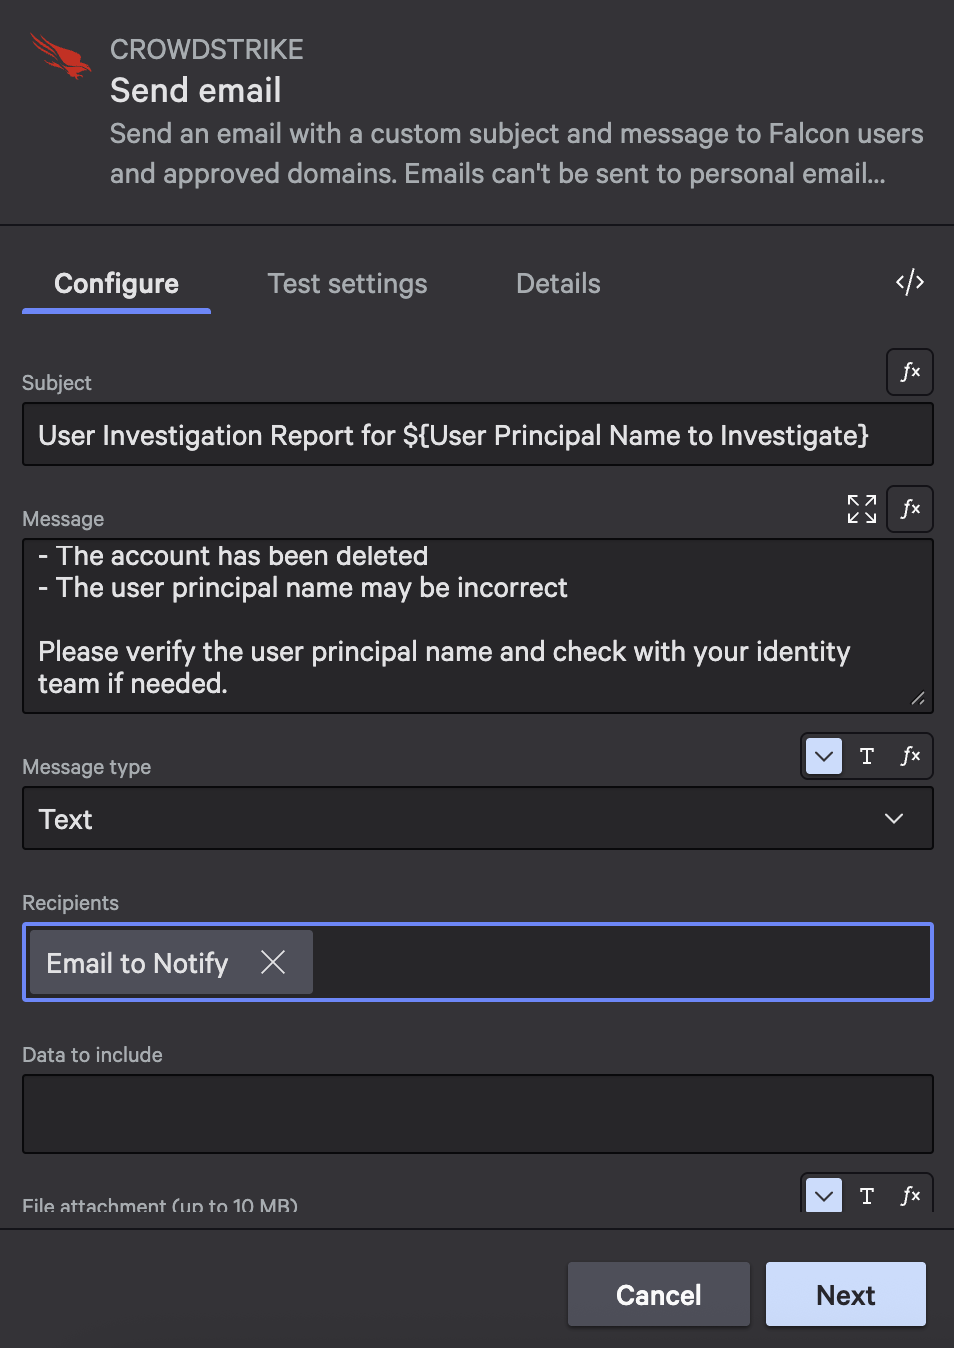
The not found email provides clear guidance about why the user wasn’t found
The workflow should look as follows when you’ve finished creating it.

Testing Your Complete Workflow
Now that you’ve built all five components, test the complete workflow end to end:
- Publish your workflow (if you haven’t already) and set its status to On
- Click Execute workflow on the workflows page. You will be prompted for two email values.
- Provide test inputs:
-
- User Principal Name: Use a real user from your Entra ID
- Email to Notify: Use your own email address
- Watch the execution in the workflow execution log
- Check your email for the investigation report
You should see results like the following:
 |
 |
|---|
Try it again with a user that doesn’t exist to test the 404 path. You should receive a different email explaining that the user wasn’t found.
 |
 |
|---|
Formatting LLM Completion Responses
One thing you might notice in the first email above is the results are displayed in Markdown. If you want to change this so it looks better, you can change the prompt to return HTML by adding “Format the response in HTML” to the end of the prompt. Then, if you change the Send email action to use HTML, it’ll look like this:
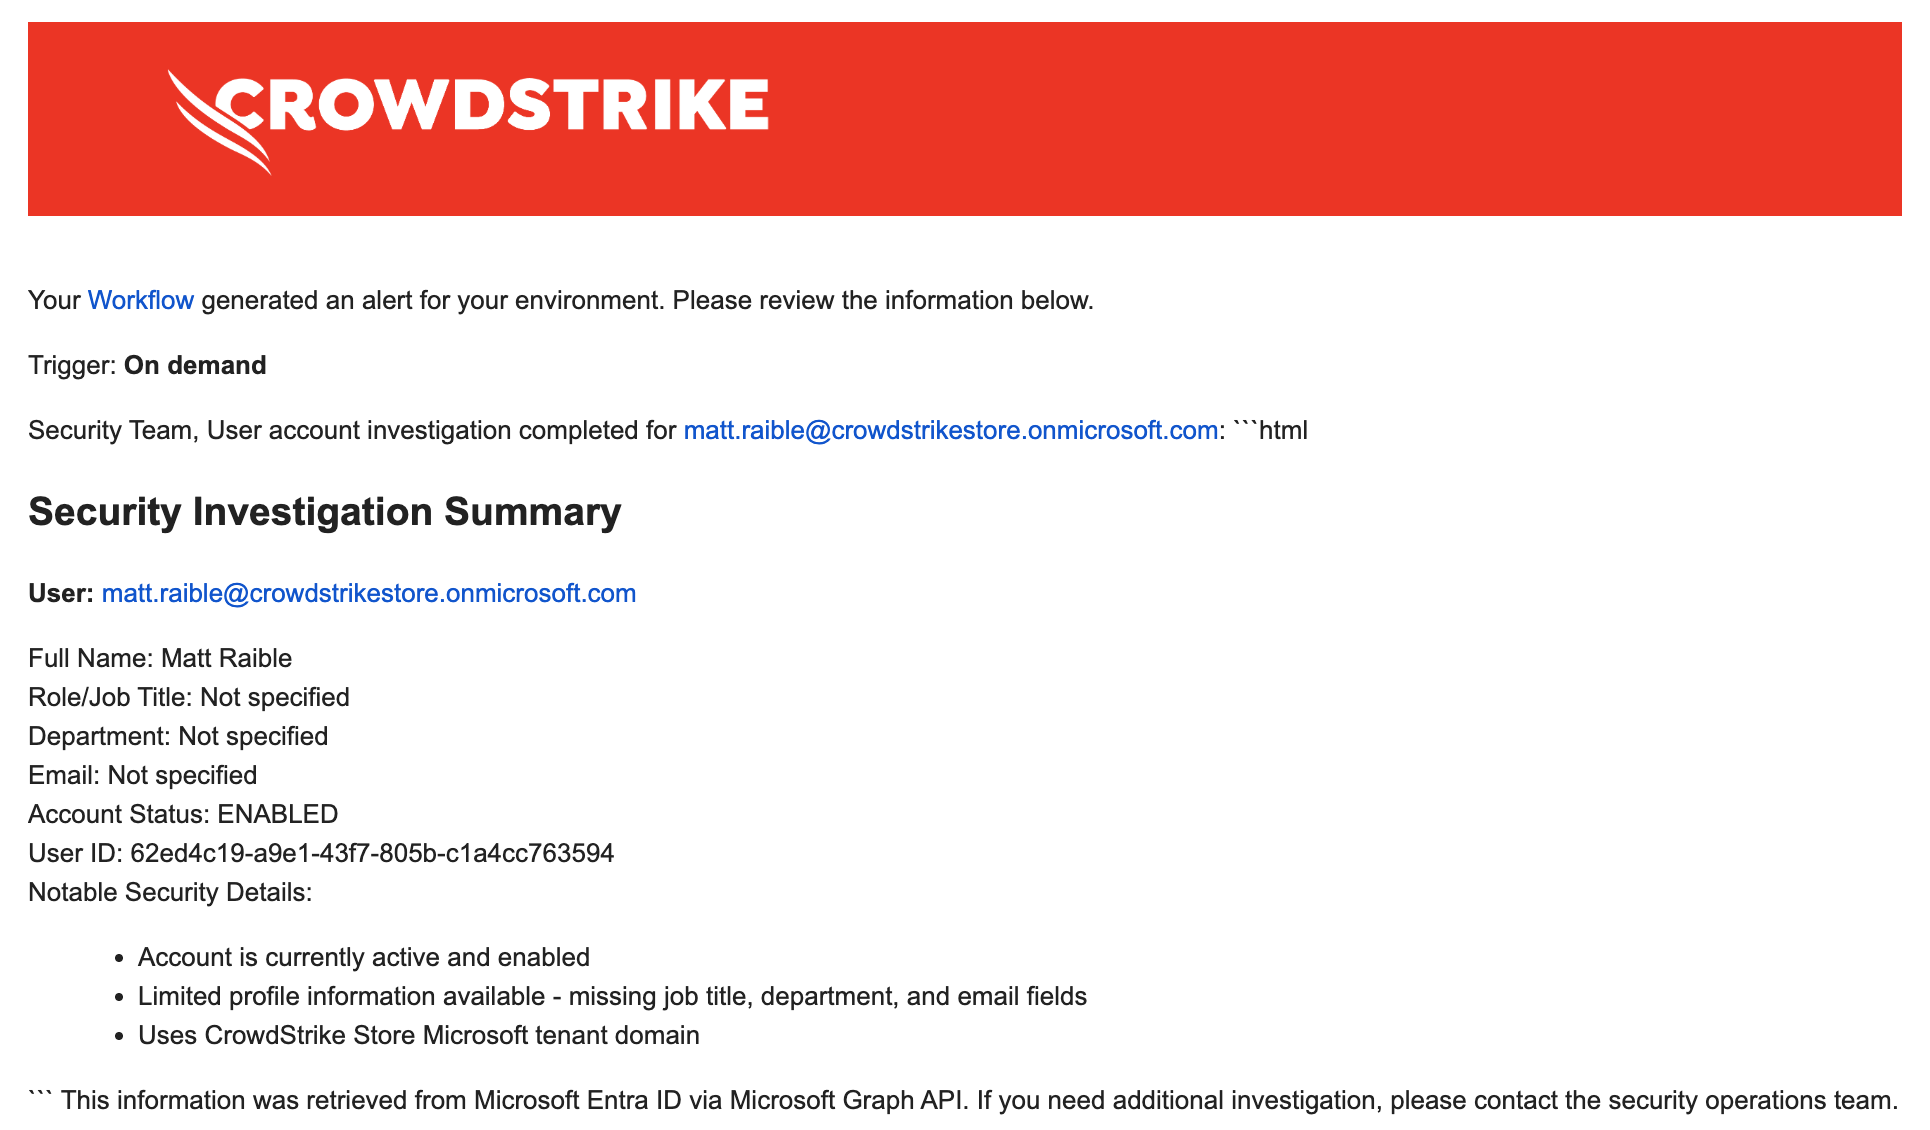
While this looks better, it still contains some Markdown elements in it. If you want to make the email as clean as possible, you need to adjust the prompt to use a JSON schema. To do this, append the following to the bottom of the prompt for the Charlotte AI action:
Respond with valid JSON using this exact structure:
{
  "user_id": "User's ID",
  "full_name": "User's full name",
  "user_principal_name": "User's email from Microsoft",
  "job_title": "Job title",
  "department": "Department",
  "account_enabled": "User's account status",
  "security_notes": "What you observed about the user"
}
Then, add the following value to the JSON Schema field:
{
  "$schema": "http://json-schema.org/draft-07/schema#",
  "type": "object",
  "title": "Microsoft Graph Response",
  "description": "Schema for LLM response analyzing user in Microsoft Graph",
  "properties": {
    "user_id": {
      "type": "string",
      "description": "User's ID"
    },
    "full_name": {
      "type": "string",
      "description": "User's full name"
    },
    "user_principal_name": {
      "type": "string",
      "description": "User's email from Microsoft"
    },
    "job_title": {
      "type": "string",
      "description": "Job title"
    },
    "department": {
      "type": "string",
      "description": "Department"
    },
    "account_enabled": {
      "type": "string",
      "description": "Account enabled"
    }
    "security_notes": {
      "type": "string",
      "description": "Analysis of what was observed about the user"
    }
  },
  "required": [
    "user_id",
    "full_name",
    "user_principal_name",
    "account_enabled",
    "security_notes"
  ],
  "additionalProperties": false
}
Next, change the Send email action to be HTML and use the following message:
<p>Security Team,</p>

<p>User account investigation completed for ${User Principal Name to Investigate}:</p>

<h2>Security Investigation Summary</h2>

<p><strong>User:</strong> ${cs.json.decode(data['CharlotteAILLMCompletion.FaaS.nlpassistantapi.llminvocator_handler.completion']).user_principal_name}</p>

<p>
Full Name: ${cs.json.decode(data['CharlotteAILLMCompletion.FaaS.nlpassistantapi.llminvocator_handler.completion']).full_name}<br/>
Role/Job Title: ${cs.json.decode(data['CharlotteAILLMCompletion.FaaS.nlpassistantapi.llminvocator_handler.completion']).job_title != '' ? cs.json.decode(data['CharlotteAILLMCompletion.FaaS.nlpassistantapi.llminvocator_handler.completion']).job_title : 'Not specified'} <br/>
Department: ${cs.json.decode(data['CharlotteAILLMCompletion.FaaS.nlpassistantapi.llminvocator_handler.completion']).department != '' ? cs.json.decode(data['CharlotteAILLMCompletion.FaaS.nlpassistantapi.llminvocator_handler.completion']).department : 'Not specified'}<br/>
Email: ${data['userPrincipalName']}<br/>
Account Status: ${cs.json.decode(data['CharlotteAILLMCompletion.FaaS.nlpassistantapi.llminvocator_handler.completion']).account_enabled == 'true' ? 'ENABLED' : 'DISABLED'}<br/>
User ID: ${cs.json.decode(data['CharlotteAILLMCompletion.FaaS.nlpassistantapi.llminvocator_handler.completion']).user_id}<br/>
Notable Security Details: ${cs.json.decode(data['CharlotteAILLMCompletion.FaaS.nlpassistantapi.llminvocator_handler.completion']).security_notes}
</p>

<p>This information was retrieved from Microsoft Entra ID via Microsoft Graph API.</p>

<p>If you need additional investigation, please contact the security operations team.</p>
This will result in a properly formatted email.

For more information on the data transformation functions available in Falcon Fusion SOAR, see our documentation.
Troubleshooting Common Issues
Variables Not Resolving
Variables show as ${variable_name} in outputs, or workflows fail with “variable not found” errors. Verify variable names match exactly (case-sensitive) and that the variable is set in a previous workflow step.
Response Schema Mismatch
Workflows fail with schema validation errors. Click Test and inspect the actual response body, then use Generate schema to regenerate the schema from a test response.
OAuth Authentication Failures
Requests fail with 401 errors. Verify your tenant ID, client ID, and secret are correct. Check that required API permissions are granted and admin consent has been provided.
Timeout Errors
Requests timeout after 30 seconds. Optimize query parameters (use $select), add pagination ($top), or check if the API endpoint is responsive.
Next Steps: From HTTP Actions to Full Falcon Foundry Development
Start with something simple like the VirusTotal Quickstart earlier in this post. Once comfortable, build more complex integrations like the Microsoft Graph example. When you hit the limits of HTTP Actions and need more sophisticated logic, it’s time to level up to full Falcon Foundry development.
Ready to build your first custom app? These guides walk you through the complete development process:
- A Practical Guide to Building a Falcon Foundry App for the First Time
- Create Custom Actions for SOAR with Falcon Foundry
- Deploy a Foundry App Template in 5 Easy Steps
For enriching your security data, these posts cover detection enrichment and lookup tables:
- Creating a Lookup Table with 3rd Party Data for Automated Enrichment
- Enrich Detections with Falcon Foundry Extension Builder
When you need serverless functions or structured data storage, these guides show you how:
For official documentation, see the Falcon Fusion SOAR HTTP Actions reference, CrowdStrike API documentation, and CEL expression reference for advanced conditional logic.
Got questions or want to share your HTTP Actions workflows? Join the conversation in the Falcon Fusion SOAR Developer Community.
HTTP Actions might seem simple, but they solve complex integration problems elegantly. By letting you call any REST API directly from your workflows without writing custom apps, they eliminate weeks of development time for straightforward integrations. The next time you need to connect to an external API, remember that HTTP Actions can probably handle it in minutes instead of hours.
If you’d like to dive deeper into the core CrowdStrike modules mentioned in this post, here are some resources:
- Falcon Insight XDR: Learn more about Falcon Insight XDR
- Falcon Next-Gen SIEM: Explore Falcon Next-Gen SIEM
- Falcon Foundry: Discover Falcon Foundry
- Falcon Fusion SOAR: Learn about Falcon Fusion SOAR
What APIs are you integrating with in your security workflows? Have you tried HTTP Actions in Falcon Fusion SOAR? I’d love to hear about your experiences! Drop me a line on Twitter @mraible or connect with me on LinkedIn.