Dive into Falcon Foundry Functions with Python
Falcon Foundry provides a powerful way to extend the CrowdStrike Falcon platform with custom, low-code apps. One of its standout features is serverless functions, which give you maximum flexibility for those power users comfortable with coding. If you need to do some processing or transformation of data, and writing code is the fastest way to do it, functions can be your new best friend!
Falcon Foundry functions are built on CrowdStrike’s Function as a Service (FaaS) platform and leverage serverless technology for their execution. Everything that’s required to provision, run, and scale functions is managed by Falcon Foundry.
You can write and deploy functions in Python or Go using the Foundry CLI. Like other Falcon Foundry capabilities, functions can work with other artifacts in your app, such as API integrations, UI extensions, workflows, RTR scripts, and custom storage collections.
Table of Contents:
- Key Falcon Foundry Function Concepts
- Creating Your First Falcon Foundry Function
- Using FalconPy in Falcon Foundry Functions
- Access the Falcon API in a Function with FalconPy
- Calling an API Integration from a Falcon Foundry Function
- Communicating with Collections from a Falcon Foundry Function
- Debugging Falcon Foundry Functions
- Using Falcon Foundry Functions in Workflows
- Using Falcon Foundry Functions in UI Extensions
- Working with Multiple Falcon Foundry Functions, Files, and Handlers
- Falcon Foundry Function Limitations
- Take Your Next Steps with Falcon Foundry Functions
Before you begin, ensure you have the following.
Prerequisites:
- Falcon Insight XDR or Falcon Prevent
- Falcon Next-Gen SIEM or Falcon Foundry
- Foundry CLI 1.4.3 or above
You can install the latest version of the Foundry CLI with Homebrew on Linux/macOS.
brew tap crowdstrike/foundry-cli
brew install crowdstrike/foundry-cli/foundry
If you’re on Windows, download the latest Windows zip file, expand it, and add the installation directory to your PATH environment variable.
Run thefoundry version command to see what version of the CLI you’re using. If it’s greater than 1.4.3, you should be good to go. CrowdStrike’s Python FDK (Functions Development Kit) is called crowdstrike-foundry-function and this post uses its 1.1.1 version, released on June 12, 2025. You can find its GitHub repository at @CrowdStrike/foundry-fn-python.
Key Falcon Foundry Function Concepts
Functions are completely customizable and let you define your code, request/response content, error handling, and access permissions. You can also provide files that specify additional information and environment variables.
Falcon Foundry currently supports two FDKs (Function Development Kits): one for Python and one for Go. The FDK allows you to write less boilerplate code to make your function available as a REST endpoint.
There are a few key concepts that will make understanding functions easier.
- Handler:
- Your code’s entry point for incoming requests.
- Define handlers in your application’s
manifest.ymlwith a name, description, HTTP method, and path. - Add request/response schemas and workflow integration options.
- Schemas: All handlers can have one request schema and one response schema, also known as input and output schemas. These are defined in JSON using JSON Schema Draft 7. The request schema defines what can be sent as incoming data in the HTTP request while the response schema defines what you want to get back. Schemas must be defined if you want to expose your functions to Falcon Fusion SOAR workflows.
- Environment variables: You can provide environment variables in your
manifest.ymlthat can be read at runtime by your function. Encryption of environment variables is not available at this time. - Dependencies: You can add library dependencies in the function’s
requirements.txtorgo.modfile, just like you would for a regular Python or Go project, respectively. These will be downloaded and installed by Foundry when your function is deployed.
It’s best to use functions when you’ve exhausted all the other possibilities in Falcon Foundry. If you can perform the work with an API integration and actions in a workflow, try that first. That being said, if you’re a developer that’s fluent in Python or Go, you may be able to iterate faster with functions.
Creating Your First Falcon Foundry Function
You can create functions with the Foundry CLI and its functions create command. For example:
foundry functions create
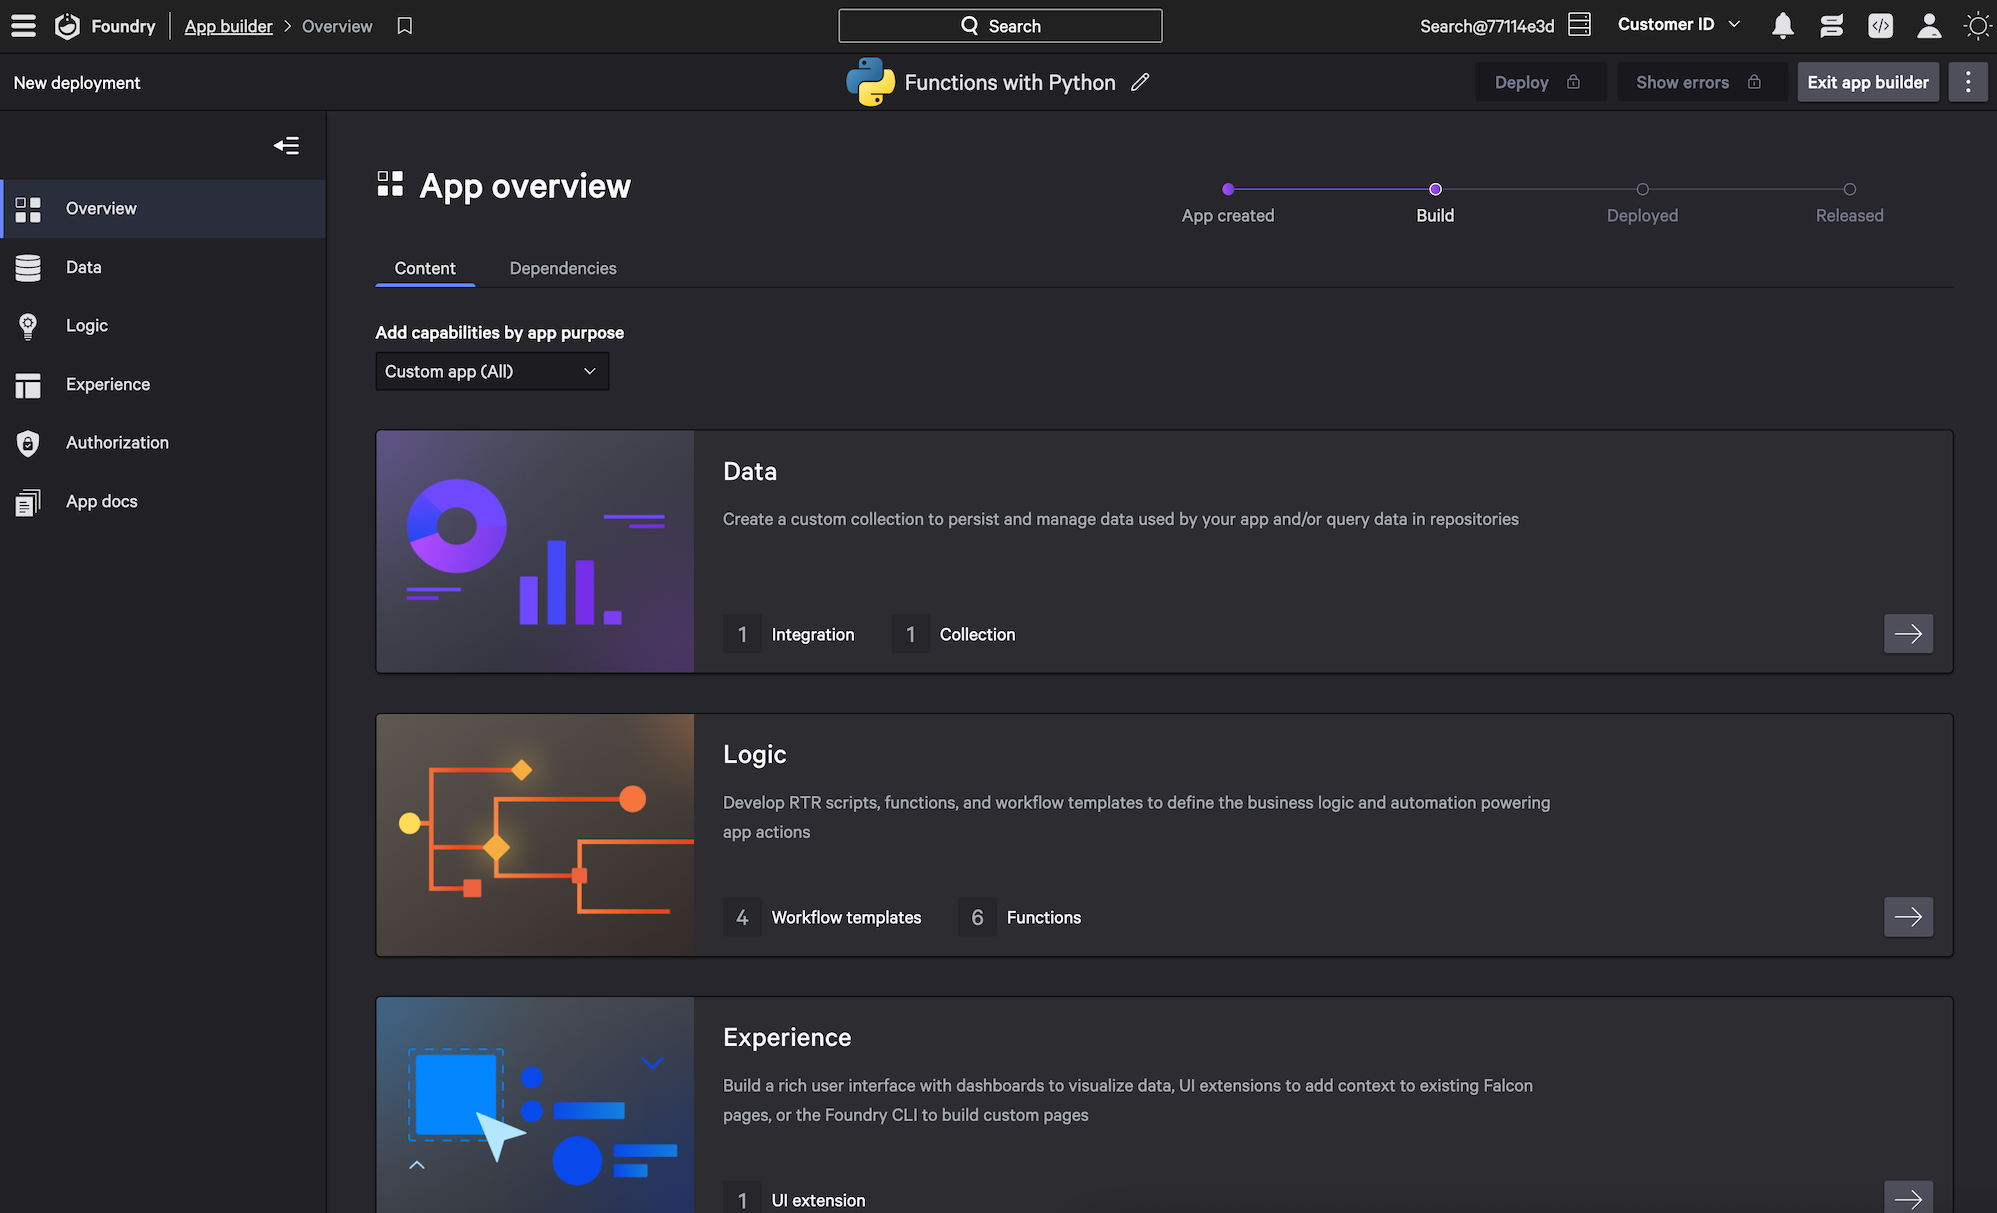
This command won’t work unless you’re inside a Falcon Foundry application. To create one for this tutorial, create an app with foundry apps create:
- Use app templates?
N - Name:
functions-python - Description:
<empty> - Press enter to skip the next three fields
- Use Case:
Cloud Security
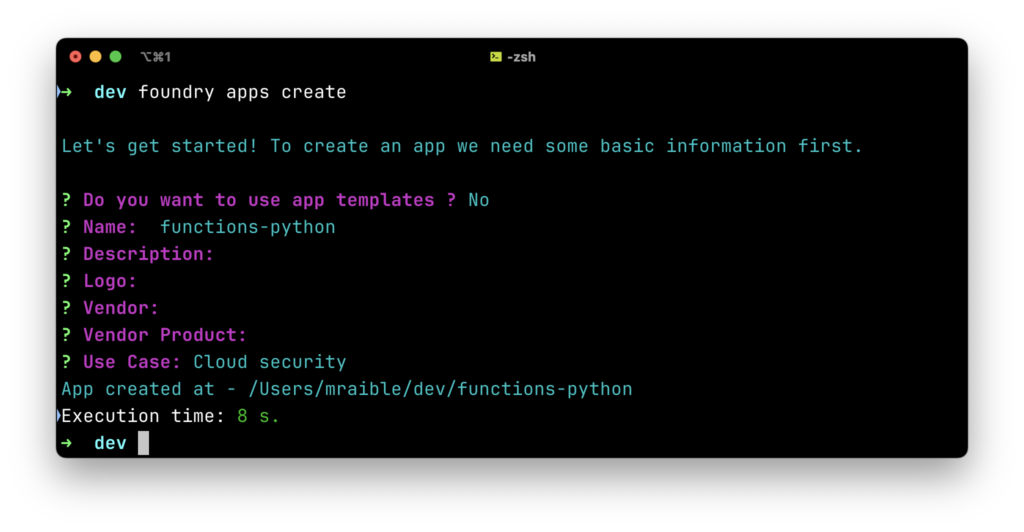
Navigate into the functions-python directory and create your first function with foundry functions create:
- Function Name:
hello - Description:
Returns a greeting based on name input - Language:
python - Handler Name:
hello - Handler Method:
POST - Handler Path:
/hello - Input schema (Enter file path or URL to schema or press continue):
<blank> - Would you like to generate a default input schema?
Yes - Output schema (Enter file path or URL to schema or press continue):
<blank> - Would you like to generate a default output schema?
Yes - Workflow share settings:
Share function with app workflows and Fusion SOAR - Is the function potentially disruptive?
No - Enter a tag to assign to the workflow action:
<blank>
This creates a function with the following code:
from crowdstrike.foundry.function import Function, Request, Response, APIError

func = Function.instance()


# Handler hello
@func.handler(method='POST', path='/hello')
def on_post(request: Request) -> Response:

    #
    # Replace the following example code with your handler code
    #

    # Demonstrates how to validate the request body if your handler requires input payload
    # Replace with your own request and update the input schema to match
    if 'name' not in request.body:
        # This example expects 'name' field in the request body and returns
        # an error response (400 - Bad Request) if not provided by the caller
        return Response(
            code=400,
            errors=[APIError(code=400, message='missing name from request body')]
        )

    # Demonstrates how to return a success response with JSON body
    # Replace with your response and update the output schema to match
    return Response(
        body={'greeting': f'Hello {request.body["name"]}! It is nice to see you.'},
        code=200,
    )


if __name__ == '__main__':
    func.run()
If you have Docker installed and running, you can run this function locally using foundry functions run and invoke it with curl. This command runs a Docker container with your function inside it. Make sure the port number matches what the functions run command specified.
curl --request POST --url http://localhost:65463/ \ --header 'content-type: application/json' \ --data '{ "body":

{ "name": "Matt" }
, "method": "POST", "url": "/hello" }'
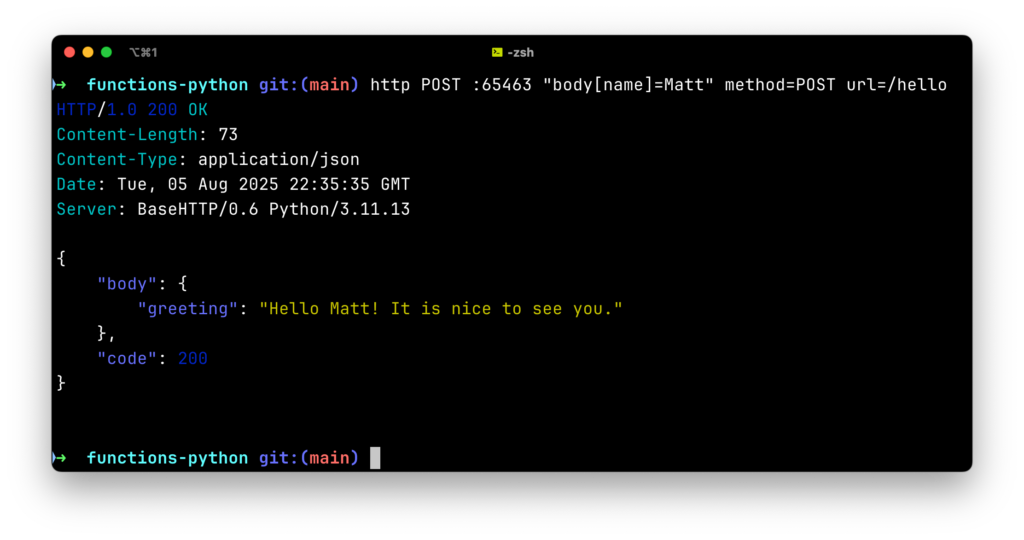
You can also use HTTPie, which makes this even easier because it’s short enough to memorize.
http POST :65463 "body[name]=Matt" method=POST url=/hello
 If you don’t have Docker (or a Docker alternative) installed, you can simply run the
 main.py file from the functions/hello directory:
python -m venv .venv
source .venv/bin/activate

# Install dependencies
pip install -r requirements.txt

# Run the function
python main.py
You can invoke this function by sending a request to port 8081.
http POST :8081 "body[name]=Monty" method=POST url=/hello
Using FalconPy in Falcon Foundry Functions
Add FalconPy, our Python SDK for the Falcon API, to your requirements.txt file to get started:
crowdstrike-falconpy
NOTE: Leave the FalconPy version unpinned to automatically receive the latest SDK updates when installing your app.
Then, run the following command to install it:
pip install -r requirements.txt
You can also create Go functions and use the goFalcon SDK. You can find usage examples in the foundry-fn-go project’s README on GitHub.
To test FalconPy API calls locally:
- Set
FALCON_CLIENT_IDandFALCON_CLIENT_SECRETenvironment variables - Find these values in
~/config/foundry/configuration.yml - Run
python main.py
Access the Falcon API in a Function with FalconPy
With functions, you can easily access the Falcon API using our SDKs. To modify the Python function to retrieve host information using FalconPy, you’ll first need to import the service collection you want to use. At the top of the main.py file, add the import.
from falconpy import Hosts
To figure out what scopes you need for this service collection, run the foundry auth scopes add command. Search for “Hosts” and select Hosts read as an option. Once you hit Enter, this scope is added to your manifest.yml in the auth section.
auth:
    scopes:
        - devices:read
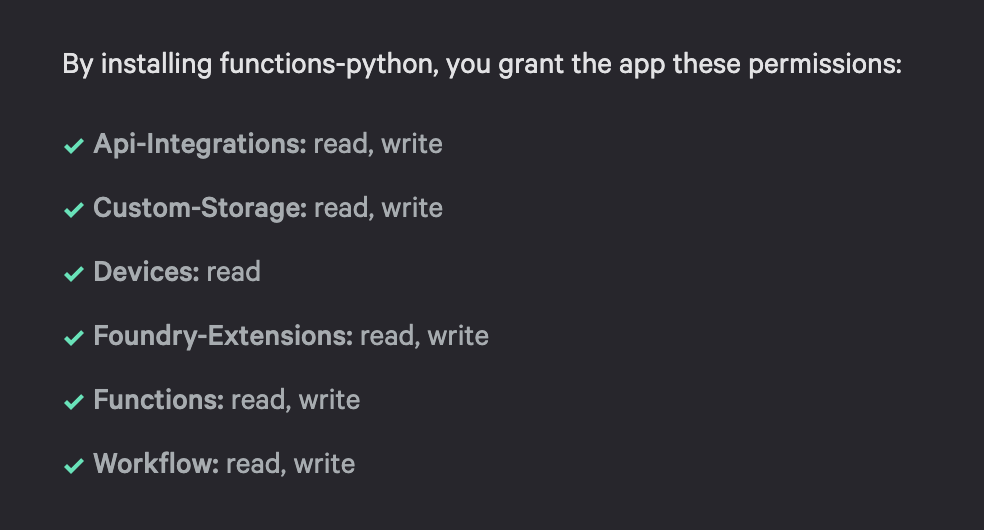
If you add API integrations and Collections to your app, additional scopes will be added by Falcon Foundry when you deploy your app. You don’t need to reference scopes for api-integrations or custom-storage (aka collections) in your manifest. When you install the app referenced in this post, you’ll see it has many scopes auto-assigned. The devices:read scope is the only one referenced in the manifest.
Below is an example function that shows how to return host information using FalconPy.
"""Main module for the host-details function handler."""

from crowdstrike.foundry.function import Function, Request, Response, APIError
# Import service collection you'd like to use
from falconpy import Hosts

FUNC = Function.instance()


@FUNC.handler(method="POST", path="/host-details")
def on_post(request: Request) -> Response:
    """
    Handle POST requests to /host-details endpoint.

    Args:
        request: The incoming request object containing the request body.

    Returns:
        Response: JSON response with host details or error message.
    """
    # Validate request
    if "host_id" not in request.body:
        return Response(
            code=400,
            errors=[APIError(code=400, message="missing host_id from request body")]
        )

    host_id = request.body["host_id"]

    # Initialize the Hosts class with context-aware authentication
    falcon = Hosts()

    # Query device details
    response = falcon.get_device_details(ids=host_id)

    if response["status_code"] != 200:
        return Response(
            code=response["status_code"],
            errors=[APIError(code=response["status_code"],
                             message=f"Error retrieving host: {response['body']}")],
        )

    # Return host information
    return Response(
        body={"host_details": response["body"]["resources"][0]},
        code=200,
    )


if __name__ == "__main__":
    FUNC.run()
I created the scaffolding for this function using the answers below after running foundry functions create:
- Function Name:
host-details - Description:
Get Device Details using FalconPy - Language:
python - Handler Name:
host-details - Handler Method:
POST - Handler Path:
/host-details - Input schema (file path or URL or press continue):
<blank> - Would you like to generate a default input schema?
Yes - Output schema (file path or URL or press continue):
<blank> - Would you like to generate a default output schema?
Yes - Workflow share settings:
Share function with app workflows only - Is the function potentially disruptive?
No - Enter a tag to assign to the workflow action:
HostDetails - Add another?
Yes - Enter a tag to assign to the workflow action:
FalconPy - Add another?
No
The Hosts() client provided by the FalconPy SDK uses context authentication. This means it can read the access token automatically when running in the cloud, making it easy to interact with your integrations.
You can run this function locally by setting environment variables for FalconPy. In this case, FalconPy will use environment authentication.
cd functions/host-details
export FALCON_CLIENT_ID=...
export FALCON_CLIENT_SECRET=...
python main.py

... [INFO]  runner_http.py run:43  ->  running at port 8081
Then, invoke it to see the results:
http POST :8081 "body[host_id]=8f3e99d73be8434a83d9d328c02ce3ab" \
  method=POST url=/host-details
Calling an API Integration from a Falcon Foundry Function
Falcon Foundry functions can leverage API integrations you’ve defined in your app. This is particularly useful when you need to interact with third-party services. You could use Python’s requests HTTP library to make API requests. However, you’d have to embed the credentials in plain text in your code. If you call an API integration, Falcon Foundry prompts for the credentials when you install the app and stores them securely.
To help illustrate how you can do this, let’s look at a ServiceNow function that calls the Table API to create tickets. I created the scaffolding for the function below using the following Foundry CLI command:
# Mac/Linux
foundry functions create \
  --name servicenow \
  --description "Create ServiceNow Ticket" \
  --language python \
  --handler-name snow-ticket \
  --handler-path /ticket \
  --handler-method POST \
  --wf-expose wf-app-only-action \
  --wf-tags ServiceNow,FalconPy

# Windows (PowerShell)
foundry functions create `
  --name servicenow `
  --description "Create ServiceNow Ticket" `
  --language python `
  --handler-name snow-ticket `
  --handler-path /ticket `
  --handler-method POST `
  --wf-expose wf-app-only-action `
  --wf-tags ServiceNow,FalconPy

# Windows (Command Prompt)
foundry functions create ^
  --name servicenow ^
  --description "Create ServiceNow Ticket" ^
  --language python ^
  --handler-name snow-ticket ^
  --handler-path /ticket ^
  --handler-method POST ^
  --wf-expose wf-app-only-action ^
  --wf-tags ServiceNow,FalconPy
After I got everything working, the code looks as follows:
"""Main module for the ServiceNow function handler."""

from logging import Logger
from typing import Dict, Optional

from crowdstrike.foundry.function import Function, Request, Response, APIError
from falconpy import APIIntegrations

FUNC = Function.instance()


@FUNC.handler(method="POST", path="/ticket")
def on_post(request: Request, _config: Optional[Dict[str, object]], logger: Logger) -> Response:
    """
    Create an incident ticket in ServiceNow using the Table API.

    Args:
        request: The incoming request object containing the request body.
        _config: Configuration dictionary (unused).
        logger: Logger instance for logging.

    Returns:
        Response: JSON response with incident details or error message.

    Required fields in request body:
    - title: Short description of the incident
    - description: Detailed description of the incident

    Optional fields:
    - impact: Impact level (1-High, 2-Medium, 3-Low)
    - urgency: Urgency level (1-High, 2-Medium, 3-Low)
    - category: Category of the incident
    - subcategory: Subcategory of the incident
    - assignment_group: Group to assign the incident to
    - caller_id: User ID of the caller
    """
    # Validate required fields
    if "title" not in request.body or "description" not in request.body:
        return Response(
            code=400,
            errors=[APIError(code=400, message="Missing required fields: title and description")]
        )

    # Prepare payload for ServiceNow incident creation
    payload = {
        "short_description": request.body["title"],
        "description": request.body["description"],
    }

    # Add optional fields if provided
    optional_fields = {
        "impact": request.body.get("impact", "2"),
        "urgency": request.body.get("urgency", "2"),
        "category": request.body.get("category"),
        "subcategory": request.body.get("subcategory"),
        "assignment_group": request.body.get("assignment_group"),
        "caller_id": request.body.get("caller_id")
    }

    # Only include fields with non-None values
    for field, value in optional_fields.items():
        if value is not None:
            payload[field] = value

    logger.info(f"Creating ServiceNow incident with payload: {payload}")

    try:
        # Use the APIIntegrations client to call ServiceNow Table API to create incident
        api = APIIntegrations()
        response = api.execute_command_proxy(
            definition_id="ServiceNow",
            operation_id="POST__api_now_table_tablename",
            params={
                "path": {"tableName": "incident"}
            },
            request={
                "json": payload,
                "headers": {
                    "Accept": "application/json",
                    "Content-Type": "application/json"
                }
            }
        )

        # Log the raw response for troubleshooting
        logger.info(f"ServiceNow API response: {response}")

        if response["status_code"] >= 400:
            error_message = response.get("error", {}).get("message", "Unknown error")
            return Response(
                code=response["status_code"],
                errors=[APIError(
                    code=response["status_code"],
                    message=f"ServiceNow integration error: {error_message}"
                )]
            )

        # Extract relevant information from the response
        result = response["body"]["result"]

        # Return formatted response with incident details
        return Response(
            body={
                "incident_id": result["sys_id"],
                "incident_number": result["number"],
                "state": result["state"],
                "priority": result["priority"],
                "created_at": result["sys_created_on"],
                "assigned_to": result["assigned_to"],
                "url": response["headers"]["Location"]
            },
            code=201 if response["status_code"] == 200 else response["status_code"]
        )
    except (ValueError, KeyError) as v:
        # ValueError/KeyError can be thrown if one of the fields accessed in the response does not exist
        logger.error(f"Error processing ServiceNow response: {str(v)}", exc_info=True)
        return Response(
            code=500,
            errors=[APIError(code=500, message=f"Error creating incident: {str(v)}")]
        )
    except (ConnectionError, TimeoutError) as e:
        # Specific network-related errors
        logger.error(f"Error creating ServiceNow incident: {str(e)}", exc_info=True)
        return Response(
            code=500,
            errors=[APIError(code=500, message=f"Error creating incident: {str(e)}")]
        )


if __name__ == "__main__":
    FUNC.run()
If you want to run a function that calls an API integration locally, you’ll need to deploy and install your app first. The installation will prompt you for the API’s credentials. Then, copy the API integration’s ID from your app’s manifest.yml and use the value for the definition_id. For example:
api = APIIntegrations()
response = api.execute_command_proxy(
    definition_id="b6a8af4dc66f46979aa3aff1fd1758b6",
    operation_id="POST__api_now_table_tablename",
    params={
        "path": {"tableName": "incident"}
    },
    request={
        "json": payload,
        "headers": {
            "Accept": "application/json",
            "Content-Type": "application/json"
        }
    }
)
If you use the name for the definition_id, you’ll receive a 404 error message like the one below:
'errors': [{'code': 404, 'message': "definition 'ServiceNow' does not contain a
operation with name 'POST__api_now_table_tablename'"}]
If your app is not installed and configured correctly, you’ll get a 400 error.
{
    "body": {},
    "code": 400,
    "errors": [
        {
            "code": 400,
            "message": "ServiceNow integration error: Unknown error"
        }
    ]
}
Once your function works as expected, I recommend adding a workflow template to your Falcon Foundry app to invoke it with pre-defined parameter values or a schema that prompts for user input. This way, you can quickly test your function after the app is installed.
Communicating with Collections from a Falcon Foundry Function
Foundry collections provide persistent storage for your app. To create a collection, you can use the Foundry CLI’s foundry collections create command. It’ll prompt you for name, description, a schema file, workflow share settings, and tags.
For example, here’s the schema for an event_log collection:
{
  "$schema": "https://json-schema.org/draft-07/schema",
  "x-cs-indexable-fields": [
    { "field": "/event_id", "type": "string", "fql_name": "event_id" },
    { "field": "/timestamp", "type": "integer", "fql_name": "timestamp" }
  ],
  "type": "object",
  "properties": {
    "event_id": {
      "type": "string",
      "description": "Unique identifier for the event (used as the object key)"
    },
    "data": {
      "type": "object",
      "description": "Event data payload from the request"
    },
    "timestamp": {
      "type": "integer",
      "description": "Unix timestamp when the event was recorded"
    }
  },
  "required": [
    "event_id",
    "data",
    "timestamp"
  ]
}
And below is a function that shows how to interact with this collection using FalconPy.
"""Main module for the log-event function handler."""

import os
import time
import uuid

from crowdstrike.foundry.function import Function, Request, Response, APIError
from falconpy import APIHarnessV2

FUNC = Function.instance()


@FUNC.handler(method="POST", path="/log-event")
def on_post(request: Request) -> Response:
    """
    Handle POST requests to /log-event endpoint.

    Args:
        request: The incoming request object containing the request body.

    Returns:
        Response: JSON response with event storage result or error message.
    """
    # Validate request
    if "event_data" not in request.body:
        return Response(
            code=400,
            errors=[APIError(code=400, message="missing event_data")]
        )

    event_data = request.body["event_data"]

    try:
        # Store data in a collection
        # This assumes you've already created a collection named "event_logs"
        event_id = str(uuid.uuid4())
        json_data = {
            "event_id": event_id,
            "data": event_data,
            "timestamp": int(time.time())
        }

        # Allow setting APP_ID as an env variable for local testing
        headers = {}
        if os.environ.get("APP_ID"):
            headers = {
                "X-CS-APP-ID": os.environ.get("APP_ID")
            }

        api_client = APIHarnessV2()
        collection_name = "event_logs"

        response = api_client.command("PutObject",
                                      body=json_data,
                                      collection_name=collection_name,
                                      object_key=event_id,
                                      headers=headers
                                      )

        if response["status_code"] != 200:
            error_message = response.get("error", {}).get("message", "Unknown error")
            return Response(
                code=response["status_code"],
                errors=[APIError(
                    code=response["status_code"],
                    message=f"Failed to store event: {error_message}"
                )]
            )

        # Query the collection to retrieve the event by id
        query_response = api_client.command("SearchObjects",
                                            filter=f"event_id:'{event_id}'",
                                            collection_name=collection_name,
                                            limit=5,
                                            headers=headers
                                            )

        return Response(
            body={
                "stored": True,
                "metadata": query_response.get("body").get("resources", [])
            },
            code=200
        )
    except (ConnectionError, ValueError, KeyError) as e:
        return Response(
            code=500,
            errors=[APIError(code=500, message=f"Error saving collection: {str(e)}")]
        )


if __name__ == "__main__":
    FUNC.run()
When running in the cloud, the X-CS-APP-ID header is set for you. This function has the following code to mimic this behavior when running locally. You just need to set APP_ID as an environment variable.
headers = {}
if os.environ.get("APP_ID"):
    headers = {
        "X-CS-APP-ID": os.environ.get("APP_ID")
    }
If you’d rather not set the app ID as an environment variable, you can also adjust the code to expect it to be passed in via headers.
# Expect the APP_ID to be passed in via params.header
response = api_client.command("PutObject",
                              body=json,
                              collection_name=collection_name,
                              object_key=event_id,
                              headers=request.params.header
                              )
Once you’ve made this change, you can use the following commands to test it locally:
# curl command
curl -X POST http://localhost:8081 \
  -H "Content-Type: application/json" \
  -d '{
    "body": {
      "event_data": {
        "quote": "Tis but a scratch"
      }
    },
    "method": "POST",
    "url": "/log-event",
    "params": {"header": {"X-CS-APP-ID": "YOUR_APP_ID"}}

# HTTPie command
http POST :8081 "body[event_data][quote]='Tis but a scratch'" \
  method=POST url=/log-event \
  "params[header][X-CS-APP-ID]=YOUR_APP_ID"
Also, the client ID and secret from the Foundry CLI will not work for accessing collections. You need to create a new API client in Falcon by going to Support and resources > API clients and keys. Then, create a new API client and select read and write for the Custom storage scope.
Setting these environment variables will allow you to run and test this function locally.
# From the function's directory, set variables and run
export APP_ID=...
export FALCON_CLIENT_ID=...
export FALCON_CLIENT_SECRET=...
python main.py

# In a new terminal, send event_data
http POST :8081 "body[event_data][quote]=Tis but a scratch" \
  method=POST url=/log-event
Collections provide a powerful way to persist data between function invocations or share data between different parts of your app.
Access Collections via the Falcon API
If you want to access your collection via the Falcon API, you’ll need the same custom client ID and secret, as well as the X-CS-APP-ID header. For example:
# Get an access token for the Falcon API
# Create a new API client in Falcon: Support and resources > API clients and keys
# Make sure to select Custom Storage: read and write
https -f POST api.crowdstrike.com/oauth2/token \
  client_id=xxx \
  client_secret=yyy

# Set the value of the returned access_token as an environment variable
TOKEN=eyJ...

# List objects in your app's collection
APP_ID=123...
COLLECTION_NAME=event_logs
https api.crowdstrike.com/customobjects/v1/collections/$COLLECTION_NAME/objects \
  "Authorization: Bearer $TOKEN" X-CS-APP-ID:$APP_ID
Debugging Falcon Foundry Functions
Thorough testing is essential for reliable functions. We recommend adding logging and error handling to your functions to simplify debugging during development and to help with troubleshooting in production.
Add Logging
Add logging to your Python functions:
- Import
logging - Add
loggeras the third parameter to your handler function - Use
logger.info()andlogger.error()to track function activity
You can also enable FalconPy logging by initializing the FalconPy class with debug=True.
The example below highlights the logging done in the ServiceNow function, and shows how to enable FalconPy debugging.
from logging import Logger
...

@FUNC.handler(method="POST", path="/ticket")
def on_post(request: Request, _config: Optional[Dict[str, object]], logger: Logger) -> Response:
    ...

    logger.info(f"Creating ServiceNow incident with payload: {payload}")

    ...

        # Initialize FalconPy client for APIIntegrations and enable debugging
        api = APIIntegrations(debug=True)
        ...

        # Log the raw response for troubleshooting
        logger.info(f"ServiceNow API response: {response}")
        ...
Viewing Logs in Falcon Next-Gen SIEM
Data that’s written to the logger within a function is available in Next-Gen SIEM > Advanced Event Search using the following query. The only thing that needs to be substituted in this query is {function ID}.
"#event_simpleName" = FunctionLogMessage | "fn_id" = {function ID}
The output from a workflow can also be viewed using the following query:
"#event_simpleName" = FusionWorkflowEvent | @source = PlatformEvents | execution_log_type = details | definition_id = {definition ID}
If you have deployment issues, you can simply copy and paste the deployment ID into Falcon Next-Gen SIEM to see related log messages.
Error Handling
Always implement proper error handling to make debugging easier. The code below highlights the parts of the ServiceNow function that validate input as well as process data with detailed error handling. These errors will be logged in Falcon Next-Gen SIEM when they happen, giving you visibility into what’s happening when things don’t work.
def on_post(request: Request, _config: Optional[Dict[str, object]], logger: Logger) -> Response:

    # Validate required fields
    if "title" not in request.body or "description" not in request.body:
        return Response(
            code=400,
            errors=[APIError(code=400, message="Missing required fields: title and description")]
        )

   	 ...

        if response["status_code"] >= 400:
            error_message = response.get("error", {}).get("message", "Unknown error")
            return Response(
                code=response["status_code"],
                errors=[APIError(
                    code=response["status_code"],
                    message=f"ServiceNow integration error: {error_message}"
                )]
            )

        ...
   except (ValueError, KeyError) as v:
        # ValueError/KeyError can be thrown if one of the fields accessed in the response does not exist
        logger.error(f"Error processing ServiceNow response: {str(v)}", exc_info=True)
        return Response(
            code=500,
            errors=[APIError(code=500, message=f"Error creating incident: {str(v)}")]
        )
    except (ConnectionError, TimeoutError) as e:
        # Specific network-related errors
        logger.error(f"Error creating ServiceNow incident: {str(e)}", exc_info=True)
        return Response(
            code=500,
            errors=[APIError(code=500, message=f"Error creating incident: {str(e)}")]
        )
Invoking Functions Locally
Functions can be run locally using three mechanisms:
- Using the Foundry CLI
- Using Python
- Using Python with a
--dataflag
The first two will start an HTTP server, while the third option does not. To run your functions with the Foundry CLI, execute the following command:
foundry functions run
This will package and start all your app’s functions in Docker containers. You’ll see an output similar to the following:
functions running at:
        host-info: http://localhost:58718
        To stop host-info, run: docker container stop 53ea7fd841dafa128cd3f2f8d31b237be54427050ff1228c7778db53336bd506

        user-management: http://localhost:58739
        To stop user-management, run: docker container stop f490525b9c4afacda1632333ba6940a3c4b3eafbd6fd724c5cf24a68ddb3b789

        hello: http://localhost:58631
        To stop hello, run: docker container stop 30d561507cd29b545403a56d8de98f974e4180a14bd5edaba62e853318057de8

        host-details: http://localhost:58655
        To stop host-details, run: docker container stop 048936db3e7a24de79623685fbf7946a26ad5e968c2e824ae337e3ad47aa994f

        servicenow: http://localhost:58670
        To stop servicenow, run: docker container stop 5c62e7554c170ac6c01355c479680815c59acb7c5356bcc071951a148668675c

        log-event: http://localhost:58687
        To stop log-event, run: docker container stop d9635cc4075fcbbbdcf58b538de24e71face9f21de7d6ddba602890034f99d84
To run a single function with Docker, you can use the --name flag. For example:
foundry functions run --name servicenow
You can also run functions individually with Python:
# Navigate to functions/{name} in your terminal first
# python -m venv .venv && source .venv/bin/activate
python main.py
The main difference between the two is that the Foundry CLI command creates a simple Docker container with the same Python version used by FaaS.
To tail the logs from the Docker container running your function, you can use the following command:
docker logs -f CONTAINER_ID_OR_NAME
Once your function is started, you can invoke it with HTTPie or curl. To exit the log tail, press Ctrl+C.
# Set the port; it changes depending on if you're using the Foundry CLI or Python
PORT=8081

# Invoke the /hello function with HTTPie
http POST :$PORT "body[name]=Matt" method=POST url=/hello

# Invoke the /hello function with curl
curl --request POST --url http://localhost:$PORT \
  --header 'content-type: application/json' \
  --data '{
    "body": {
      "name": "Matt"
    },
    "method": "POST",
    "url": "/hello"
  }'
You can also invoke your functions locally without spinning up a web server. First, create a JSON file with your request payload.
{
  "body": {
    "name": "Banu"
  },
  "method": "POST",
  "url": "/hello"
}
Save it as a test_payload.json file in the same directory as your function. Then, send your data to the /hello endpoint with the following command:
python main.py --data ./test_payload.json
This will execute the requested function handler and print the response returned, including the response status code, body and headers.
2025-08-05 09:37:11,952 [INFO]  runner_cli.py run:104  ->  Running without HTTP server

Status code: 200
Response Header: Content-Length: 73
Response Header: Content-Type: application/json
Response Payload:
{"code": 200, "body": {"greeting": "Hello Banu! It is nice to see you."}}
You can also send request headers to your function from the command line:
python main.py --data test_payload.json --header "X-CUSTOM-HEADER_NAME: header-value"
Running functions locally and invoking them allows you to validate your function’s behavior before deploying it to Falcon Foundry.
Unit Testing Functions
Writing unit tests for functions is recommended, especially if you have a lot of dependencies that get updated frequently. Tests are the best way to ensure your code works. Automate running them with continuous integration, and you’re well on your way to creating high-quality code!
Below is the code in the test_main.py file. It contains unit tests for the hello function.
"""Test module for the host-details function handler."""

import importlib
import unittest
from unittest.mock import patch, MagicMock

from crowdstrike.foundry.function import Request

import main


def mock_handler(*_args, **_kwargs):
    """Mock handler decorator for testing."""

    def identity(func):
        return func

    return identity


class FnTestCase(unittest.TestCase):
    """Test case class for function handler tests."""

    def setUp(self):
        """Set up test fixtures before each test method."""
        patcher = patch("crowdstrike.foundry.function.Function.handler", new=mock_handler)
        self.addCleanup(patcher.stop)
        self.handler_patch = patcher.start()

        importlib.reload(main)

    @patch("main.Hosts")
    def test_on_post_success(self, mock_hosts_class):
        """Test successful POST request with valid host_id in body."""
        # Mock the Hosts instance and its response
        mock_hosts_instance = MagicMock()
        mock_hosts_class.return_value = mock_hosts_instance
        mock_hosts_instance.get_device_details.return_value = {
            "status_code": 200,
            "body": {
                "resources": [{
                    "device_id": "test-host-123",
                    "hostname": "test-host",
                    "platform_name": "Windows"
                }]
            }
        }

        request = Request()
        request.body = {
            "host_id": "test-host-123"
        }

        response = main.on_post(request)

        self.assertEqual(response.code, 200)
        self.assertIn("host_details", response.body)
        self.assertEqual(response.body["host_details"]["device_id"], "test-host-123")
        mock_hosts_instance.get_device_details.assert_called_once_with(ids="test-host-123")

    def test_on_post_missing_host_id(self):
        """Test POST request with missing host_id in body returns error."""
        request = Request()

        response = main.on_post(request)

        self.assertEqual(response.code, 400)
        self.assertEqual(len(response.errors), 1)
        self.assertEqual(response.errors[0].message, "missing host_id from request body")

    @patch("main.Hosts")
    def test_on_post_api_error(self, mock_hosts_class):
        """Test POST request when API returns an error."""
        # Mock the Hosts instance to return an error
        mock_hosts_instance = MagicMock()
        mock_hosts_class.return_value = mock_hosts_instance
        mock_hosts_instance.get_device_details.return_value = {
            "status_code": 404,
            "body": {"errors": [{"message": "Host not found"}]}
        }

        request = Request()
        request.body = {
            "host_id": "nonexistent-host"
        }

        response = main.on_post(request)

        self.assertEqual(response.code, 404)
        self.assertEqual(len(response.errors), 1)
        self.assertIn("Error retrieving host:", response.errors[0].message)
        mock_hosts_instance.get_device_details.assert_called_once_with(ids="nonexistent-host")


if __name__ == "__main__":
    unittest.main()
You can run unit tests in a terminal by navigating to the function’s directory, then running:
pytest
Using Falcon Foundry Functions in Workflows
Functions can be powerful components in Falcon Foundry workflows. To use a function in a workflow:
- Make sure your function is shared with workflows (you selected this during creation)
- Define proper request and response schemas in your function’s JSON schema files
- In the Falcon Foundry UI, create or edit a workflow
- Add an action with your function’s name
- Map input variables from previous workflow steps to your function’s inputs
- Use the function’s outputs in subsequent workflow steps
For example, if you have a function that enriches alert data with additional context, your workflow might:
- Trigger on a new detection
- Extract key details like host ID and detection type
- Call your custom function to gather additional context
- Use the enriched data to determine if the alert should be escalated
The JSON schemas you define for your function determine what data can be passed to and from your function in the workflow. For example:
request_schema.json:
{
  "$schema": "http://json-schema.org/draft-07/schema#",
  "type": "object",
  "required": ["detection_id", "host_id"],
  "properties": {
    "detection_id": {
      "type": "string",
      "description": "The ID of the detection to enrich"
    },
    "host_id": {
      "type": "string",
      "description": "The ID of the host involved in the detection"
    }
  }
}
response_schema.json:
{
  "$schema": "http://json-schema.org/draft-07/schema#",
  "type": "object",
  "properties": {
    "risk_score": {
      "type": "number",
      "description": "Calculated risk score based on enrichment data"
    },
    "context": {
      "type": "object",
      "description": "Additional context for the detection"
    },
    "recommended_action": {
      "type": "string",
      "description": "Recommended action based on analysis"
    }
  }
}
NOTE: The root must be an object in request and response schemas.
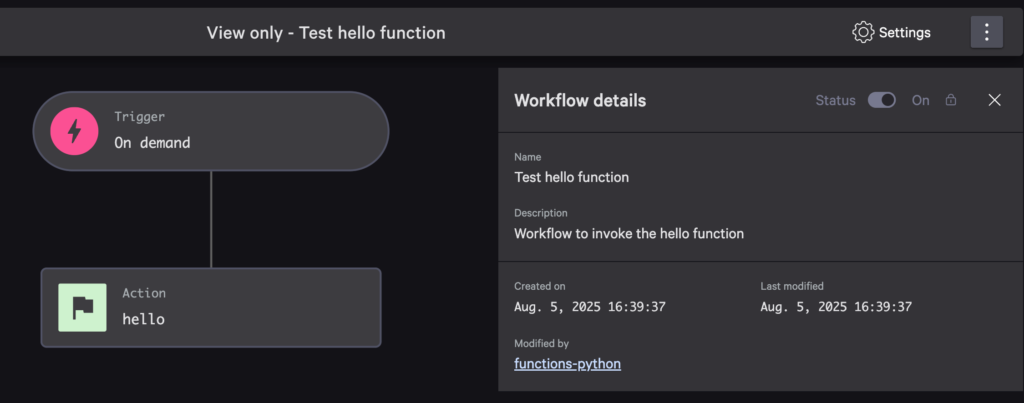
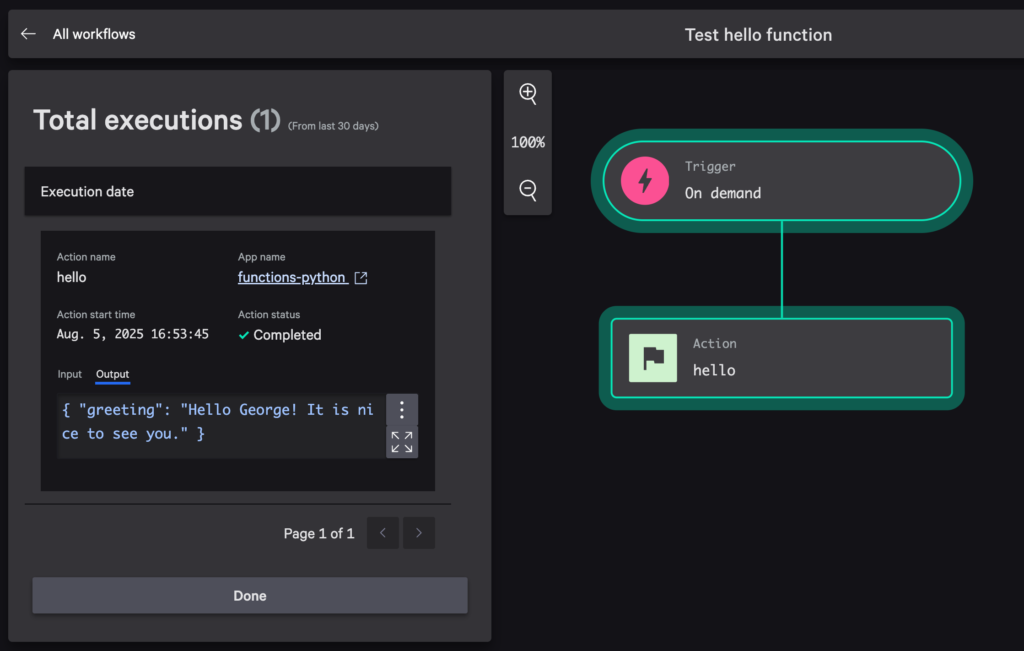
The sample app for this blog post includes a few workflows to invoke functions. For example, the test hello function workflow looks as follows:
I configured it to send “George” as the name and it responded as expected!
Using Falcon Foundry Functions in UI Extensions
Functions can power dynamic UI Extensions by providing backend processing capabilities. You will need to deploy your function to the Falcon console before you can use it in developer or preview mode.
This UI extension below calls the hello function when you click the Say Hello button and displays the results. It handles loading states and errors, providing a pleasant user experience. It will render in the Falcon console’s Next-Gen SIEM > Endpoint detections screen when you click on a detection.
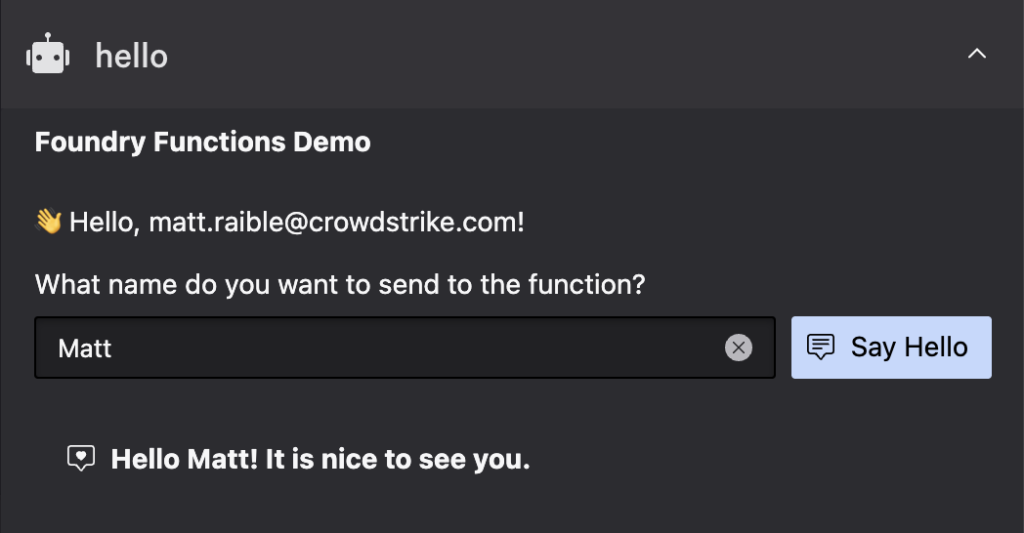
The React code below shows how it all works, from getting the user’s name from the Falcon platform, to setting up the UI with an input field. When the button is clicked, it calls the function and handles the response, including errors if they exist. Shoelace components are used to make things look good. CrowdStrike’s Falcon Shoelace Theme makes light and dark mode work in the Falcon console.
import React, { useState, useContext } from 'react';
import { FalconApiContext } from '../contexts/falcon-api-context';
import { Link } from '../components/link';
import { SlInput } from '@shoelace-style/shoelace/dist/react';

function Home() {
  const { falcon } = useContext(FalconApiContext);

  // Extract user's first name from the username (assuming format: firstname.lastname)
  const username = falcon?.data?.user?.username || '';
  const firstName = username.split('.')[0] || '';
  const capitalizedFirstName = firstName.charAt(0).toUpperCase() + firstName.slice(1);

  const [name, setName] = useState(capitalizedFirstName);
  const [greeting, setGreeting] = useState(null);
  const [loading, setLoading] = useState(false);
  const [error, setError] = useState(null);

  // Calls the 'hello' cloud function with the user's name and displays the response
  const fetchGreeting = async () => {
    if (!name.trim()) {
      setError("Please enter a name first");
      return;
    }

    try {
      setLoading(true);
      setError(null);

      // Call the hello function
      const helloFunction = falcon.cloudFunction({
        name: 'hello'
      });

      const response = await helloFunction.path('/hello')
        .post({ name: name });

      if (response.status_code !== 200) {
        throw new Error(`Function call failed: ${response.status_code} ${response.errors}`);
      }

      // Set the greeting from the response
      setGreeting(response.body.greeting);
    } catch (error) {
      console.error('Error calling function', error);
      const errorMessages = error.errors?.map(err => err.message || String(err)).join(', ');
      setError(`Error: ${errorMessages || 'Failed to get greeting'}`);
      setGreeting(null);
    } finally {
      setLoading(false);
    }
  };

  // Handle Enter key press in the input field
  const handleKeyPress = async (e) => {
    if (e.key === 'Enter') {
      await fetchGreeting();
    }
  };

  return (
    <sl-card>
      <div slot="header">
        <strong>Foundry Functions Demo</strong>
      </div>

      <div style={{ display: 'flex', flexDirection: 'column', gap: '16px' }}>
        <p className="text-primary">
           Hello, {username}!
        </p>

        <div>
          <label htmlFor="name-input" style={{display: 'block', marginBottom: '8px'}}>
            What name do you want to send to the function?
          </label>
          <div style={{ display: 'flex', gap: '8px' }}>
            <SlInput
              id="name-input"
              placeholder="Enter your name"
              value={name}
              onSlChange={(e) => setName(e.target.value)}
              onKeyDown={handleKeyPress}
              clearable
              style={{ flex: 1 }}
              required="true"
            ></SlInput>
            <sl-button
              variant="primary"
              onClick={fetchGreeting}
              disabled={loading}
            >
              {loading ?
                <sl-spinner></sl-spinner> :
                <sl-icon name="chat-square-text" slot="prefix"></sl-icon>
              }
              Say Hello
            </sl-button>
          </div>
        </div>

        {error && (
          <sl-alert variant="danger" open>
            <sl-icon slot="icon" name="exclamation-triangle"></sl-icon>
            {error}
          </sl-alert>
        )}

        {greeting && (
          <sl-card style={{ background: 'var(--sl-color-neutral-50)', border: '1px solid var(--sl-color-neutral-200)' }}>
            <div style={{ fontWeight: 'bold', display: 'flex', alignItems: 'center' }}>
              <sl-icon name="chat-square-heart" style={{ marginRight: '8px' }}></sl-icon>
              {greeting}
            </div>
          </sl-card>
        )}

        <sl-divider></sl-divider>
      </div>

      <div slot="footer">
        <small>Powered by Falcon Foundry</small>
      </div>
    </sl-card>
  );
}

export { Home };
Working with Multiple Falcon Foundry Functions, Files, and Handlers
As your app grows, you might need multiple functions working together. Here are some best practices:
- Group related functions by domain in the same file
- Create shared utility files for common code
- Configure with environment variables instead of hardcoding values
- Implement consistent error handling and logging across functions
For example, create a shared utility file (utils.py) to standardize validation and error handling across your functions:
# functions/utils.py
import json
import re
from typing import Dict, Any, Optional

from crowdstrike.foundry.function import APIError


def validate_host_id(host_id: str) -> bool:
    """Validate that a host ID is in the correct format."""
    if not host_id or not isinstance(host_id, str):
        return False
    return len(host_id) == 32 and all(c in "0123456789abcdef" for c in host_id.lower())


def validate_email(email: str) -> bool:
    """Validate email format."""
    if not email or not isinstance(email, str):
        return False
    pattern = r"^[a-zA-Z0-9._%+-]+@[a-zA-Z0-9.-]+\.[a-zA-Z]{2,}$"
    return bool(re.match(pattern, email))


def format_error_response(message: str, code: int = 400) -> list[Any]:
    """Create a standardized error response."""
    return [APIError(code=code, message=message)]


def safe_json_parse(data: str) -> Optional[Dict[str, Any]]:
    """Safely parse JSON data."""
    try:
        return json.loads(data)
    except (json.JSONDecodeError, TypeError):
        return None
Then import this in multiple functions:
# functions/host-info/main.py
from logging import Logger
from typing import Dict, Optional

from crowdstrike.foundry.function import Function, Request, Response

# The following line is necessary to import utils locally
import sys; sys.path.append("../")
from utils import validate_host_id, format_error_response

FUNC = Function.instance()


@FUNC.handler(method="POST", path="/host-info")
def on_post(request: Request, _config: Optional[Dict[str, object]], logger: Logger) -> Response:
    """
    Handle POST requests to /host-info endpoint.

    Args:
        request: The incoming request object containing the request body.
        _config: Configuration dictionary (unused).
        logger: Logger instance for logging.

    Returns:
        Response: JSON response with host info or error message.
    """
    host_id = request.body.get("host_id")

    logger.info(f"Host ID: {host_id}")
    logger.info(f"Is valid? {validate_host_id(host_id)}")

    if not validate_host_id(host_id):
        return Response(errors=format_error_response("Invalid host ID format"))

    # Continue processing...
# functions/user-management/main.py
from logging import Logger
from typing import Dict

from crowdstrike.foundry.function import Function, Request, Response

# The following line is necessary to import utils locally
import sys; sys.path.append("../")
from utils import validate_email, format_error_response

FUNC = Function.instance()


@FUNC.handler(method="POST", path="/create-user")
def on_post(request: Request, _config: Optional[Dict[str, object]], logger: Logger) -> Response:
    """
    Handle POST requests to /create-user endpoint.

    Args:
        request: The incoming request object containing the request body.
        _config: Configuration dictionary (unused).
        logger: Logger instance for logging.

    Returns:
        Response: JSON response with user info or error message.
    """
    email = request.body.get("email")

    logger.info(f"Email: {email}")
    logger.info(f"Is valid? {validate_email(email)}")

    if not validate_email(email):
        return Response(errors=format_error_response("Invalid email format"))

    # Continue processing...
This approach will only work when developing locally. Before you go to production, you will need to copy the utils.py file into each function that’s using it. Then, delete the following lines from each function:
# The following line is necessary to import utils locally
import sys; sys.path.append("../")
This works locally because the relative ../ path points to a directory where utils exists, above your script.
However, in CrowdStrike’s FaaS, The file system structure is different. Only files included in your deployment zip/package (or container image) are available. If utils is in the parent directory, it won’t be included in the FaaS deployment package. This means the foundry functions run command won’t work. Running python main.py will work.
Another alternative is to create a library of utilities and publish them to PyPI so they can be referenced in your requirements.txt.
Falcon Foundry Function Limitations
There are a few limitations on how much data functions can process:
- Request payload: 124 KB maximum1
- Response payload: 120 KB maximum
- Execution timeout period: 30 seconds (configurable up to 900 seconds)
- Concurrent executions: 100
- Memory allowance (RAM; runtime + code): 256 MB (configurable up to 1 GB)
- Package size: 50 MB including dependencies
1. There is no restriction on the input to a function which contains a file. That is, if the request payload contains one or more files, those files may be of arbitrary size. The JSON portion of the request must still fall within the 124 KB limit.
Take Your Next Steps with Falcon Foundry Functions
Ready to extend the Falcon platform with custom low-code apps? Falcon Foundry functions let you add custom logic and integrations to elevate your Foundry apps with code. Start with these projects:
You can also check out the Falcon Foundry functions with Python sample app on GitHub to see all the code used in this post. The repository below has GitHub Actions configured to ensure all functions start successfully.
Take advantage of these additional resources to accelerate your development:
- Master the basics with Falcon Foundry documentation
- Deep dive into the Falcon Foundry functions Documentation
- Connect with peers in the Foundry Developer Community
- Get started quickly with sample functions in Go and Python
- Level up your skills at Fal.Con 2025
With Falcon Foundry functions, you can build sophisticated custom capabilities that leverage the power of the Falcon platform while meeting your organization’s unique requirements. Whether you’re automating security workflows, enriching alert data, or building custom integrations, functions provide the flexibility to implement exactly what you need.