Getting Started with Falcon Foundry Collections: Your Guide to Structured Data Storage in Foundry Apps

Falcon Foundry collections provide structured data storage for Falcon Foundry applications, enabling developers to persist configuration data, manage workflow state, and maintain checkpoint information across application lifecycles. This guide demonstrates how to implement collections in your Foundry apps to solve common data management challenges including scattered configuration data, duplicate event processing, and cross-session state persistence.
Collections integrate seamlessly with Falcon Foundry’s ecosystem, providing schema validation, FQL-based querying, and role-based access control. This article covers collection schemas, CRUD operations, CSV data import, UI extension integration, and workflow pagination patterns.
Table of Contents:
- What are Falcon Foundry Collections and When Should You Use Them?
- Collection Schemas: Your Data’s Blueprint
- Creating Your First Falcon Foundry Collection
- Accessing Collections from Falcon Foundry Functions
- Converting CSV Files to Collections
- Step 1: Create a Collection Schema for CSV Data
- Step 2: Create the Collection
- Step 3: Create the CSV Import Function
- Step 4: CSV Import Function
- Step 5: Usage Examples
- Step 6: Advanced CSV Import Features
- Step 7: Querying Imported CSV Data
- Best Practices for CSV Import
- Performance Considerations
- Troubleshooting CSV Import
- Using Collections in UI Extensions
- Configuring Workflow Share Settings
- Pagination in Falcon Fusion SOAR Workflows
- Managing Collection Access with RBAC
- Searching Collections with FQL
- Accessing Collections via the Falcon API
- Learn More About Falcon Foundry Collections
Before you begin, ensure you have the following.
Prerequisites:
- Falcon Insight XDR or Falcon Prevent
- Falcon Next-Gen SIEM or Falcon Foundry
- Foundry CLI 1.4.3 or above
You can install the latest version of the Foundry CLI with Homebrew on Linux/macOS.
brew tap crowdstrike/foundry-cli
brew install crowdstrike/foundry-cli/foundry
For Windows installation instructions and initial setup, refer to the Foundry Tutorial Quickstart repository.
Verify the installation by running:
foundry version
What are Falcon Foundry Collections and When Should You Use Them?
Falcon Foundry collections are structured data stores that integrate seamlessly with Foundry’s ecosystem. They provide persistent storage for application data across workflow executions, function calls, and user sessions. Collections support schema validation, FQL-based querying, and role-based access control, making them the platform-native solution for managing structured data within Foundry applications.
Here are the most common scenarios where collections shine:
Storing User-Provided Configuration
A threat hunting app requires persistent storage for user preferences including detection thresholds, notification settings, and custom rule parameters. Collections persist these settings, eliminating manual configuration on subsequent application starts:
# Store user configuration
user_config = {
    "alertThreshold": 85,
    "emailNotifications": True,
    "customRules": ["rule1", "rule2"],
    "lastUpdated": int(time.time())
}
Checkpointing for Incremental Data Processing
Collections are particularly effective for implementing checkpointing in data processing workflows. A log analysis function that processes security events incrementally can store the last processed timestamp in a collection:
import json
import os
import time
from logging import Logger
from typing import Dict

from crowdstrike.foundry.function import Function, Request, Response, APIError
from falconpy import APIHarnessV2

func = Function.instance()


@func.handler(method="POST", path="/process-events")
def process_events_handler(request: Request, config: Dict[str, object] | None, logger: Logger) -> Response:
    """Process events with checkpointing to prevent duplicate processing."""

    try:
        api_client = APIHarnessV2()
        headers = {}
        if os.environ.get("APP_ID"):
            headers = {"X-CS-APP-ID": os.environ.get("APP_ID")}

        checkpoint_collection = "processing_checkpoints"
        workflow_id = request.body.get("workflow_id", "default")

        logger.info(f"Processing workflow ID: {workflow_id}")

        # Retrieve the most recent checkpoint for this workflow
        checkpoint_response = api_client.command("SearchObjects",
                                                 filter=f"workflow_id:'{workflow_id}'",
                                                 collection_name=checkpoint_collection,
                                                 sort="last_processed_timestamp.desc",
                                                 limit=1,
                                                 headers=headers)

        logger.debug(f"checkpoint response: {checkpoint_response}")

        # Get last processed timestamp or use default
        last_timestamp = 0
        if checkpoint_response.get("body", {}).get("resources"):
            last_checkpoint = checkpoint_response["body"]["resources"][0]
            logger.debug(f"last_checkpoint: {last_checkpoint}")

            # SearchObjects returns metadata, not actual objects, so use GetObject for details
            object_details = api_client.command("GetObject",
                                                collection_name=checkpoint_collection,
                                                object_key=last_checkpoint["object_key"],
                                                headers=headers)

            # GetObject returns bytes; convert to JSON
            json_response = json.loads(object_details.decode("utf-8"))
            logger.debug(f"object_details response: {json_response}")

            last_timestamp = json_response["last_processed_timestamp"]

        logger.debug(f"last_timestamp: {last_timestamp}")

        # Simulate fetching new events since last checkpoint
        current_timestamp = int(time.time())
        new_events = simulate_fetch_events_since(last_timestamp, current_timestamp)

        # Process the events
        processed_count = len(new_events)

        # Simulate event processing
        for event in new_events:
            process_single_event(event)

        # Update checkpoint with latest processing state
        checkpoint_data = {
            "workflow_id": workflow_id,
            "last_processed_timestamp": current_timestamp,
            "processed_count": processed_count,
            "last_updated": current_timestamp,
            "status": "completed"
        }

        logger.debug(f"Sending data to PutObject: {checkpoint_data}")

        api_client.command("PutObject",
                           body=checkpoint_data,
                           collection_name=checkpoint_collection,
                           object_key=f"checkpoint_{workflow_id}",
                           headers=headers)

        return Response(
            body={
                "processed_events": processed_count,
                "last_checkpoint": current_timestamp,
                "previous_checkpoint": last_timestamp,
                "status": "success"
            },
            code=200
        )

    except Exception as e:
        return Response(
            code=500,
            errors=[APIError(code=500, message=f"Processing failed: {str(e)}")]
        )


def simulate_fetch_events_since(timestamp, current_time):
    """Simulate fetching events from a data source."""
    return [
        {"id": f"event_{i}", "timestamp": current_time - i, "data": f"sample_data_{i}"}
        for i in range(5)
    ]


def process_single_event(event):
    """Simulate processing a single event."""
    print(f"Processing event: {event['id']}")


if __name__ == "__main__":
    func.run()
This pattern helps reduce duplicate processing and makes your workflows more resilient to interruptions. When implemented correctly, the function picks up close to where it left off, minimizing the risk of missed or duplicate events
Structured Data Store vs. Unstructured Alternatives
While you could store data in other data stores without enforced schemas, collections provide schema validation and structured queries. This means fewer runtime errors and more predictable data handling, something every developer appreciates when dealing with security-critical applications.
Other real-world uses cases are as follows:
- Feature flag management: Dynamically enable/disable features for different users or environments.
- Workflow state machines: Track the progress and status of multi-step security processes.
- Reference data: Store frequently accessed, relatively static data like threat intelligence feeds or approved IP lists.
Collection Schemas: Your Data’s Blueprint
Collections aren’t just free-form data dumps. They enforce schemas that keep your data consistent and your code reliable. Schemas are a blueprint that defines the structure of your collection data, including field types, validation rules, and required properties. They establish a contract between your application and the data store, ensuring data consistency and enabling type safety.
When designing your collection schema, consider:
- Data types: String, Number, Boolean, Array, Object
- Required fields: What data must always be present?
- Validation rules: Min/max values, string patterns, etc.
- Searchable fields: Which fields will you query frequently using FQL (Falcon Query Language)? Collections use the
x-cs-indexable-fieldsschema extension to designate fields that can be efficiently searched.
{
  "$schema": "https://json-schema.org/draft-07/schema",
  "x-cs-indexable-fields": [
    { "field": "/userId", "type": "string", "fql_name": "user_id" },
    { "field": "/confidenceThreshold", "type": "integer", "fql_name": "confidence_threshold" },
    { "field": "/lastSync", "type": "string", "fql_name": "last_sync" }
  ],
  "type": "object",
  "properties": {
    "userId": {
      "type": "string",
      "description": "Unique identifier for the user (used as the object key)"
    },
    "iocSources": {
      "type": "array",
      "items": {
        "type": "string"
      },
      "description": "List of threat intelligence sources to monitor",
      "default": []
    },
    "confidenceThreshold": {
      "type": "integer",
      "minimum": 0,
      "maximum": 100,
      "description": "Minimum confidence score for threat indicators",
      "default": 70
    },
    "lastSync": {
      "type": "string",
      "format": "date-time",
      "description": "ISO 8601 timestamp of last synchronization"
    }
  },
  "required": [
    "userId",
    "confidenceThreshold"
  ]
}
Key Schema Components
Indexable Fields (x-cs-indexable-fields): This CrowdStrike-specific extension defines which fields can be efficiently queried using FQL. Each indexable field specifies:
field: JSON pointer to the field locationtype: Data type for indexing purposesfql_name: The name to use in FQL queries
You can index up to 10 fields in your schema, making them searchable through the collections API.
Standard JSON Schema Properties:
$schema: References the JSON Schema specification versiontype: Defines the root data type (typically “object” for collections)properties: Defines each field’s structure and validation rulesrequired: Array of mandatory fields
Validation Rules: You can enforce data quality with standard JSON Schema validation:
minimum/maximum: Numeric boundsformat: String format validation (date-time, email, etc.)items: Array element validationdefault: Default values for optional fields
This schema structure ensures your collection data is both well-structured and efficiently queryable, giving you the best of both worlds: data integrity and performance.
Creating Your First Falcon Foundry Collection
Now that you know a bit about collections, let’s use them in a Foundry app. You can create collections with the Foundry CLI and its collections create command. For example:
foundry collections create
This command won’t work unless you’re in a Foundry application’s directory. If you’d like to follow along, create an app with foundry apps create:
- Use app templates?
N - Name:
Collections Toolkit - Description:
<empty> - Press enter to skip the next three fields
- Use Case:
Utilities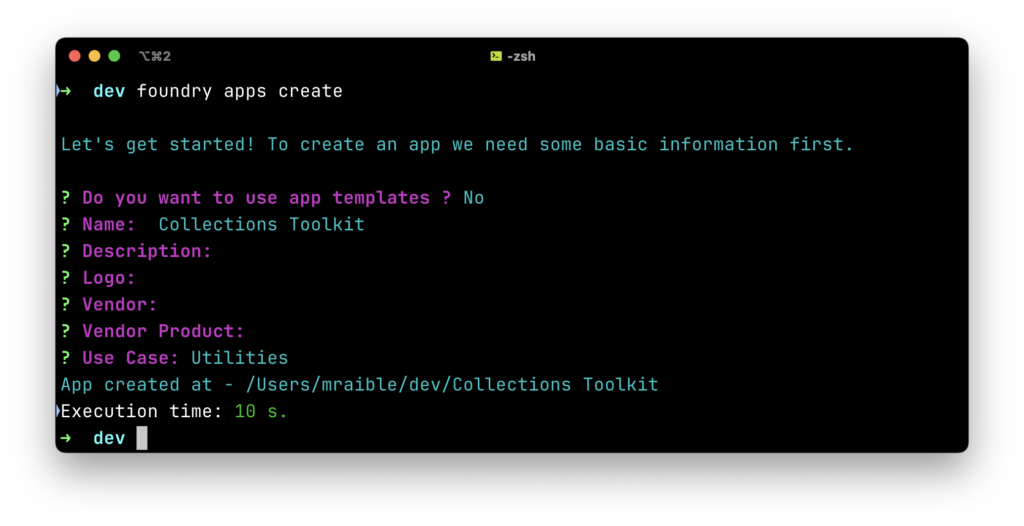
Add a schemas/user_preferences.json file with the following schema:
{
  "$schema": "https://json-schema.org/draft-07/schema",
  "x-cs-indexable-fields": [
    { "field": "/userId", "type": "string", "fql_name": "user_id" },
    { "field": "/theme", "type": "string", "fql_name": "theme" },
    { "field": "/lastUpdated", "type": "integer", "fql_name": "last_updated" }
  ],
  "type": "object",
  "properties": {
    "dashboardLayout": {
      "enum": [
        "compact",
        "standard",
        "expanded"
      ],
      "type": "string",
      "title": "Dashboard Layout",
      "description": "Dashboard layout preference",
      "default": "standard"
    },
    "lastUpdated": {
      "type": "integer",
      "title": "Last Updated",
      "description": "Unix timestamp of last update"
    },
    "notificationsEnabled": {
      "type": "boolean",
      "title": "Notifications Enabled",
      "description": "Whether notifications are enabled",
      "default": true
    },
    "theme": {
      "enum": [
        "light",
        "dark"
      ],
      "type": "string",
      "title": "Theme",
      "description": "User's preferred theme",
      "default": "light"
    },
    "userId": {
      "type": "string",
      "title": "Email",
      "description": "Unique identifier for the user"
    }
  },
  "required": ["userId", "lastUpdated"]
}
Go to the collections directory and create a collection with the Foundry CLI’s foundry collections create command.
# Create a new collection
foundry collections create --name user_preferences --schema schemas/user_preferences.json --description "Store user preferences"

# You can update an existing collection (using the same command)
foundry collections create --name user_preferences --schema schemas/user_preferences.json
NOTE: The Foundry CLI doesn’t have a separate “edit” command for collections. Instead, you use the same collections create command with an existing collection name to update it.
You can also control access to collections with permissions:
# Create a collection with restricted access
foundry collections create --name secure_data --schema schemas/user_preferences.json --permissions "data-access-permission"
API Access: Direct and Programmatic
Collections can be accessed directly via the Falcon API with the appropriate authentication and headers. This gives you flexibility for automation and integration with external systems.
Accessing Collections from Falcon Foundry Functions
This is where collections really start to shine, but the implementation is more straightforward than you might expect. From within your Foundry functions, you access collections through the standard CrowdStrike API using the APIHarnessV2 client from FalconPy.
Below is an example Foundry function that stores and retrieves event data from a collection:
"""Main module for the log-event function handler."""

import os
import time
import uuid

from crowdstrike.foundry.function import Function, Request, Response, APIError
from falconpy import APIHarnessV2

FUNC = Function.instance()


@FUNC.handler(method="POST", path="/log-event")
def on_post(request: Request) -> Response:
    """
    Handle POST requests to /log-event endpoint.

    Args:
        request: The incoming request object containing the request body.

    Returns:
        Response: JSON response with event storage result or error message.
    """
    # Validate request
    if "event_data" not in request.body:
        return Response(
            code=400,
            errors=[APIError(code=400, message="missing event_data")]
        )

    event_data = request.body["event_data"]

    try:
        # Store data in a collection
        # This assumes you've already created a collection named "event_logs"
        event_id = str(uuid.uuid4())
        json_data = {
            "event_id": event_id,
            "data": event_data,
            "timestamp": int(time.time())
        }

        # Allow setting APP_ID as an env variable for local testing
        headers = {}
        if os.environ.get("APP_ID"):
            headers = {
                "X-CS-APP-ID": os.environ.get("APP_ID")
            }

        api_client = APIHarnessV2()
        collection_name = "event_logs"

        response = api_client.command("PutObject",
                                      body=json_data,
                                      collection_name=collection_name,
                                      object_key=event_id,
                                      headers=headers
                                      )

        if response["status_code"] != 200:
            error_message = response.get("error", {}).get("message", "Unknown error")
            return Response(
                code=response["status_code"],
                errors=[APIError(
                    code=response["status_code"],
                    message=f"Failed to store event: {error_message}"
                )]
            )

        # Query the collection to retrieve the event by id
        query_response = api_client.command("SearchObjects",
                                            filter=f"event_id:'{event_id}'",
                                            collection_name=collection_name,
                                            limit=5,
                                            headers=headers
                                            )

        return Response(
            body={
                "stored": True,
                "metadata": query_response.get("body").get("resources", [])
            },
            code=200
        )
    except (ConnectionError, ValueError, KeyError) as e:
        return Response(
            code=500,
            errors=[APIError(code=500, message=f"Error saving collection: {str(e)}")]
        )


if __name__ == "__main__":
    FUNC.run()
Key Collection Operations
The beauty of FalconPy’s implementation is its simplicity. You have three main operations for working with collections:
Storing Data (PutObject):
response = api_client.command("PutObject",
                              body=json_data,
                              collection_name=collection_name,
                              object_key=event_id,
                              headers=headers
                              )
Querying Data (SearchObjects):
query_response = api_client.command("SearchObjects",
                                    filter=f"event_id:'{event_id}'",
                                    collection_name=collection_name,
                                    limit=5,
                                    headers=headers
                                    )
As mentioned in FalconPy’s documentation for SearchObjects, this operation returns metadata, not actual objects. If you want to get an object’s values, you’ll need to use the GetObject command.
Fetching Data (GetObject):
object_details = api_client.command("GetObject",
                                    collection_name="your_collection",
                                    object_key="unique_identifier",
                                    headers=headers
                                    )
Practical Patterns
Here are some common patterns I’ve found useful:
Configuration Storage Pattern:
# Store user configuration
user_config = {
    "user_id": user_id,
    "alert_threshold": 85,
    "email_notifications": True,
    "last_updated": int(time.time())
}

api_client.command("PutObject",
                   body=user_config,
                   collection_name="user_configs",
                   object_key=user_id,
                   headers=headers
                   )
Checkpointing Pattern:
# Update processing checkpoint
checkpoint_data = {
    "workflow_id": workflow_id,
    "last_processed_timestamp": int(time.time()),
    "processed_count": event_count,
    "status": "completed"
}

api_client.command("PutObject",
                   body=checkpoint_data,
                   collection_name="processing_checkpoints",
                   object_key=f"checkpoint_{workflow_id}",
                   headers=headers
                   )
Error Handling Best Practices
Always check the response status and handle errors gracefully:
if response["status_code"] != 200:
    error_details = response.get("error", {})
    error_message = error_details.get("message", "Unknown error occurred")

    # Log the full error for debugging
    print(f"Collection operation failed: {error_details}")

    # Example of more granular error handling
    if response["status_code"] == 400:
        error_message = f"Schema validation failed: {error_details.get('details', 'Invalid data provided')}"
    elif response["status_code"] == 404:
        error_message = f"Object not found: {error_details.get('details', 'The specified object key does not exist')}"

    # Return appropriate error response
    return Response(
        code=response["status_code"],
        errors=[APIError(
            code=response["status_code"],
            message=f"Collection operation failed: {error_message}"
        )]
    )
The key insight here is that collections integrate seamlessly with the existing CrowdStrike API patterns you’re already familiar with. No special libraries or complex abstractions – just the reliable APIHarnessV2 client doing what it does best.
TIP: You can learn more about Foundry functions and how they work in our comprehensive Dive into Foundry Functions with Python article.
Converting CSV Files to Collections
One common use case for collections is importing existing data from CSV files. This section provides step-by-step instructions and code examples for converting CSV data into Falcon Foundry collections.
Converting CSV data to collections involves:
- Reading and parsing the CSV file
- Defining an appropriate collection schema
- Transforming the data to match the schema
- Uploading the data to the collection
Step 1: Create a Collection Schema for CSV Data
First, examine your CSV file structure and create an appropriate schema. For this example, we’ll use a security events CSV:
Sample CSV (security_events.csv):
event_id,timestamp,event_type,severity,source_ip,destination_ip,user,description
EVT-001,2024-01-15T10:30:00Z,login_failure,medium,192.168.1.100,10.0.0.5,john.doe,Failed login attempt
EVT-002,2024-01-15T10:31:15Z,malware_detected,high,192.168.1.105,external,alice.smith,Malware detected on endpoint
EVT-003,2024-01-15T10:32:30Z,suspicious_network,low,10.0.0.10,external,system,Unusual network traffic pattern
Create Collection Schema (schemas/security_events_csv.json):
{
  "$schema": "https://json-schema.org/draft-07/schema",
  "x-cs-indexable-fields": [
    { "field": "/event_id", "type": "string", "fql_name": "event_id" },
    { "field": "/event_type", "type": "string", "fql_name": "event_type" },
    { "field": "/severity", "type": "string", "fql_name": "severity" },
    { "field": "/timestamp_unix", "type": "integer", "fql_name": "timestamp_unix" },
    { "field": "/source_ip", "type": "string", "fql_name": "source_ip" },
    { "field": "/user", "type": "string", "fql_name": "user" }
  ],
  "type": "object",
  "properties": {
    "event_id": {
      "type": "string",
      "description": "Unique event identifier from CSV"
    },
    "timestamp": {
      "type": "string",
      "format": "date-time",
      "description": "Original ISO timestamp from CSV"
    },
    "timestamp_unix": {
      "type": "integer",
      "description": "Unix timestamp for efficient querying"
    },
    "event_type": {
      "type": "string",
      "enum": ["login_failure", "malware_detected", "suspicious_network", "data_exfiltration", "privilege_escalation"],
      "description": "Type of security event"
    },
    "severity": {
      "type": "string",
      "enum": ["low", "medium", "high", "critical"],
      "description": "Event severity level"
    },
    "source_ip": {
      "type": "string",
      "description": "Source IP address"
    },
    "destination_ip": {
      "type": "string",
      "description": "Destination IP address"
    },
    "user": {
      "type": "string",
      "description": "Associated user account"
    },
    "description": {
      "type": "string",
      "description": "Event description"
    },
    "imported_at": {
      "type": "integer",
      "description": "Unix timestamp when record was imported"
    },
    "csv_source": {
      "type": "string",
      "description": "Source CSV filename"
    }
  },
  "required": ["event_id", "timestamp", "event_type", "severity"]
}
Step 2: Create the Collection
# Create the collection using Foundry CLI
foundry collections create \
  --name security_events_csv \
  --description "Security events imported from CSV files" \
  --schema schemas/security_events_csv.json \
  --wf-expose true
Step 3: Create the CSV Import Function
# Create the function using Foundry CLI
foundry functions create \
  --name "csv-import" \
  --description "Import CSV data into Collections" \
  --language python \
  --handler-method POST \
  --handler-name "import_csv_handler" \
  --handler-path "/import-csv"
Step 4: CSV Import Function
The following code adds an /import-csv handler, logic, and dependencies to convert CSV files to structured data in a security_events_csv collection.
functions/csv-import/main.py:
"""
CrowdStrike Foundry Function for importing CSV data into Collections.

This module provides a REST API endpoint for importing CSV data into CrowdStrike
Foundry Collections with data transformation and validation.
"""

import io
import os
import time
import uuid
from datetime import datetime
from logging import Logger
from typing import Dict, Any, List

import pandas as pd
from crowdstrike.foundry.function import Function, Request, Response, APIError
from falconpy import APIHarnessV2

FUNC = Function.instance()


@FUNC.handler(method="POST", path="/import-csv")
def import_csv_handler(request: Request, config: Dict[str, object] | None, logger: Logger) -> Response:
    """Import CSV data into a Foundry Collection."""
    # Mark unused config parameter
    _ = config

    # Validate request
    if "csv_data" not in request.body and "csv_file_path" not in request.body:
        return Response(
            code=400,
            errors=[APIError(code=400, message="Either csv_data or csv_file_path is required")]
        )

    collection_name = request.body.get("collection_name", "security_events_csv")

    try:
        # Process the import request
        return _process_import_request(request, collection_name, logger)

    except pd.errors.EmptyDataError as ede:
        return Response(
            code=400,
            errors=[APIError(code=400, message=f"CSV file is empty: {str(ede)}")]
        )
    except ValueError as ve:
        return Response(
            code=400,
            errors=[APIError(code=400, message=f"Validation error: {str(ve)}")]
        )
    except FileNotFoundError as fe:
        return Response(
            code=404,
            errors=[APIError(code=404, message=f"File not found: {str(fe)}")]
        )
    except (IOError, OSError) as ioe:
        return Response(
            code=500,
            errors=[APIError(code=500, message=f"File I/O error: {str(ioe)}")]
        )


def _process_import_request(request: Request, collection_name: str, logger: Logger) -> Response:
    """Process the import request and return response."""
    # Initialize API client and headers
    api_client = APIHarnessV2()
    headers = _get_headers()

    # Read CSV data
    csv_data_result = _read_csv_data(request, logger)
    df = csv_data_result["dataframe"]
    source_filename = csv_data_result["source_filename"]

    # Transform and validate data
    import_timestamp = int(time.time())
    transformed_records = _process_dataframe(df, source_filename, import_timestamp)

    # Import records to Collection with batch processing
    import_results = batch_import_records(api_client, transformed_records, collection_name, headers)

    return _create_success_response({
        "df": df,
        "transformed_records": transformed_records,
        "import_results": import_results,
        "collection_name": collection_name,
        "source_filename": source_filename,
        "import_timestamp": import_timestamp
    })


def _get_headers() -> Dict[str, str]:
    """Get headers for API requests."""
    headers = {}
    if os.environ.get("APP_ID"):
        headers = {"X-CS-APP-ID": os.environ.get("APP_ID")}
    return headers


def _read_csv_data(request: Request, logger: Logger) -> Dict[str, Any]:
    """Read CSV data from request body or file path."""
    if "csv_data" in request.body:
        # CSV data provided as string
        csv_string = request.body["csv_data"]
        df = pd.read_csv(io.StringIO(csv_string))
        source_filename = "direct_upload"
    else:
        # CSV file path provided
        csv_file_path = request.body["csv_file_path"]

        # If it's just a filename (no directory separators), prepend current directory
        if not os.path.dirname(csv_file_path):
            csv_file_path = os.path.join(os.getcwd(), csv_file_path)
            logger.debug(f"After: {csv_file_path}")

        df = pd.read_csv(csv_file_path)
        source_filename = os.path.basename(csv_file_path)

    return {"dataframe": df, "source_filename": source_filename}


def _process_dataframe(df: pd.DataFrame, source_filename: str, import_timestamp: int) -> List[Dict[str, Any]]:
    """Process dataframe and transform records."""
    transformed_records = []

    for index, row in df.iterrows():
        try:
            # Transform the row to match schema
            record = transform_csv_row(row, source_filename, import_timestamp)

            # Validate required fields
            validate_record(record)

            transformed_records.append(record)

        except ValueError as row_error:
            print(f"Error processing row {index}: {str(row_error)}")
            continue

    return transformed_records


def _create_success_response(response_data: Dict[str, Any]) -> Response:
    """Create success response with import results."""
    df = response_data["df"]
    transformed_records = response_data["transformed_records"]
    import_results = response_data["import_results"]
    collection_name = response_data["collection_name"]
    source_filename = response_data["source_filename"]
    import_timestamp = response_data["import_timestamp"]

    return Response(
        body={
            "success": import_results["success_count"] > 0,
            "total_rows": len(df),
            "processed_rows": len(transformed_records),
            "imported_records": import_results["success_count"],
            "failed_records": import_results["error_count"],
            "collection_name": collection_name,
            "source_file": source_filename,
            "import_timestamp": import_timestamp
        },
        code=200 if import_results["success_count"] > 0 else 207
    )


def transform_csv_row(row: pd.Series, source_filename: str, import_timestamp: int) -> Dict[str, Any]:
    """Transform a CSV row to match the Collection schema."""

    # Parse timestamp
    timestamp_str = str(row.get("timestamp", ""))
    try:
        # Try parsing ISO format
        dt = datetime.fromisoformat(timestamp_str.replace("Z", "+00:00"))
        timestamp_unix = int(dt.timestamp())
    except (ValueError, TypeError):
        # Fallback to current timestamp
        timestamp_unix = import_timestamp
        timestamp_str = datetime.fromtimestamp(import_timestamp).isoformat() + "Z"

    # Create transformed record
    record = {
        "event_id": str(row.get("event_id", f"csv_{uuid.uuid4()}")),
        "timestamp": timestamp_str,
        "timestamp_unix": timestamp_unix,
        "event_type": str(row.get("event_type", "unknown")).lower(),
        "severity": str(row.get("severity", "low")).lower(),
        "source_ip": str(row.get("source_ip", "")),
        "destination_ip": str(row.get("destination_ip", "")),
        "user": str(row.get("user", "")),
        "description": str(row.get("description", "")),
        "imported_at": import_timestamp,
        "csv_source": source_filename
    }

    # Clean empty strings to None for optional fields
    for key, value in record.items():
        if value == "" and key not in ["event_id", "timestamp", "event_type", "severity"]:
            record[key] = None

    return record


def validate_record(record: Dict[str, Any]) -> None:
    """Validate that record meets schema requirements."""
    required_fields = ["event_id", "timestamp", "event_type", "severity"]

    for field in required_fields:
        if not record.get(field):
            raise ValueError(f"Missing required field: {field}")

    # Validate enums
    valid_severities = ["low", "medium", "high", "critical"]
    if record["severity"] not in valid_severities:
        raise ValueError(f"Invalid severity: {record['severity']}. Must be one of {valid_severities}")

    valid_event_types = ["login_failure", "malware_detected", "suspicious_network", "data_exfiltration",
                         "privilege_escalation"]
    if record["event_type"] not in valid_event_types:
        # Allow unknown event types but log a warning
        print(f"Warning: Unknown event type: {record['event_type']}")


def batch_import_records(
    api_client: APIHarnessV2,
    records: List[Dict[str, Any]],
    collection_name: str,
    headers: Dict[str, str],
    batch_size: int = 50
) -> Dict[str, int]:
    """Import records to Collection in batches with rate limiting."""

    success_count = 0
    error_count = 0

    for i in range(0, len(records), batch_size):
        batch = records[i:i + batch_size]

        # Rate limiting: pause between batches
        if i > 0:
            time.sleep(0.5)

        batch_context = {
            "api_client": api_client,
            "batch": batch,
            "collection_name": collection_name,
            "headers": headers,
            "batch_number": i // batch_size + 1
        }

        batch_results = _process_batch(batch_context)
        success_count += batch_results["success_count"]
        error_count += batch_results["error_count"]

    return {
        "success_count": success_count,
        "error_count": error_count
    }


def _process_batch(batch_context: Dict[str, Any]) -> Dict[str, int]:
    """Process a single batch of records."""
    api_client = batch_context["api_client"]
    batch = batch_context["batch"]
    collection_name = batch_context["collection_name"]
    headers = batch_context["headers"]
    batch_number = batch_context["batch_number"]

    success_count = 0
    error_count = 0

    for record in batch:
        try:
            response = api_client.command("PutObject",
                                          body=record,
                                          collection_name=collection_name,
                                          object_key=record["event_id"],
                                          headers=headers)

            if response["status_code"] == 200:
                success_count += 1
            else:
                error_count += 1
                print(f"Failed to import record {record['event_id']}: {response}")

        except (ConnectionError, TimeoutError) as conn_error:
            error_count += 1
            print(f"Connection error importing record {record.get('event_id', 'unknown')}: {str(conn_error)}")
        except KeyError as key_error:
            error_count += 1
            print(f"Key error importing record {record.get('event_id', 'unknown')}: {str(key_error)}")

    print(f"Processed batch {batch_number}: {len(batch)} records")

    return {
        "success_count": success_count,
        "error_count": error_count
    }


if __name__ == "__main__":
    FUNC.run()
functions/csv-import/requirements.txt:
crowdstrike-foundry-function==1.1.2
crowdstrike-falconpy
numpy==2.3.4
pandas==2.3.3
Step 5: Usage Examples
You’ll need to create a virtual Python environment and install dependencies when testing this function locally.
cd functions/csv-import
python -m venv .venv
source .venv/bin/activate

# Install dependencies
pip install -r requirements.txt
First, you’ll need to create an API client with the appropriate permissions. Normally, you can use the client ID and secret from the Foundry CLI’s configuration, but it doesn’t have permissions to access collections.
- In the Falcon console, go to Support and resources > API clients and keys
- Create a new API client
- Select read and write scopes for Custom storage
Then, you’ll need to set some environment variables:
# Set variables for local testing
export APP_ID=your_app_id
export FALCON_CLIENT_ID=your_client_id
export FALCON_CLIENT_SECRET=your_client_secret
export FALCON_BASE_URL=your_base_url
The FALCON_BASE_URL should be one of the following:
- US-1:
https://api.crowdstrike.com(default) - US-2:
https://api.us-2.crowdstrike.com - EU-1:
https://api.eu-1.crowdstrike.com - US-GOV-1:
https://api.laggar.gcw.crowdstrike.com
Example 1: Import from Local CSV File
To make sure everything works, you can run the function with Python, then invoke it with HTTPie.
# Run function locally
python main.py

# In another terminal, make sure you're in the same directory:
cd functions/csv-import

# Then, invoke the endpoint with HTTPie
http POST :8081 method=POST url=/import-csv "body[csv_file_path]=security_events.csv"
This results in a response like the following:
{
    "body": {
        "collection_name": "security_events_csv",
        "failed_records": 0,
        "import_timestamp": 1752257231,
        "imported_records": 3,
        "processed_rows": 3,
        "source_file": "security_events.csv",
        "success": true,
        "total_rows": 3
    },
    "code": 200
}
Example 2: Import CSV Data Directly
You can also verify that sending CSV data directly works:
# Import CSV data as string
http POST :8081 method=POST url=/import-csv 'body[csv_data]="$(cat security_events.csv)"'

# Response
{
    "body": {
        "collection_name": "security_events_csv",
        "failed_records": 0,
        "import_timestamp": 1752257361,
        "imported_records": 0,
        "processed_rows": 0,
        "source_file": "direct_upload",
        "success": true,
        "total_rows": 0
    },
    "code": 200
}
Example 3: Programmatic Import
To test your function programmatically, create a script with the following Python code:
functions/csv-import/import.py:
"""
Module for importing CSV data to CrowdStrike Foundry Collections.

This module provides functionality to prepare and send CSV data to the import function.
"""

import json

import pandas as pd
import requests

# Prepare CSV data
df = pd.DataFrame([
    {
        "event_id": "EVT-004",
        "timestamp": "2024-01-15T11:00:00Z",
        "event_type": "data_exfiltration",
        "severity": "critical",
        "source_ip": "192.168.1.200",
        "destination_ip": "external",
        "user": "compromised.user",
        "description": "Large data transfer detected"
    },
    {
        "event_id": "EVT-005",
        "timestamp": "2024-01-15T11:05:00Z",
        "event_type": "privilege_escalation",
        "severity": "high",
        "source_ip": "192.168.1.150",
        "destination_ip": "internal",
        "user": "admin.account",
        "description": "Unauthorized privilege escalation"
    }
])

# Convert to CSV string
csv_data = df.to_csv(index=False)

# Send to import function
response = requests.post(
    "https://www.crowdstrike.com:8081",
    json={
        "method": "POST",
        "url": "/import-csv",
        "body": {
            "csv_file_path": "security_events.csv",
            "collection_name": "security_events_csv"
        }
    },
    timeout=30
)

print("Import result:")
print(json.dumps(response.json(), indent=2))
This code uses the requests library, so you’ll need to update requirements.txt to use this before it will work.
functions/csv-import/requirements.txt:
crowdstrike-foundry-function==1.1.2
crowdstrike-falconpy
requests
numpy==2.3.4
pandas==2.3.3
The response from running this script with python import.py will resemble the following:
Import result:
{
  "code": 200,
  "body": {
    "success": true,
    "total_rows": 2,
    "processed_rows": 2,
    "imported_records": 2,
    "failed_records": 0,
    "collection_name": "security_events_csv",
    "source_file": "direct_upload",
    "import_timestamp": 1752257761
  }
}
You can see how to automate the execution of these tests by examining the Collections Toolkit’s integration test script.
Step 6: Advanced CSV Import Features
Importing CSV files is a common practice. You might find you want to add chunking for large files or create a schema based on its data types.
Handle Large CSV Files
For large CSV files, implement chunked processing:
def import_large_csv(file_path, collection_name, chunk_size=1000):
    """Import large CSV files in chunks."""

    api_client = APIHarnessV2()
    headers = {"X-CS-APP-ID": os.environ.get("APP_ID")}

    total_processed = 0
    total_imported = 0

    # Process CSV in chunks
    for chunk_df in pd.read_csv(file_path, chunksize=chunk_size):
        print(f"Processing chunk of {len(chunk_df)} records...")

        # Transform chunk
        transformed_records = []
        import_timestamp = int(time.time())

        for _, row in chunk_df.iterrows():
            try:
                record = transform_csv_row(row, os.path.basename(file_path), import_timestamp)
                validate_record(record)
                transformed_records.append(record)
            except Exception as e:
                print(f"Skipping invalid record: {e}")

        # Import chunk
        results = batch_import_records(api_client, transformed_records, collection_name, headers)

        total_processed += len(chunk_df)
        total_imported += results["success_count"]

        print(f"Chunk complete: {results['success_count']} imported, {results['error_count']} failed")

        # Pause between chunks to avoid rate limiting
        time.sleep(1)

    return {
        "total_processed": total_processed,
        "total_imported": total_imported
    }
CSV Schema Auto-Detection
def auto_detect_csv_schema(df, collection_name):
    """Auto-detect schema from CSV DataFrame."""

    schema = {
        "$schema": "https://json-schema.org/draft-07/schema",
        "x-cs-indexable-fields": [],
        "type": "object",
        "properties": {},
        "required": []
    }

    for column in df.columns:
        # Auto-detect data type
        sample_values = df[column].dropna().head(100)

        if sample_values.empty:
            data_type = "string"
        elif sample_values.dtype in ['int64', 'int32']:
            data_type = "integer"
        elif sample_values.dtype in ['float64', 'float32']:
            data_type = "number"
        elif sample_values.dtype == 'bool':
            data_type = "boolean"
        else:
            data_type = "string"

        # Add to schema
        schema["properties"][column] = {
            "type": data_type,
            "description": f"Auto-detected from CSV column {column}"
        }

        # Add to indexable fields if string or numeric
        if data_type in ["string", "integer", "number"]:
            schema["x-cs-indexable-fields"].append({
                "field": f"/{column}",
                "type": data_type,
                "fql_name": column.lower().replace(" ", "_")
            })

    # Save auto-detected schema
    schema_path = f"schemas/{collection_name}_auto.json"
    with open(schema_path, 'w') as f:
        json.dump(schema, f, indent=2)

    print(f"Auto-detected schema saved to: {schema_path}")
    return schema
Step 7: Querying Imported CSV Data
Once imported, query your CSV data using FQL:
# Search for high severity events
response = api_client.command("SearchObjects",
                              filter="severity:'high'",
                              collection_name="security_events_csv",
                              limit=50,
                              sort="timestamp_unix.desc",
                              headers=headers
                              )

# Search for specific event types
response = api_client.command("SearchObjects",
                              filter="event_type:'malware_detected'",
                              collection_name="security_events_csv",
                              limit=25,
                              headers=headers
                              )

# Search by date range
yesterday = int(time.time()) - 86400
response = api_client.command("SearchObjects",
                              filter=f"timestamp_unix:>{yesterday}",
                              collection_name="security_events_csv",
                              limit=100,
                              headers=headers
                              )

# Complex search with multiple conditions
response = api_client.command("SearchObjects",
                              filter="severity:['high','critical']+user:*'admin*'",
                              collection_name="security_events_csv",
                              limit=25,
                              headers=headers
                              )
Best Practices for CSV Import
It’s a good idea to learn from others and follow these best practices for success:
- Data Validation: Always validate CSV data before import
- Batch Processing: Use batching for large datasets to avoid timeouts
- Rate Limiting: Implement pauses between API calls
- Error Handling: Log failed records for manual review
- Schema Design: Include both original and transformed timestamp fields
- Deduplication: Check for existing records before import
- Monitoring: Track import progress and success rates
Performance Considerations
Beyond batch processing and rate limiting, keep these performance tips in mind for your collections:
- Indexing strategy: Thoughtfully select which fields to include in your
x-cs-indexable-fields. Indexing frequently queried fields (e.g.,event_id,timestamp,username) significantly speeds up FQL searches. Avoid over-indexing, as it can increase write times. - Query complexity: While FQL is powerful, overly complex queries with many conditions or extensive use of wildcards can impact performance. Design your queries to be as specific and efficient as possible.
- Data volume impact: For extremely large collections with billions of records, consider architectural patterns like data archival strategies for older data or offloading complex analytical queries to dedicated data processing services if real-time performance is critical within Falcon Foundry.
Troubleshooting CSV Import
If you experience errors when importing a CSV, some common issues might occur:
- Schema Validation Errors: Ensure CSV data matches collection schema
- Date Format Issues: Handle various timestamp formats consistently
- Memory Issues: Use chunked processing for large files
- Rate Limiting: Implement proper delays between API calls
- Encoding Issues: Specify CSV encoding explicitly
# Handle encoding issues
df = pd.read_csv(file_path, encoding='utf-8-sig')  # For files with BOM
df = pd.read_csv(file_path, encoding='latin1')     # For legacy encodings
This comprehensive guide provides everything needed to convert CSV files into Falcon Foundry collections, from basic imports to advanced processing scenarios.
Using Collections in UI Extensions
Collections aren’t just for storing data for backend functions. They’re equally useful in UI Extensions. CrowdStrike provides the foundry-js JavaScript library which makes it easy to work with collections in your frontend code.
When building UI Extensions with this library, you’ll follow a simple pattern:
import FalconApi from '@crowdstrike/foundry-js';

// Initialize and connect
const falcon = new FalconApi();
await falcon.connect();

async function crud() {
  try {
    // Create a collection instance
    const userPreferences = falcon.collection({
      collection: 'user_preferences'
    });

    // CRUD Operations
    const userId = 'user123';

    // Create/Update: Store user preferences
    const userData = {
      theme: 'dark',
      dashboardLayout: 'compact',
      notificationsEnabled: true,
      lastUpdated: Date.now(),
      userId
    };

    await userPreferences.write(userId, userData);

    // Read: Retrieve user preferences
    const preferences = await userPreferences.read(userId);
    console.log(`User theme: ${preferences.theme}`);

    // Search: Find records that match criteria
    // Note: This doesn't use FQL. Exact matches are required
    const darkThemeUsers = await userPreferences.search({
      filter: `theme:'dark'`
    });
    console.log('Dark theme users:');
    console.table(darkThemeUsers.resources);

    // List: Get all keys in the collection (with pagination)
    const keys = await userPreferences.list({limit: 10})
    console.log('Collection keys:');
    console.table(keys.resources)

    // Delete: Remove a record
    await userPreferences.delete(userId);
  } catch (error) {
    console.error('Error performing collection operations:', error);
  }
}

// Add event listener to Reload button
document.getElementById('reloadBtn').addEventListener('click', crud);

// Execute on load
await crud();
The HTML file that loads this file (named app.js) is as follows:
<!DOCTYPE html>
<html lang="en">
  <head>
    <title>CRUD on Collections</title>

    <script type="importmap">
      {
        "imports": {
          "@crowdstrike/foundry-js": "https://unpkg.com/@crowdstrike/foundry-js"
        }
      }
    </script>

    <link
      rel="stylesheet"
      href="https://assets.foundry.crowdstrike.com/tailwind-toucan-base@5.0.0/toucan.css"
    />
    <!-- Add Shoelace -->
    <link rel="stylesheet" href="https://unpkg.com/@crowdstrike/falcon-shoelace/dist/style.css" />
    <script type="module" src="https://cdn.jsdelivr.net/npm/@shoelace-style/shoelace@2.20.1/cdn/shoelace-autoloader.js"></script>
  </head>

  <body class="bg-ground-floor">
    <div id="app">
      <sl-card class=card-footer">
        Please check your browser console for log messages.
        <div slot="footer">
          <sl-button variant="primary" id="reloadBtn">Reload</sl-button>
        </div>
      </sl-card>
    </div>

    <script src="./app.js" type="module"></script>
  </body>
</html>
Handling Collection Data in Components
Within a React component, you might structure your collection access like this:
import React, { useContext, useEffect, useState } from 'react';
import { FalconApiContext } from '../contexts/falcon-api-context';
import '@shoelace-style/shoelace/dist/themes/light.css';
import '@shoelace-style/shoelace/dist/components/card/card.js';
import '@shoelace-style/shoelace/dist/components/select/select.js';
import '@shoelace-style/shoelace/dist/components/option/option.js';
import '@shoelace-style/shoelace/dist/components/switch/switch.js';
import '@shoelace-style/shoelace/dist/components/button/button.js';
import '@shoelace-style/shoelace/dist/components/icon/icon.js';
import '@shoelace-style/shoelace/dist/components/spinner/spinner.js';
import '@shoelace-style/shoelace/dist/components/alert/alert.js';
import '@shoelace-style/shoelace/dist/components/divider/divider.js';
import '@shoelace-style/shoelace/dist/components/skeleton/skeleton.js';
import { SlButton, SlIconButton, SlOption, SlSelect, SlSwitch } from '@shoelace-style/shoelace/dist/react';
function Home() {
const { falcon } = useContext(FalconApiContext);
const userId = falcon?.data?.user?.uuid || "42";
const [preferences, setPreferences] = useState(null);
const [loading, setLoading] = useState(true);
const [error, setError] = useState(null);
const [saving, setSaving] = useState(false);
const [saveSuccess, setSaveSuccess] = useState(false);
const [deleting, setDeleting] = useState(false);
const [deleteSuccess, setDeleteSuccess] = useState(false);
// Form state
const [formData, setFormData] = useState({
theme: 'light',
dashboardLayout: 'standard',
notificationsEnabled: true
});
useEffect(() => {
const loadPreferences = async () => {
if (!userId || !falcon) return;
try {
setLoading(true);
const userPrefs = falcon.collection({
collection: "user_preferences"
});
const data = await userPrefs.read(userId);
if (data) {
setPreferences(data);
setFormData({
theme: data.theme || 'light',
dashboardLayout: data.dashboardLayout || 'standard',
notificationsEnabled: data.notificationsEnabled !== false
});
} else {
// Set default preferences
setPreferences({
theme: 'light',
dashboardLayout: 'standard',
notificationsEnabled: true
});
}
} catch (err) {
console.error("Failed to load preferences:", err);
setError("Unable to load preferences");
} finally {
setLoading(false);
}
};
loadPreferences();
}, [userId, falcon]);
useEffect(() => {
let timer;
if (saveSuccess) {
// Hide success message after 3 seconds
timer = setTimeout(() => setSaveSuccess(false), 3000);
}
return () => clearTimeout(timer);
}, [saveSuccess]);
const handleSave = async () => {
try {
setSaving(true);
setSaveSuccess(false);
const userPrefs = falcon.collection({
collection: "user_preferences"
});
const updatedPreferences = {
userId: userId,
theme: formData.theme,
dashboardLayout: formData.dashboardLayout,
notificationsEnabled: formData.notificationsEnabled,
lastUpdated: Date.now()
};
await userPrefs.write(userId, updatedPreferences);
setPreferences(updatedPreferences);
setSaveSuccess(true);
} catch (err) {
console.error("Failed to save preferences:", err);
setError("Failed to save preferences");
} finally {
setSaving(false);
}
};
useEffect(() => {
let timer;
if (deleteSuccess) {
// Hide success message after 3 seconds
timer = setTimeout(() => setDeleteSuccess(false), 3000);
}
return () => clearTimeout(timer);
}, [deleteSuccess]);
const handleDelete = async () => {
try {
setDeleting(true);
setDeleteSuccess(false);
const userPrefs = falcon.collection({
collection: "user_preferences"
});
await userPrefs.delete(userId);
// Reset to defaults
const defaultPreferences = {
theme: "light",
dashboardLayout: "standard",
notificationsEnabled: true
};
setPreferences(null);
setFormData(defaultPreferences);
setDeleteSuccess(true);
} catch (err) {
console.error("Failed to delete preferences:", err);
setError("Failed to delete preferences");
} finally {
setDeleting(false);
}
};
const handleInputChange = (field, value) => {
setFormData(prev => ({
...prev,
[field]: value
}));
};
if (loading) {
return (
<div style={{ padding: '1rem' }}>
<sl-card class="preference-card">
<div style={{ display: 'flex', flexDirection: 'column', gap: '0.75rem' }}>
<sl-skeleton style={{ width: '100%', height: '40px' }}></sl-skeleton>
<sl-skeleton style={{ width: '100%', height: '40px' }}></sl-skeleton>
<sl-skeleton style={{ width: '60%', height: '24px' }}></sl-skeleton>
<sl-skeleton style={{ width: '120px', height: '36px' }}></sl-skeleton>
</div>
</sl-card>
</div>
);
}
if (error) {
return (
<div style={{ padding: '1rem' }}>
<sl-alert variant="danger" open>
<sl-icon slot="icon" name="exclamation-triangle"></sl-icon>
<strong>Error loading preferences</strong><br />
{error}
</sl-alert>
</div>
);
}
return (
<div style={{ padding: '1rem' }}>
<sl-card className="preference-card">
<div className="card-content">
<div className="card-header user-info" slot="header">
<span>User preferences for: <strong
style={{color: 'rgb(59, 130, 246)'}}>{falcon.data.user.username}</strong></span>
{preferences?.lastUpdated && (
<SlIconButton
name="trash"
label="Delete preferences"
className="delete-button"
loading={deleting}
onClick={handleDelete}
style={{
'--sl-color-neutral-600': 'var(--sl-color-danger-600)',
'--sl-color-neutral-700': 'var(--sl-color-danger-700)'
}}
></SlIconButton>
)}
</div>
{saveSuccess && (
<sl-alert variant="success" open closable style={{ marginBottom: '0.75rem' }}>
<sl-icon slot="icon" name="check-circle"></sl-icon>
Preferences saved successfully!
</sl-alert>
)}
{deleteSuccess && (
<sl-alert variant="success" open closable style={{ marginBottom: '0.75rem' }}>
<sl-icon slot="icon" name="check-circle"></sl-icon>
Preferences deleted successfully! Default settings restored.
</sl-alert>
)}
<div className="preference-section">
{/* Theme Selection */}
<div className="preference-item">
<label className="preference-label">
<sl-icon name="palette" style={{fontSize: '1rem', color: 'var(--sl-color-primary-500)'}}></sl-icon>
Theme Preference
</label>
<SlSelect
value={formData.theme}
placeholder="Select theme"
onSlChange={(e) => handleInputChange('theme', e.target.value)}
style={{width: '100%'}}
>
<SlOption value="light">
<sl-icon slot="prefix" name="sun"></sl-icon>
Light Theme
</SlOption>
<SlOption value="dark">
<sl-icon slot="prefix" name="moon"></sl-icon>
Dark Theme
</SlOption>
</SlSelect>
</div>
{/* Layout Selection */}
<div className="preference-item">
<label className="preference-label">
<sl-icon name="grid" style={{fontSize: '1rem', color: 'var(--sl-color-primary-500)'}}></sl-icon>
Dashboard Layout
</label>
<SlSelect
value={formData.dashboardLayout}
placeholder="Select layout"
onSlChange={(e) => handleInputChange('dashboardLayout', e.target.value)}
style={{width: '100%'}}
>
<SlOption value="compact">
<sl-icon slot="prefix" name="grid-3x3"></sl-icon>
Compact - Dense information display
</SlOption>
<SlOption value="standard">
<sl-icon slot="prefix" name="grid"></sl-icon>
Standard - Balanced layout
</SlOption>
<SlOption value="expanded">
<sl-icon slot="prefix" name="grid-1x2"></sl-icon>
Expanded - Spacious layout
</SlOption>
</SlSelect>
</div>
{/* Notifications Toggle */}
<div className="preference-item">
<div className="switch-container">
<div className="switch-label">
<sl-icon
name={formData.notificationsEnabled ? "bell" : "bell-slash"}
style={{fontSize: '1rem', color: 'var(--sl-color-primary-500)'}}
></sl-icon>
Enable Notifications
</div>
<SlSwitch
checked={formData.notificationsEnabled}
onSlChange={(e) => handleInputChange('notificationsEnabled', e.target.checked)}
>
</SlSwitch>
</div>
<div className="notification-help">
{formData.notificationsEnabled
? "You'll receive notifications for important security events"
: "Notifications are disabled - you won't receive alerts"
}
</div>
</div>
</div>
<sl-divider style={{margin: '1rem 0 0.75rem 0'}}></sl-divider>
<div className="save-section">
<SlButton
variant="primary"
size="medium"
loading={saving}
onClick={handleSave}
>
{saving ? "Saving..." : "Save Preferences"}
</SlButton>
{preferences?.lastUpdated && (
<div style={{fontSize: '0.8rem', color: 'var(--sl-color-neutral-500)'}}>
Last updated: {new Date(preferences.lastUpdated).toLocaleString()}
</div>
)}
</div>
</div>
</sl-card>
</div>
);
}
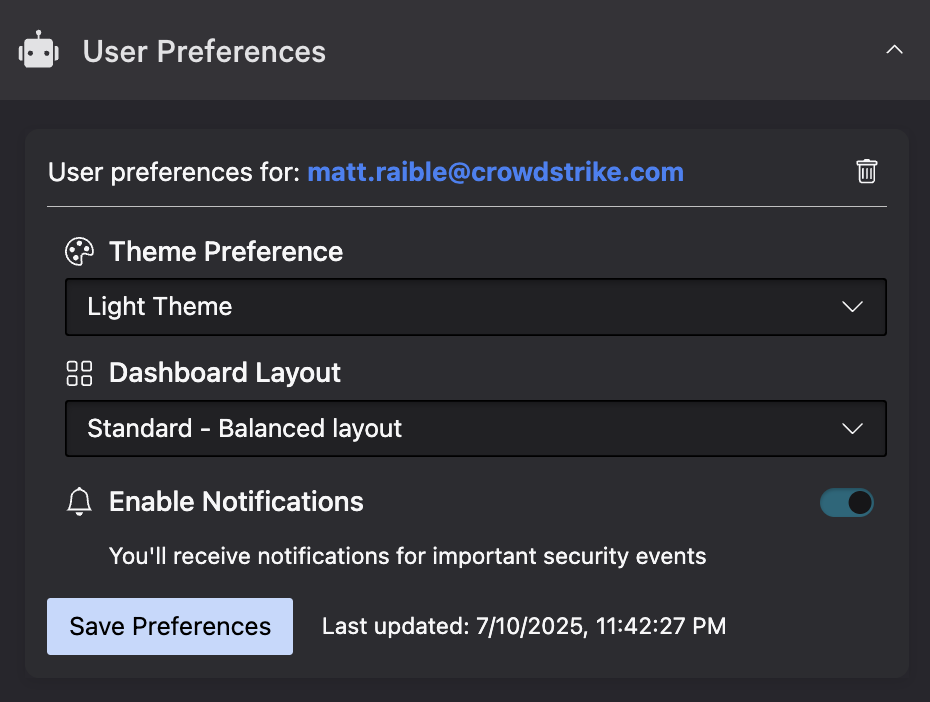
export { Home };
This code creates a UI extension in the Falcon console’s Host management module that looks as follows:
Collection Recommended Practices in UI Extensions
- Connection Required: Always ensure you call
await falcon.connect()before attempting to access collections - Search Limitations: The
search()method’s filter parameter does NOT use FQL (Falcon Query Language). It requires exact matches for values - Error Handling: Implement proper error handling as network issues or permission problems can occur
- Pagination: For collections with many objects, use the pagination parameters (
start,end,limit) when callinglist()
TIP: Collections work great with both UI extensions and standalone pages. They provide a consistent data layer across your entire Foundry app, letting you share data seamlessly between frontend and backend components.
Configuring Workflow Share Settings
One powerful feature of collections is the ability to control how they’re shared with workflows. When creating or updating a collection, you can specify one of three sharing options:
- Share with app workflows only – The collection can only be used within your app’s workflow templates
- Share with app workflows and Falcon Fusion SOAR – The collection is available in both your app’s workflows and in Falcon Fusion SOAR workflows
- Do not share with any workflows – The collection cannot be used in any workflows
From the CLI, you can configure these settings:
# Share with app workflows only (default)
foundry collections create --name "user_preferences" --schema \
  schemas/user_preferences.json --wf-expose=true \
  --wf-app-only-action=true --no-prompt

# Share with app workflows and Fusion SOAR
foundry collections create --name "user_preferences" --schema \
  schemas/user_preferences.json --wf-expose=true \
  --wf-app-only-action=false --no-prompt

# Do not share with workflows
foundry collections create --name "user_preferences" --schema \
  schemas/user_preferences.json --wf-expose=false \
  --wf-app-only-action=false --no-prompt
TIP: Remove --no-prompt to and the --wf-* flags to be prompted for sharing options.
You can also modify your manifest.yml after you’ve created a collection to change these settings.
The first command creates the following YAML below the collections element. You can see that system_action: true indicates the collection should only be shared with app workflows.
- name: user_preferences
  description: ""
  schema: collections/user_preferences.json
  permissions: []
  workflow_integration:
    system_action: true
    tags: []
The second one has system_action: false, which indicates the collection should be shared with Falcon Fusion SOAR.
- name: user_preferences
  description: ""
  schema: collections/user_preferences.json
  permissions: []
  workflow_integration:
    system_action: false
    tags: []
The third command turns off sharing with workflow_integration: null:
- name: user_preferences
  description: ""
  schema: collections/user_preferences.json
  permissions: []
  workflow_integration: null
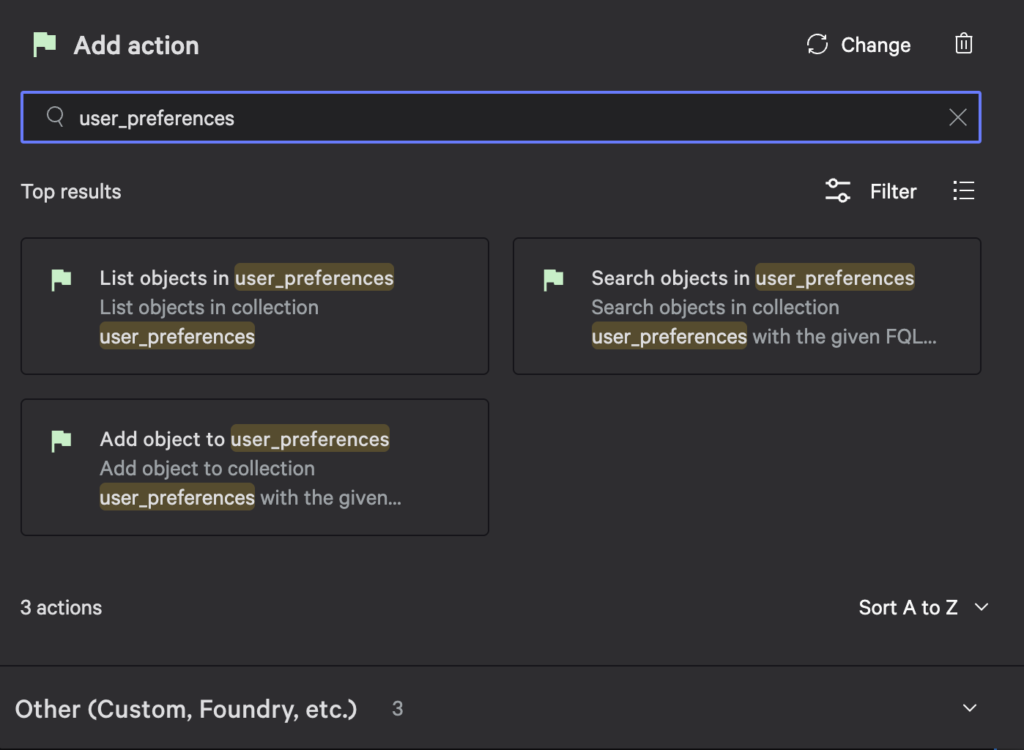
Once you’ve shared your collection with workflows, you can access them when building a new workflow. For example, the screenshot below shows the actions available for the user preferences collection.
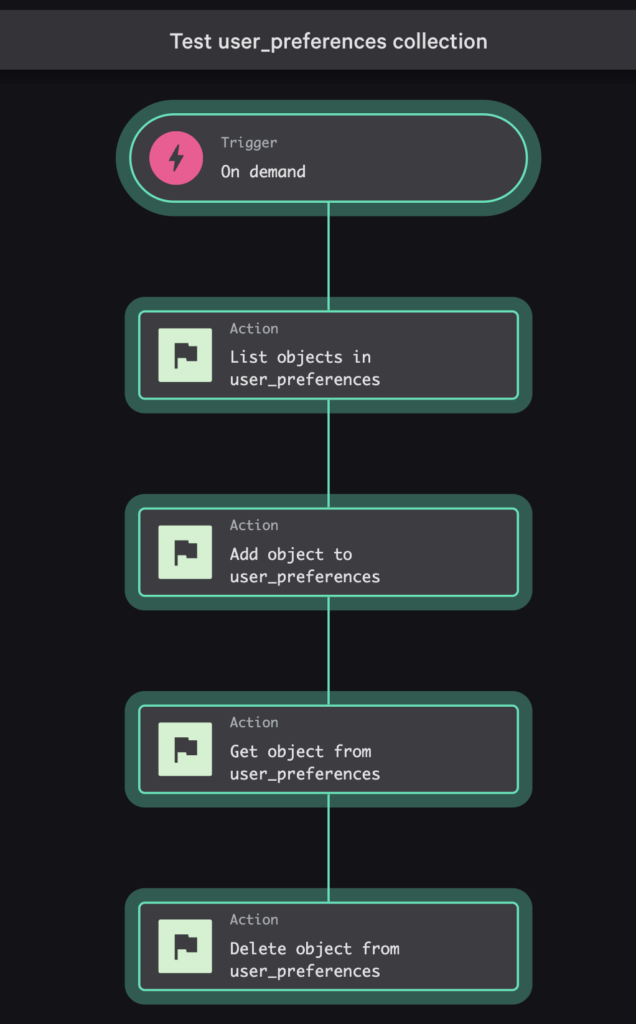
The sample for this blog post has an on-demand workflow that prompts the user for an object key value, the user’s ID, and a last updated timestamp.
The workflow uses collection actions to CRUD a user preferences object. If you want to see Get object and Delete object actions when searching, you have to change the trigger’s schema to use foundryCustomStorageObjectKey for the format of the object-key property.
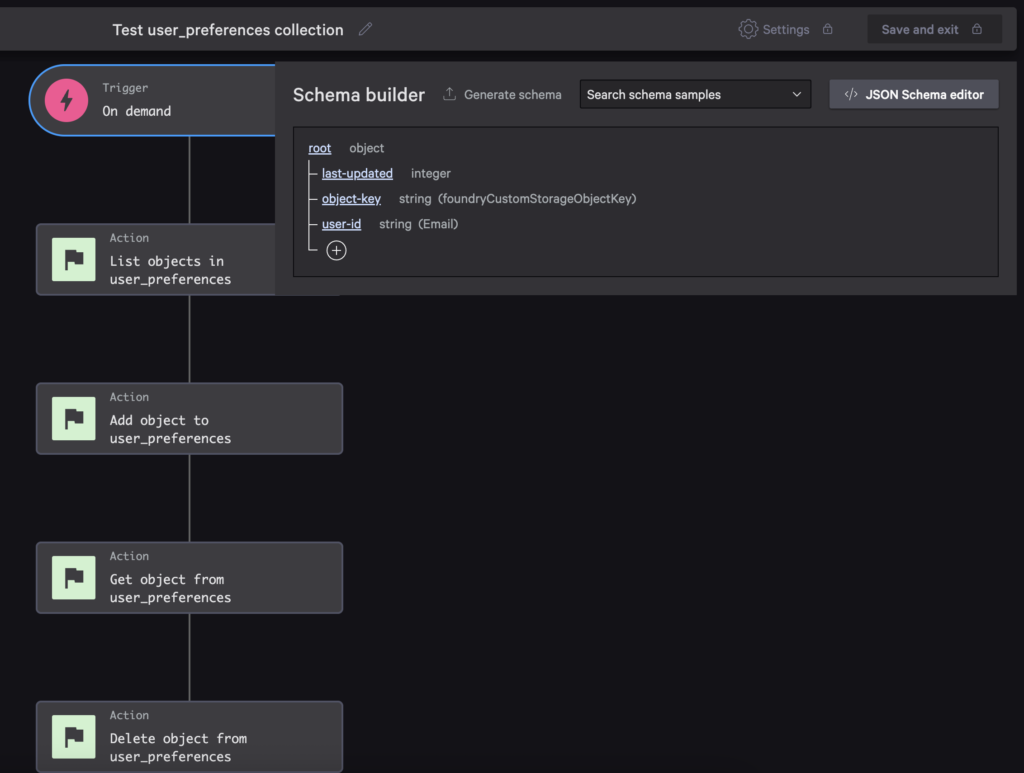
If you install the sample app and run this workflow, you can see the object added and deleted successfully.
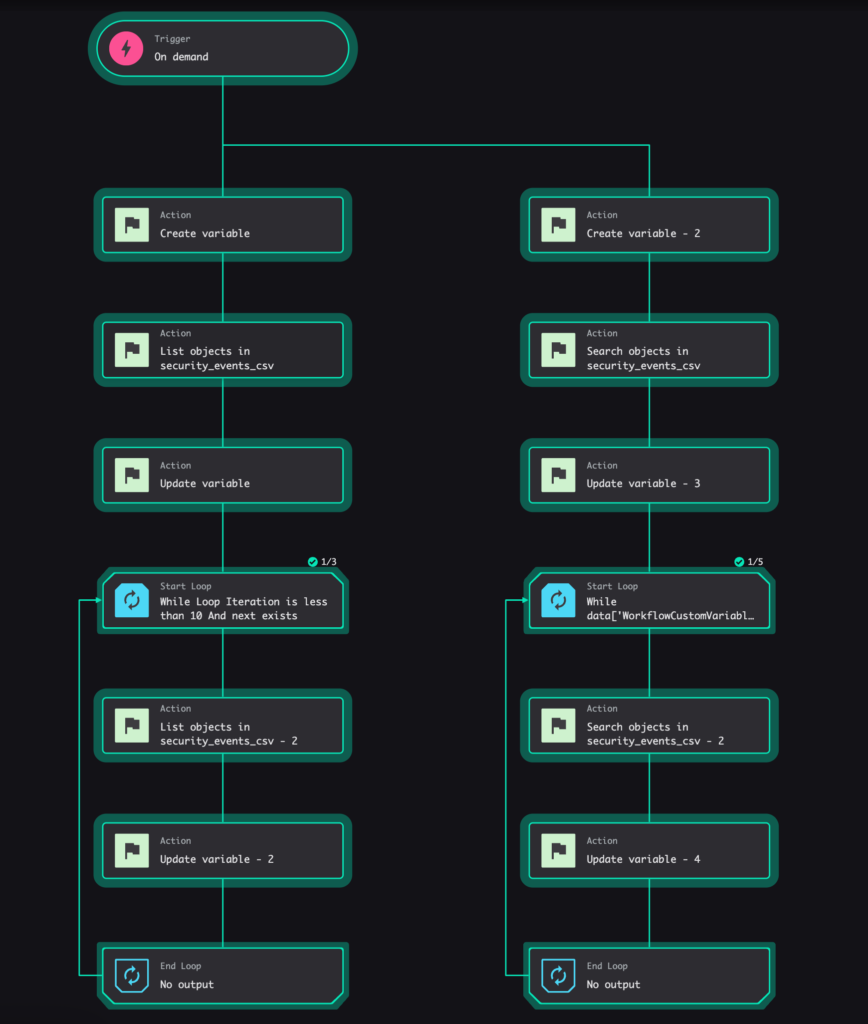
Pagination in Falcon Fusion SOAR Workflows
When working with large datasets in collections, Falcon Fusion SOAR provides two different pagination approaches: using next for List operations and offset for Search operations.
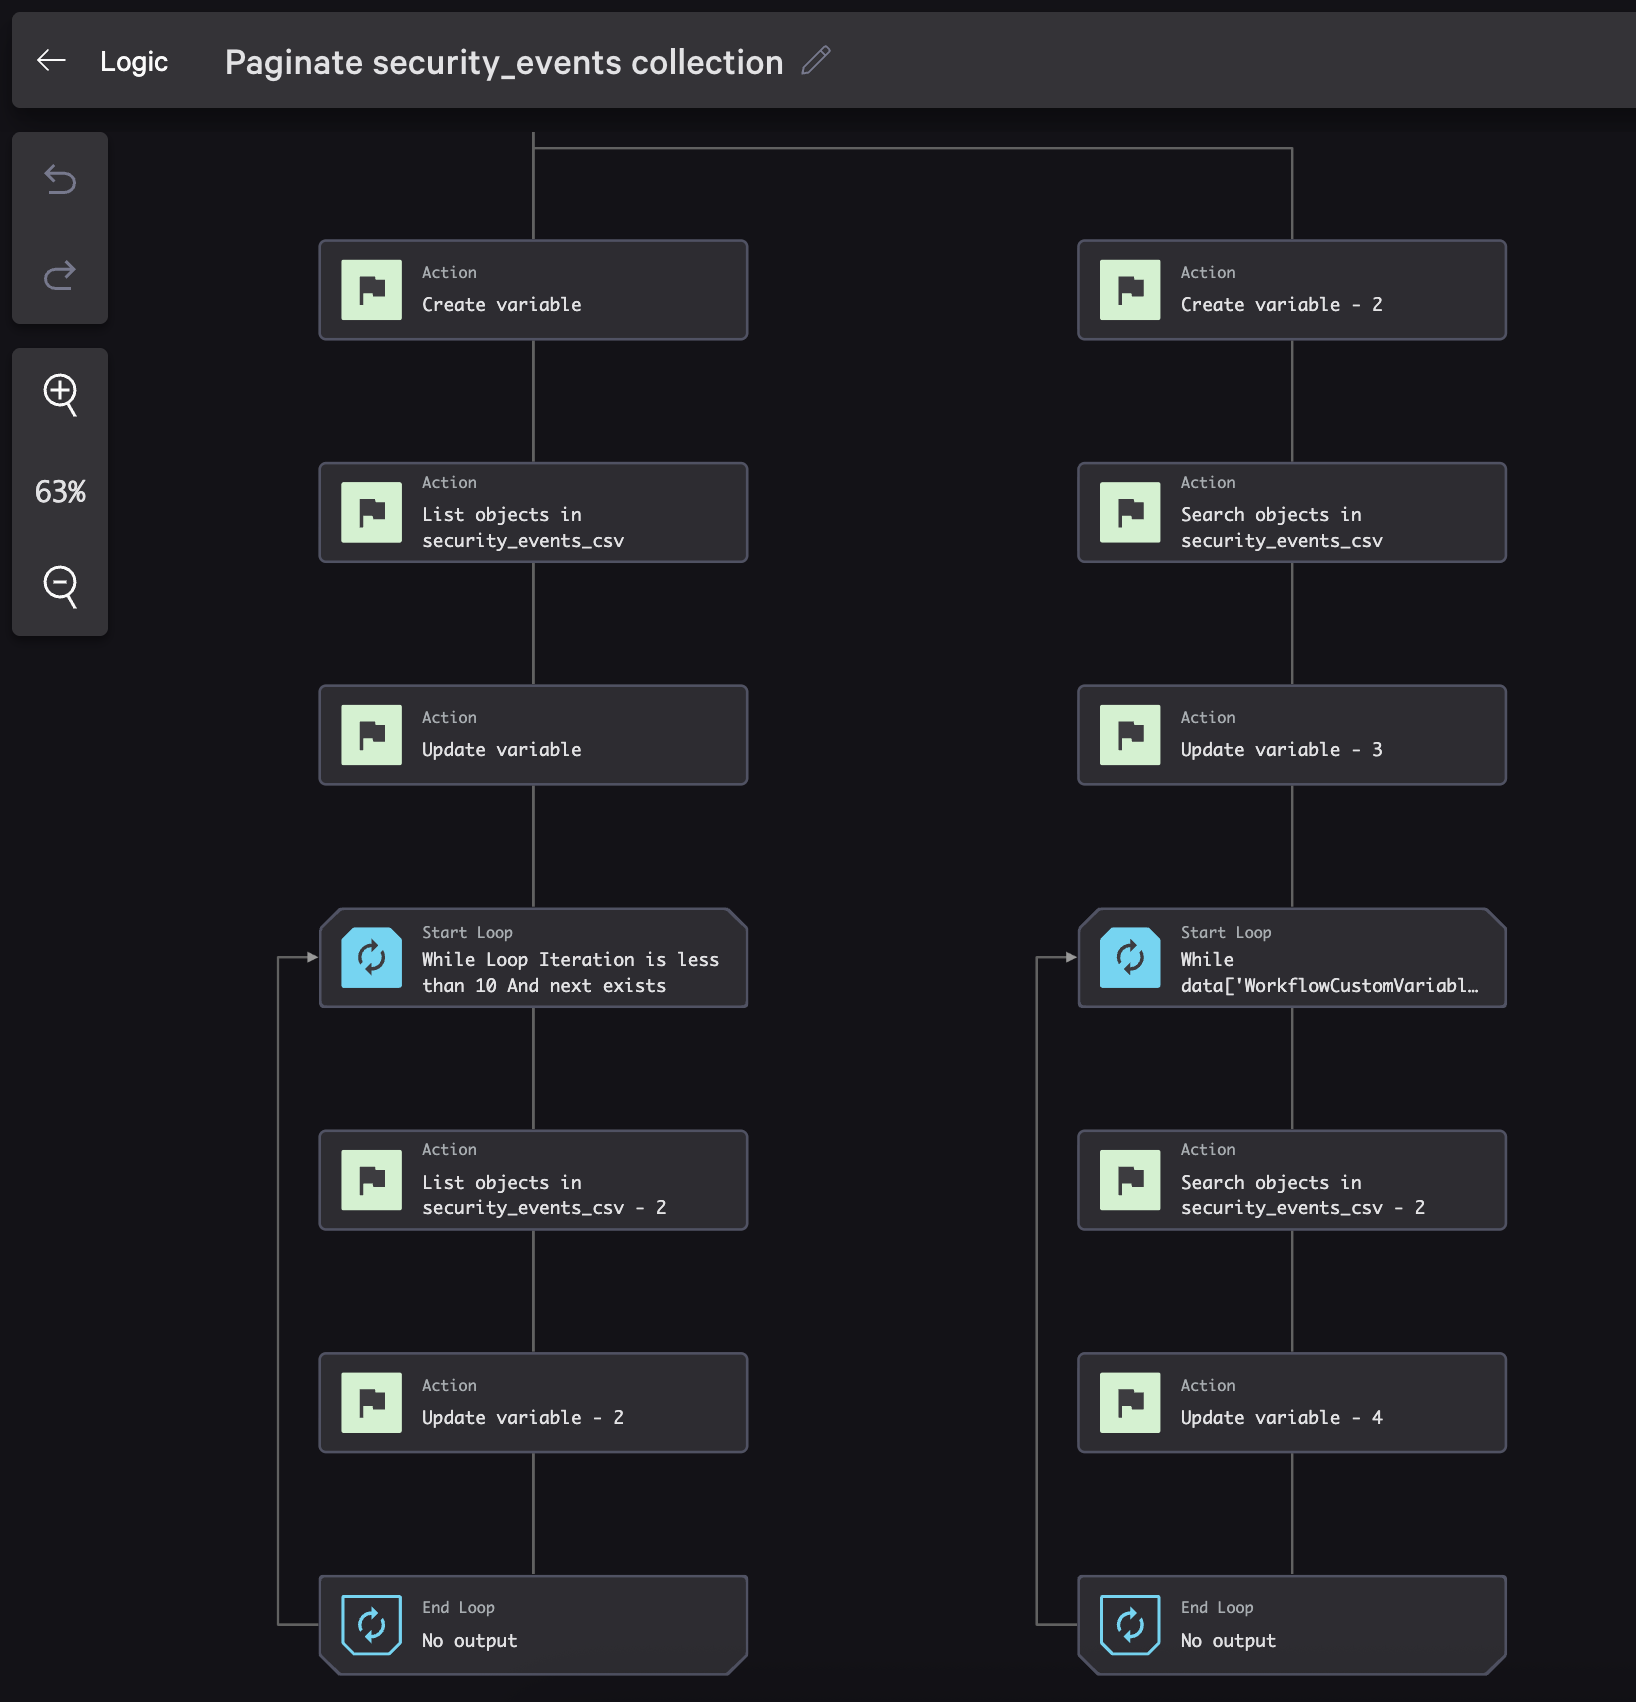
The screenshot below shows both operations in a single workflow. This workflow is named Paginate security_events collection and is part of the Collections Toolkit sample app.
If you want to try it out, you’ll need to clone the repo from GitHub, deploy the app, and then run the following commands to populate the security_events_csv collection with 250 security events.
# Clone repo
git clone https://github.com/CrowdStrike/foundry-sample-collections-toolkit
cd foundry-sample-collections-toolkit

# Deploy the app
foundry apps deploy

# Generate a bunch of events in a CSV file
cd functions
python generate_security_events.py

# Make sure the deployment is complete, then copy the App ID

# Set env variables and start the csv-import function
cd csv-import
export APP_ID=...

# Make sure your API client has CustomStorage scope
export FALCON_CLIENT_ID=...
export FALCON_CLIENT_SECRET...

# Run function
python -m venv .venv
source .venv/bin/activate
pip install -r requirements.txt --upgrade pip
python main.py

# Open a new terminal, and navigate to the functions directory
# Import the CSV file to your collection
sh import_large_events.sh

# Wait ~3 minutes until process completes...
Let’s look at how to implement both. Start by creating a workflow and adding an On demand trigger.
List Operation Pagination
The List collection objects operation uses a start parameter and returns a next token for pagination. It also has a limit parameter that defaults to 50. Here’s how to implement it:
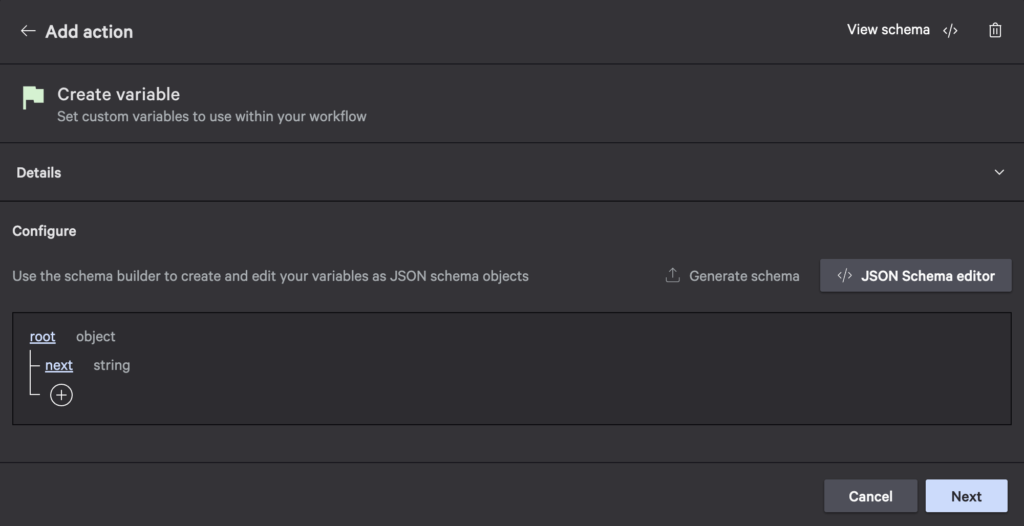
- Create a variable to store the next token:
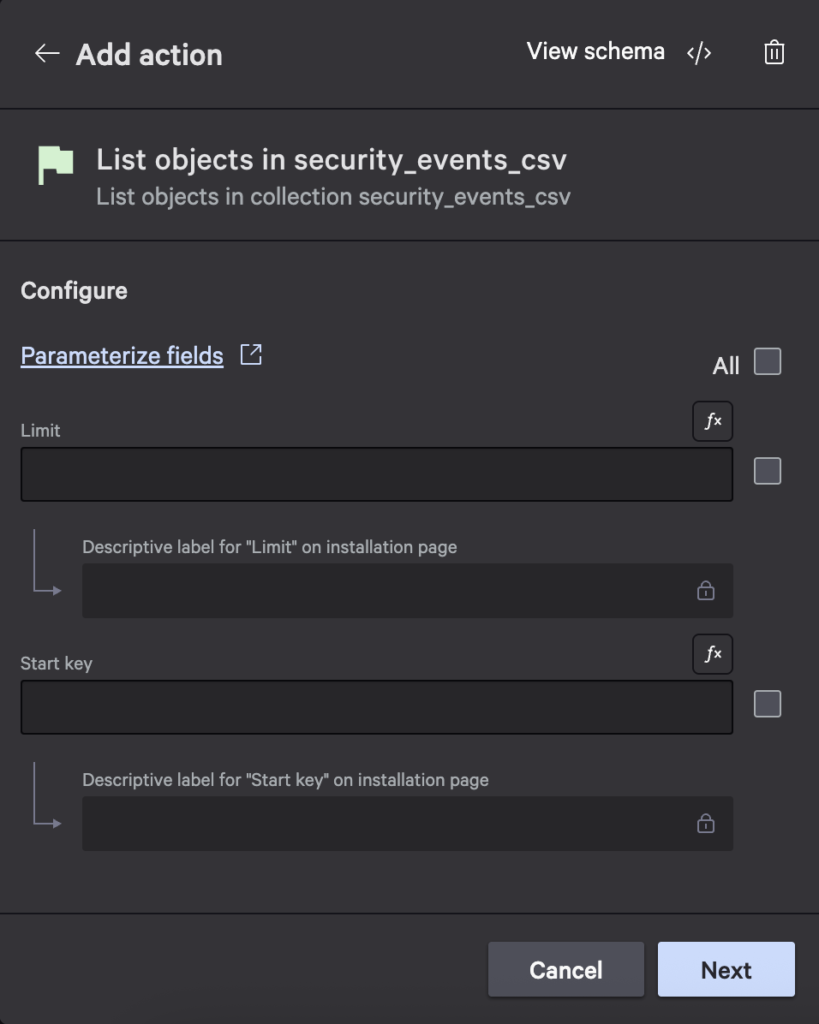
- Add the List objects in security_events_csv action:
- Add an Update variable action to set the next variable’s value to
${Next object key}: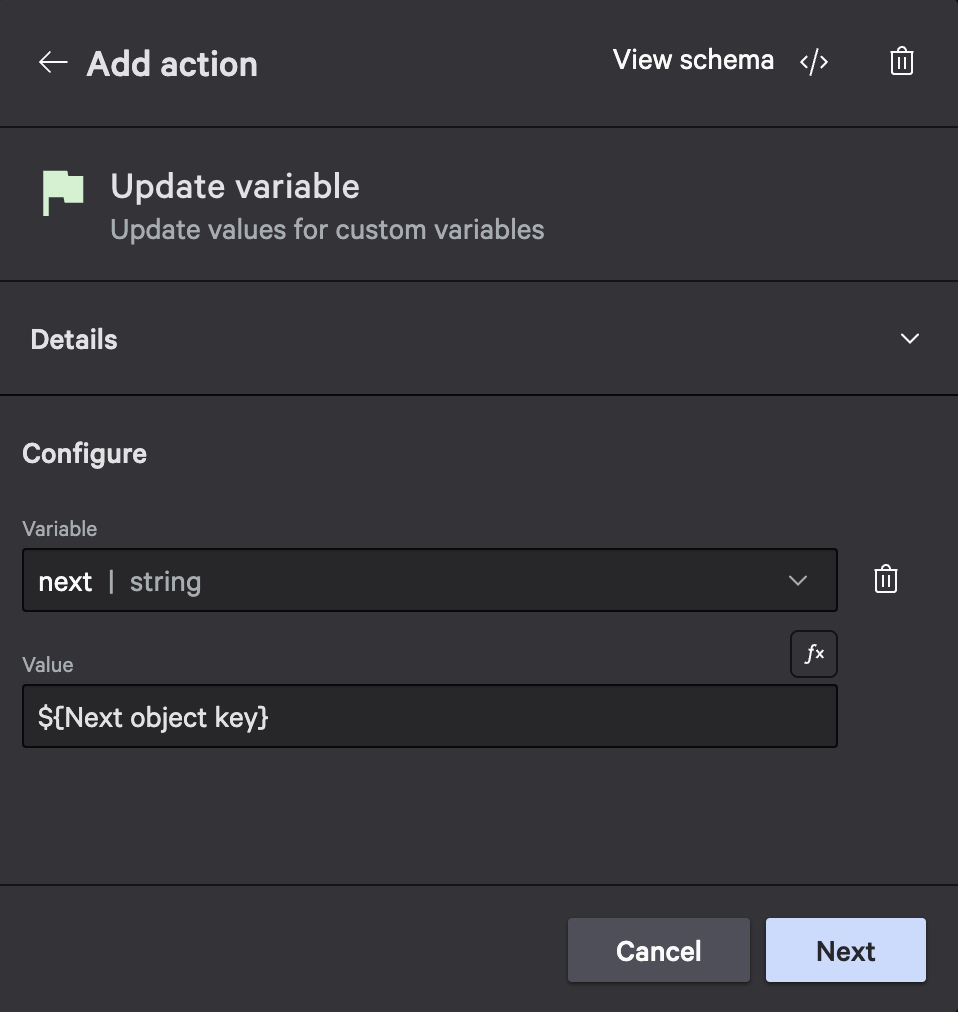
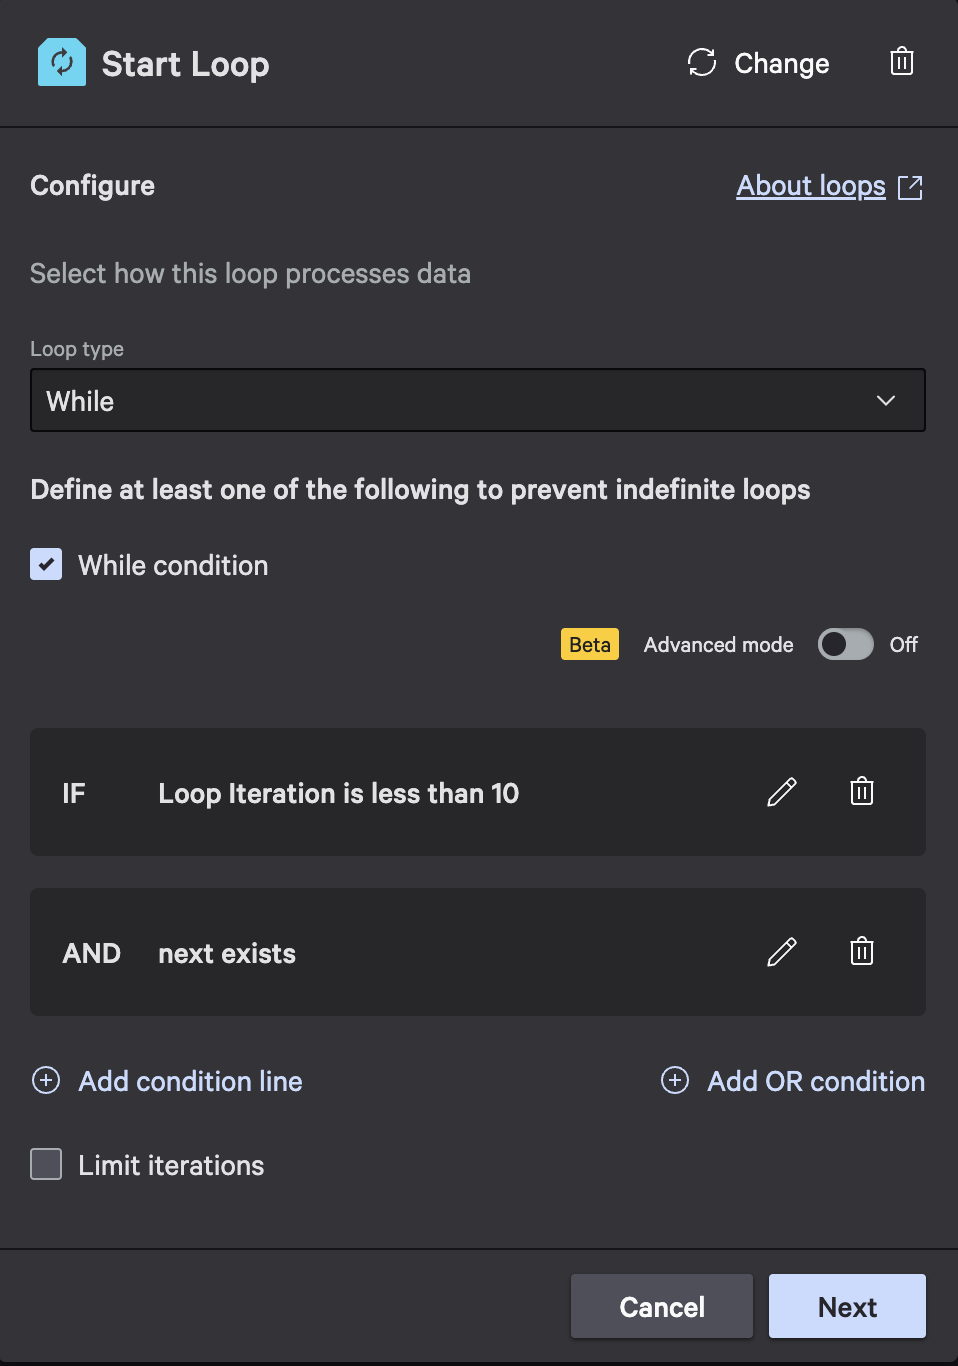
- Create a While loop that continues while next exists and iteration count is less than 10:
- In the while loop, add another List objects in security_events_csv action, set the limit, and specify
${next}as the Start key: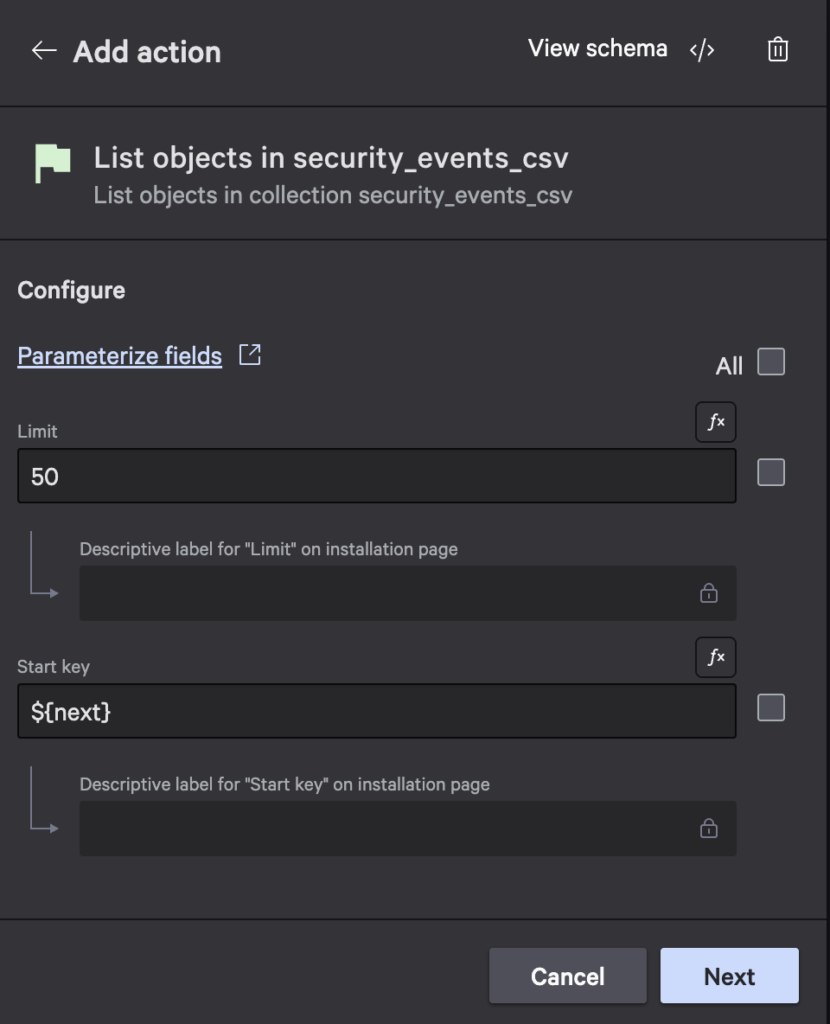
- Add another Update variable action to update the next variable and set its value to
${List objects in security_events_csv - 2: Next object key}: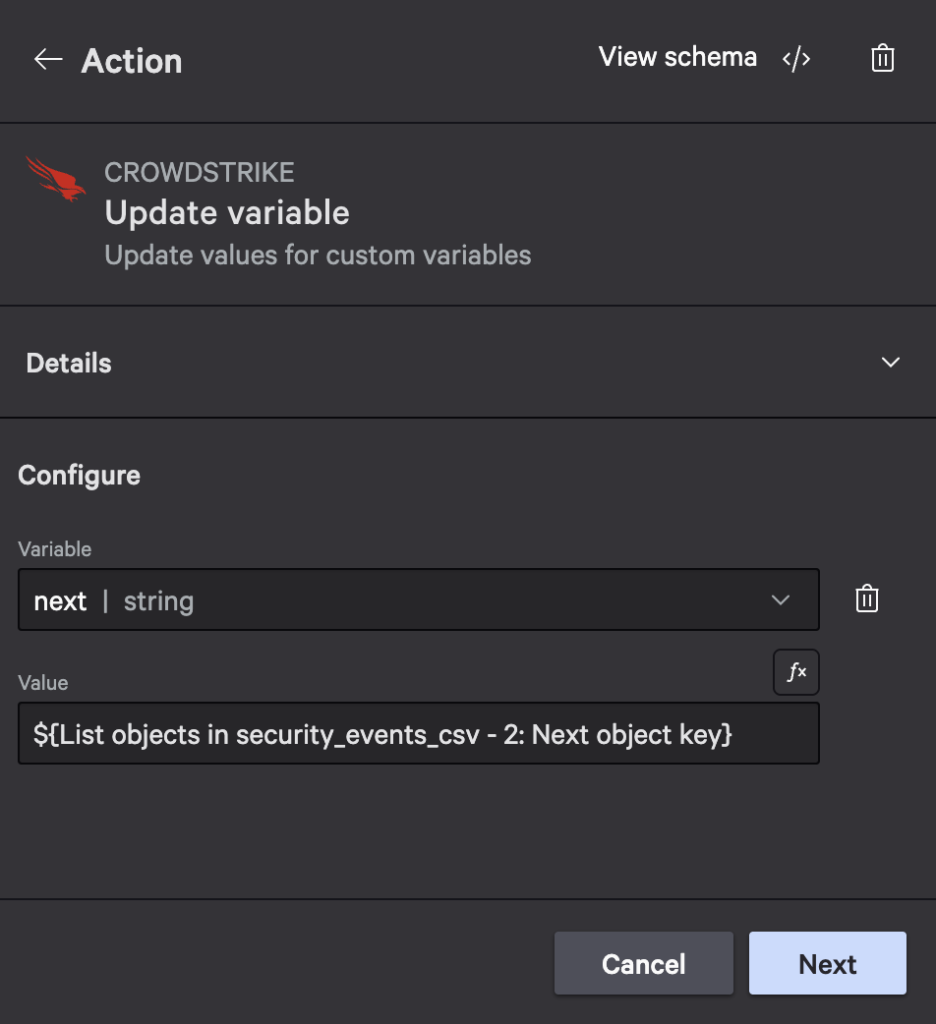
Search Operation Pagination
The Search for an object operation uses an offset parameter for pagination. Below is an example of how to implement it.
- Create a variable that has keys, offset, and total properties:
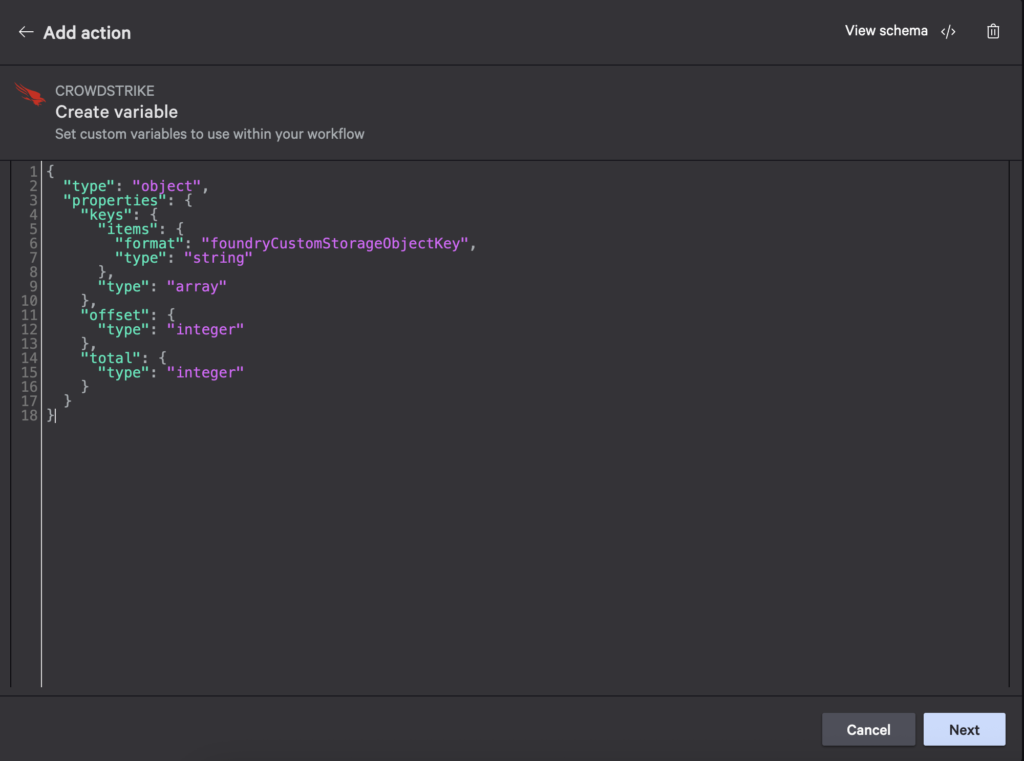
The value above is repeated below so you can copy and paste:
{ "type": "object", "properties": { "keys": { "items": { "format": "foundryCustomStorageObjectKey", "type": "string" }, "type": "array" }, "offset": { "type": "integer" }, "total": { "type": "integer" } } } - Add the Search objects in security_events_csv action, set the FQL filter to
event_type:'malware_detected', and add a limit of 10: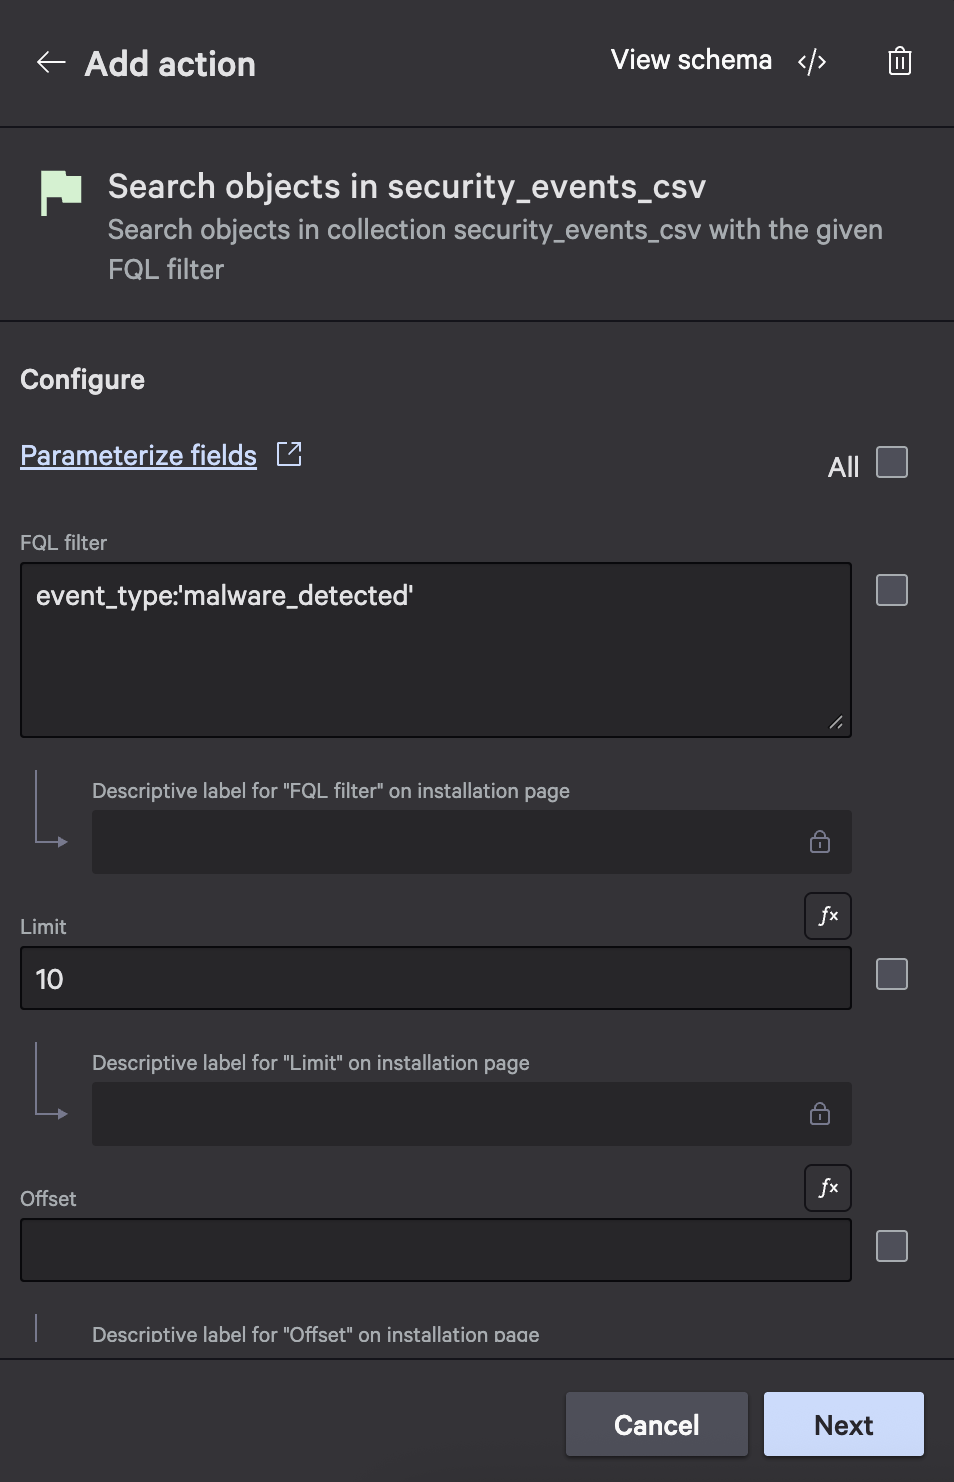
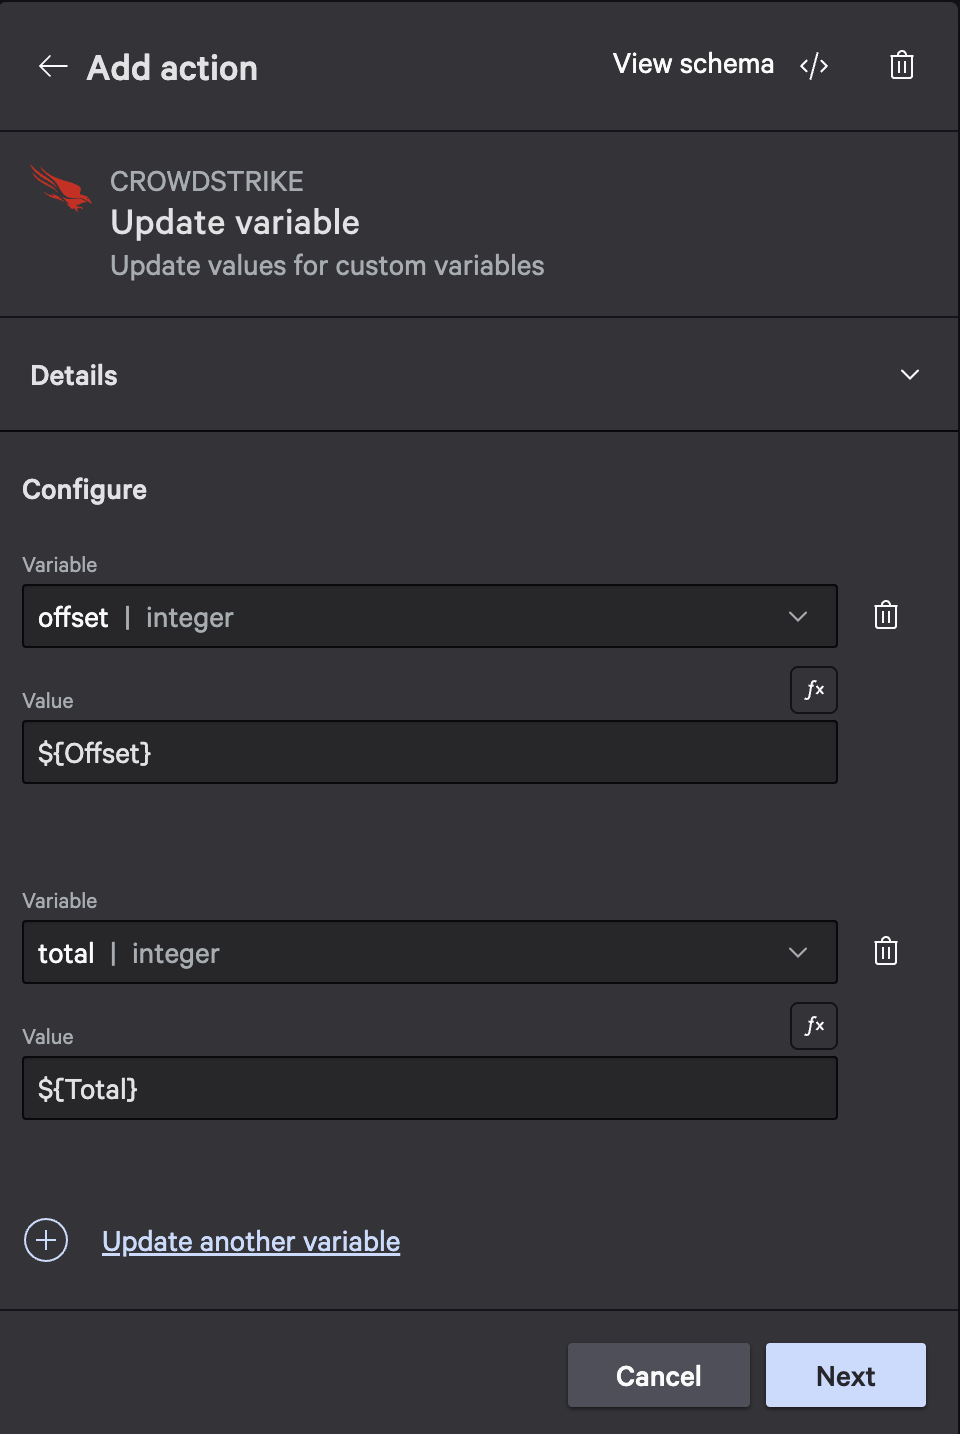
- Add an Update variable action that sets the offset and total values from variables:
- Add a while loop that continues while there are more results, limits iterations to five, and limits the loop time to five minutes:
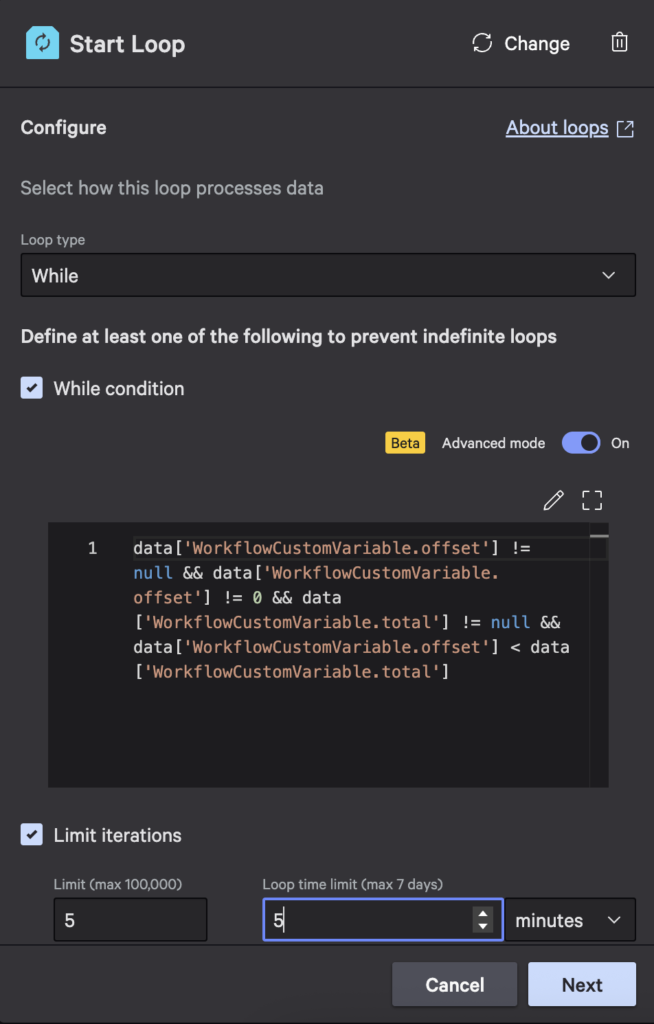
The value above is repeated below so you can copy and paste:
data['WorkflowCustomVariable.offset'] != null && data['WorkflowCustomVariable.offset'] != 0 && data['WorkflowCustomVariable.total'] != null && data['WorkflowCustomVariable.offset'] < data['WorkflowCustomVariable.total']
- Add another Search objects in security_events_csv action in the loop with the same filter as before and a limit of 10. Configure the offset to be
${offset}:
- Add an Update variable action to configure the keys, set the offset variable’s value to
${Search objects in security_events_csv - 2: Offset}from the inner search and set the total variable’s value to${Search objects in security_events_csv: Total}from the outer search: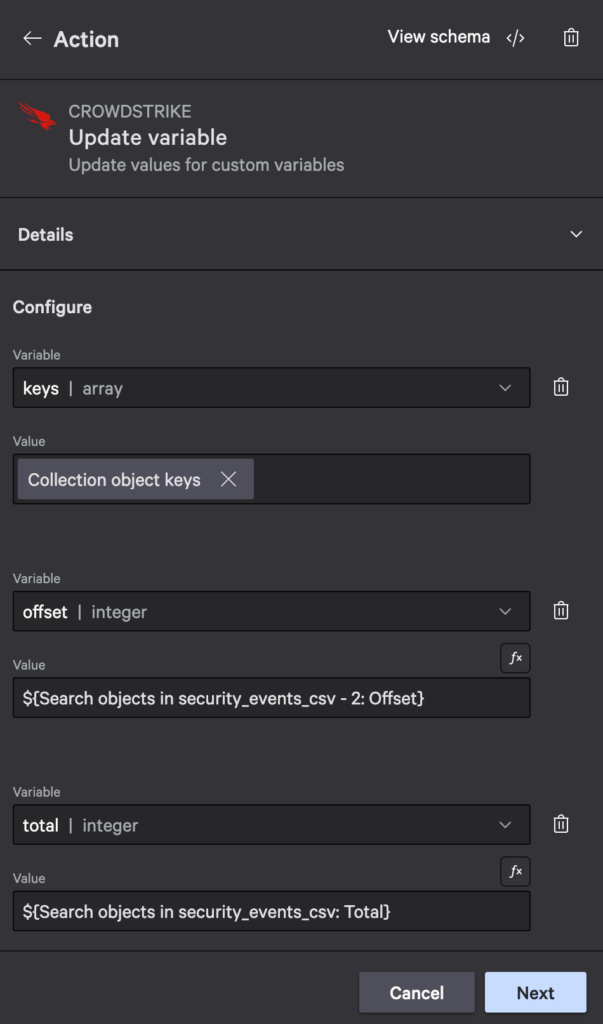
Running this workflow will result in an execution like the screenshot below.
Best Practices
There are a few best practices you should use when adding pagination to your collection actions in workflows:
- Set Reasonable Limits:
- List operations: Use 50 items per page
- Search operations: Use smaller limits (3-20) for filtered results
- Implement Safety Checks:
- Add maximum iteration count (e.g., < 10 iterations)
- Add timeout limits (e.g., 5 minute limit)
- Track total results for Search operations
- Store Results:
- Use workflow variables to accumulate results across iterations
- Store object keys in arrays for further processing
- Update pagination tokens/offsets after each iteration
By following these patterns, you can efficiently process large collections datasets while maintaining good performance and preventing infinite loops in your workflows.
Managing Collection Access with RBAC
For sensitive data, you’ll want to control who can access your collections. Falcon Foundry provides robust Role-Based Access Control (RBAC) capabilities to restrict access to specific collections.
To implement access control for your collections:
- Create custom roles and permissions:
# Create a permission for collection access
foundry auth roles create --name "threat-intel-access" --description "Access to threat intelligence data"
- Assign permissions to collections:
# Create a collection with restricted access
foundry collections create --name "threat_intel" --schema schema.json --permissions "threat-intel-access-permission"
- Update app manifest: Your app’s manifest file will reflect the permissions setup:
collections: - name: threat_intel description: 'Threat intelligence data' schema: collections/threat_intel.json permissions: - threat-intel-access-permission - Assign roles to users: Once deployed, a Falcon Administrator can assign the custom roles to appropriate users through the Falcon Console.
This approach ensures that only authorized users can access your sensitive collection data.
Searching Collections with FQL
Collections support Falcon Query Language (FQL) for sophisticated filtering and searching. You can search across all your indexed fields using familiar syntax:
# Basic equality search
api_client.command("SearchObjects",
                  filter="user_id:'john.smith'",
                  collection_name="user_configs",
                  limit=10,
                  headers=headers
                  )

# Numeric comparisons
api_client.command("SearchObjects",
                  filter="confidence_threshold:>80",
                  collection_name="threat_intel",
                  limit=10,
                  headers=headers
                  )

# Combining conditions with AND
api_client.command("SearchObjects",
                  filter="user_id:'john.smith'+last_login:>1623456789",
                  collection_name="user_configs",
                  limit=10,
                  headers=headers
                  )

# Combining conditions with OR
api_client.command("SearchObjects",
                  filter="user_id:['john.smith','jane.doe']",
                  collection_name="user_configs",
                  limit=10,
                  headers=headers
                  )

# Wildcard searches
api_client.command("SearchObjects",
                  filter="hostname:*'web-server*'",
                  collection_name="host_inventory",
                  limit=10,
                  headers=headers
                  )
In addition to your indexed fields, you can also use built-in fields:
x-cs-object-name: Search for objects by namex-cs-schema-version: Find objects by their schema version
NOTE: It is not possible to search objects in collections by metadata, for example last_modified_time. You can only search the objects by the fields defined in the schema as indexable / searchable.
Accessing Collections via the Falcon API
You can directly access your Falcon Foundry collections using the CrowdStrike Falcon API, which is useful for integration with external systems or automation scripts. To do this, you’ll need to set up the proper authentication and headers.
Creating an API Client with Custom Storage Scopes
First, you’ll need to create an API client with the appropriate permissions:
- In the Falcon console, go to Support and resources > API clients and keys
- Create a new API client
- Select read and write scopes for Custom storage
Making Direct API Calls
Once you have your API client, you can interact with your collections directly:
# Specify the BASE_URL for the Falcon API
export FALCON_BASE_URL=https://api.us-2.crowdstrike.com

# Get an access token for the Falcon API
https -f POST $FALCON_BASE_URL/oauth2/token \
  client_id=your_client_id \
  client_secret=your_client_secret

# Set the value of the returned access_token as an environment variable
TOKEN=eyJ...

# List objects in your app's collection
APP_ID=your_app_id
COLLECTION_NAME=event_logs
https $FALCON_BASE_URL/customobjects/v1/collections/$COLLECTION_NAME/objects \
  "Authorization: Bearer $TOKEN" X-CS-APP-ID:$APP_ID
The X-CS-APP-ID Header
A critical component of collection API access is the X-CS-APP-ID header, which specifies which app’s collections you’re accessing. This is required when making direct API calls to collections, such as during testing or when integrating with external systems. Note that when accessing collections from within Falcon Foundry workflows or functions, this header is automatically provided by the platform.
# Example of adding an object to a collection via direct API call
https PUT $FALCON_BASE_URL/customobjects/v1/collections/$COLLECTION_NAME/objects/my-object-key \
  "Authorization: Bearer $TOKEN" \
  X-CS-APP-ID:$APP_ID \
  < object_data.json
This direct API access gives you tremendous flexibility in how you integrate collections with your existing systems and workflows.
Learn More About Falcon Foundry Collections
Ready to dive deeper? Here are your next steps:
- Start small: Create a simple collection for user preferences in your next Falcon Foundry project
- Explore the documentation: Check out the official Falcon Foundry collections docs for advanced schema options
- Join the community: Connect with other Falcon Foundry developers in CrowdStrike’s Falcon Foundry Developer Forums
- Build something real: Pick a current project where you’re managing state manually and refactor it to use collections
Collections might seem like a simple feature, but they solve complex problems elegantly. By providing structured, persistent storage that integrates natively with Falcon Foundry’s ecosystem, they eliminate a whole category of infrastructure concerns that used to slow down security application development.
The next time you find yourself thinking “I wish I had somewhere reliable to store this data,” remember that collections are there, ready to make your life as a security developer just a little bit easier.
Want more? Check out the Collections Toolkit sample app on GitHub to see all the code used in this post.
If you’d like to dive deeper into the core CrowdStrike components mentioned in the prerequisites, here are some resources:
- Falcon Insight XDR: Learn more about Falcon Insight XDR
- Falcon Prevent: Learn more about Falcon Prevent
- Falcon Next-Gen SIEM: Explore Falcon Next-Gen SIEM
- Falcon Foundry: Discover Falcon Foundry
What challenges are you facing with data persistence in your security workflows? Have you tried using collections in your Falcon Foundry projects? I’d love to hear about your experiences! Drop me a line on Twitter @mraible or connect with me on LinkedIn.