Ingesting Custom Data into Falcon LogScale with Falcon Foundry Functions

When building security workflows, you often need custom data in Falcon LogScale for correlation and analysis. Whether it’s threat intelligence from third-party sources, custom alerts from proprietary systems, or aggregated security events, having this data alongside Falcon telemetry unlocks richer queries and correlations.
In this tutorial, you’ll learn how to deploy a working app that ingests custom data into Falcon LogScale, use the included UI to submit data immediately, and understand how the function uses both FalconPy approaches (Service Class and Uber Class). You’ll also learn how to test and customize the function locally and query your ingested data in Falcon LogScale.
Note: This blog focuses on ingesting data into Falcon LogScale, the data foundation for Falcon Next-Gen SIEM. Any data ingested using this approach is available within Falcon Next-Gen SIEM for search and analysis.
Table of Contents:
- Prerequisites
- Architecture Overview
- Deploy the Sample App
- Using the App
- Understanding the Ingest Function
- Test Locally
- Query Your Data in LogScale
- Query LogScale from UI Extensions
- Customization Ideas
- Troubleshooting Common Issues
- Start Ingesting Custom Data Today
- Learn More About LogScale Data Ingestion
Prerequisites
To follow along, you’ll need a CrowdStrike Falcon tenant with Falcon Foundry enabled.
For local testing (optional): the Foundry CLI (installation guide), Python 3.13+ or Docker, and a code editor.
If you’re new to Foundry Functions, check out Dive into Falcon Foundry Functions with Python for an introduction to functions, handlers, and the development workflow.
Architecture Overview
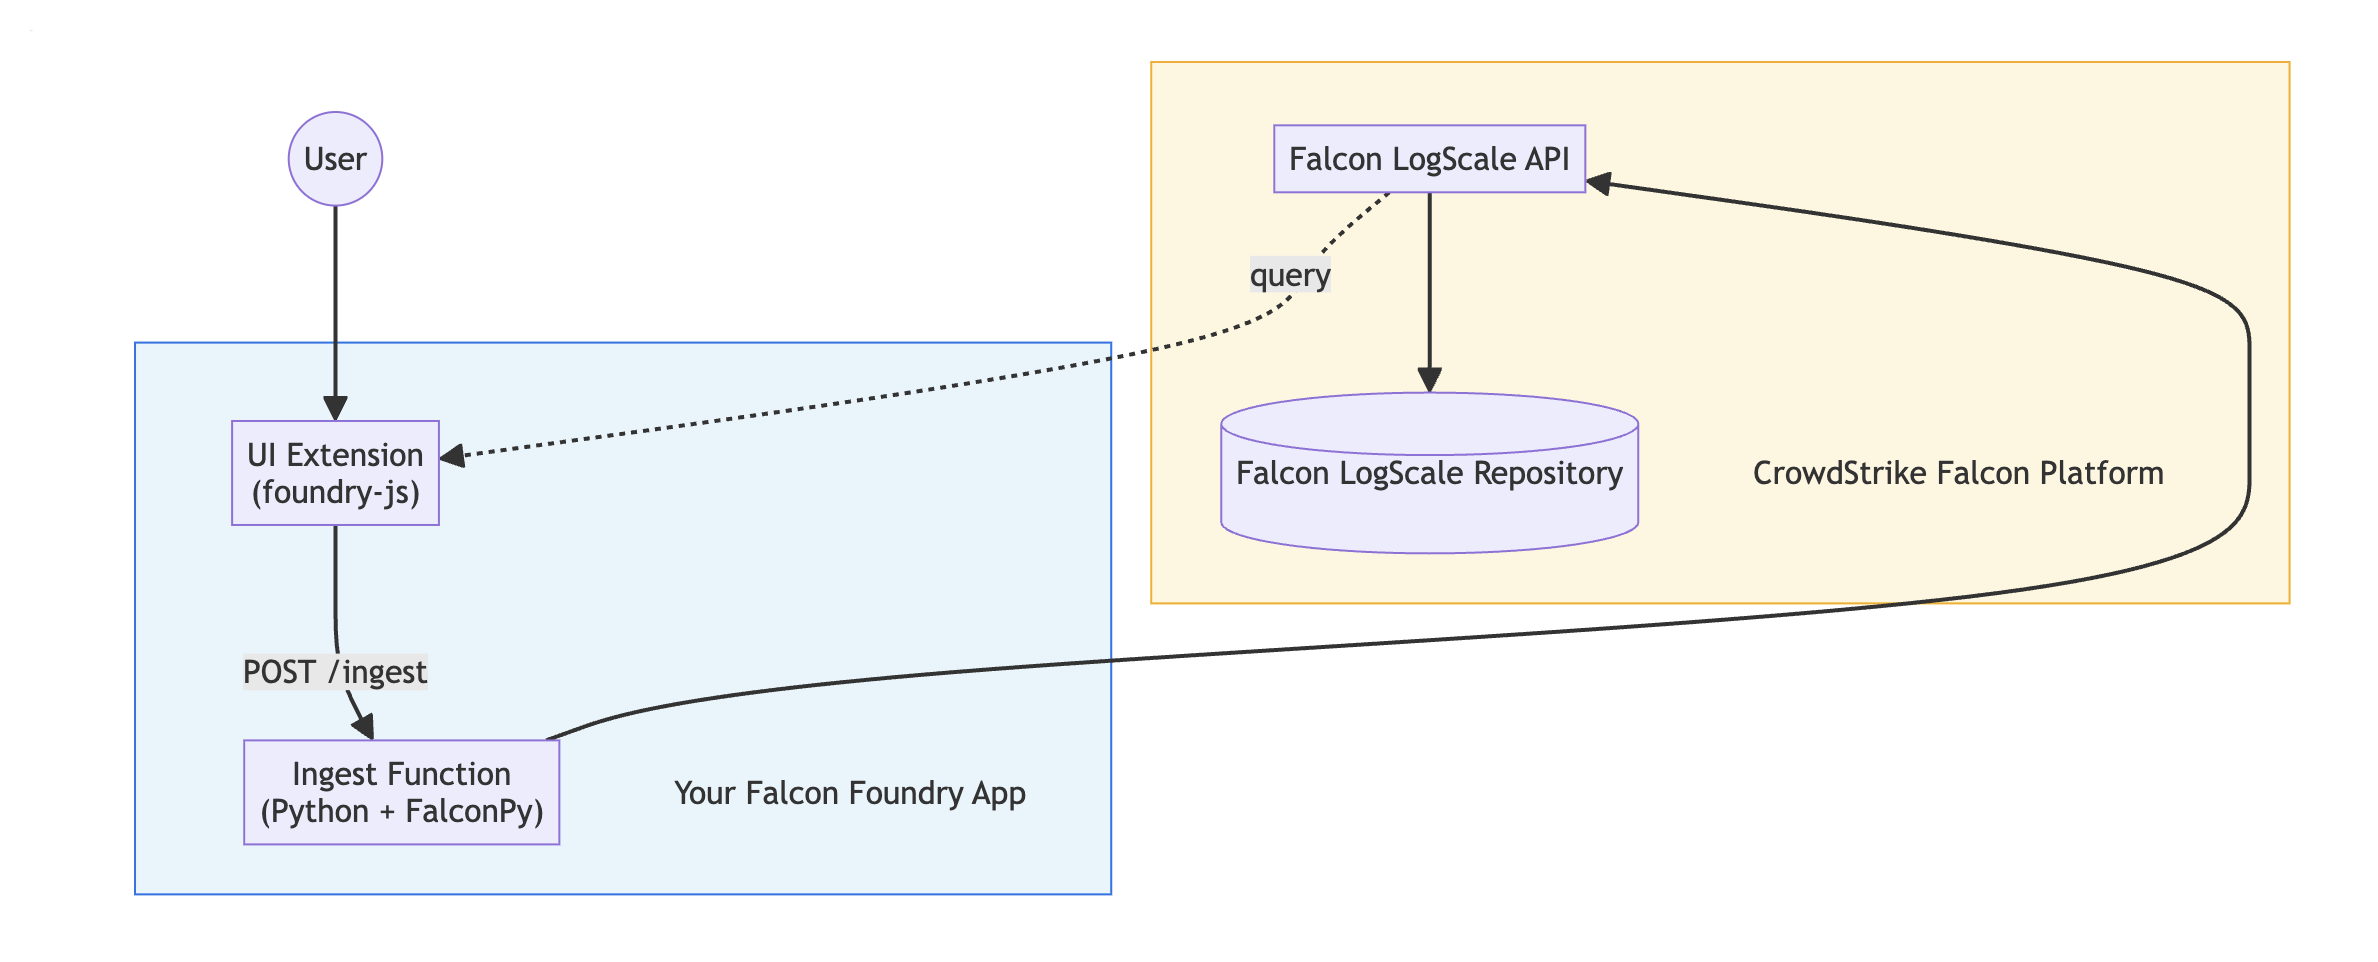
Before diving into code, let’s understand how the pieces fit together. The Falcon Foundry function processes the data and handles ingestion. The FalconPy SDK communicates with the LogScale API. A Falcon LogScale repository stores your custom data. And the UI Extension provides a form for users to submit data (included in the sample).
The data flows like this: a user submits data in the UI form, which calls the function endpoint. The function validates and converts the data, then FalconPy sends it to the Falcon LogScale API. Finally, the data gets stored in your Falcon LogScale repository.
Deploy the Sample App
Let’s get the app deployed so you can see it in action. You have four options depending on your preference.
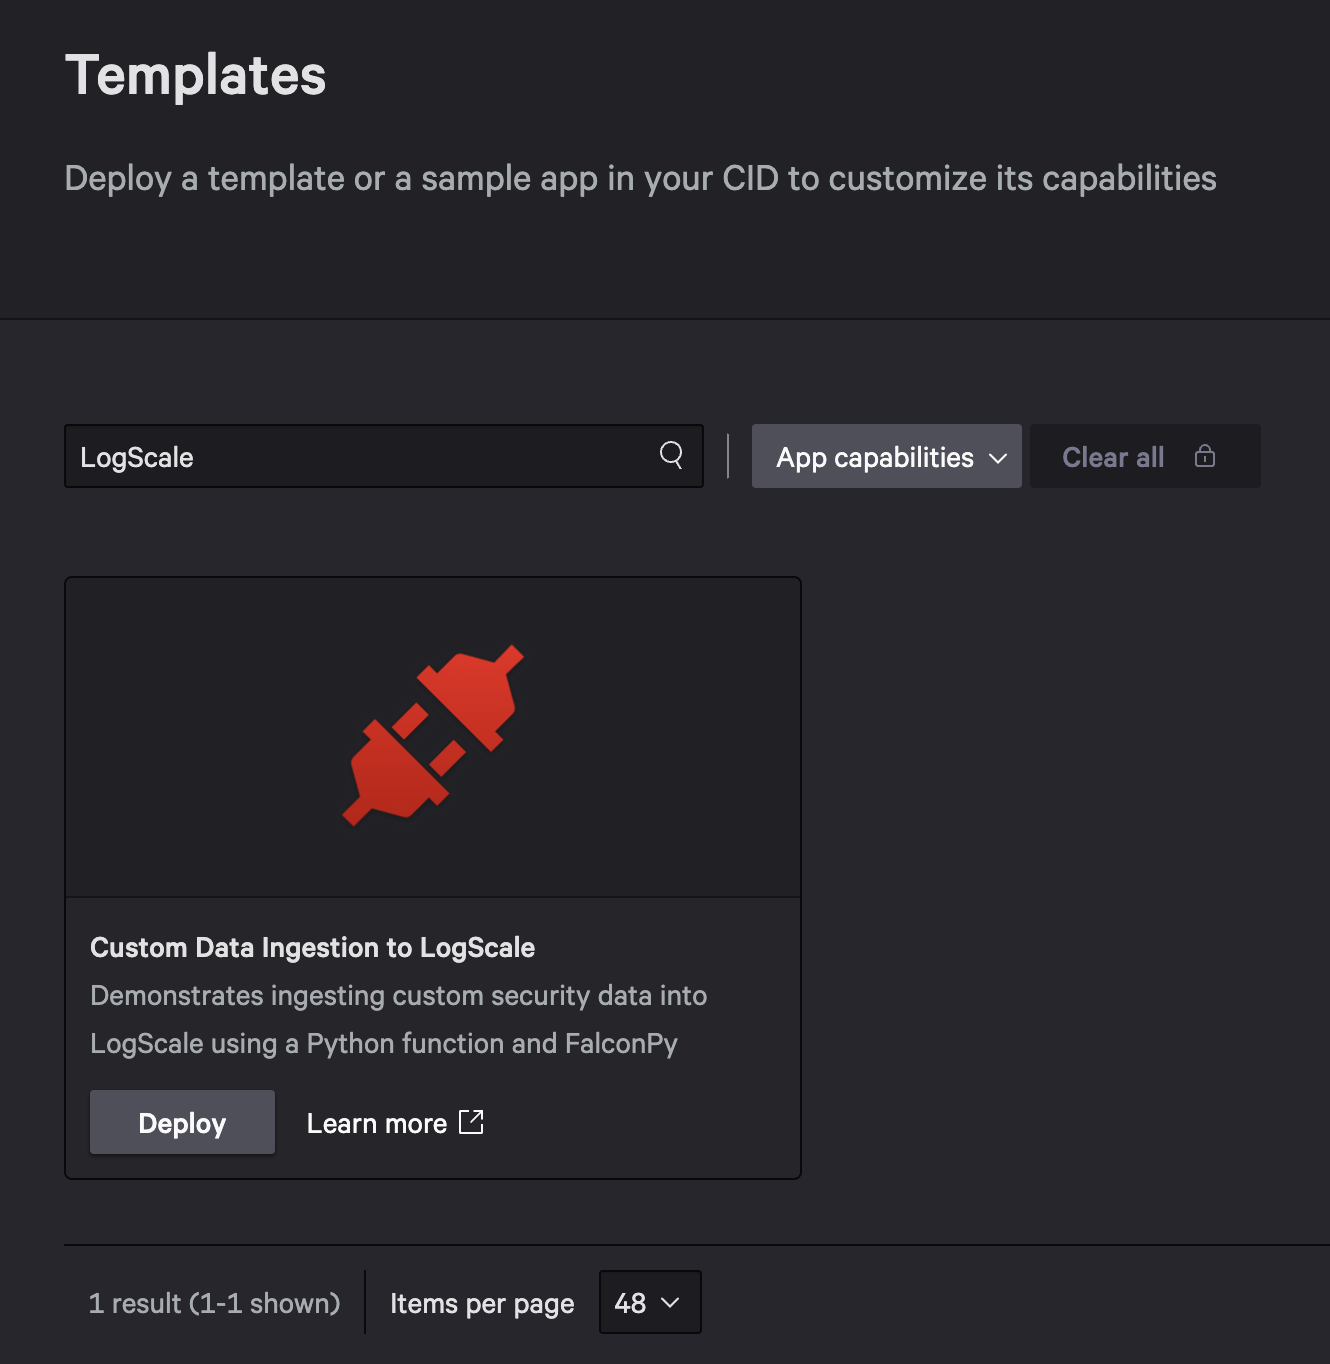
Option 1: Deploy from Template (Easiest) – In the Falcon console, go to Foundry > Templates, search for LogScale, and click Deploy on the “Custom Data Ingestion to LogScale” template. After the deploy completes, click Release.
Option 2: Import from GitHub – Download the ZIP from GitHub, then in the Falcon console go to Foundry > App manager > Import app and upload it. Deploy and release.
Option 3: CLI with Template – Run foundry apps create, select Yes when asked to create from a template, and choose “Custom Data Ingestion to LogScale”. Then:
foundry apps deploy
foundry apps release
Option 4: CLI from GitHub – Clone and deploy directly:
git clone https://github.com/CrowdStrike/foundry-sample-logscale
cd foundry-sample-logscale
foundry apps deploy
foundry apps release
For all options, you can install the app from Foundry > App catalog. See Deploy a Foundry App Template in 5 Easy Steps for detailed steps.
Using the App
One of the success messages will have an Open App button you can use to navigate to the app. If that’s not available, navigate to Custom apps > Custom Data Ingestion to LogScale > Data Ingestion.
The form includes fields for Event Type (e.g., suspicious_login, malware_detection), Severity (dropdown: low, medium, high, critical), Description, and Additional Fields (JSON for custom attributes like IP addresses or file hashes).
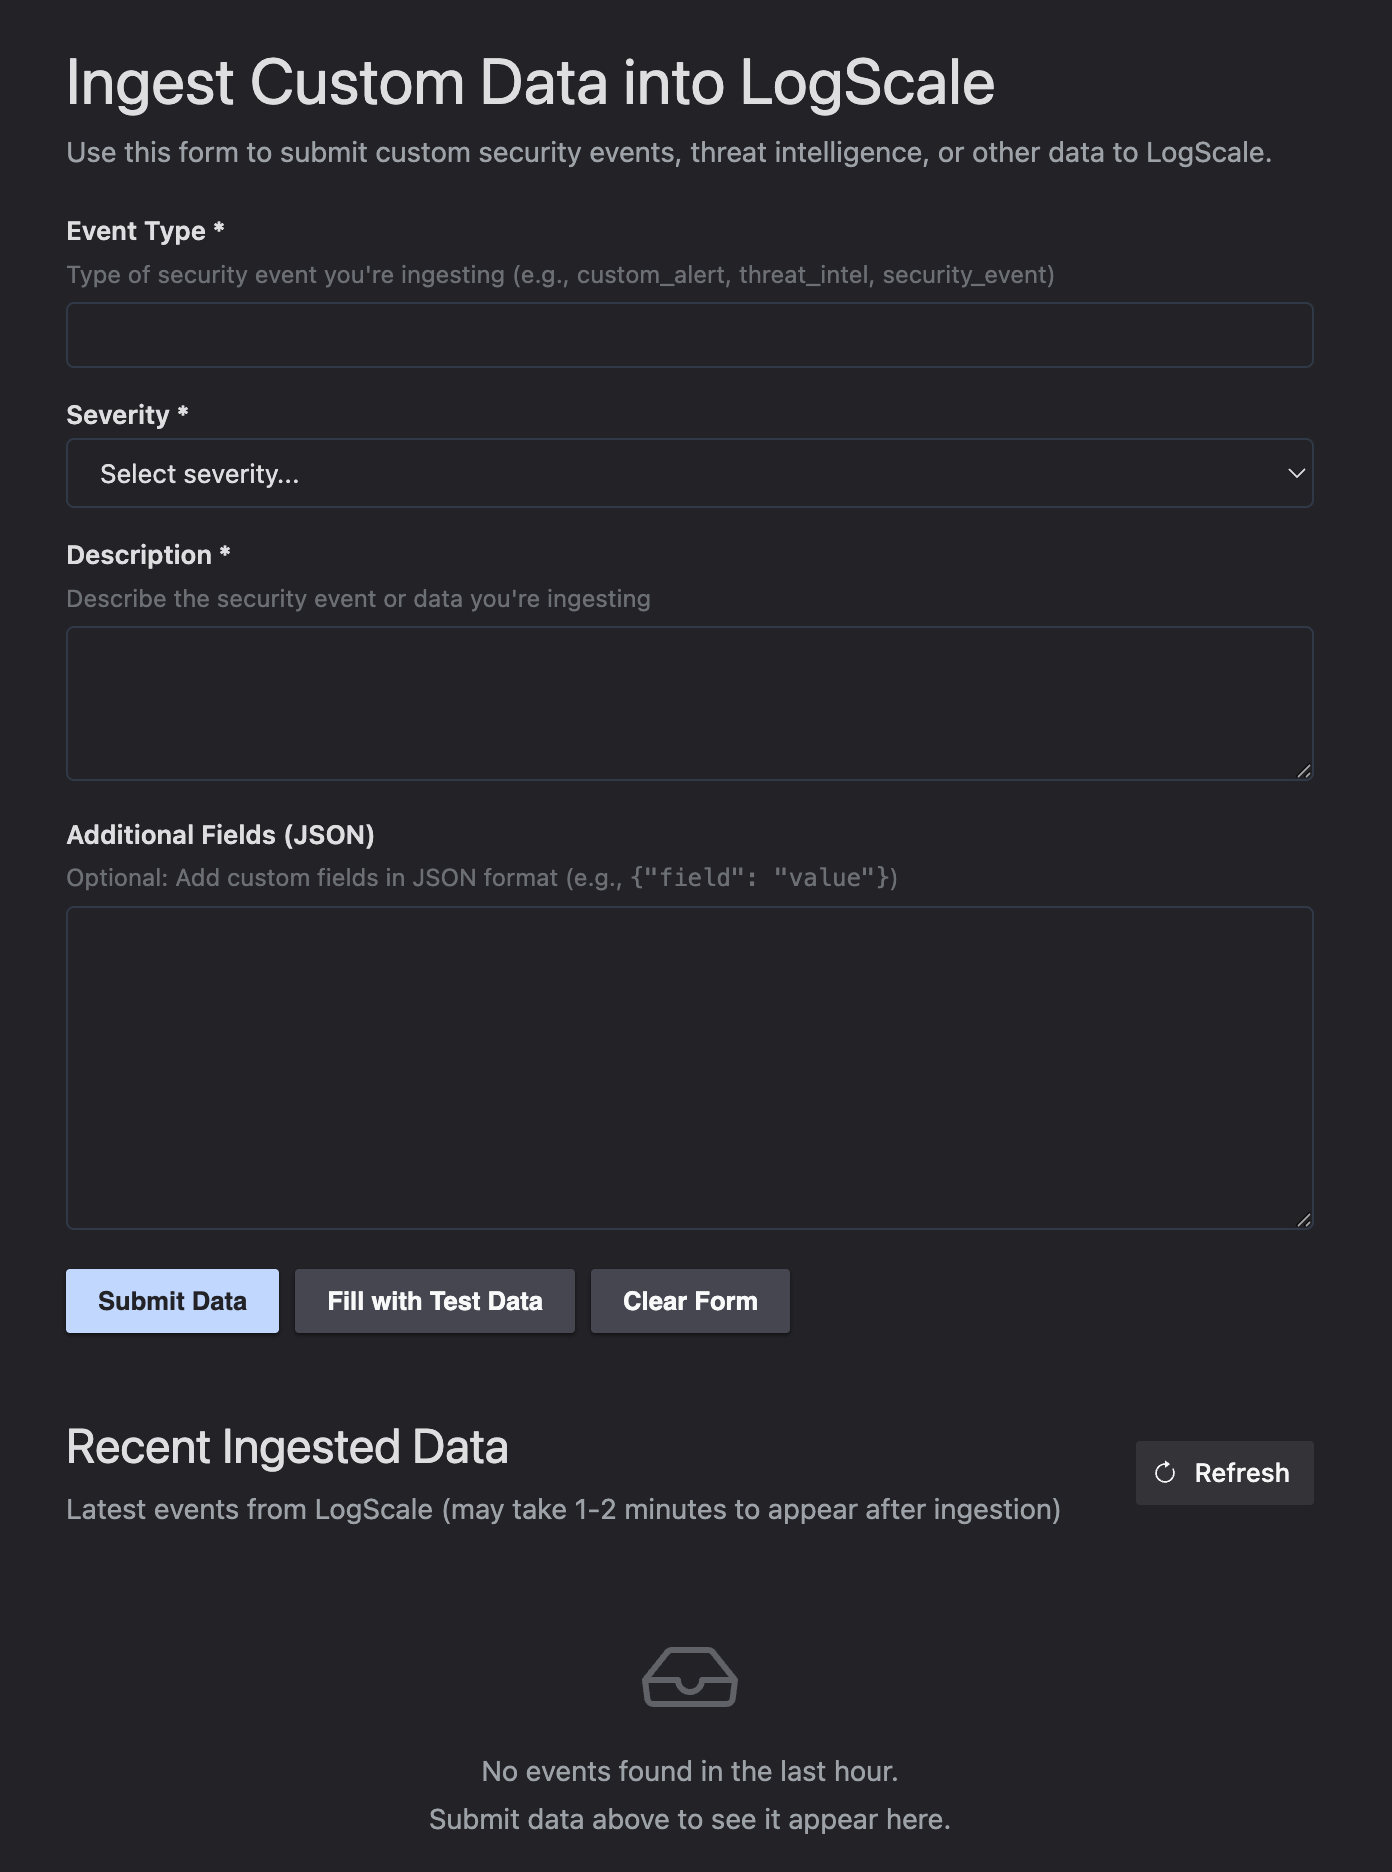
Click Fill with Test Data to populate the form with realistic security event data, or enter your own values. When you click Submit Data, the UI calls the function endpoint, which ingests the data into Falcon LogScale.
The bottom of the page shows Recent Ingested Data pulled directly from Falcon LogScale. This demonstrates how UI extensions can both write to and read from Falcon LogScale. Click Refresh to see your newly submitted events (they may take 1-2 minutes to appear after ingestion).
You can also call the function endpoint directly via API for programmatic ingestion (see Test Locally).
Understanding the Ingest Function
Now that you have the app deployed, let’s walk through how the ingestion function works. The function demonstrates both FalconPy approaches for Falcon LogScale data ingestion.
Open functions/ingest/main.py in your local copy (if using Option 4) or view it on GitHub.
"""Demonstrates ingesting data to Foundry LogScale repo"""
import os
from io import BytesIO
from json import dumps
from logging import Logger
from crowdstrike.foundry.function import APIError, Function, Request, Response
from falconpy import FoundryLogScale, APIHarnessV2


FUNC = Function.instance()


@FUNC.handler(method="POST", path="/ingest")
def on_create(request: Request, config: dict, logger: Logger) -> Response:
    """Write data into LogScale."""

    # Fetch the data to write from input payload
    data = request.body.get("data")
    if not data:
        logger.error("No data received in request")
        return Response(
            code=400,
            errors=[APIError(code=400, message="missing data from request body")]
        )

    # Convert the json input to binary for writing to LogScale
    try:
        json_binary = dumps(data).encode(encoding="utf-8")
    except TypeError as ex:
        logger.error("Invalid data provided in request body: %s", ex)
        return Response(
            code=400,
            errors=[APIError(code=400, message="invalid data in request body")]
        )

    # Set up headers for local testing (requires APP_ID env var)
    app_id = os.environ.get("APP_ID")
    headers = {"X-CS-APP-ID": app_id} if app_id else {}

    # Use Uber class or Service class based on config (deployed) or env var (local)
    use_uber_class = os.environ.get("USE_UBER_CLASS", "").lower() == "true"
    if config and config.get("use_uber_class"):
        use_uber_class = True

    if use_uber_class:
        logger.info("Using FalconPy APIHarnessV2 (Uber Class)")
        file_tuple = [("data_file", ("data_file", json_binary, "application/json"))]
        api_client = APIHarnessV2()
        result = api_client.command(
            "IngestDataV1",
            files=file_tuple,
            headers=headers
        )
    else:
        logger.info("Using FalconPy FoundryLogScale (Service Class)")
        json_file = BytesIO(json_binary)
        api_client = FoundryLogScale(ext_headers=headers)
        result = api_client.ingest_data(data_file=json_file)

    return Response(
        code=result["status_code"],
        body=result["body"]
    )


if __name__ == "__main__":
    FUNC.run()
The function validates input data exists, converts JSON to binary format (required by Falcon LogScale), and uses either the Service Class or Uber Class based on configuration.
Service Class (Recommended) with FoundryLogScale() is purpose-built and type-safe:
json_file = BytesIO(json_binary)
api_client = FoundryLogScale()
result = api_client.ingest_data(data_file=json_file)
Uber Class with APIHarnessV2() is more flexible but requires more boilerplate:
file_tuple = [("data_file", ("data_file", json_binary, "application/json"))]
api_client = APIHarnessV2()
result = api_client.command("IngestDataV1", files=file_tuple)
You need to construct the file tuple with the correct format, know the exact operation name (IngestDataV1), and pass the files parameter explicitly. The Service Class abstracts all of this away.
| Aspect | Service Class (FoundryLogScale) | Uber Class (APIHarnessV2) |
| Purpose | Purpose-built for Falcon LogScale | Generic interface for all APIs |
| Syntax | Simple, intuitive methods | Requires operation names and file tuples |
| Type Safety | Type-safe method signatures | Dynamic, less type checking |
| Flexibility | Falcon LogScale operations only | Access any CrowdStrike API |
| Best For | Most Falcon LogScale use cases | Advanced scenarios, newer endpoints |
You can switch between approaches via configuration in manifest.yml:
config:
  use_uber_class: false  # Set to true to use Uber Class
This design pattern is useful when you want to test both approaches or gradually migrate from one to the other. In production, you’ll typically stick with the Service Class unless you have a specific reason to use the Uber Class.
In deployed functions, FalconPy automatically handles authentication using the function’s execution context. No explicit credentials are needed in the code. This is one of the benefits of running inside Falcon Foundry: the platform manages authentication for you.
Test Locally
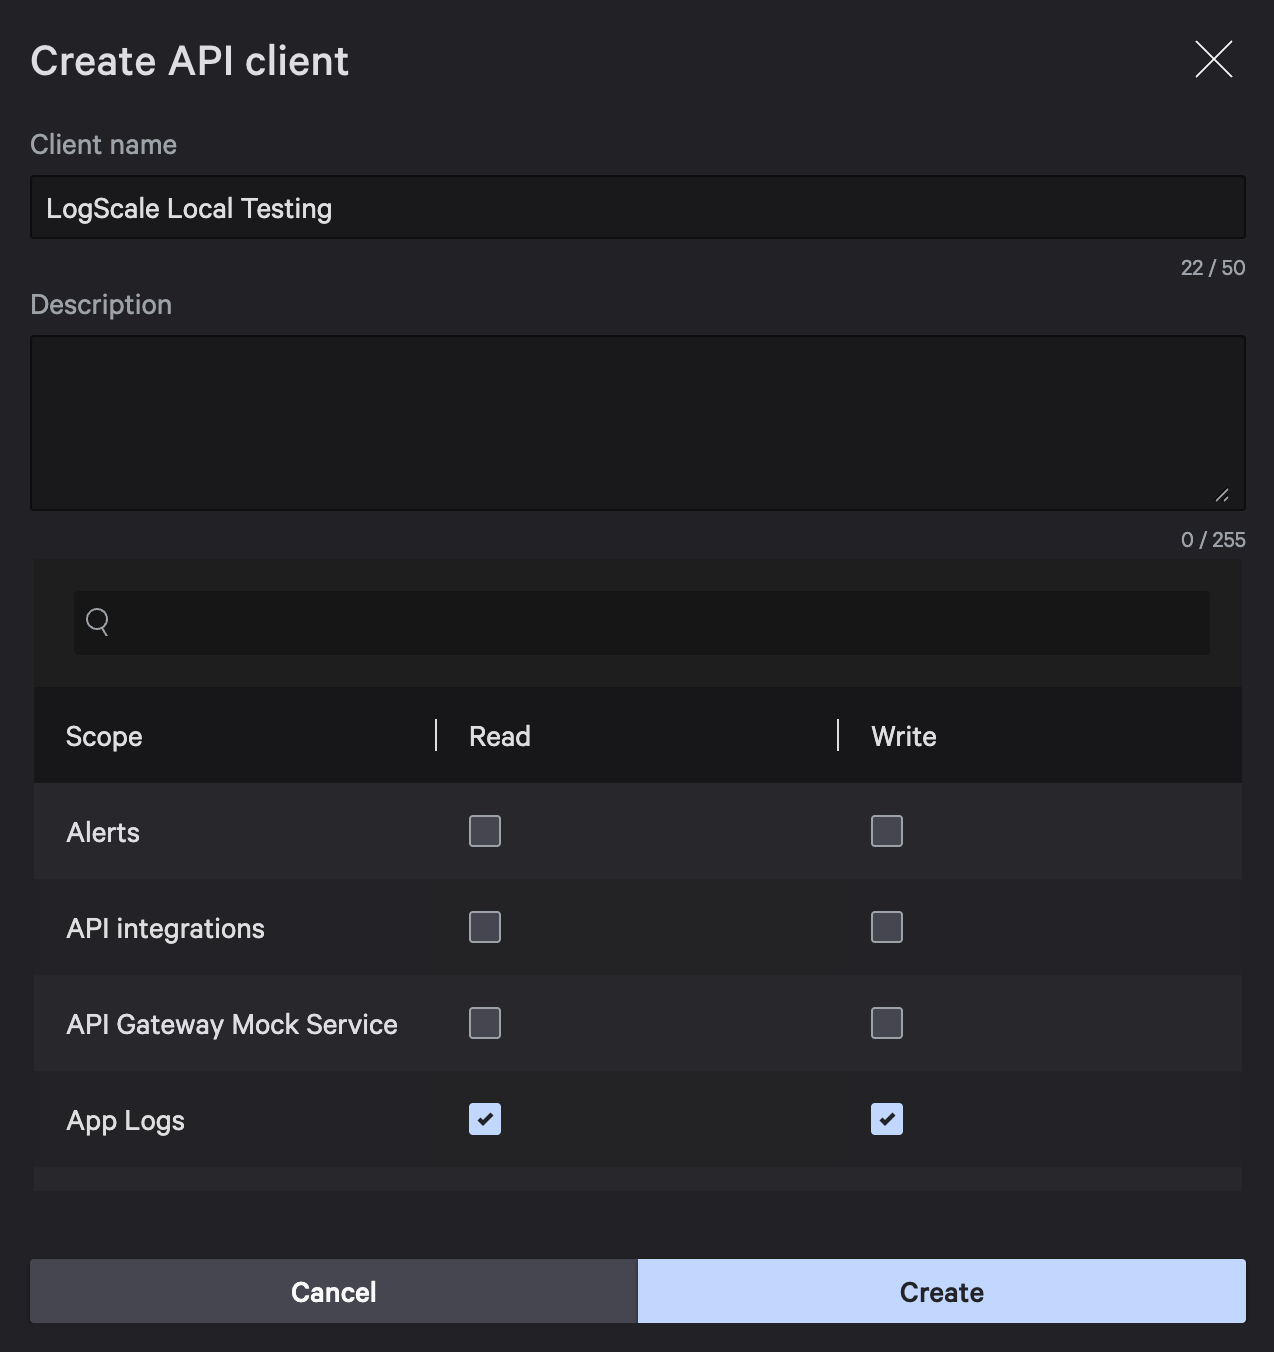
Create an API client with Falcon LogScale write permissions. In the Falcon console, navigate to Support and resources > API Clients and Keys, click Create API client, name it LogScale Local Testing, select the App Logs scope with Read and Write permissions, and click Create.
Export your credentials and app ID:
export FALCON_CLIENT_ID="your_client_id"
export FALCON_CLIENT_SECRET="your_client_secret"
export APP_ID="your_app_id"
You will have to deploy your app to create an app ID. After deploying, you can find your app ID in manifest.yml (the app_id field at the top).
Set up the local environment:
cd functions/ingest
python -m venv .venv
source .venv/bin/activate  # On Windows: venv\Scripts\activate
pip install -r requirements.txt --upgrade pip
Run the function:
python main.py
The function starts on https://www.crowdstrike.com:8081. Alternatively, use foundry functions run to run in Docker (which will use a random port).
Then, you can send test data to make sure everything works:
curl -X POST 'https://www.crowdstrike.com:8081' \
  -H 'Content-Type: application/json' \
  -d '{
    "method": "POST",
    "url": "/ingest",
    "body": {
        "data": {
           "event_type": "custom_alert",
           "severity": "high",
           "description": "Suspicious activity detected",
           "timestamp": "2026-01-21T14:30:00Z"
        }
    }
  }'
Switching Between Service Class and Uber Class
By default, the function uses the Service class (FoundryLogScale). To test with the Uber class (APIHarnessV2) locally, set an environment variable:
export USE_UBER_CLASS=true
For deployed apps, you can switch via configuration in manifest.yml:
config:
  use_uber_class: true
Query Your Data in Falcon LogScale
Navigate to Next-Gen SIEM > Advanced event search and specify your Falcon Foundry repository (foundry_{app id}_applicationrepo) as the #repo value in the query. For example:
event_type=phishing_attempt | #repo=foundry_cb40e50468944c7282c8ffdd04bc575c_applicationrepo
Below is a screenshot of what this looks like with results:

Basic Queries
Search for your custom data:
// Find all custom alerts
event_type=custom_alert

// Filter by severity
event_type=custom_alert severity=high

// Time-based query
event_type=custom_alert
| @timestamp > now() - 1h
Advanced Queries
Once you have data flowing in, you can run more sophisticated queries. Count events by severity to understand the distribution:
event_type=custom_alert
| groupBy(severity)
| count()
If you included device identifiers in your data, you can correlate with Falcon detections:
event_type=custom_alert severity=high
| join({#event_simpleName=DetectionSummaryEvent}, field=aid)
The specific fields available depend on the data structure you ingested. Adjust queries to match your data schema.
Query Falcon LogScale from UI Extensions
The sample app demonstrates querying Falcon LogScale directly from JavaScript using foundry-js:
import FalconApi from '@crowdstrike/foundry-js';

const falcon = new FalconApi();
await falcon.connect();

const queryResult = await falcon.logscale.query({
  search_query: "*",
  start: "1h",
  end: "now"
});

const events = queryResult.resources?.[0]?.events || [];
To query the “search-all” repository in Falcon Next-Gen SIEM (which contains Falcon telemetry), specify repo_or_view:
const queryResult = await falcon.logscale.query({
  search_query: '#event_simpleName=ProcessRollup2',
  start: '1h',
  end: 'now',
  repo_or_view: 'search-all'
});
This lets you enrich detections or correlate your custom data with Falcon telemetry directly in your UI extension.
Required Manifest Scopes
For Falcon LogScale queries to work, your manifest.yml must include the appropriate scopes:
auth:
  scopes:
    - app-logs:read
    - app-logs:write
The app-logs:read scope is required for querying, and app-logs:write is required for ingestion.
Customization Ideas
Now that you understand how the function works, here are ways to extend it for your specific use cases.
Batch Ingestion
Modify the function to accept arrays of data events and ingest them in a single call. This improves performance when you have multiple events to send:
data_list = request.body.get("data_list", [])
for data in data_list:
    # Process and ingest each item
Schema Validation
Add JSON Schema validation for required fields to ensure data quality before ingestion. Define schemas in your manifest.yml for request/response validation. This catches malformed data at the function boundary rather than letting it fail silently in Falcon LogScale.
Webhook Integration
Add a second handler to accept webhooks from external systems. Many security tools can send webhooks when events occur, and you can transform their payloads into your Falcon LogScale format:
@FUNC.handler(method="POST", path="/webhook")
def on_webhook(request: Request, config: dict, logger: Logger) -> Response:
    # Process webhook payload
    # Transform to your data format
    # Call the ingest logic
Scheduled Ingestion
Use Falcon Foundry workflows to trigger the function on a schedule to pull data from APIs periodically. This works well for threat intelligence feeds or other data sources that you need to poll regularly.
Custom UI Fields
Modify the UI extension to add fields specific to your data sources. You might add asset IDs, custom tags, or source system identifiers depending on what data you’re ingesting.
Troubleshooting Common Issues
Missing data from request body: Verify your JSON structure includes a data field and check that the Content-Type header is application/json.
Local authentication failures: Ensure FALCON_CLIENT_ID and FALCON_CLIENT_SECRET are exported. Verify the API client has “App Logs: Read and Write” permissions.
Data not appearing in Falcon LogScale: Allow 1-2 minutes for indexing. Verify you’re searching the correct repository.
Start Ingesting Custom Data Today
You now know how to ingest custom data into Falcon LogScale using Falcon Foundry functions. This enables you to bring third-party threat intelligence into Falcon LogScale, create custom security alerts from proprietary systems, correlate external data with Falcon telemetry, and build richer security workflows.
Learn More About LogScale Data Ingestion
The sample app provides a solid foundation. Its source code is available on GitHub in the @CrowdStrike/foundry-sample-logscale repository. For official documentation, see the FalconPy SDK, CrowdStrike Query Language (CQL) Syntax, and Falcon Foundry docs.
Extend your Falcon Foundry skills with these guides:
- A Practical Guide to Building a Falcon Foundry App for the First Time
- Deploy a Foundry App Template in 5 Easy Steps
- Dive into Falcon Foundry Functions with Python
- Getting Started with Falcon Foundry Collections
- API Pagination Strategies for Falcon Foundry: Functions and Workflows
Got questions or want to share your Falcon LogScale ingestion workflows? Join the conversation in the CrowdStrike Foundry Developer Community.
If you’d like to dive deeper into the core CrowdStrike Falcon modules mentioned in this post, below are some resources:
- Falcon Next-Gen SIEM: Explore Falcon Next-Gen SIEM
- Falcon Foundry: Discover Falcon Foundry
- FalconPy: Learn about FalconPy
What custom data are you ingesting into Falcon LogScale? Have you built any interesting Falcon Foundry functions for data enrichment? I’d love to hear about your experiences! Drop me a line on Twitter @mraible or connect with me on LinkedIn.