


![Helping Non-Security Stakeholders Understand ATT&CK in 10 Minutes or Less [VIDEO]](https://assets.crowdstrike.com/is/image/crowdstrikeinc/video-ATTCK2-1?wid=530&hei=349&fmt=png-alpha&qlt=95,0&resMode=sharp2&op_usm=3.0,0.3,2,0)
![Qatar’s Commercial Bank Chooses CrowdStrike Falcon®: A Partnership Based on Trust [VIDEO]](https://assets.crowdstrike.com/is/image/crowdstrikeinc/Edward-Gonam-Qatar-Blog2-1?wid=530&hei=349&fmt=png-alpha&qlt=95,0&resMode=sharp2&op_usm=3.0,0.3,2,0)


?wid=2048&hei=1350&fmt=png-alpha&qlt=95,0&resMode=sharp2&op_usm=3.0,0.3,2,0)


Introduction
Machine learning is one of the many tools we use at CrowdStrike® to stop breaches. To do it well, we need enormous amounts of data — and also the tools to process all of this data. In a recent blog from CrowdStrike’s Data Science department, titled “Using Docker to Do Machine Learning at Scale,” we talked about Python and Docker as being two of the tools that enable us to stop breaches In this blog, Part 1 of a two-part series, I briefly explain Apache Airflow, the infrastructure around it, its use in creating/updating our corpus (ground truth), and how we run feature extraction jobs in parallel. In Part 2, I’ll go into greater detail on the corpus update pipeline and talk about some of the tools we use to streamline the process. We use Airflow to automate workflows/pipelines. We have pipelines for keeping our corpus up to date, various spark jobs for processing data, etc. By codifying these pipelines in Directed Acyclic Graphs (DAGs, via Python) using Airflow, we have a standard way to develop, deploy and monitor them. Our Airflow jobs allow us to update our corpus on a daily basis, making sure our data scientists always have the latest data to work with. Before I discuss that, I’ll go through a quick, high-level overview of Airflow.What is Apache Airflow?
Apache Airflow was developed at Airbnb in 2014 and was open sourced in 2015. Since then, it has grown rapidly and is used by many organizations today. As a framework written in Python, it allows users to programmatically author, schedule and monitor data pipelines and workflows. Airflow is NOT for streaming data workflows! If you try to use it for streaming data processing, you are going to have a difficult time.Airflow Infrastructure
Airflow is easily installed using Python pip, and is composed of a web server, job scheduler, database and job worker(s). By default, it uses a SQLite database, but it can be configured to use MySQL or PostgreSQL.Core Components
DAGs are the building blocks for Airflow jobs. A DAG contains the tasks that Airflow runs, and these tasks can be chained together. An example from the official Airflow documentation, shown in Figure 1, helps illustrate the concept of a DAG with three tasks: t1, t2 and t3.In this example, once task t1 is run successfully, tasks t2 and t3 will run either sequentially or in parallel, depending on the Airflow executor you are using.
DAGs have many more features, and we recommend checking out the official documentation for more in-depth information.
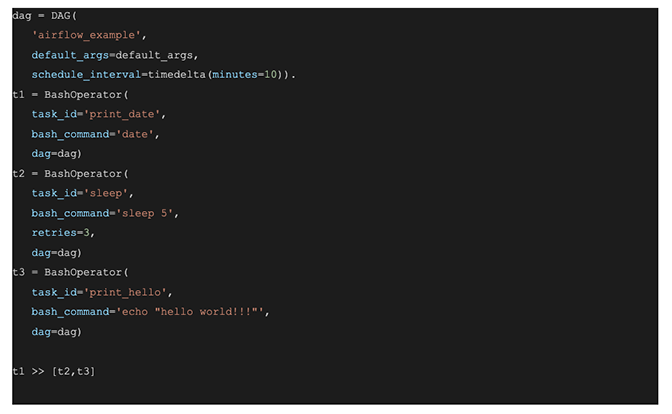 Figure 1. This code example shows a very basic Airflow DAG and task setup.
Airflow Configuration Properties Precedence:
Environment Variables <- Command Line <- Configuration File <- Defaults
The minimum recommended setup shown in Figure 2 requires moving the metadata database to an actual database, such as MySQL or PostgreSQL, versus the default SQLite that Airflow comes with. Airflow does not keep track of the workers connected, nor does it have any concept of a master/slave architecture. In order to make Airflow multi-node/highly available, you need to connect multiple workers to the same databases. Design considerations should also be given to the databases you choose, such as setting up high availability and backups. The Airflow scheduler instance/container needs connectivity to each worker. You should avoid multiple schedulers in the same Airflow cluster, as this can cause problems while running jobs such as race conditions.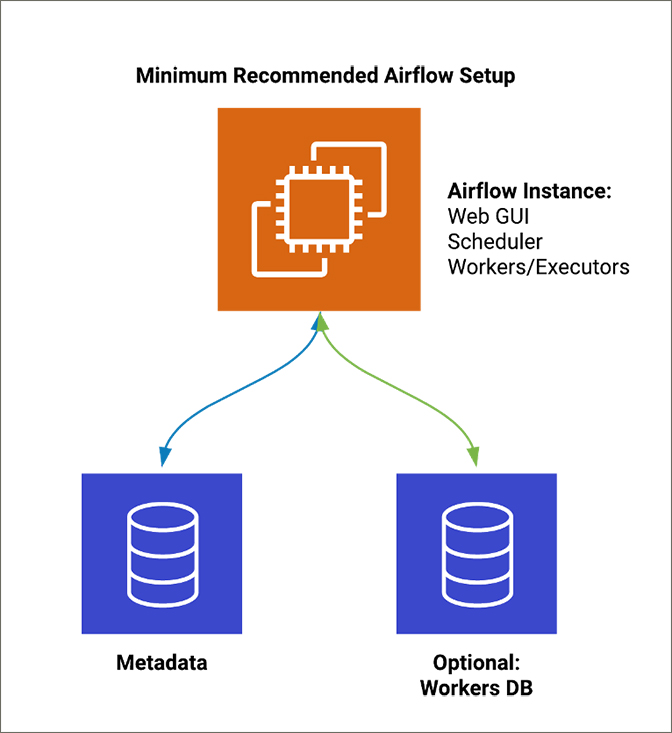 Figure 2. This diagram illustrates the minimum recommended Airflow setup.
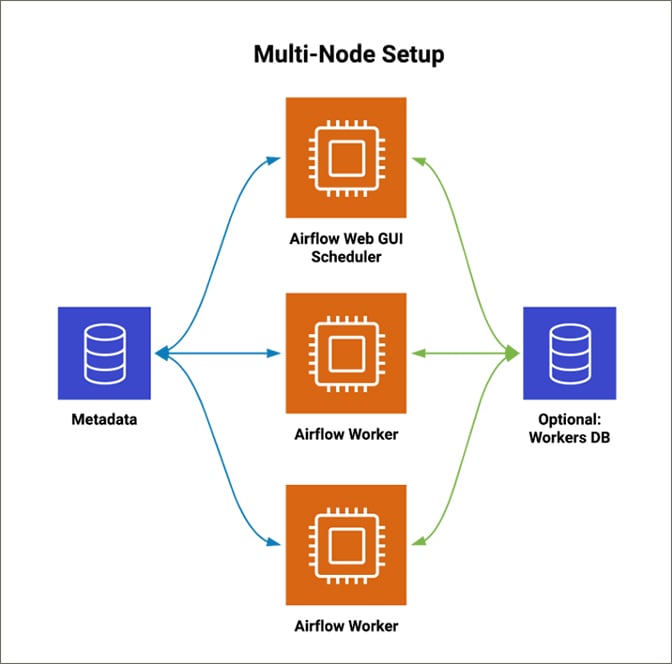 Figure 3. This diagram illustrates a possible multi-node Airflow setup.
What We Learned About Airflow Along the Way
To make Airflow easier to deploy, we use a combination of Terraform, Chef and Docker. Our end goal is to move our machine learning workloads into a company-wide Kubernetes cluster. In the interim, we feel that moving to Docker containers is a good step to prepare for Kubernetes, while the Kubernetes infrastructure is being built out. Puckel/docker-airflow is a great project to get you started. We leverage Docker Compose for ease of deployment and synergy between our engineers’ local development and what is deployed across our environments. With our setup, each engineer and scientist gets his or her own local Airflow cluster that closely resembles our cloud Airflow setup. This will all migrate to Kubernetes in the near future. Figure 4 is a high-level diagram of our current Airflow setup and the basic step-by-step process for our infrastructure provisioning process.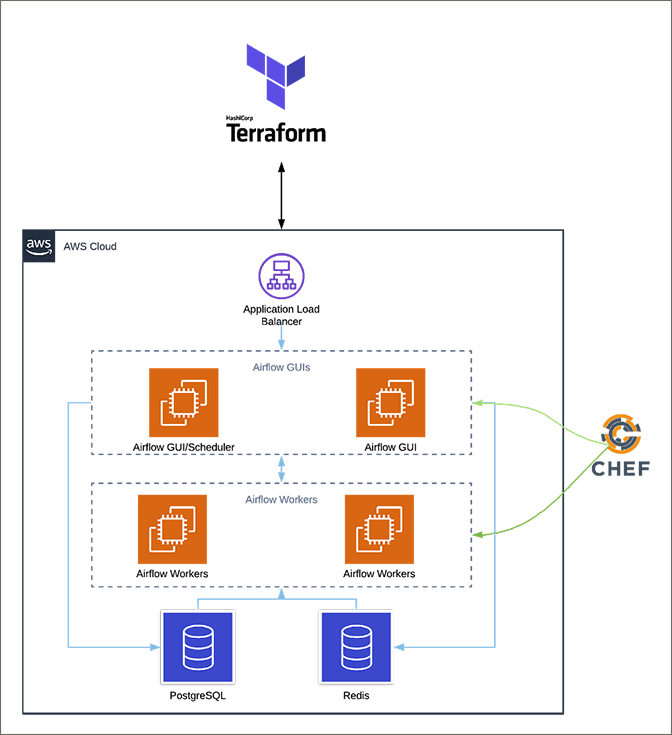 Figure 4. This diagram illustrates a high-level overview of the Airflow infrastructure at CrowdStrike.
- Terraform creates the Airflow AWS infrastructure, which: a. Provisions the application load balancer b. Provisions EC2 instances c. Provisions volumes and attaches to the EC2 instances d. Creates EC2 user data scripts
- EC2 user data script: a. Installs the Chef client b. Writes out the Chef client bootstrap file with variables supplied from Terraform c. Runs Chef client with configured bootstrap file
- Chef provisions the EC2 instances: a. Installs and applies internal security requirements b. Creates the Airflow Docker Compose YAML file via Chef templates and any configuration files needed c. Installs our Airflow Debian package, which contains DAGs and plugins d. Pulls all containers required by the Airflow DAGs e. Starts Airflow containers per the Docker Compose file
- Monitoring and logging a. All system, application and DAG logs are sent to Splunk. We attach DAG/job UUIDs to related logs to allow for quick searching b. DAG/job-level metrics are collected via Graphite and tied into our monitoring and alerting services
Deployment
Hashicorp Terraform is used to build out the infrastructure, and Chef is utilized for instance provisioning. To deploy Docker containers and Docker Compose configurations, Chef templates and recipes that use attributes in the Chef roles, for container and application versioning, and Airflow parameters are used. An example is shown in Figure 5. Once Chef writes out the Docker Compose and configuration files, Chef pulls the required containers and starts Airflow via Docker Compose. This same Chef recipe is also used for upgrades, as it allows a simple version bump in the Chef role attributes and the entire upgraded Airflow stack is deployed. The Chef workflow is also responsible for scaling containers, as it is an attribute contained in Chef roles. Lastly, Chef deploys any new/updated Airflow DAGs and plugins via an internal Debian package that is created with our CI/CD tool. There are many ways to deploy DAGs and plugins, but we chose Debian packages due to the existing internal infrastructure to build and deploy them.Chef Examples
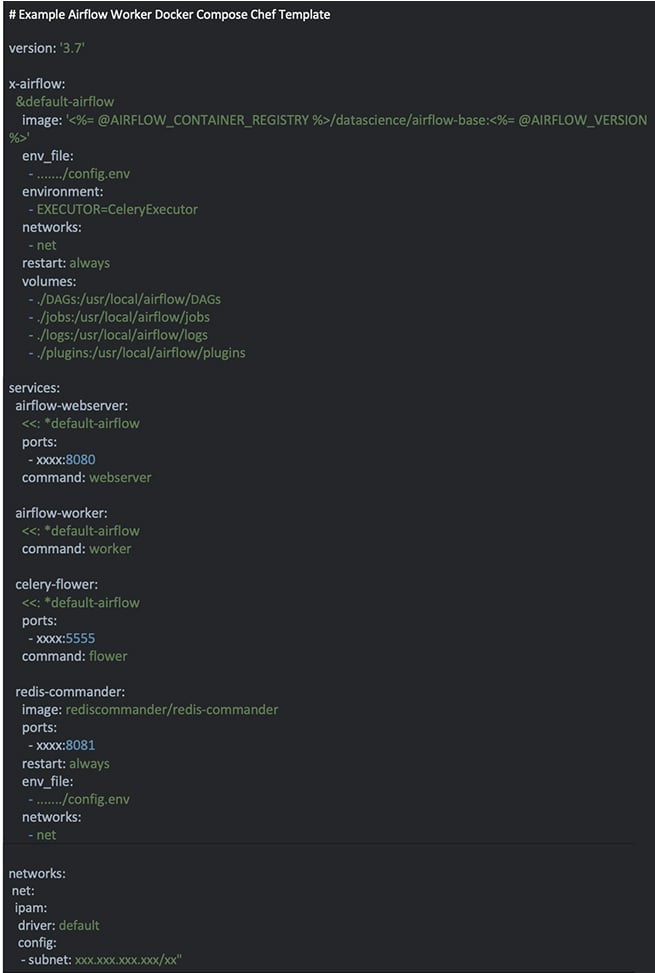 Figure 5. This is an example Chef template similar to what CrowdStrike uses to create a docker-compose.yaml file to deploy Airflow containers.
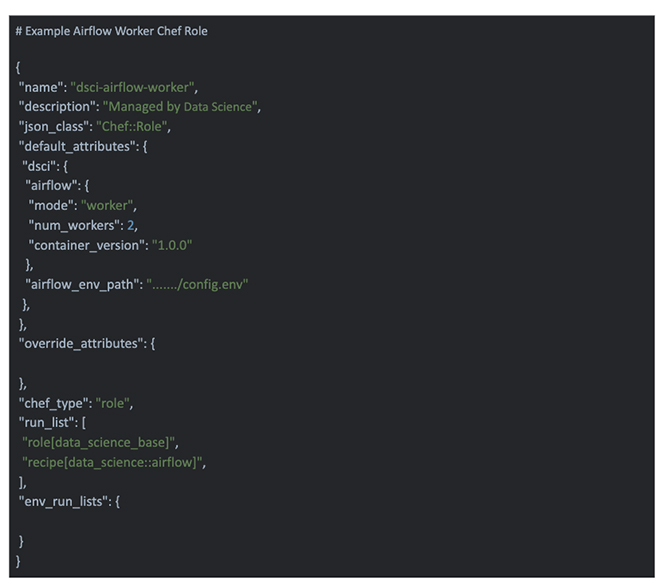 Figure 6. This is an example Chef role similar to what CrowdStrike uses for configuration of our Airflow deployments.
Challenges We Faced
Logging
Airflow defaults to info-level logging. This will log the full command run by the DAG, which can be troublesome if you are passing in any sensitive data via the Docker run command line, even if only for testing. If you have multiple instances running multiple Airflow worker containers, it’s best to use a shared file system (such as an EFS volume) across your instances, or instead, set up remote logging. You can have logging issues if you run multiple containerized workers on the same instance, specifically when displaying the logs in the Airflow GUI. This issue arises because the Airflow GUI uses the Airflow API to get the logs from the workers. It uses the worker container’s hostname as the domain in the API call. The worker container is not reachable from another instance via its default hostname, unless you configured a Docker network, DNS, or you set the container hostname and opened up the correct ports. We found that it’s more manageable and scalable to use EFS or remote logging. With either of these solutions, all of the Airflow containers running on different instances are writing to the same location, and it can all be reached locally from any given instance. Airflow has no built-in log rotation or log cleanup service. This is something to consider when you are building out your infrastructure and deciding how you are going to manage the Airflow logs. All CrowdStrike logs are sent to Splunk, so we remove old logs after a certain period of time. This also applies to Airflow database cleanup, as each of the past DAG executions will stay in the database until they are cleaned out.Zombie Jobs with Docker and Celery Executor
There is an open issue related to using Celery executors and Airflow in containers. If you experience jobs not starting, check the worker logs for additional troubleshooting. A restart of the Airflow containers will get everything working again, but no one wants to have to restart an entire cluster.DAGs Triggering DAGs
For our corpus update process, we initially had multiple DAGs that each served a single, specific purpose and could be its own service. We needed to run each one sequentially with a couple of additional DAGs to finish the corpus update pipeline. We looked into multiple ways of accomplishing this, such as having one giant DAG consisting of each service DAG as its own task. Another option is to use the “TriggerDagRunOperator” to run DAGs from within other DAGs, but this operator will indicate success only when the child DAG has been successfully started, not when it successfully completes. To determine successful completion, you have to use an Airflow sensor to verify the DAG ran successfully. Airflow sensors allow us to check for a specified condition to be met. The sensors are normally time-based and run off the parent DAG. We ended up creating custom triggers and sensors to accommodate our use case, but this became more involved than we originally intended. We found that the cleanest solution is to turn each of these DAGs into operators and create a master corpus update DAG that calls each of the new operators. This allows us to reuse these operators independently while following the DRY (don’t repeat yourself) principles outlined in our last blog.Final Thoughts
We’ve learned some valuable lessons while working with Airflow that I want to share with you. If you’re just beginning your Airflow journey, here are some questions you should consider:- Have preliminary use cases for Airflow been clearly defined? Having some predefined jobs to run in Airflow can help with resource planning, and with identifying any additional work needed to get you started.
- What are the SLAs of the jobs that are going to be running? If you’re planning to run jobs that have a high SLA, make sure you have a plan of action for alerting and monitoring.
- How do you plan to handle user access, logging, alerting, monitoring and security? These items can help determine how you configure Airflow and what, if any, additional tooling you will need to build your jobs.
- How do you plan to scale if you are running Airflow in a cluster/multi-node setup? You may eventually need to scale out your cluster, and it’s easier if you have planned how to scale from the beginning rather than being forced to find a quick solution when all of your jobs freeze up.
- What type of development process do you want for your users? We wanted a development environment that would closely resemble our production environments. This allows for a smooth transition from local development to production.
- How do you plan to update/publish DAGs and any custom plugins? This is an important factor to consider if you plan on having an automated deployment. You want users to be able to seamlessly update and publish new DAGs and plugins without much effort.
- Do you have the database and infrastructure experience to address any issues that may arise? This is helpful when planning, to make sure you are allocating enough resources and also have the experience and knowledge on hand to quickly resolve any issues.
Additional Resources
- Learn how CrowdStrike
extends the protection of Falcon Insight™ to introduce compatibility with Docker, ensuring deep visibility and protection across this critical platform. Read the press release. - Learn more about the CrowdStrike Falcon®® platform by visiting the product webpage.
- Learn more about CrowdStrike endpoint detection and response by visiting the Falcon InsightTM webpage.
- Test CrowdStrike next-gen AV for yourself. Start your free trial of Falcon Prevent™ today.


