Getting Started with foundry-js using the Foundry-JS Demo App

The @crowdstrike/foundry-js library is the JavaScript SDK that connects your Falcon Foundry UI to the Falcon platform. Collections, workflows, Falcon LogScale, API integrations, and cloud functions are all accessible through a single API. It works with any JavaScript-based framework: React, Vue (the MITRE ATT&CK sample uses Vue), or plain JavaScript.
This post walks through the foundry-js demo app, a reference implementation that exercises every major foundry-js capability. It’s a guided tour of an existing app, not a build-from-scratch tutorial.
Table of Contents:
- Getting Started
- App Architecture Overview
- Connecting to the Falcon Console
- Listening to Events
- Working with Collections
- Executing Workflows on Demand
- Querying Falcon LogScale
- Calling External APIs with API Integrations
- Cloud Functions
- Navigation and Modals
- Keep Building with Falcon Foundry
Prerequisites:
- Falcon Insight XDR or Falcon Prevent
- Falcon Next-Gen SIEM or Falcon Foundry
Getting Started
There are a few ways to get the demo app running. The easiest is to go to Foundry > Templates, search for “foundry-js”, and deploy it directly from the UI.
You can also download the repo as a zip file and import it into Falcon Foundry from the UI. And if you just want to browse the code, open the repo at github.dev for a VS Code-like experience in your browser.
If you prefer the command line, install the Foundry CLI first. On macOS/Linux, use Homebrew:
brew tap crowdstrike/foundry-cli
brew install crowdstrike/foundry-cli/foundry
On Windows, download the latest Windows zip file, expand it, and add the installation directory to your PATH environment variable.
Then clone and deploy:
git clone https://github.com/CrowdStrike/foundry-sample-foundryjs-demo
cd foundry-sample-foundryjs-demo
foundry login
foundry apps deploy
foundry apps release
Once deployed and released, go to Foundry > App catalog, find the app, and install it. Then go to Custom apps > Foundry-JS Demo to open it.
App Architecture Overview
The demo app is built with React 19, React Router 7, and Tailwind CSS (via @crowdstrike/tailwind-toucan-base for CrowdStrike’s design tokens). It uses Shoelace for web components.
The app is organized around two React context providers and a set of route-based pages. FalconApiProvider initializes the connection to the Falcon console and makes the FalconApi instance available to every component. EventsProvider subscribes to Falcon console events and tracks them in state. Each route in the app maps to a single foundry-js capability, so the app doubles as living documentation.
Here’s the top-level component structure from app.tsx:
function Root() {
  return (
    <Routes>
      <Route
        element={
          <TabNavigation>
            <Outlet />
          </TabNavigation>
        }
      >
        <Route index path="/" element={<Events />} />
        <Route path="/events" element={<Events />} />
        <Route path="/workflows" element={<Workflows />} />
        <Route path="/collections" element={<Collections />} />
        <Route path="/logscale" element={<LogScale />} />
        <Route path="/api-integrations" element={<ApiIntegrations />} />
        <Route path="/cloud-functions" element={<CloudFunctions />} />
        <Route path="/navigation" element={<Navigation />} />
        <Route path="/modals" element={<Modals />} />
      </Route>
    </Routes>
  );
}

function AppContent() {
  const { isInitialized } = useFalconApiContext();
  if (!isInitialized) { ... }

  return (
    <HashRouter>
      <Root />
    </HashRouter>
  );
}

function App() {
  return (
    <React.StrictMode>
      <FalconApiProvider>
        <EventsProvider>
          <AppContent />
        </EventsProvider>
      </FalconApiProvider>
    </React.StrictMode>
  );
}
This is React-specific, but the underlying FalconApi class and all the methods shown in this post work with any JavaScript framework.
Connecting to the Falcon Console
The first thing your Foundry app needs to do is call falcon.connect(). This is mandatory. Your page won’t render in the Falcon console until connect() completes.
The demo app wraps this in a React context (falcon-api-context.tsx), but the core pattern boils down to:
import FalconApi from '@crowdstrike/foundry-js';

const falcon = new FalconApi();
await falcon.connect();
That’s it. Once connect() resolves, you have access to falcon.collection(), falcon.logscale, falcon.cloudFunction(), falcon.apiIntegration(), falcon.api.workflows, falcon.ui, and falcon.navigation.
Dark Mode Support
One thing connect() does automatically is apply the correct theme. Internally, it reads the user’s current theme preference from the Falcon console and sets a theme-dark or theme-light class on the <html> element. It also listens for data events to update the theme when users toggle between modes. This means you don’t need to write any theming code yourself.
There’s one gotcha to watch out for, though. The @crowdstrike/tailwind-toucan-base CSS library scopes its design tokens to the nearest ancestor with a theme-* class. If your <body> has class="theme-light" hardcoded in the HTML, that class will take CSS precedence over the theme-dark class that foundry-js sets on <html>, and your app will be stuck in light mode no matter what the user selects. The fix is simple: don’t put theme-light or theme-dark on your <body> tag. Let foundry-js handle it on <html>.
For colors in your custom CSS, use the CSS custom properties that tailwind-toucan-base provides (--basement, --surface-base, --border-reg, --body-and-labels, --link-color, --critical, --status-success, --status-warning) instead of hardcoded hex values. These properties automatically adapt when the theme changes and ensure your app’s look and feel matches the Falcon console.
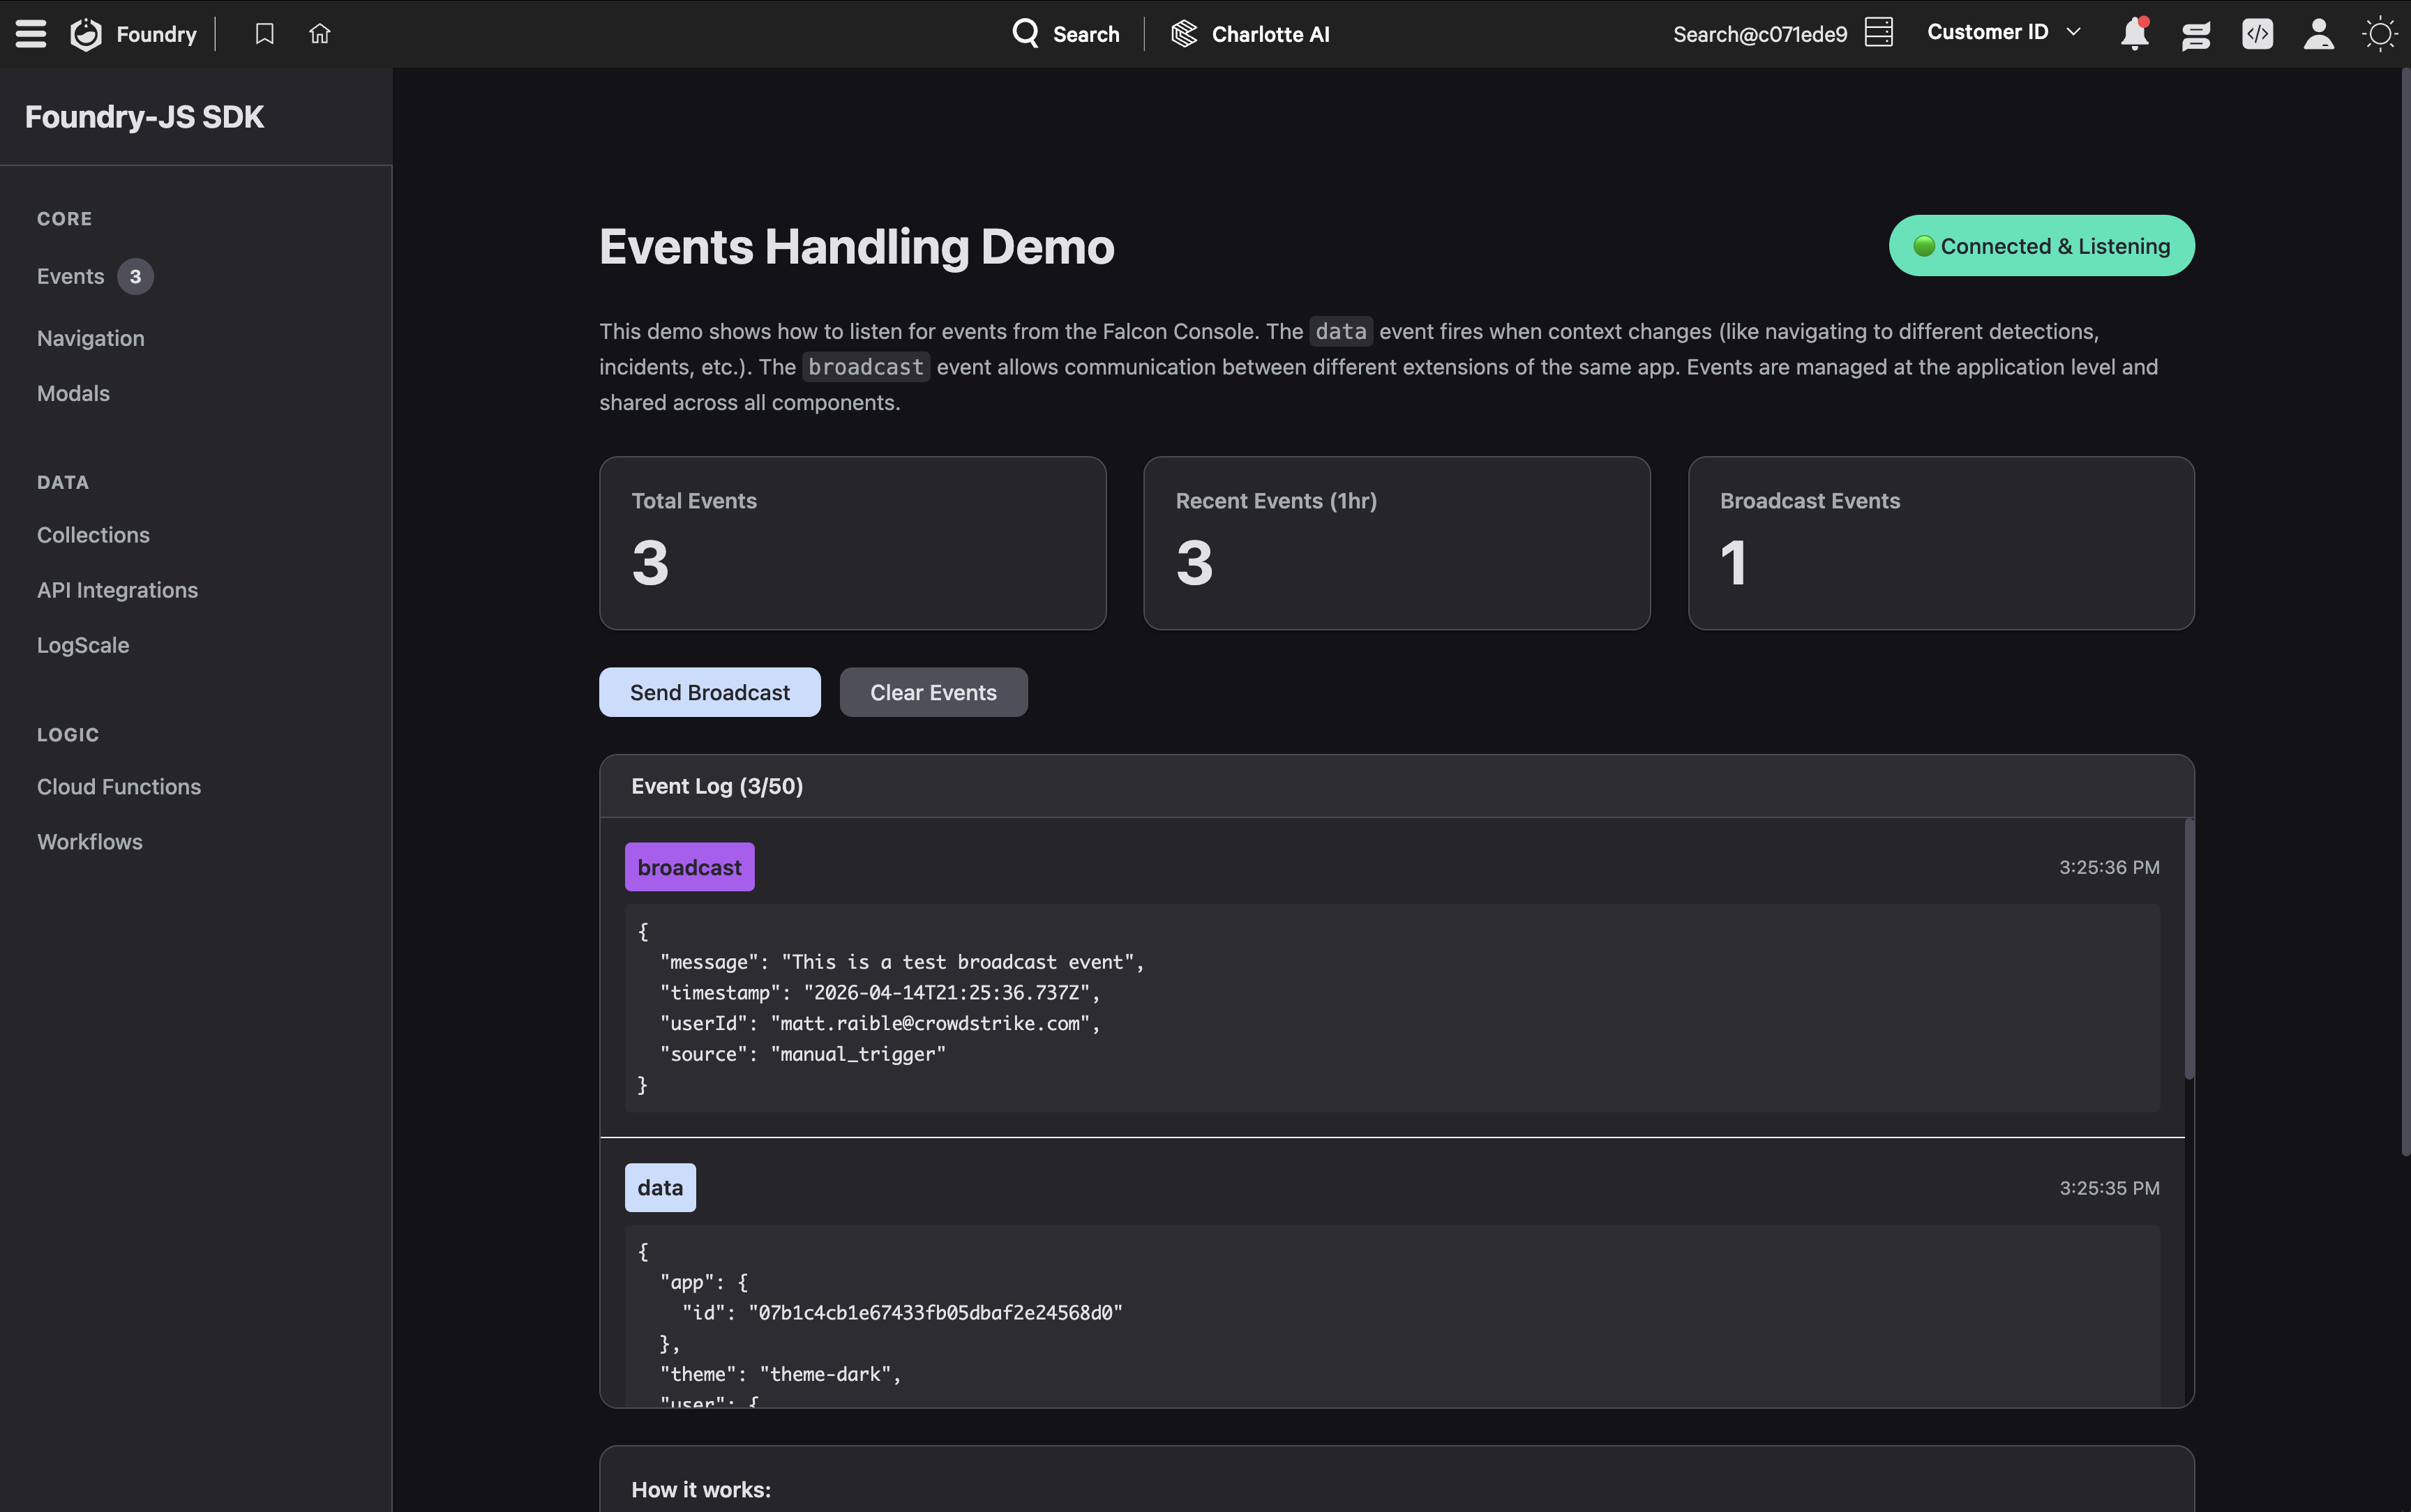
Listening to Events
After connecting, your app can listen for events from the Falcon console. The foundry-js SDK formally supports two event types: data and broadcast.
The data event fires whenever the Falcon console updates your app’s context. Its payload is a well-defined object with fields like user (uuid and username), theme (light or dark), cid (customer ID), locale, timezone, and permissions:
falcon.events.on('data', (data) => {
  console.log('Current user:', data.user.username);
  console.log('Theme:', data.theme);
  console.log('CID:', data.cid);
});

// Clean up when done
falcon.events.off('data', handler);
The broadcast event enables communication between different UI extensions of the same app. When one extension calls falcon.sendBroadcast(payload), other extensions listening for broadcast receive it. This is useful when your app has both a page and an extension that need to stay in sync.
Extensions use the same event pattern to receive context about the selected detection or other entity in the Falcon console.
See events-context.tsx and routes/events.tsx for the full implementation. The Events page is shown in the app home screenshot above.
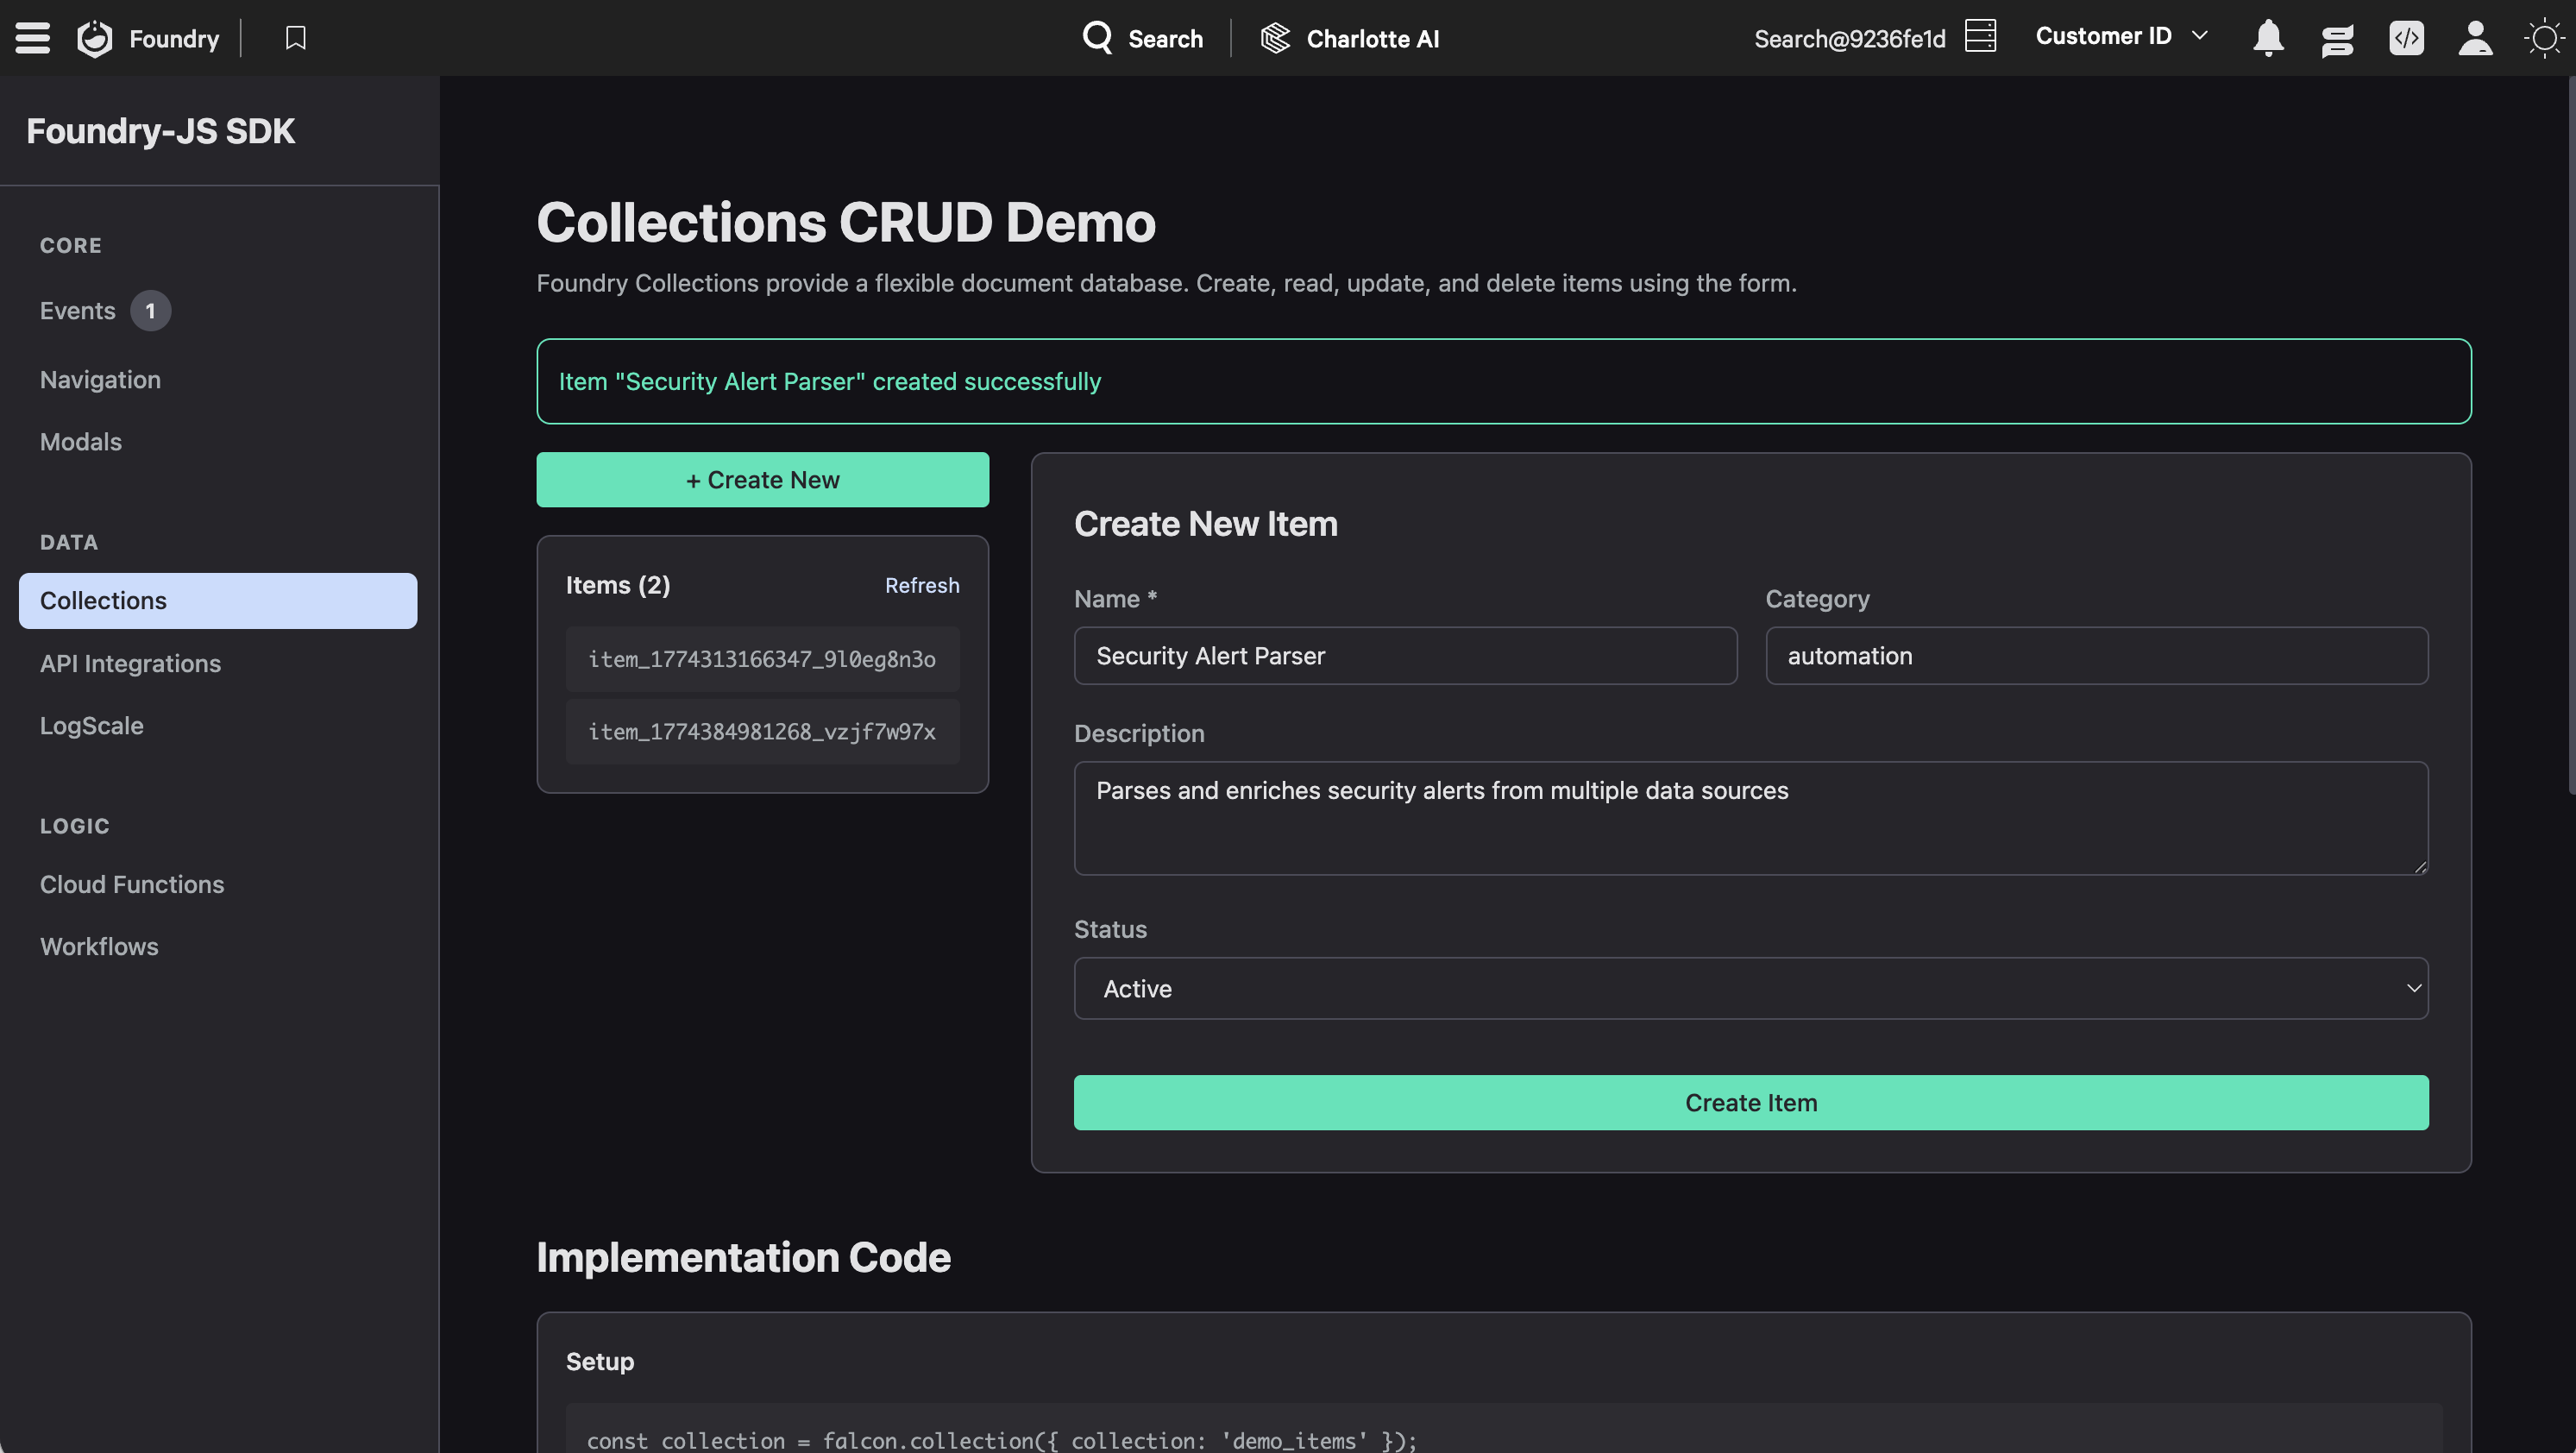
Working with Collections
Falcon Foundry collections are a NoSQL-style data store built into the platform. The demo app shows full CRUD operations on a demo_items collection.
First, create a collection reference:
const collection = falcon.collection({ collection: 'demo_items' });
Then you can create, read, list, and delete items:
// Create
await collection.write(itemId, {
  name: 'My Item',
  description: 'A demo item',
  status: 'active',
  category: 'example',
  created_at: new Date().toISOString()
});

// Read a single item
const item = await collection.read(itemId);

// List all item keys
const result = await collection.list({ start: 0, limit: 100 });
const itemIds = result.resources;

// Delete
await collection.delete(itemId);
The collection’s schema is defined in collections/demo_items_schema.json. Fields that should be available for FQL querying are marked with x-cs-indexable: true on each property:
"name": {
  "type": "string",
  "description": "Display name of the item",
  "x-cs-indexable": true
}
The demo app wraps each CRUD operation in try/catch and displays errors in the UI. It also handles partial failures gracefully during bulk reads: if a single item fails to load, it logs a warning and skips that item rather than failing the entire list. If you’re reading items sequentially (list IDs, then read each one), add a small delay between reads to avoid rate limiting. The demo app uses a 50ms delay.
Executing Workflows on Demand
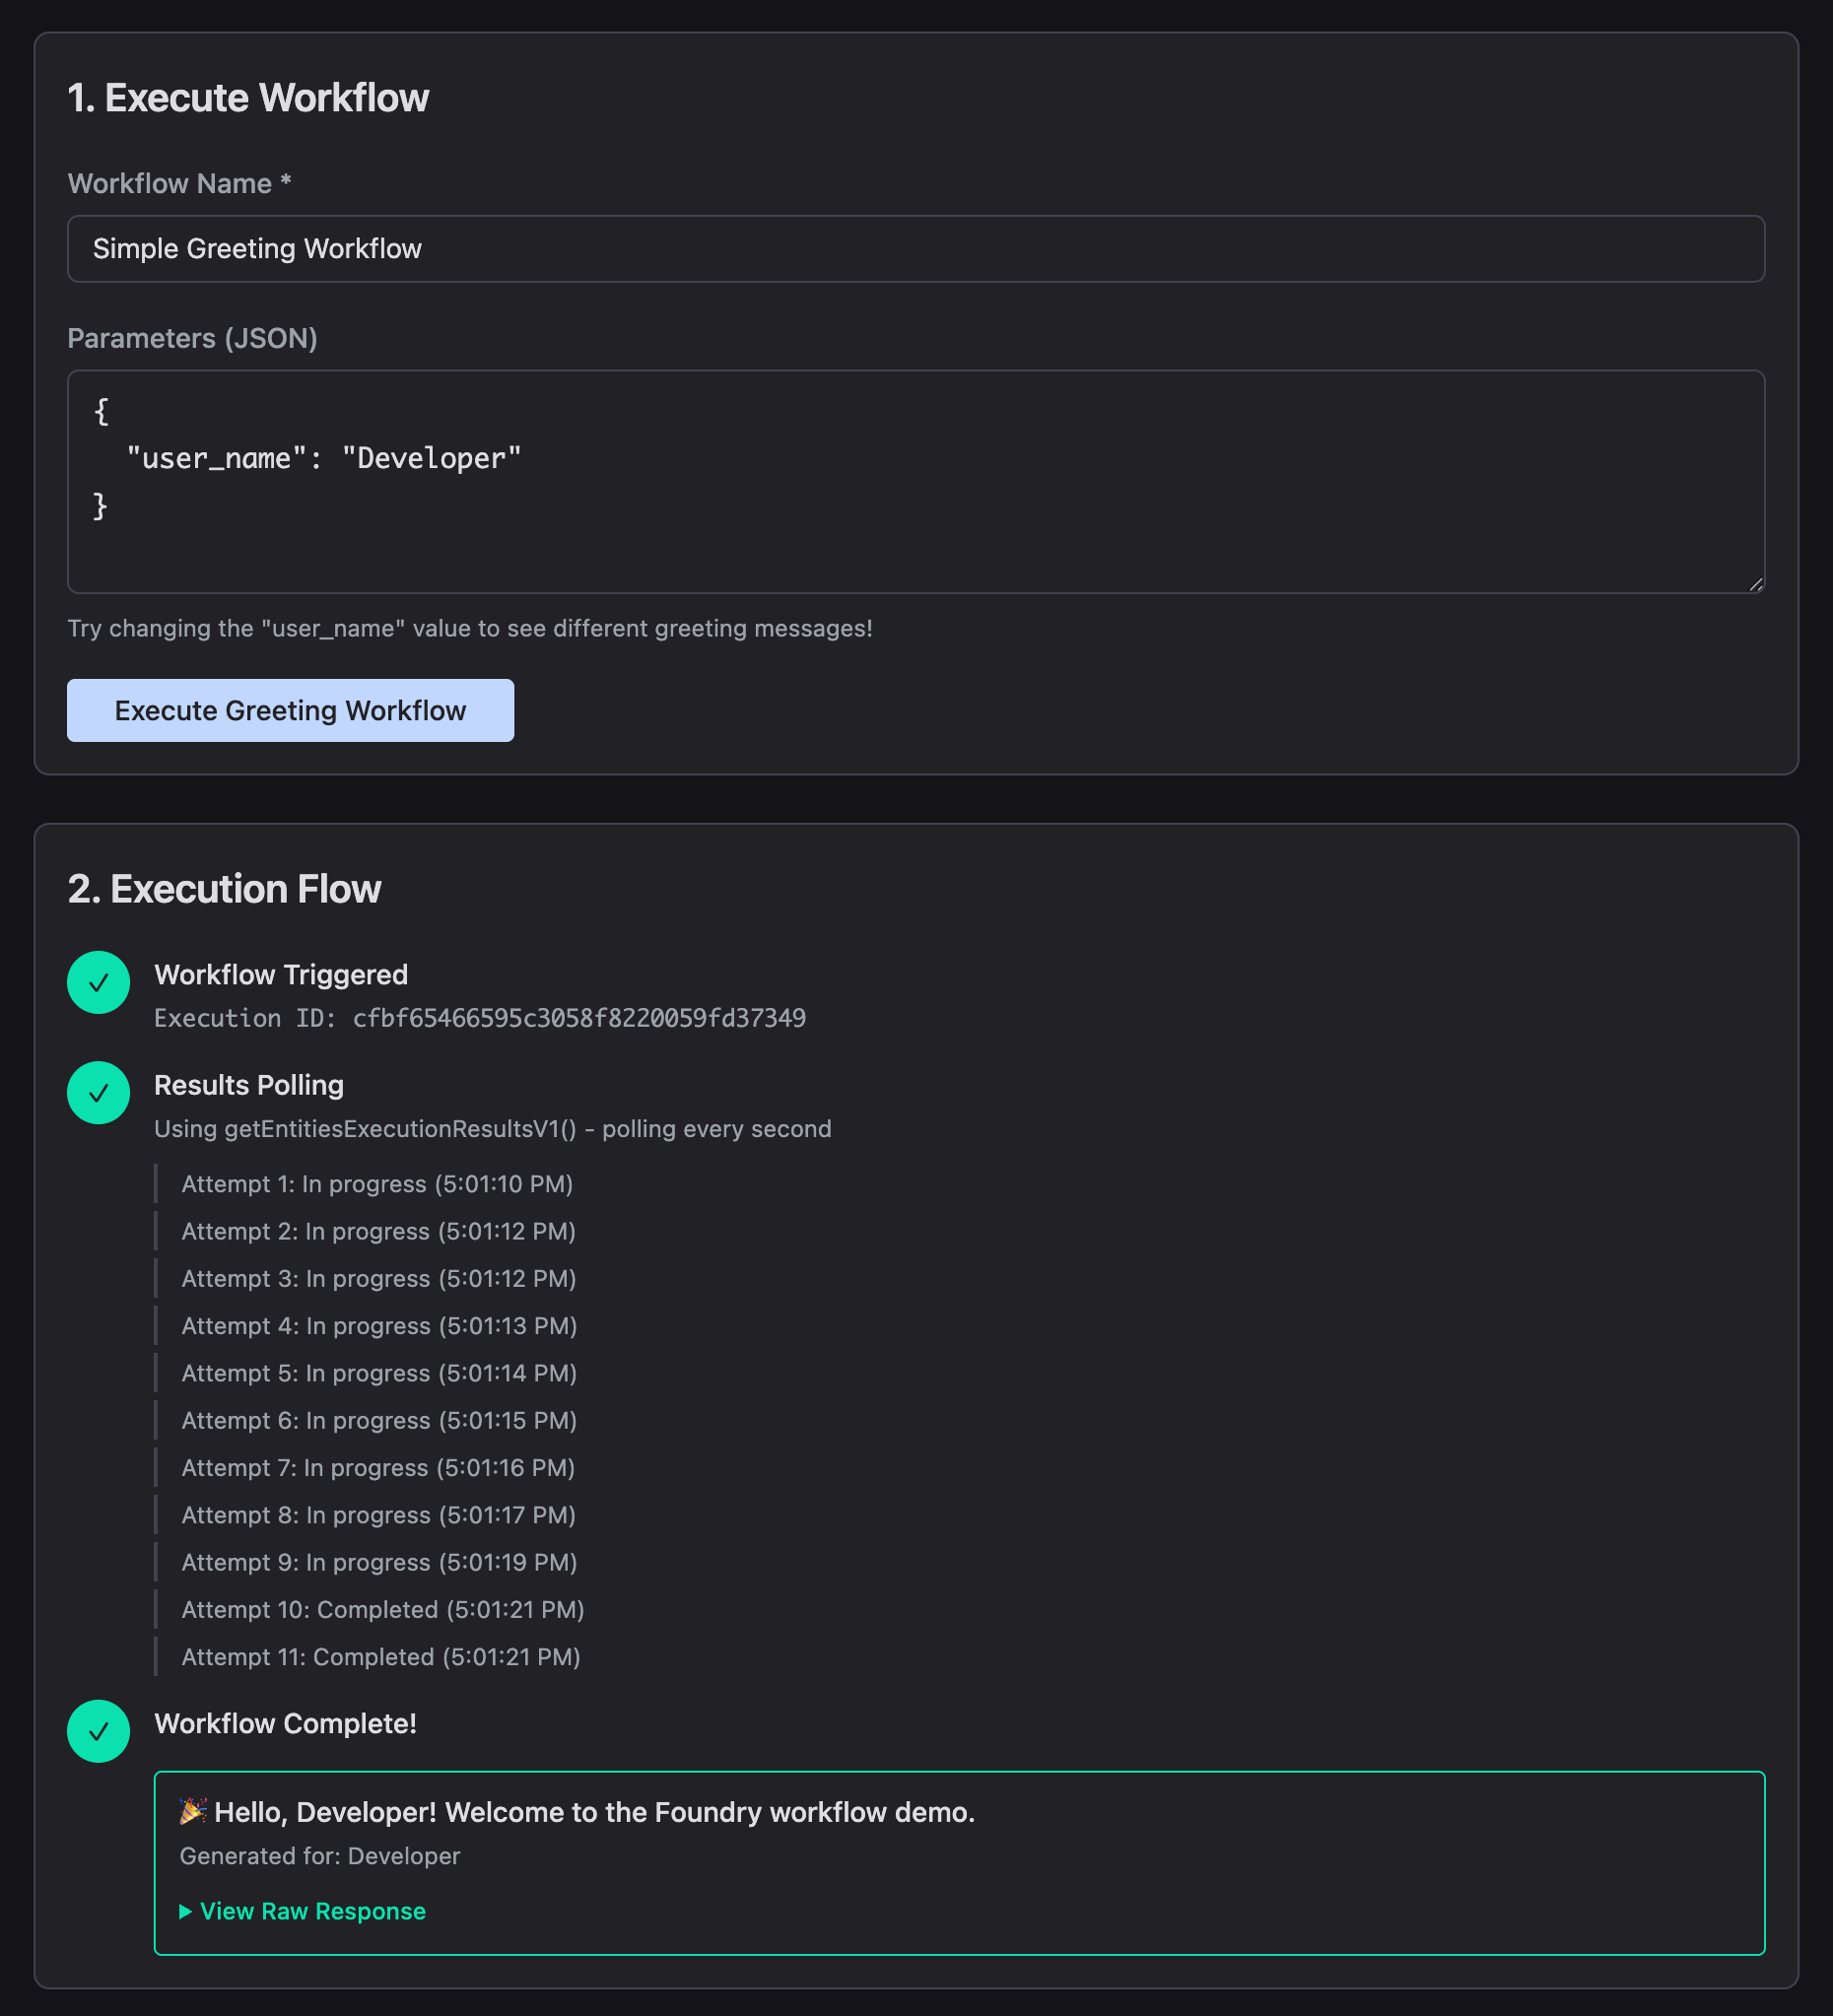
The demo app includes a simple greeting workflow that accepts a name parameter and returns a personalized greeting. The workflow is defined in workflows/greeting-workflow.yml with an on-demand trigger, which means it runs when your code calls it (not on a schedule).
Executing a workflow from foundry-js is a two-step process: trigger it, then poll for results.
// Step 1: Trigger the workflow
const triggerResult = await falcon.api.workflows.postEntitiesExecuteV1(
  { user_name: 'Developer' },
  { name: 'Simple Greeting Workflow', depth: 0 }
);
const executionId = triggerResult.resources[0];

// Step 2: Poll for results
const result = await falcon.api.workflows.getEntitiesExecutionResultsV1({
  ids: [executionId]
});
The polling pattern is important because workflows execute asynchronously. The demo app polls every second, up to 20 attempts, checking whether the execution status has reached Completed, Failed, or Cancelled. See workflow-demo.tsx for the complete polling implementation.
Querying Falcon LogScale
The demo app shows three LogScale operations: writing events, running dynamic queries, and executing saved searches.
Writing events pushes structured data from your app into LogScale:
await falcon.logscale.write({
  event_type: 'user_login',
  username: 'jdoe',
  timestamp: new Date().toISOString(),
  source_ip: '192.168.1.100'
});
Dynamic queries let users run ad-hoc LogScale searches:
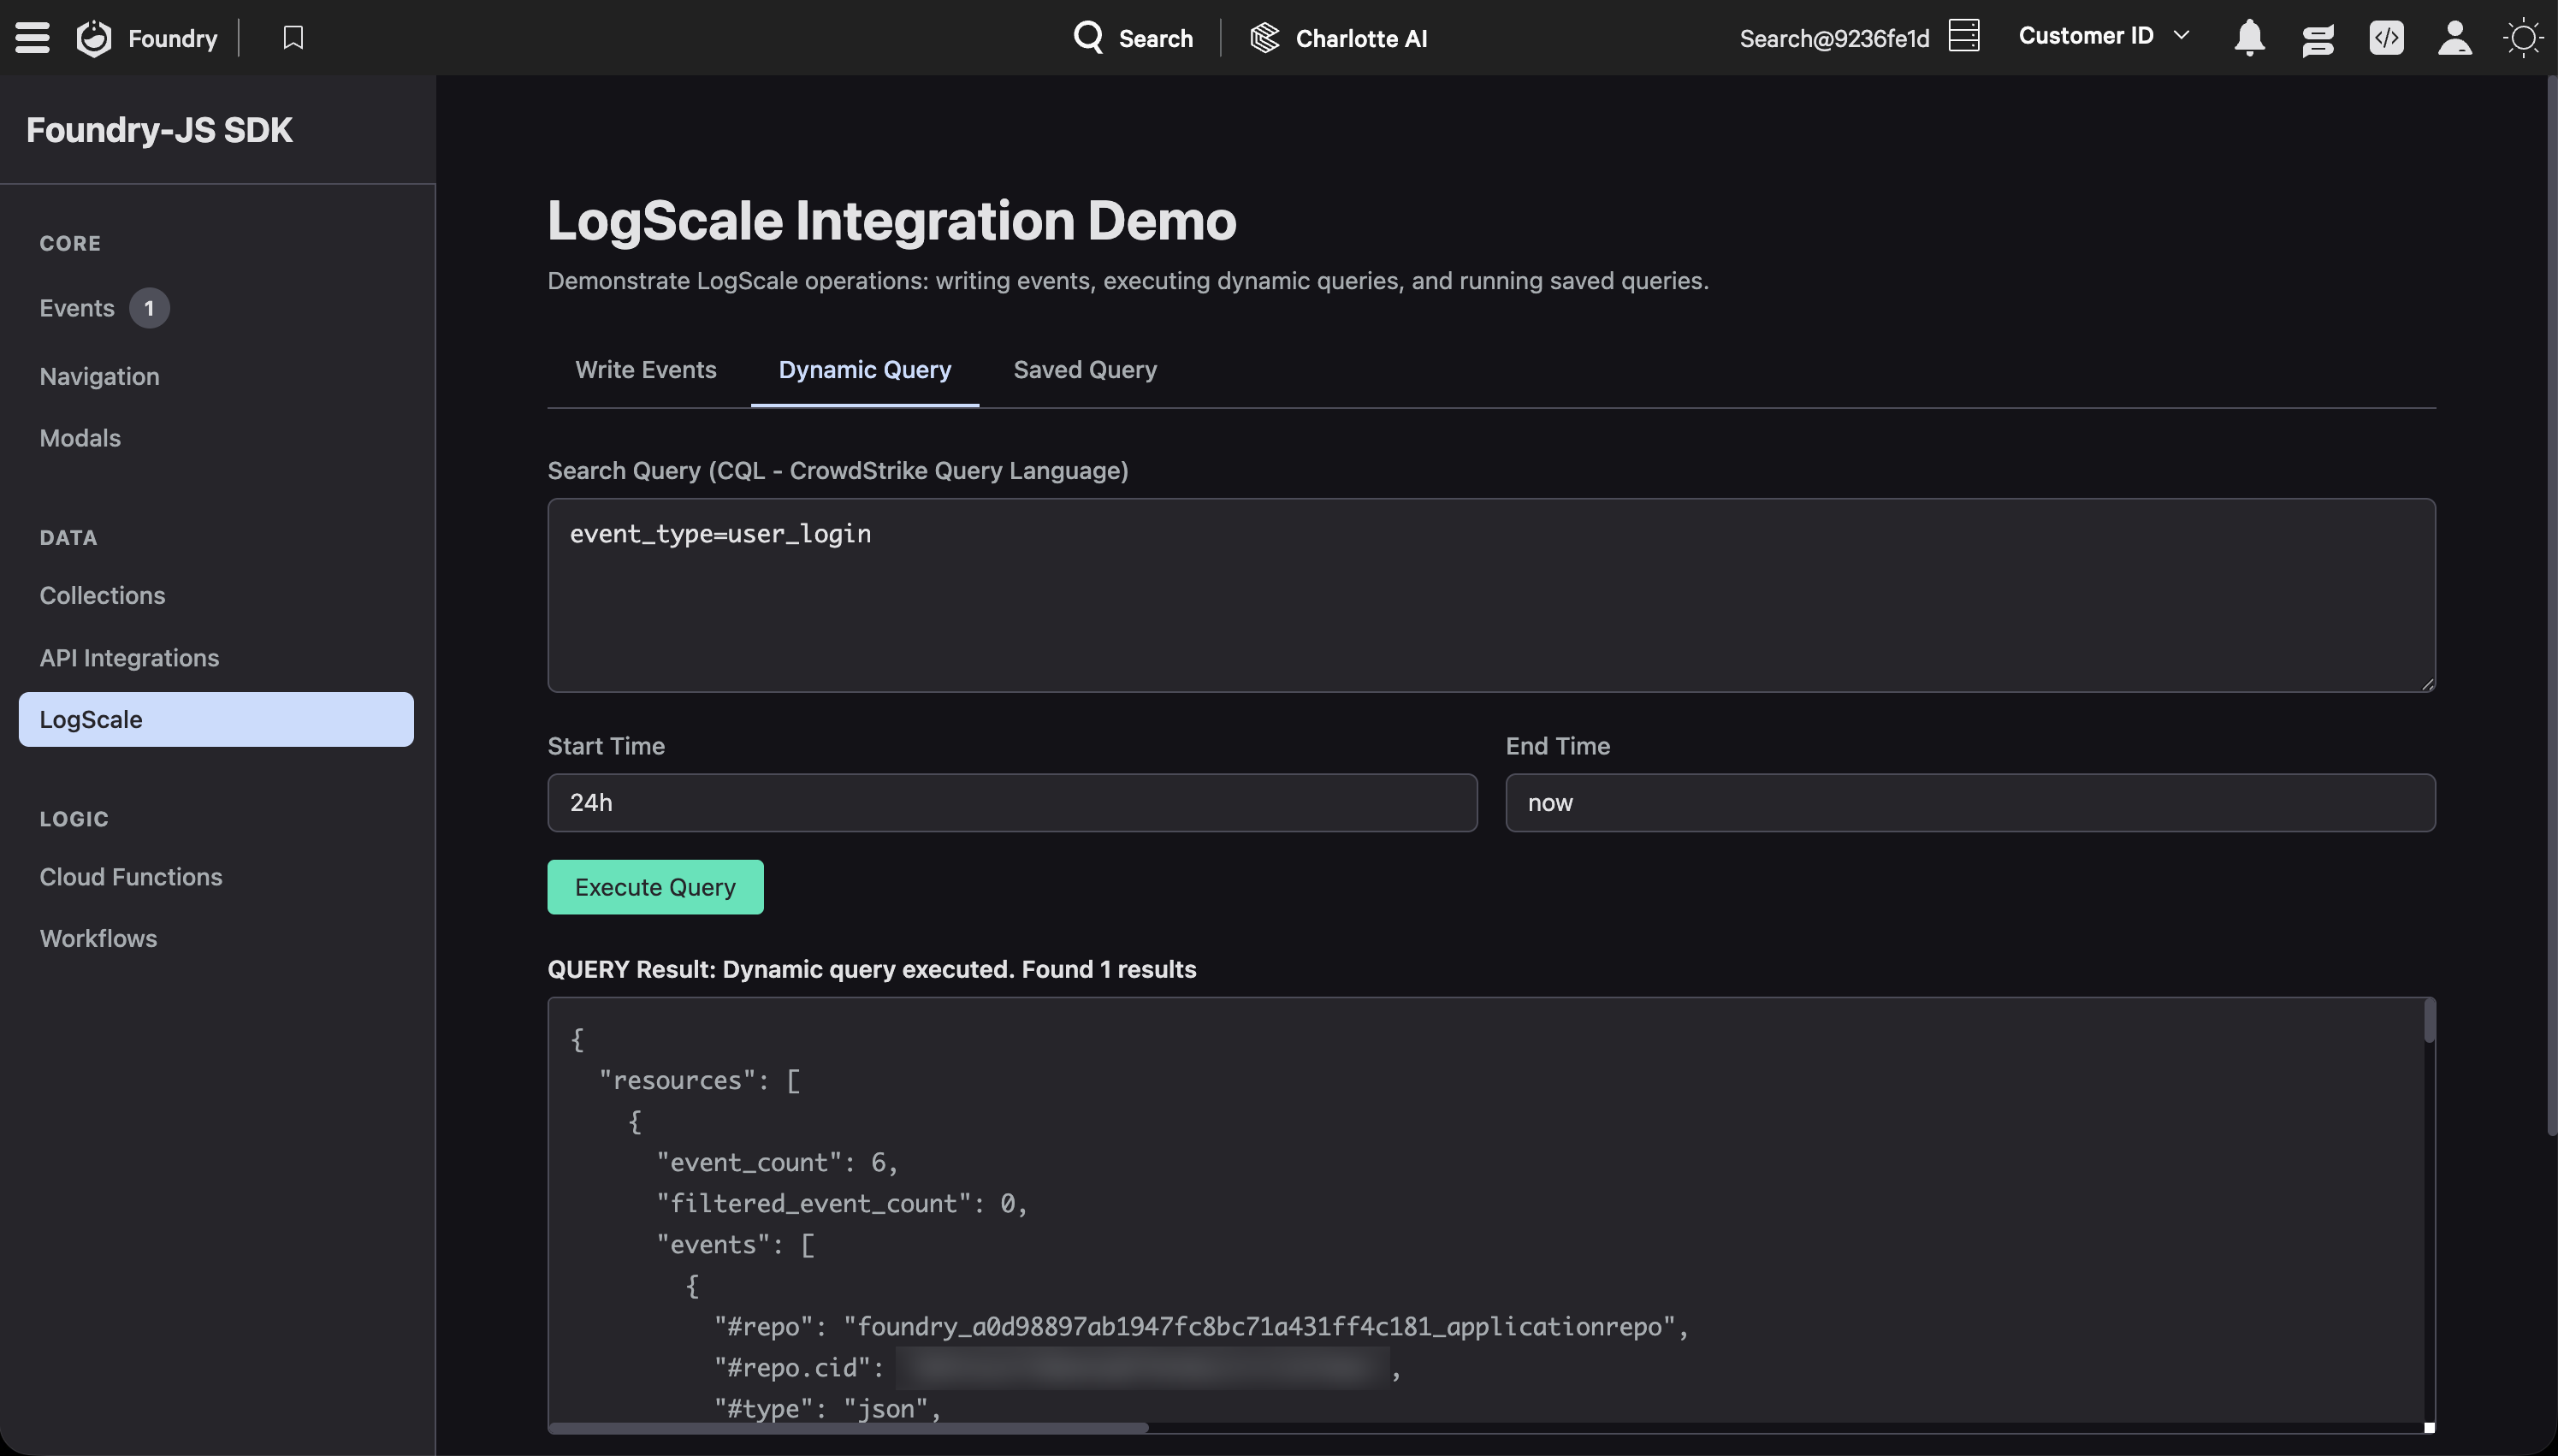
const result = await falcon.logscale.query({
  name: 'LogScaleRepo',
  search_query: 'event_type=user_login',
  start: '24h',
  end: 'now'
});
Saved searches execute pre-defined queries by ID. The demo includes a “Recent User Logins” saved search defined in the manifest:
const result = await falcon.logscale.savedQuery({
  id: 'saved-query-id',
  start: '7d',
  mode: 'sync',
  parameters: {}
});
All three operations return JSON results that you can render however you like. See logscale-demo.tsx for the full implementation.
Calling External APIs with API Integrations
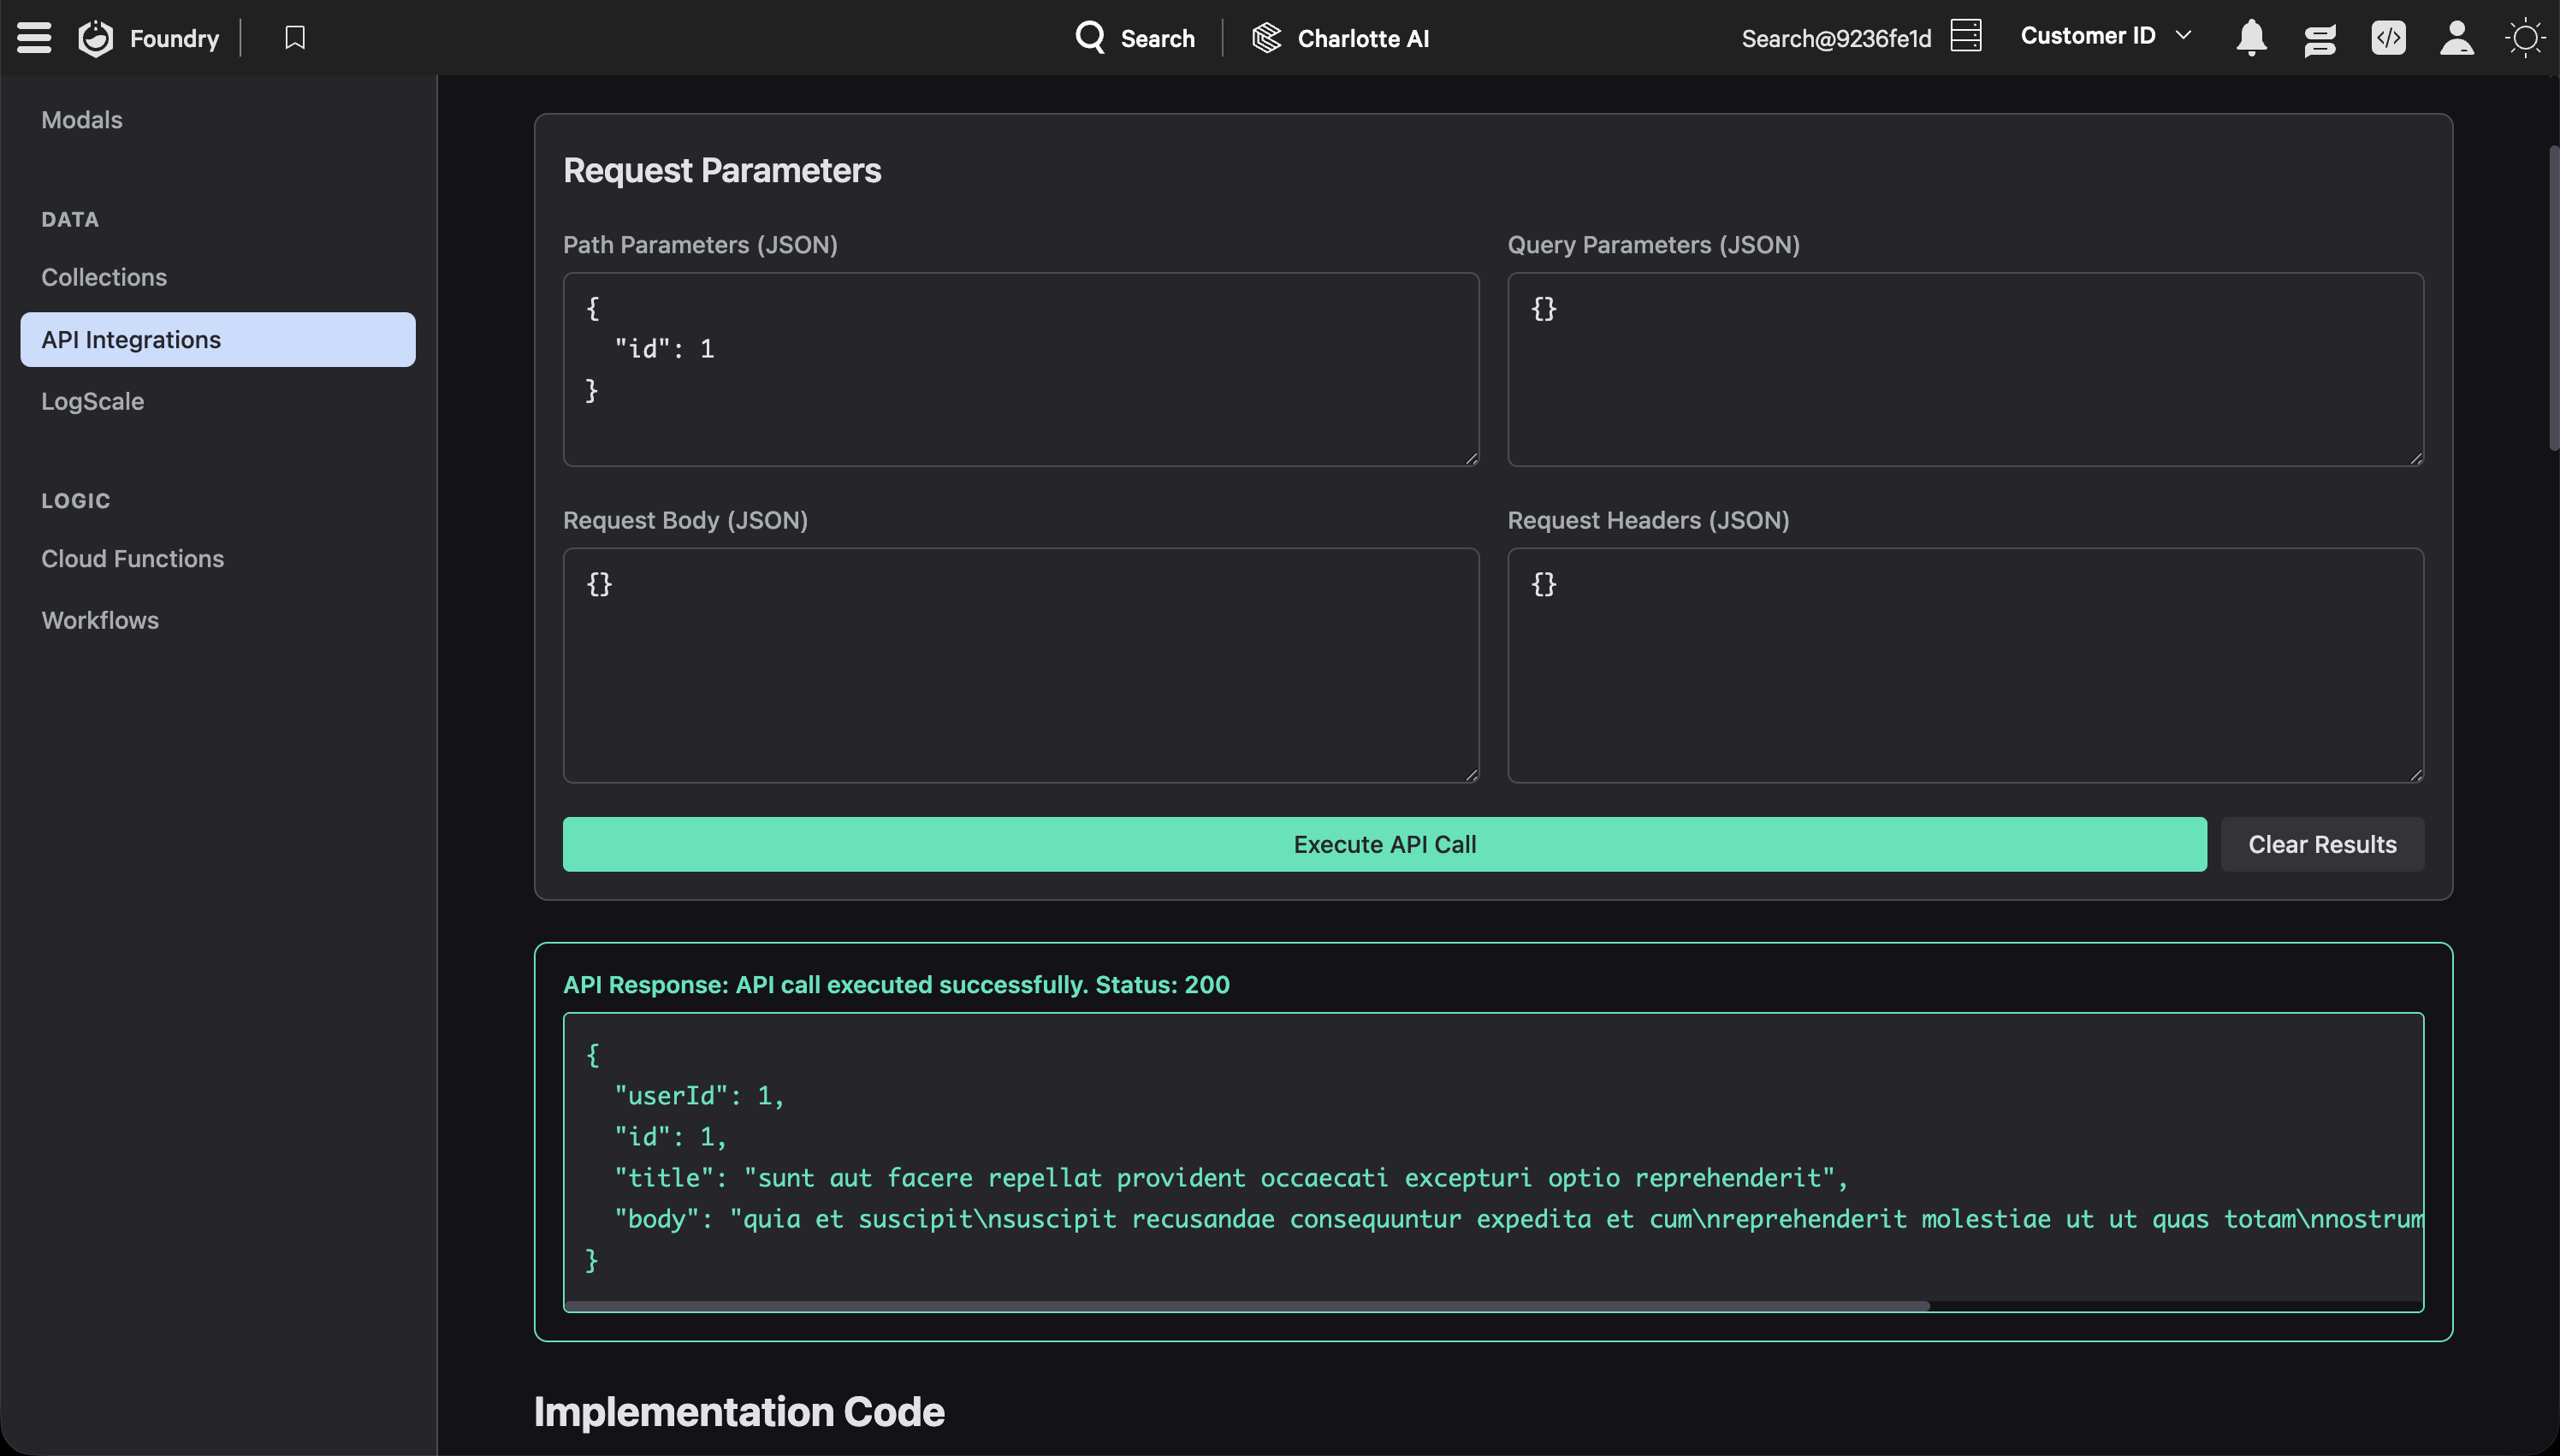
API Integrations let your Foundry app call external APIs through a managed proxy layer. The demo app uses JSONPlaceholder as a test API, with the OpenAPI spec defined in api-integrations/jsonplaceholder.json.
const apiIntegration = falcon.apiIntegration({
  definitionId: 'JSONPlaceholder Demo API',
  operationId: 'getPosts'
});

const response = await apiIntegration.execute({
  request: {
    params: {
      path: { id: 1 },
      query: { postId: 1 }
    }
  }
});

const statusCode = response.resources?.[0]?.status_code;
const data = response.resources?.[0]?.response_body;
The definitionId matches the integration name in your manifest, and operationId matches an operation defined in the OpenAPI spec. The proxy layer handles secret management (API keys stay in Foundry, not in your frontend code), request validation, and audit logging.
See api-integrations.tsx for the full implementation, including path parameters, query parameters, request bodies, and custom headers.
Cloud Functions
Cloud functions let you run server-side code that your UI can call. Here’s the Python greeting function from functions/GreetingFunction/main.py:
from crowdstrike.foundry.function import Function, Request, Response, APIError

FUNC = Function.instance()


@FUNC.handler(method="POST", path="/greet")
def on_post(request: Request) -> Response:
    # Extract name from request body
    name = request.body.get('name') if request.body else None

    # Validate input
    if not name:
        return Response(
            code=400,
            errors=[APIError(code=400, message="Name parameter is required")]
        )

    # Generate greeting message
    greeting_message = f"Hello {name}! Welcome to the Foundry Cloud Functions demo!"

    # Return successful response
    return Response(
        body={
            'message': greeting_message,
            'name': name,
        },
        code=200
    )
Calling it from the UI uses a fluent API:
const cloudFunction = falcon.cloudFunction({
  name: 'greeting_function',
  version: 1
});

const result = await cloudFunction.path('/greet').post({ name: 'Demo User' });
The same pattern works for all HTTP methods: .get(), .put(), .patch(), .delete(). You can also append query parameters to the path.
Beyond cloud functions, foundry-js also exposes falcon.api with 18 whitelisted API namespaces you can call directly from your UI code, including alerts, detects, devices, incidents, workflows, mitre, remoteResponse, userManagement, and more. Cloud functions are the escape hatch for Falcon API endpoints that aren’t in the whitelist. The whitelisted namespaces cover many common use cases, but if you need an endpoint that isn’t exposed through falcon.api, you’d use falcon.cloudFunction() with FalconPy server-side. See cloud-function-demo.tsx for all the HTTP method variations.

Navigation and Modals
Hash-Based Routing
Foundry apps run inside an iframe in the Falcon console, so standard browser routing doesn’t work. The demo uses React Router’s HashRouter with hash-based routes (#/collections, #/logscale, etc.) to navigate between pages without breaking the console’s own navigation.
When a user navigates within the app, the demo syncs the hash route with the Falcon console’s parent frame:
falcon.navigation.navigateTo({
  path: '/collections',
  type: 'internal',
  target: '_self'
});
For external links, you need to tell the Falcon console to open the URL outside the iframe. The navigateTo method accepts a path string (a full URL for external links) and handles the communication with the parent frame. Unlike the deprecated onClick method, it doesn’t need the native DOM event. Just extract the URL from the anchor element:
const handleExternalClick = (event) => {
  event.preventDefault();
  const url = event.currentTarget.href;

  if (falcon?.navigation?.navigateTo) {
    falcon.navigation.navigateTo({ path: url });
  } else {
    window.open(url, '_blank');
  }
};
The demo app’s navigation.tsx shows the deep linking pattern too: on mount, it reads the hash from document.location.hash and navigates to the initial path so shared URLs work correctly.
Modals
Foundry apps can open modals that render as separate pages within the Falcon console’s modal system. The demo defines a modal page in the manifest and opens it like this:
const result = await falcon.ui.openModal(
  { id: 'a1b2c3d4e5f6a1b2c3d4e5f6a1b2c3d4', type: 'page' },
  'Demo Modal Content',
  { path: '/modal-demo', data: { userId: 'demo-user-123' }, size: 'lg' }
);

// Close from within the modal
await falcon.ui.closeModal(returnData);
The id here is the auto-generated 32-character hex ID for your modal page, not the page key name from your source manifest (like foundry_js_demo_modal). This ID gets generated when you deploy. To find it, export the app from Foundry’s App manager and check the id field under ui.pages.foundry_js_demo_modal in the exported manifest.yml. You can pass data to the modal on open and receive return data when it closes. Size options are md, lg, and xl.
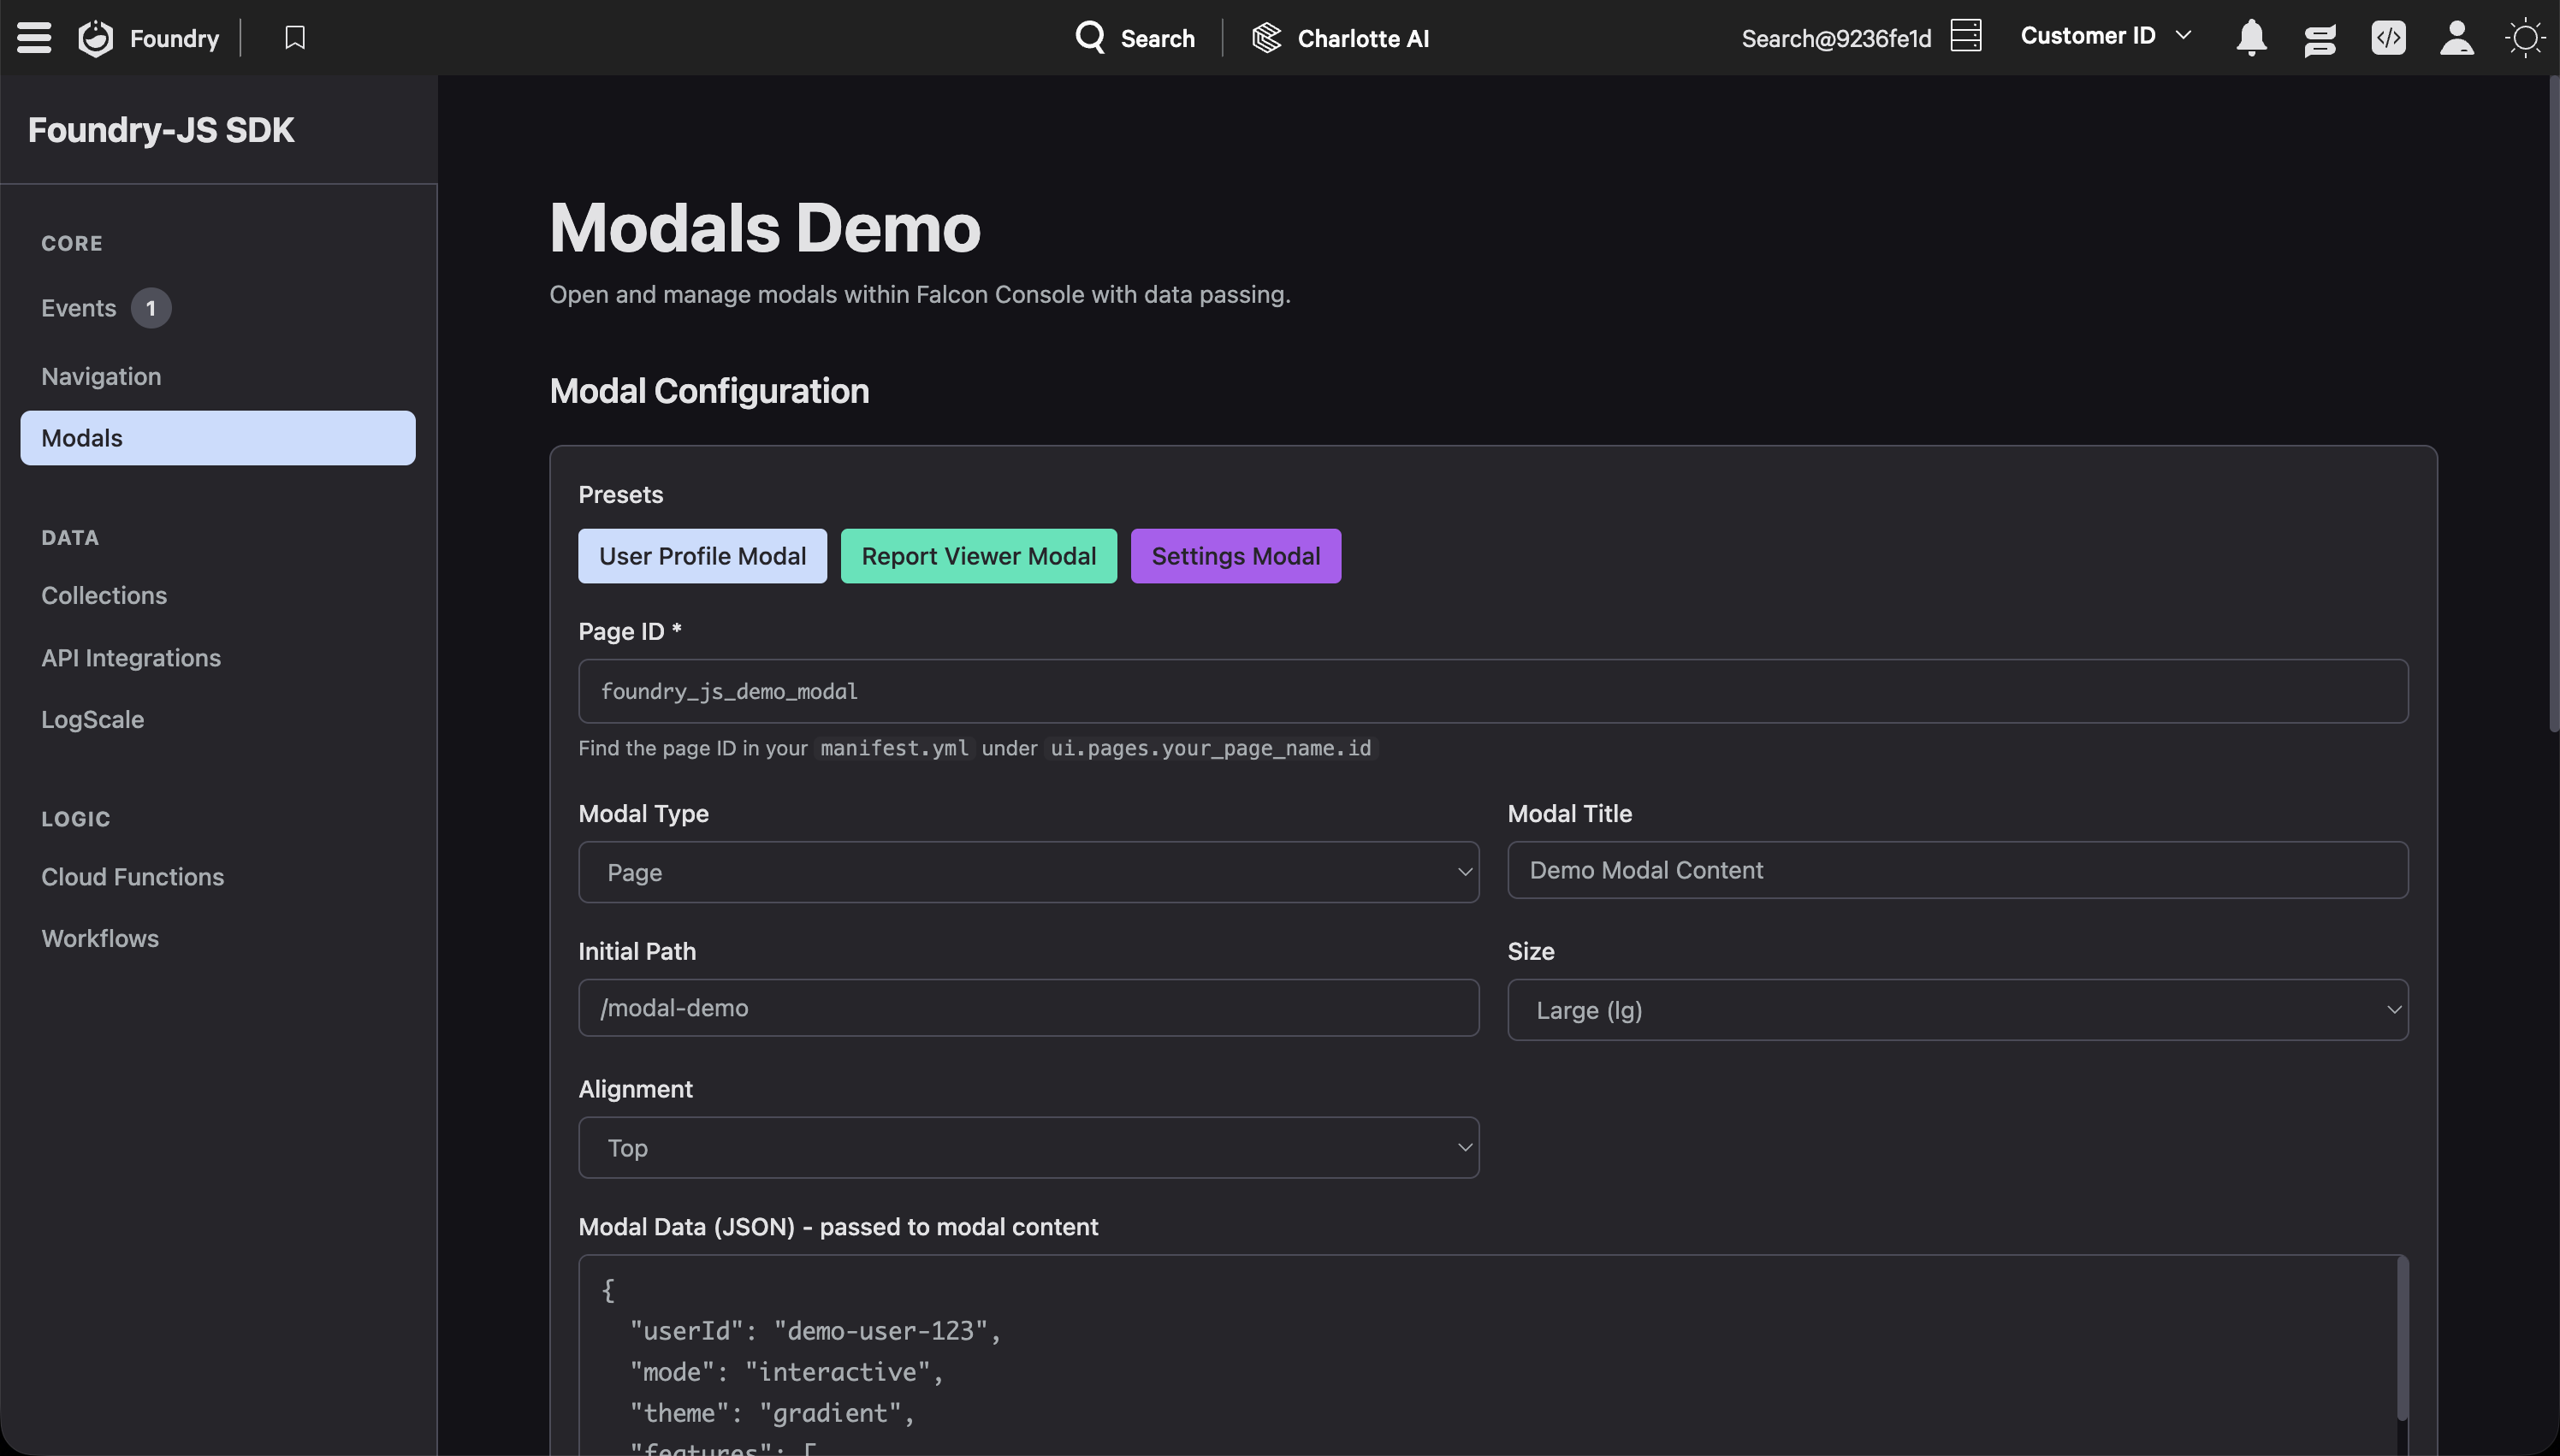
If you enter the correct Page ID and click Report Viewer Modal, you’ll see a modal like the following:
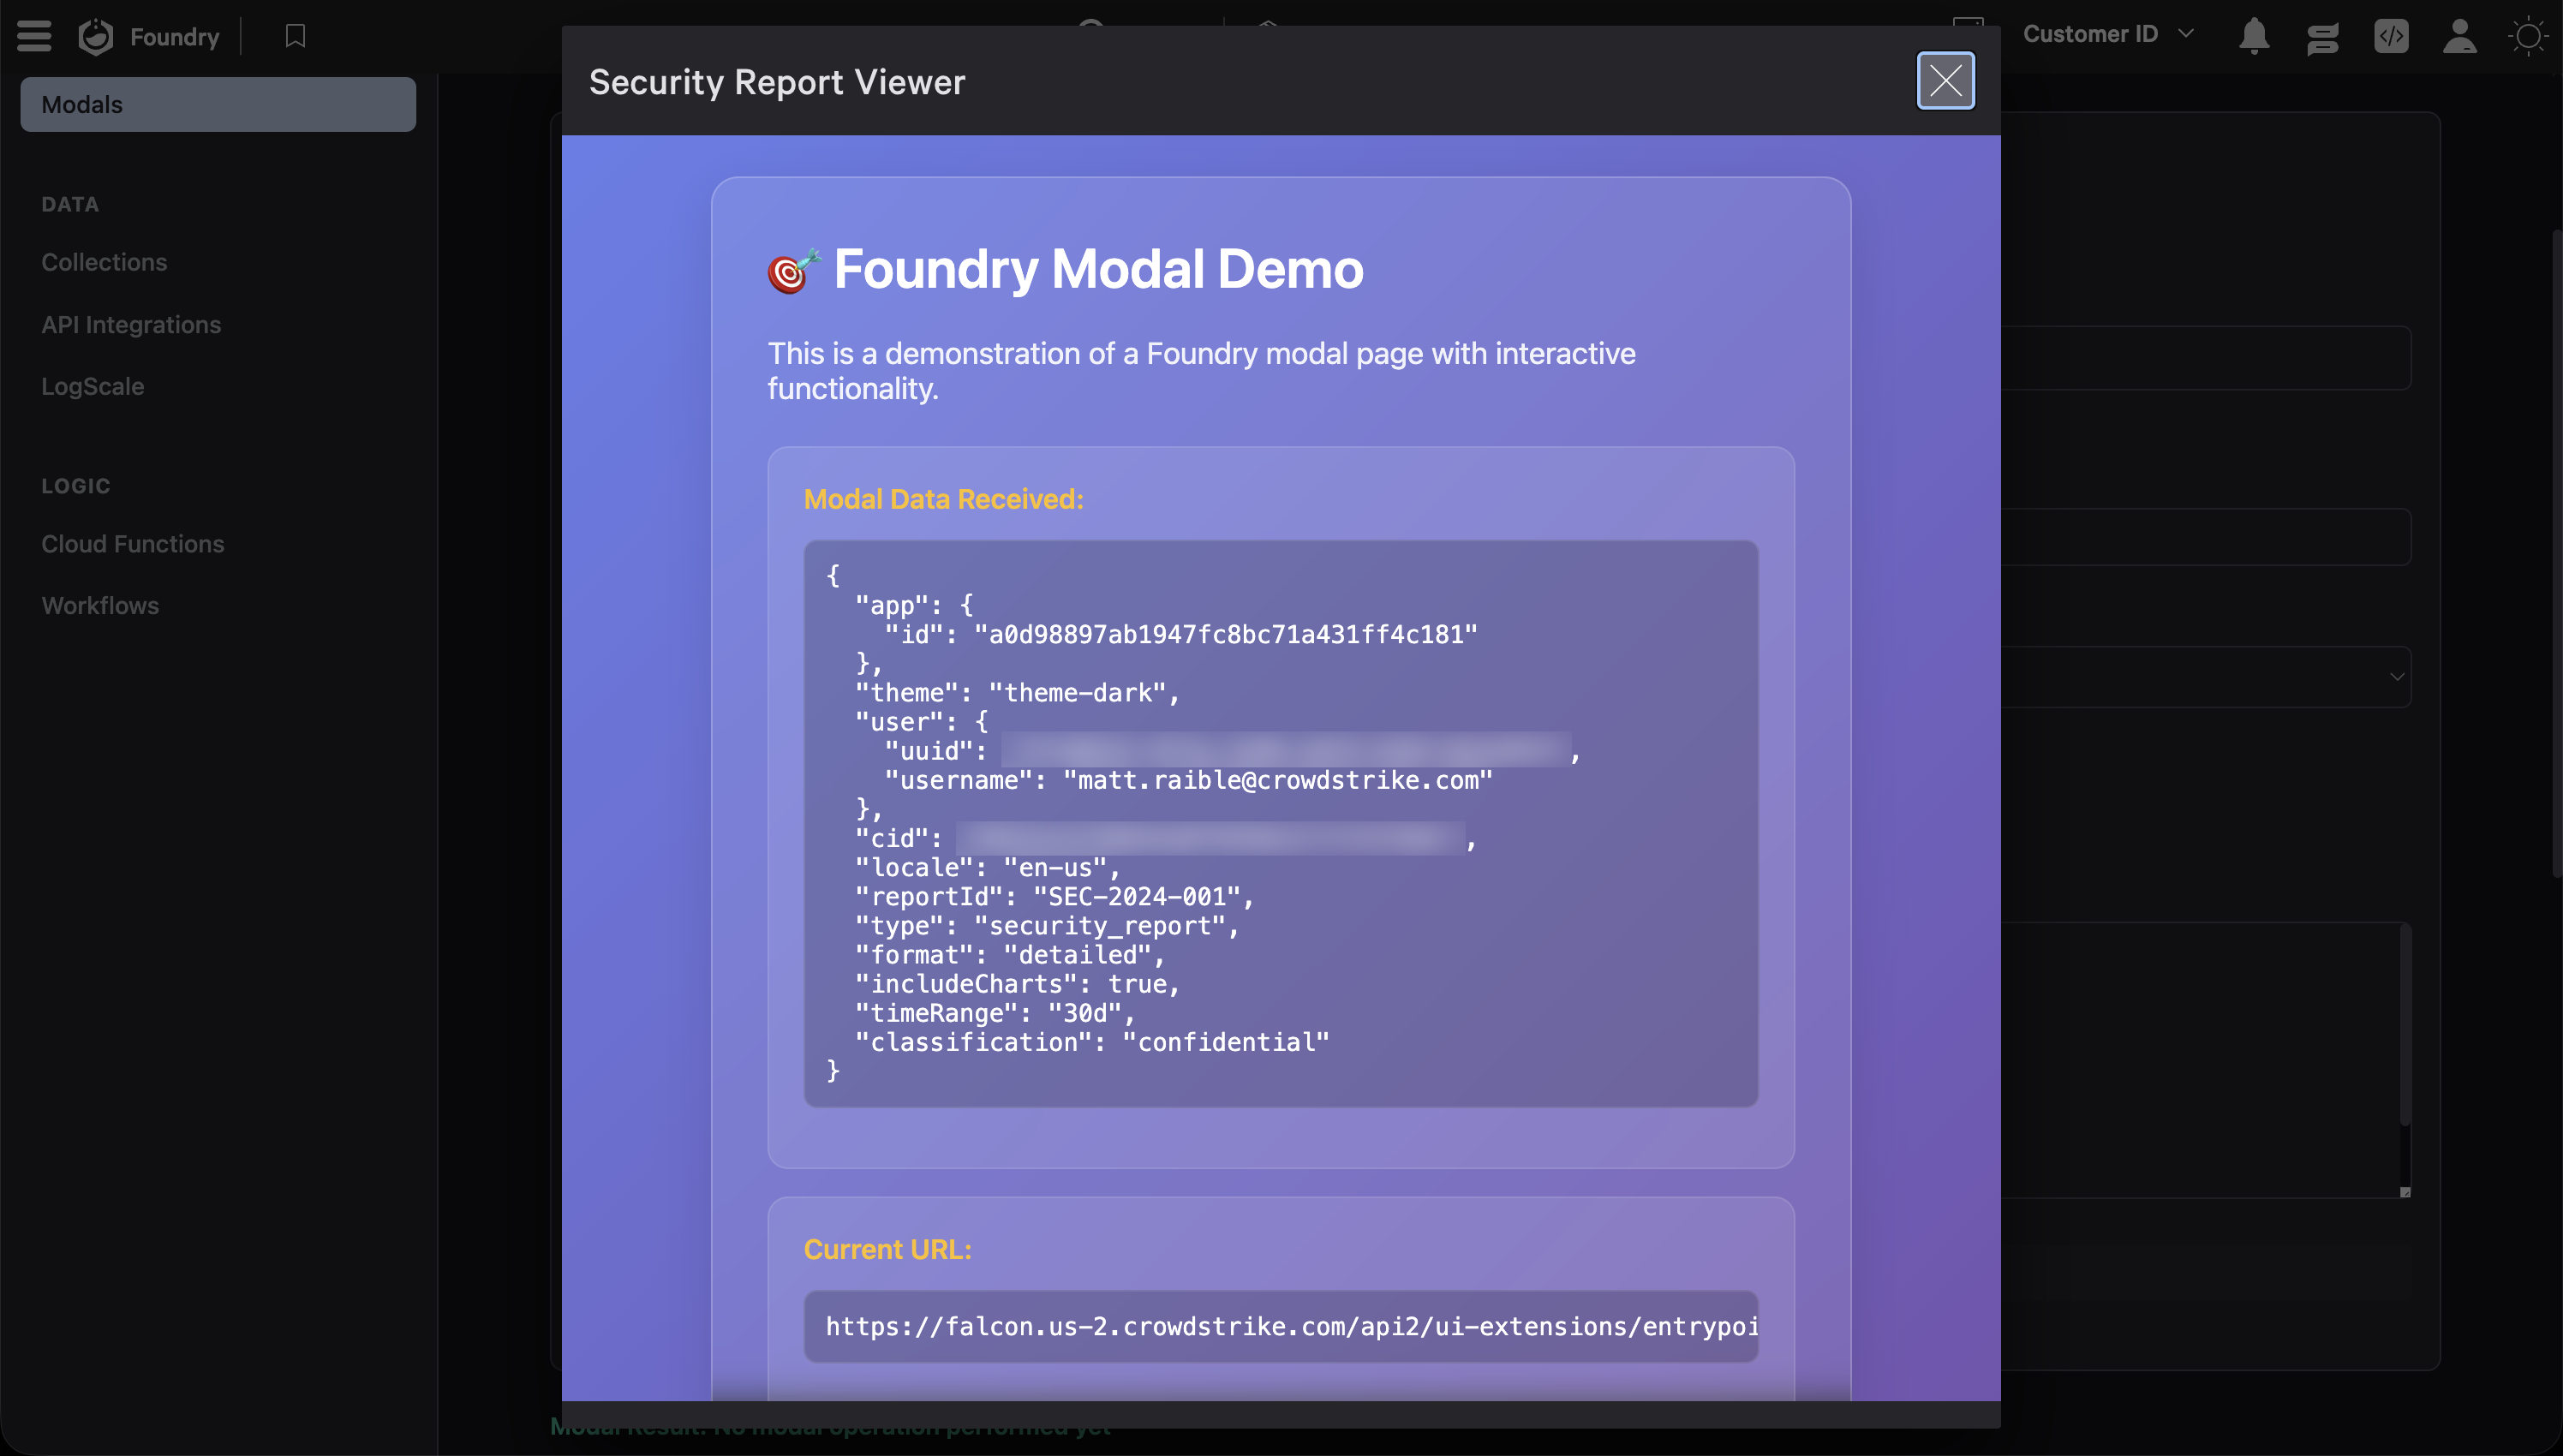
See modals.tsx for the full implementation.
Keep Building with Falcon Foundry
The foundry-js demo app covers every major integration point in a single codebase. Whether you’re building a threat intel dashboard, an incident response tool, or an automation interface, the patterns in this sample app are the ones you’ll use. Clone it, deploy it, and use it as a starting point for your own apps.
For official documentation, see the Falcon Foundry docs and the @crowdstrike/foundry-js package on npm.
If you want to dive deeper into the individual capabilities covered in this post:
- Dive into Falcon Foundry Functions with Python
- Getting Started with Falcon Foundry Collections
- Build API Integrations with Falcon Fusion SOAR HTTP Actions
Have you run into any challenges building your first Falcon Foundry app, or found a pattern that works well? I’d love to hear about your experience! Connect with me on LinkedIn or join the Foundry Developer Community to share your story.