


![Helping Non-Security Stakeholders Understand ATT&CK in 10 Minutes or Less [VIDEO]](https://assets.crowdstrike.com/is/image/crowdstrikeinc/video-ATTCK2-1?wid=530&hei=349&fmt=png-alpha&qlt=95,0&resMode=sharp2&op_usm=3.0,0.3,2,0)
![Qatar’s Commercial Bank Chooses CrowdStrike Falcon®: A Partnership Based on Trust [VIDEO]](https://assets.crowdstrike.com/is/image/crowdstrikeinc/Edward-Gonam-Qatar-Blog2-1?wid=530&hei=349&fmt=png-alpha&qlt=95,0&resMode=sharp2&op_usm=3.0,0.3,2,0)


?wid=2048&hei=1350&fmt=png-alpha&qlt=95,0&resMode=sharp2&op_usm=3.0,0.3,2,0)


Malware remediation is not always clear-cut. In this blog post, the CrowdStrike® Falcon Complete™ and Endpoint Recovery Services teams take you behind the scenes to highlight just one of numerous challenges we face on a regular basis while remediating obfuscated or hidden malware. The steps outlined below provide Falcon analysts with guidance on solving similar problems in their own environments. For the most part, our remediation efforts utilize Microsoft PowerShell via the Falcon Real Time Response (RTR) console or the RTR API. On occasion, we discover malware obfuscating file names using unique characters or language encodings in order to evade detection or complicate recovery efforts. In order to remediate files and folders like this with PowerShell, it sometimes requires a little more effort than simply invoking the Remove-Item PowerShell cmdlet or using the built-in RTR command, rm. One example where this can be seen is with an old and familiar trojan, Andromeda, which uses a non-breaking space (NBSP) character in its USB spreader plugin.
Threat Background and Context
Andromeda is a modular trojan that was used primarily as a downloader to deliver additional malware payloads including banking Trojans. It is often bundled and sold with plugins that extend its functionality, including a rootkit, HTML formgrabber, keylogger and a SOCKS proxy1. Prior to its takedown on November 29th, 2017, Andromeda was one of the most popular trojans used by Russian and Eastern European cybercriminals. One variation of the malware was found to include a USB spreader plugin that used a command-and-control (C2) protocol constituting a Domain Generation Algorithm (DGA) to complicate takedown efforts. Despite the takedown, we continue to see detections in customer environments on a daily basis for infected USB drives. Remediation of these drives helps reduce alert fatigue and prevent the spread of this malware to other hosts that do not have the CrowdStrike Falcon® sensor installed.
In this blog, our focus is on an obfuscation technique that Andromeda’s USB spreader plugin uses to make sure its payload gets executed by the user.
Hiding in Plain Sight
Once the malware has infected the host, its goal is to move laterally and continue to worm its way to additional hosts. To accomplish this mission, a USB spreader plugin is used in conjunction with a social engineering tactic, where it presents the user with a malicious shortcut (.LNK file) to a hidden folder on the root of the infected USB drive. This hidden folder contains the user’s data, which has been (unknowingly) moved by the malware. This forces the user to click through the malicious shortcut executing the hidden DLL dropper while at the same time presenting the user an Explorer session with their requested folder of data. The user is none the wiser, and the payload has been executed successfully, completing the lateral movement and infection onto additional hosts.
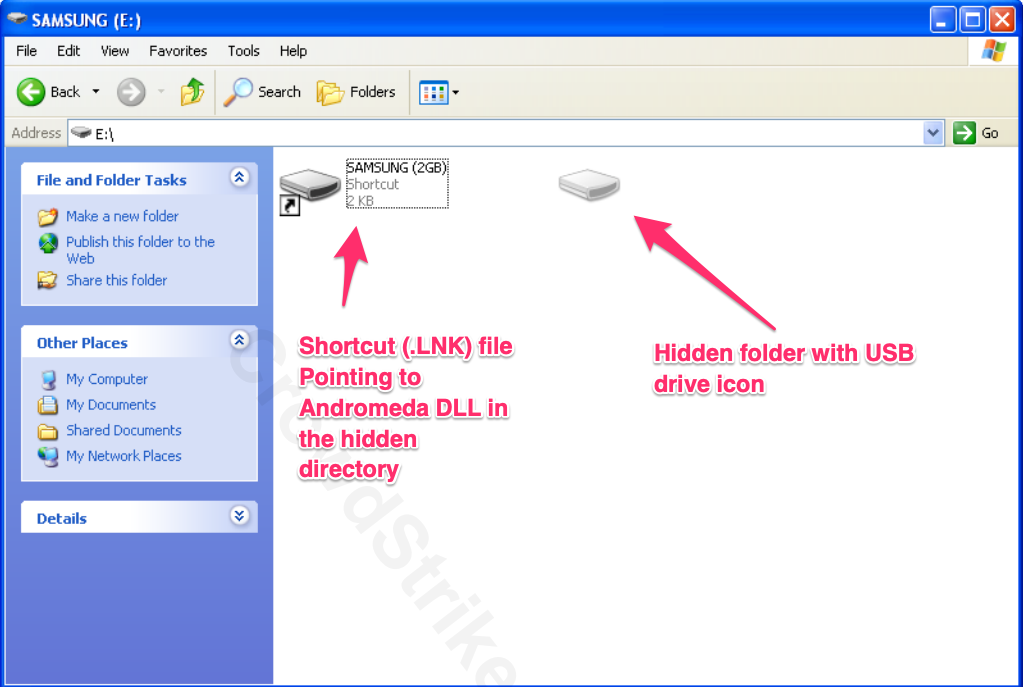 2Figure 1. Malicious shortcut and hidden directory (click image to enlarge)
As previously mentioned, Andromeda’s USB spreader plugin uses a non-printable, ASCII, non-breaking space character (0xA0 – Unicode decimal value is 160; see Figure 1.2) to create the obfuscated folder on the root of the USB drive, setting both hidden and system attributes (see Figure 1). It then moves all files and directories on the drive into this folder and creates three additional files with the following names:
desktop.ini(sets folder icon to appear as USB drive)<algorithmically generated filename>(DLL)IndexerVolumeGuid(contains second-stage payload)
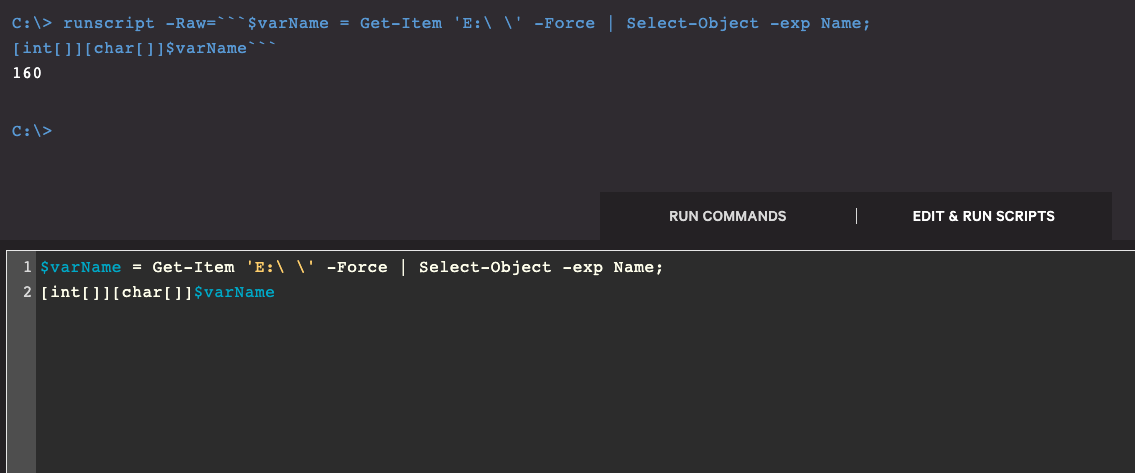 Figure 1.2. Identifying the Unicode decimal for the directory name (click image to enlarge)
The general purpose of the NBSP character is to prevent words from separating on separate lines as you type text in your word-processing software. While you type, if a word does not fit on the current line, it drops down to the next line. To prevent this from happening while you write for example, “100 km” — you can use a non-breaking space character to keep them together as one “word.”
To the user, the character simply looks like a normal "space" character. Consequently, parsing the file path becomes a little more complicated via PowerShell’s command line interface.
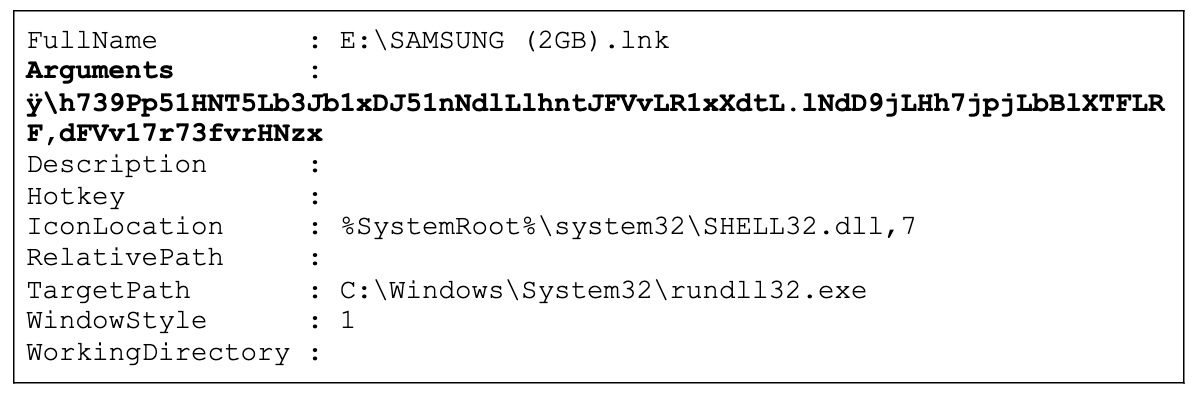 Figure 2. Contents of an Andromeda USB spreader .LNK file (NOTE: “SAMSUNG” is the name of the drive used in this example and not otherwise involved with the botnet)
If we look closely at Figure 2, we can see the character "ÿ" which is replacing the NBSP character in the path (a byproduct of PowerShell attempting to interpret the character into something printable via the RTR API). The Arguments property for the shortcut file is formatted in the following manner: HiddenFolder\EncryptedDropperDLL,EntryPointFunction Within the Falcon Detections app, we would likely observe the explorer.exe process spawning rundll32.exe when the user clicks on the shortcut to access their data. Reviewing the command line in the screenshot from Figure 2.1, we see the DLL filename and entry point called in the COMMAND LINE field: --_-_-_--_-_____-_--_-_-_----____--_---_-_--__-_-_-__.{1D5906E3-DAB2-42A6-91B0-0EEF01E691AE} The entry point function is displayed as:
FPR8puhjQK463G0E In this specific example, we also see the malware was blocked by the Falcon sensor when the rundll32.exe command was executed, effectively neutralizing the threat.
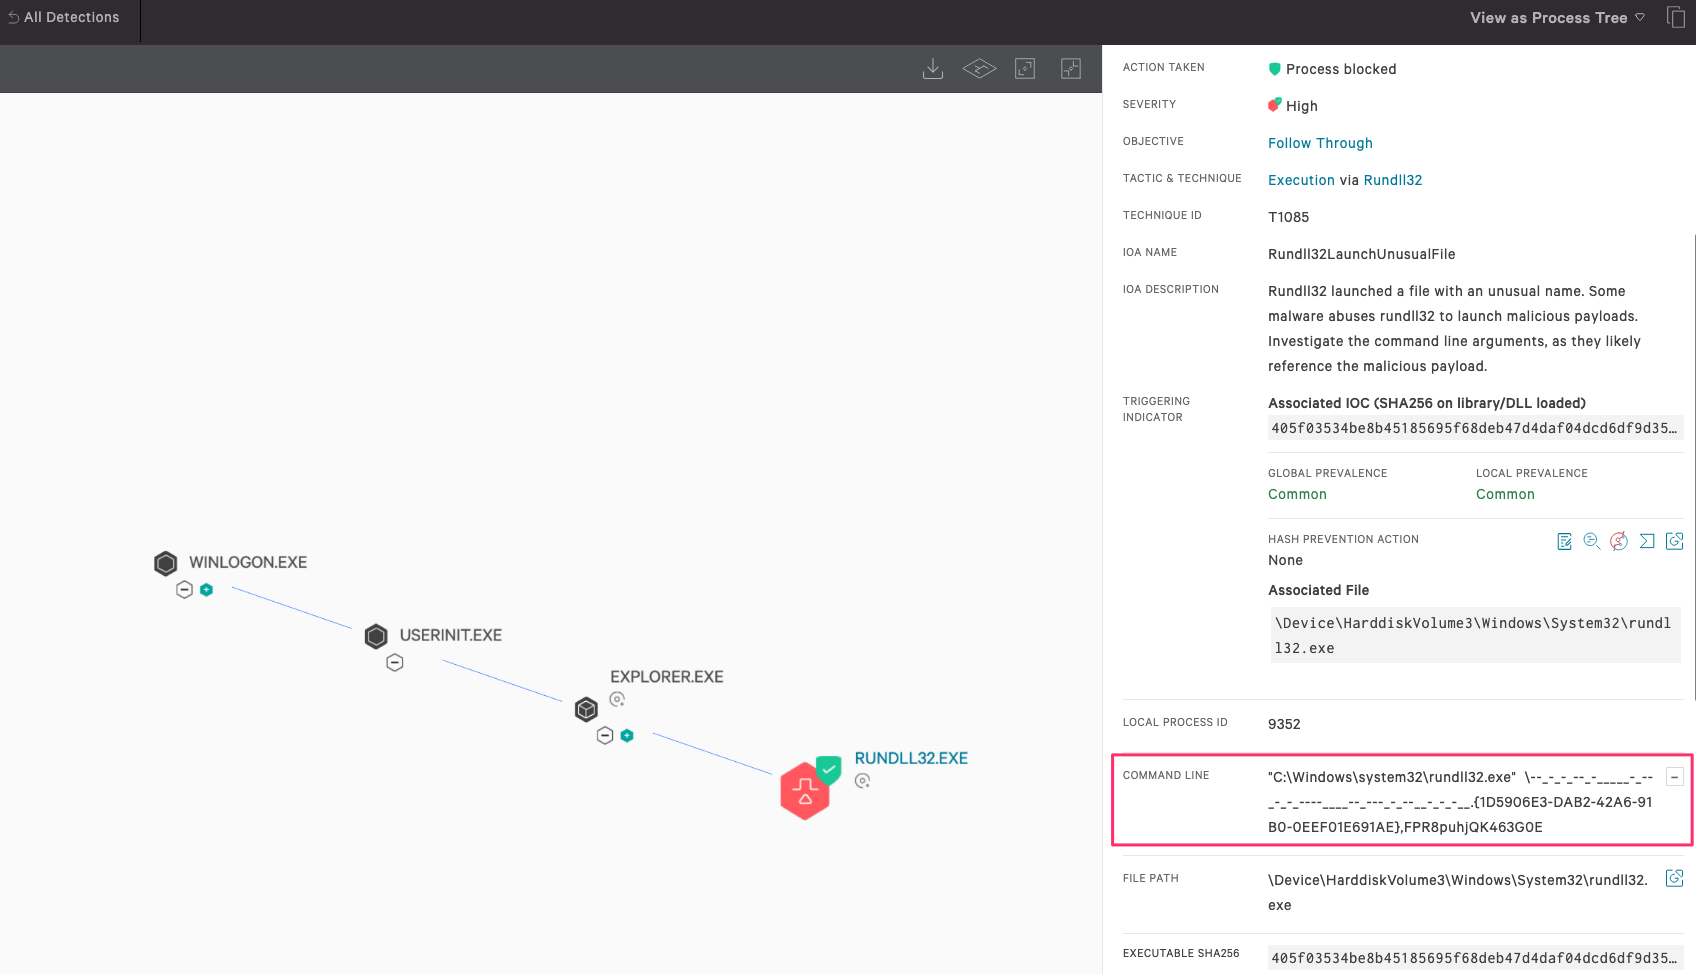 Figure 2.1. Example Andromeda USB spreader detection in the Falcon UI (click image to enlarge)
We can confirm the detection is a result of an infected USB device being connected to the drive by pivoting to the Event Search app from the detection and performing a search for USB device information (Figure 2.2) using the built-in Splunk Query Language. Comparing the blocked process start time with the DcUsbDeviceConnected/RemoveableMediaVolumeMounted event timestamps, we want to determine whether the drive was connected just prior to the blocked process start time. This usually indicates the malware attempted to run just after the drive was connected to the computer.
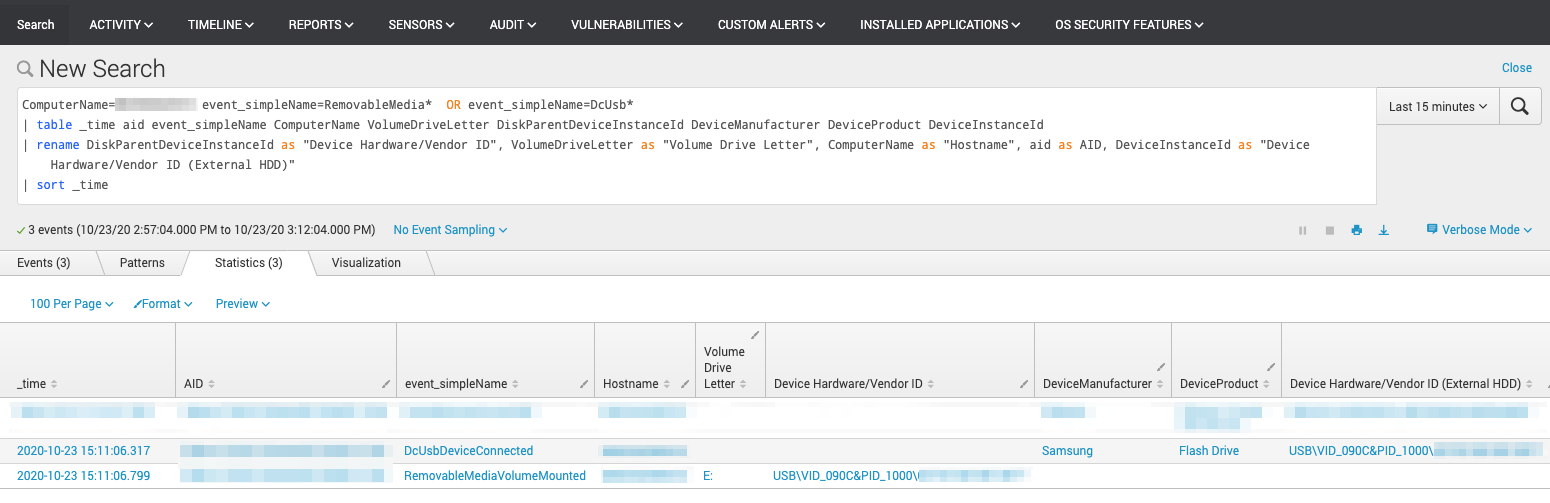 Figure 2.2 USB device information query via Event Search App (click image to enlarge)
Next, Figure 3 shows the output of listing files and folders on the root of the infected drive. We can see the “Name” object appears blank. NOTE: The RTR-native “ls” command reveals hidden and System files by default. This is why the Andromeda-created, obfuscated directory is shown.
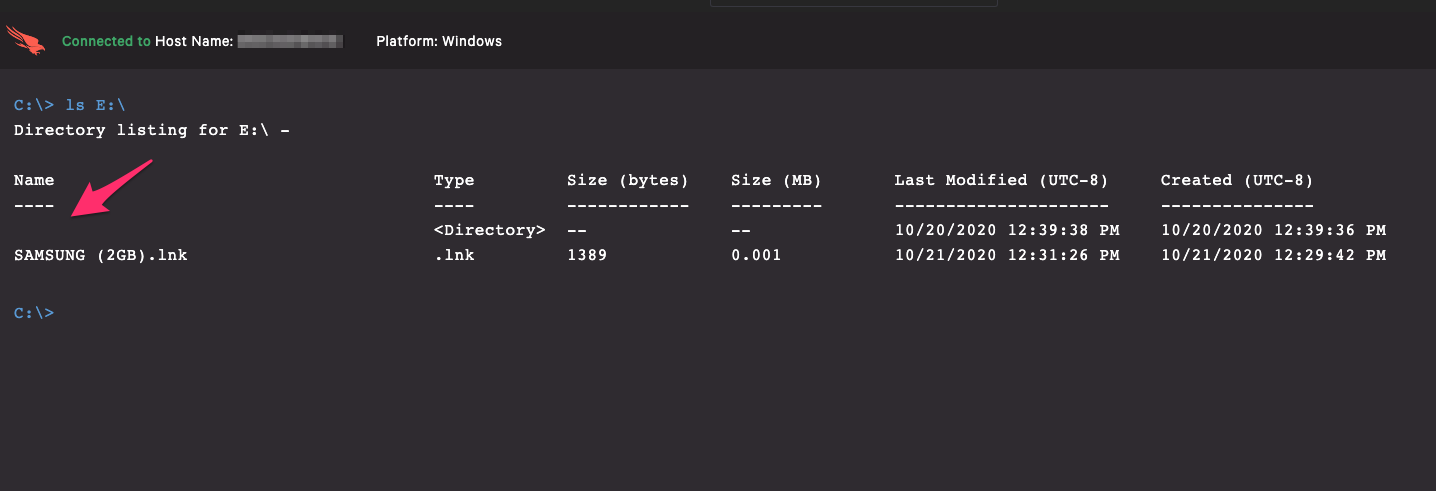 Figure 3. Directory listing at the root of the USB drive (click image to enlarge)
Our next screenshot (Figure 4) demonstrates an attempt to list the contents of the obfuscated directory using A) a regular space as the name, resulting in an error, and B) the NBSP character itself passed through by typing option+space on macOS OR Ctrl+Alt+Space/Ctrl+Space on Windows — resulting in a list of all of the files in the folder, including the Andromeda malware. This is done using the native “ls” command in RTR.
 Figure 4. A) List files using a “space,” and B) list files using the “NBSP” character (click image to enlarge)
We can achieve the same results using the NBSP character via the Edit & Run Scripts console by using the following command (Figure 5): Get-ChildItem ‘E:\ \’ -Force | Out-String NOTE: Due to the way the Edit & Run Scripts console works (and the RTR API), we need to pipe the cmdlet to Out-String for readability in the console or API output.
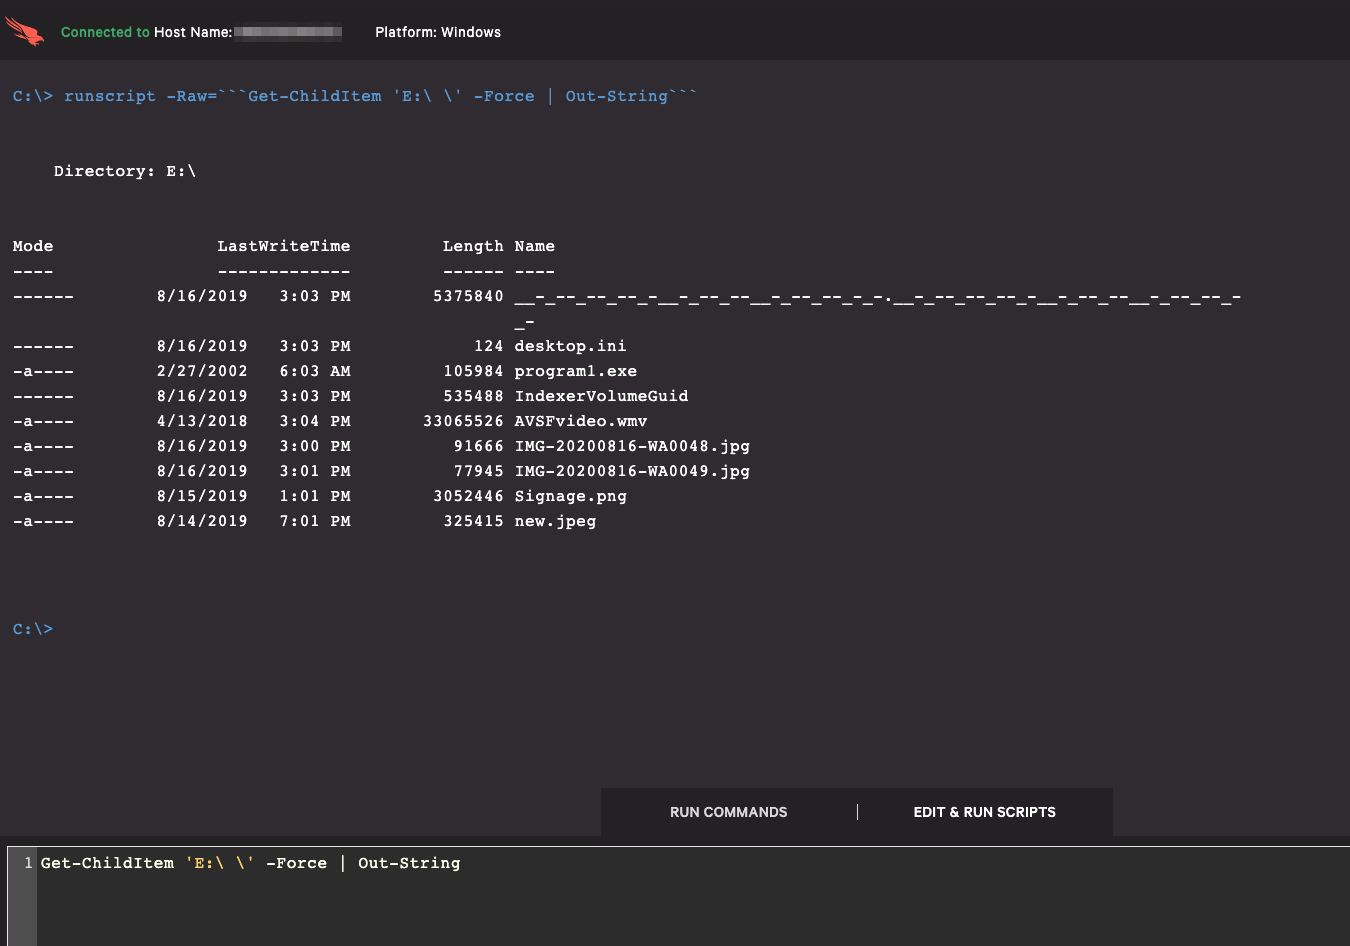 Figure 5. List files in obfuscated directory via Edit & Run Scripts (click image to enlarge)
Although using the keyboard shortcut to input the interpreted NBSP character will work in the RTR console, our preferred method is to use the UTF-8 encoded character equivalent along with the -LiteralPath parameter to force PowerShell to interpret our input properly. This reduces the risk of the NBSP character dropping from the command during copying and pasting of code or other similar actions. Get-ChildItem -LiteralPath E:\$(0xA0)\ -Force | Out-String NOTE: The trailing backslash in the path is necessary, otherwise the command will return the directory listing from the root of the drive.
Remediation
So far we’ve covered a couple of different methods of getting around Andromeda’s attempts to obfuscate the malware in a hidden directory. Empowered with this knowledge, we’ll demonstrate how to easily remove the malware and recover the user’s data back to the root of the drive.
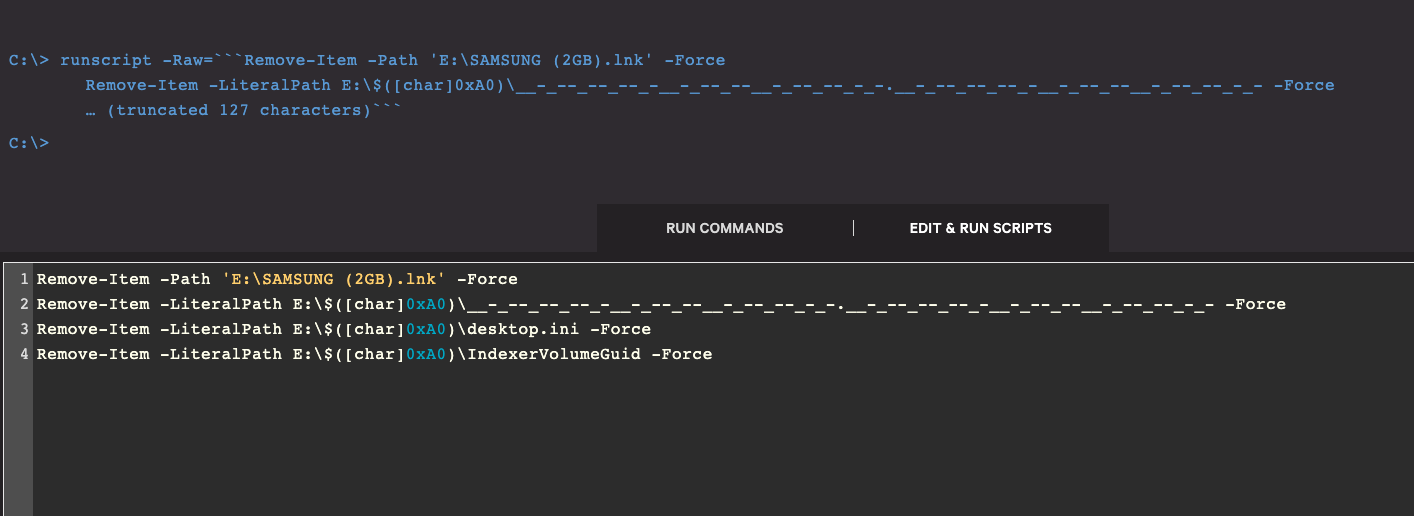 Figure 6. Remove malware artifacts from the drive (click to enlarge)
Using PowerShell’s Remove-Item cmdlet (Figure 6), we can now delete each of the malicious artifacts. Using the -Force parameter, we override any Read Only attribute that may be present.
- Line 1 removes the malicious shortcut that points to the DLL binary with all of the dashes and underscores in the filename (on Line 2).
- Line 2 removes the DLL payload.
- Line 3 removes the .ini file that configured the folder icon to display as a USB drive.
- Line 4 removes the second-stage payload.
Recovery
Although removing each of the aforementioned artifacts leaves us with a clean USB drive (Figure 7), to the end user, it may look like the drive no longer contains any data due to the hidden and obfuscated directory.
To recover the user’s data back to the root of the drive, we can now use the following command: Get-ChildItem -LiteralPath E:\$(0xA0)\ -Force -Recurse | Move-Item -Destination E:\ And the final step is to remove the hidden folder: Remove-Item -LiteralPath E:\$(0xA0)\ -Force
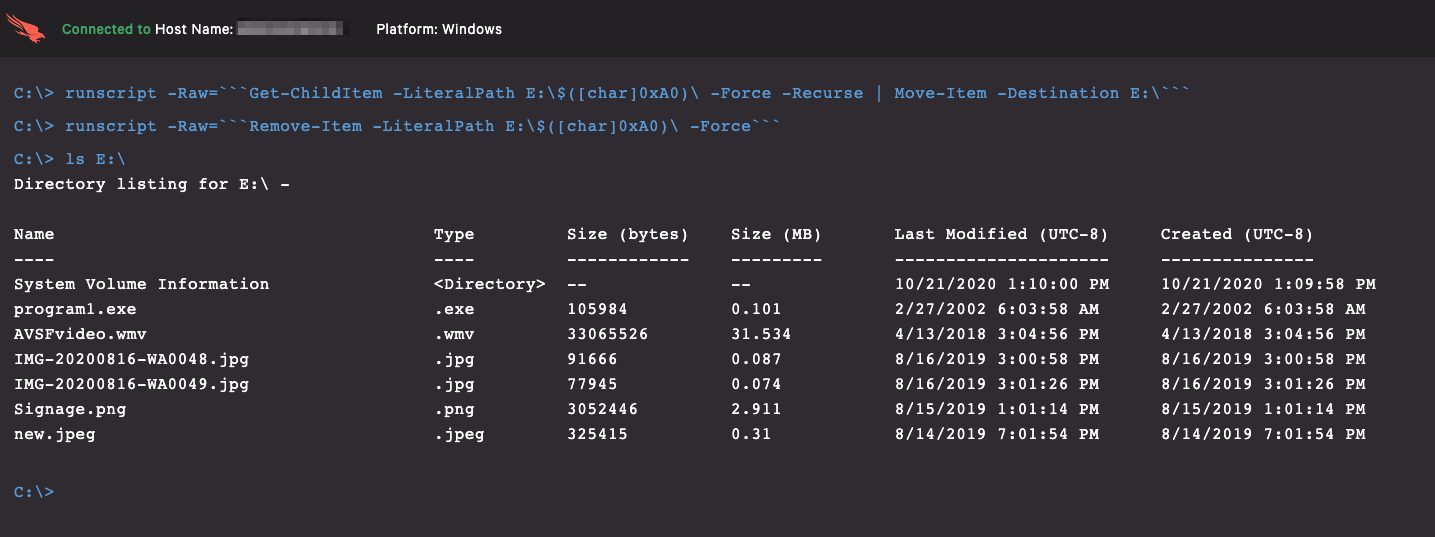 Figure 7. Remediated and recovered USB drive (click image to enlarge)
With those final steps completed, we can look again at the directory listing for the USB drive and see that only the original data remains (Figure 7). The user can now safely continue to use the USB device without spreading the Andromeda malware to any other computer system.
Conclusion
The CrowdStrike Falcon® Complete and Endpoint Recovery Services teams take remediation action on malware of all types and complexities on a daily basis. In this blog post, we demonstrated an example of identifying an obfuscation technique used by Andromeda’s USB spreader plugin, and how we use PowerShell via the Real Time Response platform to remove the malware without having to escalate and have the drive formatted — all while not impacting the user’s operations at any point. By scripting these steps, malware can be removed very quickly when a user connects an infected drive to a computer system. The Falcon sensor will block the malware (provided Preventions are enabled), and the analyst can remove it completely. This kind of automation effectively reduces future alert fatigue for the Falcon analyst and helps prevent the spread of malware from computer to computer and from network to network.
Finally, this raises awareness that USB infections are a valid entry point into your environment, and such devices should be tracked and monitored. You can utilize CrowdStrike Falcon® Device Control to help minimize the risk of unauthorized USB devices being used and therefore reduce your attack surface.
1. CrowdStrike Intel Subscribers: CrowdStrike Tipper CSIT-1605 Andromeda Trojan with DGA-Based USB Spreader Plugin (pg. 1) 2. “SAMSUNG” is the name of the drive used in this example. Samsung is not in any way involved with the botnet.
Additional Resources
- Learn how any size organization can achieve optimal security with Falcon Complete by visiting the product webpage.
- Find out how CrowdStrike can help your organization answer its most important security questions: Visit the CrowdStrike Services webpage.
- Learn more about CROWDSTRIKE FALCON® INTELLIGENCE™ threat intelligence by visiting the webpage.
- Learn about CrowdStrike’s comprehensive next-gen endpoint protection platform by visiting the Falcon products webpage.
- Test CrowdStrike next-gen AV for yourself: Start your free trial of Falcon Prevent™.