CrowdStrike processes hundreds of billions of events on a daily basis, which are processed by our custom-built CrowdStrike Threat Graph® database, which leverages cutting-edge security analytics to collect high-fidelity telemetry from millions of endpoints around the globe and index them for quick and efficient analysis.
Read more about building CrowdStrike Threat Graph, a high-performance graph database.
In this post, we discuss how we onboard new events into Threat Graph using a domain-specific language (DSL).
Our Process
 We chose HCL with HIL as our DSL specification. HCL might not be the most obvious choice
Glossary
Handler: Code that implements a specific interface, registers to be notified of certain event types, and gets invoked when we receive a matching event on our event bus. The handler processes one or more events to mutate specific graph entities. Event bus: CrowdStrike uses Kafka as our event bus. Kafka is a distributed event streaming platform. Event: A message that is generated by the CrowdStrike Falcon® sensor with information related to processes, hosts and other entities. These events contain attributes that describe the event details as well as how they may be related to other events.The Challenge
Threat Graph ingests data from multiple sources alongside the CrowdStrike Falcon® agent. In the beginning, as new or improved telemetry data was sent to Threat Graph, it required engineers from the Threat Graph team to handwrite code to capture and transform the data to the proper graph representation.This process was more involved and time-consuming because the Threat Graph team did not have the domain expertise about all of the data ingested, and did not always have the necessary context about the best way to represent the data in the graph.
In addition, the team had a limited number of engineers, resulting in a bottleneck for improving the graph using the updated telemetry data. Further, it was impractical to ask non-Threat Graph team members to learn the internal Threat Graph frameworks, avoid anti-patterns, follow best practices and write bug-free, performant code. In short, it was not a scalable solution. We needed to overcome these limitations — and a DSL seemed to fit the bill.
What Is a DSL?
A DSL is a language specialized to an application domain, using language and concepts inherent in that domain. By limiting the language to just the natural concepts of the domain, it helps to express the problems more clearly than common Turing-complete languages such as C++, Java or Go.
Why a DSL?
Our DSL lets our engineers define and ingest data with complex relationships into Threat Graph in a simple, clear and intuitive way. This removes the constraint of knowing Golang (Go) and internal Go frameworks, which are used by Threat Graph to ingest data. This also helps enforce data model constraints and best practices, avoiding bugs and generating efficient and testable code. This is a crucial point when processing a very large number of events, as is the case with Threat Graph.Our DSL
Key components used in our DSL specification are:- Name: Used to describe the context of the handler
- Event list: A set of the events the handler is interested in processing
- Variable and constant declaration: Used for storing, transforming, combining shared attributes.
- Graph mutations:
- Vertex to create
- Edges to create
- Properties to add to the above vertices and edges
Our Process
 We chose HCL with HIL as our DSL specification. HCL might not be the most obvious choice
when choosing a DSL. However, HCL is a very well-written, well-managed and popular configuration language. It is a close relative to JSON in terms of syntax and readability, which made it a good choice for our team. In addition, it has great support for Go, our primary language. Threat Graph is written in Go and operates based on a strictly defined data model for graph entities and properties. Each of the Threat Graph Go frameworks, tools and utilities help us enforce validations to ensure data model compliance. Over the years, the Threat Graph team has carefully fine-tuned optimizations to simplify the process of writing handlers.
By choosing a relatively simple specification language for a DSL, it is possible to express how events are transformed into Threat Graph’s data model while separating the complex concerns of Threat Graph’s runtime performance, constraints and best practices. This helps other teams in CrowdStrike quickly contribute new data into Threat Graph without having to learn all of the intricacies of the underlying system. Instead, they simply author the DSL, and our code-generation toolchain behind the DSL generates the code in the most optimal way possible. As a first step, we defined how we want to structure our handlers, as well as key parts of processing an event and extracting the information needed to mutate the graph.
All code snippets mentioned in this blog are written in Go.
Below is the DSL specification annotated to Go types that is used to unmarshal to Go types and that will later be converted to an intermediate representation that is used in the Go framework for Threat Graph. Side Note: A few use cases have been excluded in the snippets below to keep the content relevant and simple. Features such as nested variables, conditional variable extraction and error handling are not shown. In all code snippets, we ignored the log statements and metrics-tracking for simplicity.
Go Representation of the DSL Specification
type HandlerDef struct {
  Name        string     `hcl:"name,label"`
  Constants   <>Constant `hcl:"const,block"`
  Variables   <>Variable `hcl:"var,block"`
  Events      <>Event    `hcl:"event,block"`
  Graph       Graph      `hcl:"graph,block"`
}

type Event struct {
  Name  string `hcl:"name"`
}

type Constant struct {
  Name  string      `hcl:"name,label"`
  Value interface{} `hcl:"value"`
}

type Variable struct {
  Name        string         `hcl:"name,label"`
  Key         string         `hcl:"key,optional"`
  OnError     string         `hcl:"onError,optional"`
  Action      hcl.Attributes `hcl:"action,remain"`
  Transformer string         `hcl:"execute,optional"`
}

type Vertex struct {
  Name       string            `hcl:"name,label"`
  Type       string            `hcl:"type"`
  ID         string            `hcl:"id"`
  Timestamp  string            `hcl:"timestamp,optional"`
  Props      mapstring `hcl:"props,optional"`
}

type Edge struct {
  SourceVertex string            `hcl:"sourceVertex,label"`
  Direction    string            `hcl:"direction,label"`
  AdjVertex    string            `hcl:"adjVertex,label"`
  EdgeType     string            `hcl:"type"`
  Timestamp    string            `hcl:"timestamp"`
  Props        mapstring `hcl:"props,optional"`
}

type Graph struct {
  Mutations <>Mutation `hcl:"mutation,block"`
}

type Mutation struct {
  Events    <>string   `hcl:"events,optional"`
  Vertices  <>Vertex   `hcl:"vertex,block"`
  Edges     <>Edge     `hcl:"edge,block"`
  Variables <>Variable `hcl:"var,block"`
}
DSL Representation of Handler
There is quite a bit to unpack from the above DSL spec definition. Here we define each of these pieces separately and explain their function.handler "process_handler" {
}The handler section is the top-level section that encapsulates the entire spec and gives it a name, which in this case is process_handler.
event {
  name = event.ProcessInformation
}ProcessInformation. As seen above, there can be multiple event sections to support multiple events processed by this handler.
You might ask: “Why not take them as a list?” Since we have more information related to an event that goes into this section, it is better to have them appear separately.
const "badProcessID" {
  value = -1
}

const “validTypes” {
  value = <1, 2, 3>
}var "host" {
key = field.Hostname
onError = action.Break
}
var "processID" {
key = field.ProcessId
onError = action.Continue
}
var "user" {
execute = userlib.GetUser()
onError = action.Error
}There are three options for onError:
- action.Continue: Ignore any failure to extract or compute the field and move forward
- action.Break: Stop the execution of the handler, but do not return an error to the caller
- action.Error: Stop the execution of the handler, and return an error to the caller
As part of this process, we provide several common field extractions to be used as userlib functions. This allows users to proceed even if they don’t have the associated field names. This also enables our team to provide certain complex computations as userlib functions and bypass
features that are not yet built into the DSL. In doing so, our team is set up to achieve a clean cutover at a later time. At this point, we can also incorporate variables computed in previous steps into the next variable’s userlib functions. More fine-grained variable extraction is possible with use of HIL expressions in var blocks. For example, the variable definition will extract the field from the event. If the value does not match a specific value, the user can ignore or exit the handler.
var "processID" {
  key     = field.ProcessId
  onError = action.Continue
  action  = "${len(processID) == 0 || processID == badProcessID ? break : continue}"
}graph {
mutation {
}
}vertex "process" {
type = vertex.Process
id = var.processID
timestamp = time.Now
props = {
"process_id" : var.processID
}
}
vertex "user" {
type = vertex.User
id = var.user
timestamp = time.Now
}
vertex "host" {
type = vertex.Host
id = var.host
timestamp = time.Now
}edge "user" "->" "host" {
type = edge.UserHostEdge
timestamp = time.Now
}handler "process_handler" {
event {
name = event.ProcessInformation
}
const "badProcessID" {
value = -1
}
var "host" {
execute = field.Hostname
onError = action.Break
}
var "processID" {
key = field.ProcessId
onError = action.Error
action = "${len(processID) == 0 || processID == badProcessID ? break : continue}"
}
var "user" {
execute = userlib.GetUser()
onError = action.Error
}
graph {
mutation {
vertex "process" {
  type       = vertex.Process
  id         = var.processID
  timestamp  = time.Now
  props = {
    "process_id" : var.processID
  }
}

vertex "user" {
  type      = vertex.User
  id        = var.user
  timestamp = time.Now
}

vertex "host" {
  type      = vertex.Host
  id        = var.host
  timestamp = time.Now
}
edge "user" "->" "host" {
  type      = edge.UserHostEdge
  timestamp = time.Now
}
edge "user" "<-" "host" { type = edge.HostUserEdge timestamp = time.Now } edge "user" "->" "process" {
type = edge.UserProcessEdge
timestamp = time.Now
}
}
}
}Intermediate Representation
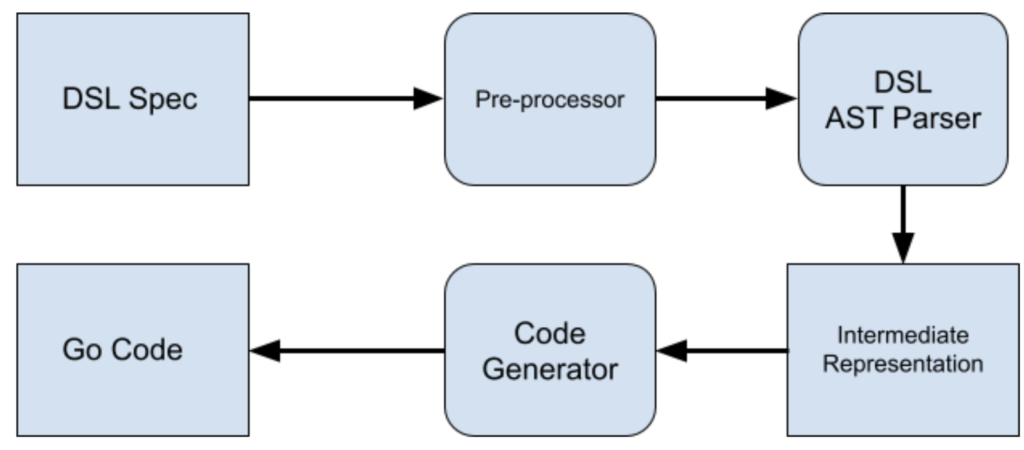
The DSL spec is pre-processed and converted to an intermediate representation that is enriched with the details that are required to mutate the graph and also aid with code generation. This intermediate representation is used to generate the Go code. This gives our team the flexibility to change the underlying code generation or features without updating the user-facing DSL spec. Having the intermediate representation also helps with validating the defined variables and constants used in the rest of the handler definition. This ensures the types of variables and constants match the types passed to userlib functions, as well as conditional statements. An intermediate representation is typically verbose and may contain a significant amount of irrelevant information. Here we review an example of how an edge block gets represented in our intermediate representation and provide some context as to why it is useful.type Edge struct {
SourceVertex string
Direction EdgeDirection
AdjVertex string
EdgeType Edge
Timestamp time.Time
Props mapstring
}Additional Resources
- For more information about CrowdStrike Threat Graph, download the data sheet.
- Find out more about the benefits of Threat Graph by visiting the webpage.
- Learn about the powerful, cloud-native CrowdStrike Falcon® platform by visiting the product webpage.
- Get a full-featured free trial of CrowdStrike Falcon® Prevent™ and see how true next-gen AV performs against today’s most sophisticated threats.


![Helping Non-Security Stakeholders Understand ATT&CK in 10 Minutes or Less [VIDEO]](https://assets.crowdstrike.com/is/image/crowdstrikeinc/video-ATTCK2-1)
![Qatar’s Commercial Bank Chooses CrowdStrike Falcon®: A Partnership Based on Trust [VIDEO]](https://assets.crowdstrike.com/is/image/crowdstrikeinc/Edward-Gonam-Qatar-Blog2-1)


