In our first two posts in this series, we covered basic and advanced concepts of Python logging. In this third post, we will explore the topic of centralizing Python logs. Specifically, we’ll cover:
- The benefits of centralizing your Python logs
- How to use the HTTPHandler to send your Python logs to an HTTP server
- How to use the SysLogHandler to send your Python logs to a syslog server
- How to send your Python logs to CrowdStrike Falcon LogScale
As a bonus, in the LogScale example, we’ll create a script that interacts with the popular Spoonacular food API. You might just work up an appetite as we go!
If you’re not familiar with log management best practices, we recommend you start there. Otherwise, let’s dive in!
Learn More
- Part 1: The Basics
- Part 2: Advanced Concepts
- Part 3: Centralized Python Logs
- Part 4: Logging with Django
The Benefits of Centralizing Python Logs
Python logging modules offer several key benefits over simple print() statements. With the default Python logging module, you can:
- Send logs to different destinations (such as syslog, stdout, or journald)
- Define different severity levels for log messages
- Support inheritance of logging settings
However, if you’re only logging locally, log management and observability can become a challenge, especially as you scale. Jumping from system to system to read log files isn’t an efficient approach to troubleshooting or analysis. Centralizing your Python logs helps solve this problem and offers the following benefits:
- Increased Ops Efficiency: When you’re managing more than a small handful of nodes, centralizing logs makes it easier for you to find what you need when you need it.
- Stronger Security: Aggregating logs in a single location makes it easier to detect threats and anomalies across a network. In fact, log aggregation is a fundamental component of SIEM. Additionally, centralization makes it easier to define security and retention policies on log data.
- More Insightful Analytics and Visualizations: Having all your data in one place improves the quality of your analytics and visualizations. For example, a dashboard that displays ERROR, CRITICAL, and ALERT messages on a single Linux server is useful, but one that summarizes the data for all of your infrastructure gives you better visibility across your network.
Approaches to Centralizing Logs
Three of the most common ways to centralize Python logs are:
- Send them to an HTTP server
- Send them to a syslog server
- Send them to a log management platform
In the sections below, we’ll provide examples of each method to help you get started.
Send Python Logs to an HTTP Server
The default Python logging module supports the HTTPHandler class, which you can use to emit log records to an HTTP or HTTPS server. You would use the following parameters:
host: The IP address or domain name of the host server. You can specify a port using the formathost:port(such asexample.com:8000for port8000).url: The URL path for logs on the host server (such as/var/log/falconapp/).method=<HTTP VERB>: Specifies the HTTP method to use when sending the logs, for either aGET(method="GET") orPOST(method="POST") request.GETis the default.secure=<BOOLEAN>: Set toTRUEto use HTTPS.FALSEis the default.credentials: A two-tuple of a username and password for basic HTTP authentication. For example:('user', 'password').context: The SSL/TLS protocol to use for HTTPS.
Here is a simple Python script that demonstrates how to use the HTTPHandler class. This script does the following:
- Imports the default logging module, time module, and Requests library.
- Initializes an HTTPHandler, to send logs to an HTTP server listening on port
8000, usingPOSTrequests. - Sets the logging severity to WARNING.
- Each minute (for a total of 10 times), checks and logs a warning message to the HTTP server if the minute value of the current time is an even number.
def main():import logging
import logging.handlers
import time
import requests
# Create the logger to POST logs to HTTP server at 192.168.2.11:8000. Use Warning level severity
logger = logging.getLogger()
falconHandler = logging.handlers.HTTPHandler("192.168.2.11:8000", "/", method="POST")
logger.addHandler(falconHandler)
logger.setLevel(logging.WARN)
# For loop to check the time, wait 1 min, if time ends in an even number, emit warning message. Repeat 10x
for i in range(10):
clock = time.localtime()
time.sleep(60)
if clock.tm_min % 2 == 0:
logger.warning(f'WARNING: it is {clock.tm_hour}:{clock.tm_min}:{clock.tm_sec}. Time to eat a pepper and egg.')
if __name__ == "__main__":
main()
Send Python Logs to a Syslog Server
Remote syslog servers are another popular method for centralizing logs. The default Python logging module has a SysLogHandler module that enables Python programs to emit logs to a syslog server.
The SysLogHandler supports these parameters:
address=(<host>, <UDP port>): The<host>is the IP address, or domain name of the remote syslog server, and<UDP port>is an integer representing the UDP port that the remote server listens on.facility=<facility>: Defines the syslog facility.socktype=<socket type>: Defines whether the connection uses UDP (socket.SOCK_DGRAM) or TCP (socket.SOCK_STREAM). UDP is the default.
Below is a sample script that demonstrates how to use the SysLogHandler. This script does the following:
- Imports the default logging module and time module.
- Initializes an HTTPHandler, to send logs to a syslog server listening on UDP port
514. - Sets the logging severity to WARNING.
- Each minute (for a total of 10 times), checks and logs a warning message to the syslog server if the minute value of the current time is an even number.
def main():import logging
import logging.handlers
import time
# Create the logger to send logs to syslog server at 192.168.2.11. Use Warning level severity
logger = logging.getLogger()
falconHandler = logging.handlers.SysLogHandler(address=("192.0.2.11", 514))
logger.addHandler(falconHandler)
logger.setLevel(logging.WARN)
# For loop to check the time, wait 1 min, if time ends in an even number, emit warning message. Repeat 10x
for i in range(10):
clock = time.localtime()
time.sleep(60)
if clock.tm_min % 2 == 0:
logger.warning(f'WARNING: it is {clock.tm_hour}:{clock.tm_min}:{clock.tm_sec}. Time to eat a pepper and egg.')
if __name__ == "__main__":
main()
Centralize Python Logs with Falcon LogScale
While HTTP and syslog are useful for some log centralization use cases, log management platforms can bring unity and simplicity to logging across all of your system components, especially when you need to scale. With a log management platform, you get additional benefits like visualization, search, formatting, and alerting tools to improve ease of use and quality of insights.
In the steps below, we’ll walk through the process of creating a simple Python script that uses the Spoonacular API and sends logs to the CrowdStrike Falcon LogScale platform. You can sign up for a free Falcon LogScale Community Edition account to follow along.
Step 1: Create a Falcon LogScale Repository and Ingest Token
First, we’ll create a log repository and ingest token in Falcon LogScale. The repository will store our logs, and our script will use the ingest token for authentication when sending logs to the platform.
1. Log in to your CrowdStrike Falcon LogScale account.
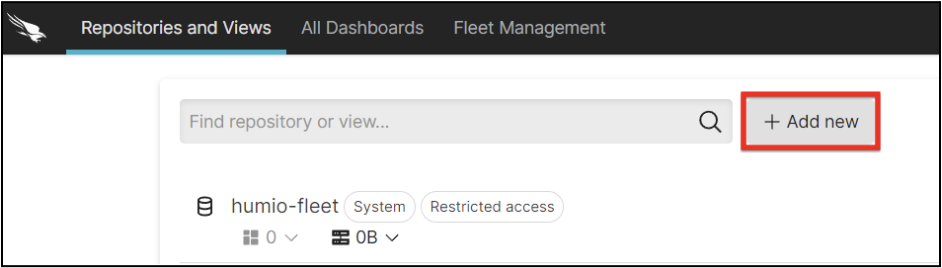
2. Click + Add new to create a new repository.
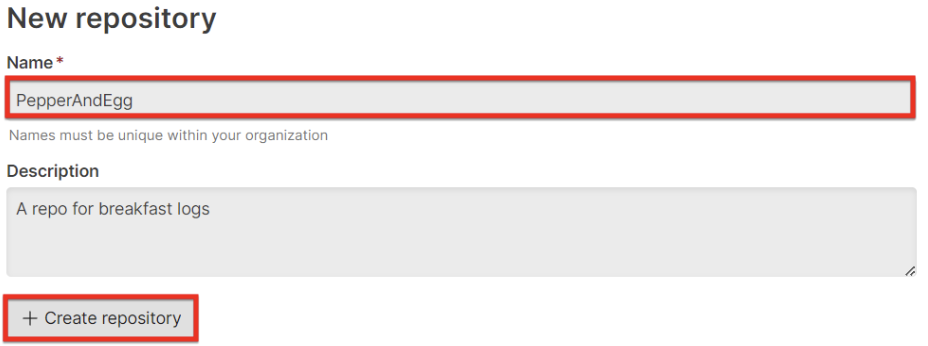
3. Go through the steps for creating a new repository, including providing a name and a description.
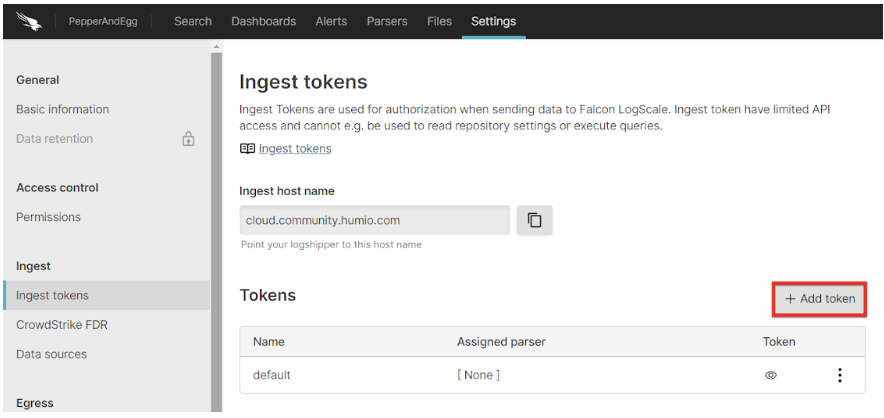
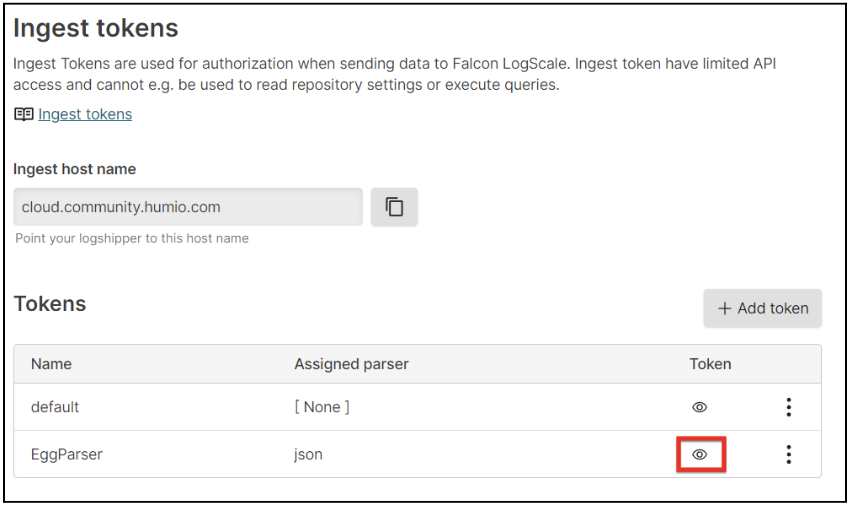
4. Under the Settings tab for your repository, click Ingest Tokens on the left menu. Then, click + Add token.
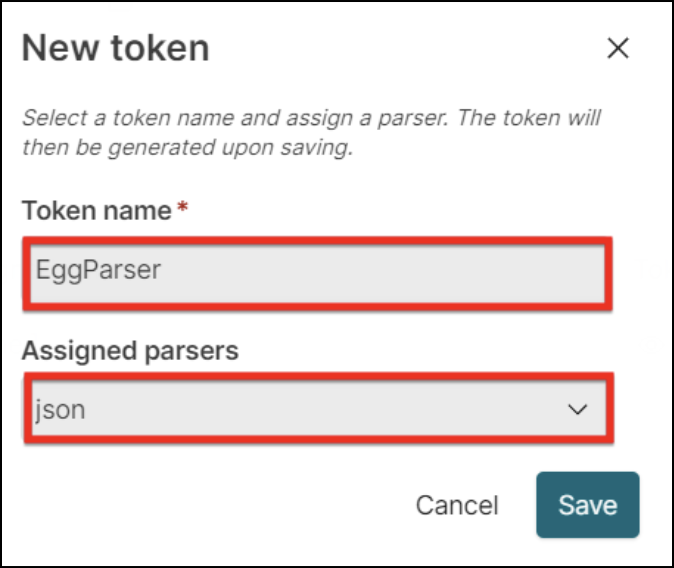
5. Assign a Token name and select json in the Assigned parsers dropdown.
6. Click the eye icon to view your newly created token value, then store it securely on your machine.
Step 2: Get a Spoonacular API Key
The Spoonacular API enables a variety of interesting food-related use cases. For example, you can use the API to find recipes based on the ingredients you already have at home. To get an API key, follow the steps below:
- Create a Spoonacular account.
- Log in to your account.
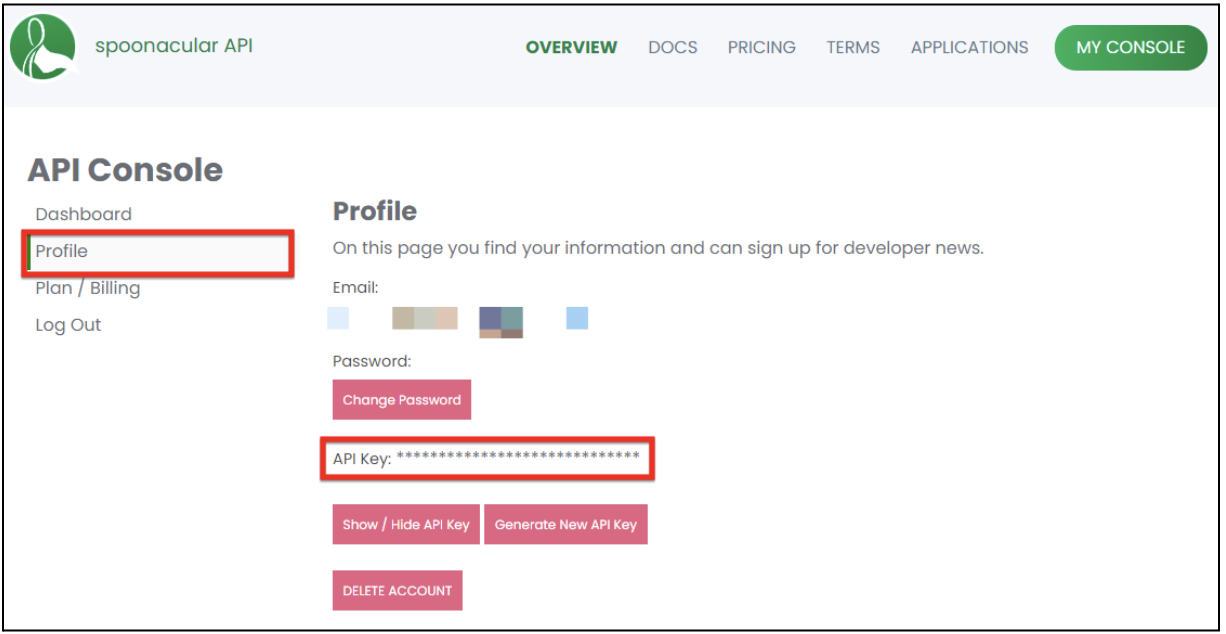
- Access your API console. Then, click Profile.
- Store your API key securely for use in the next step.
Step 3: Send Logs to Falcon LogScale from a Python Script
⚠️ Warning: For our examples, we’ll set the Spoonacular API key as a variable named spoonKey, and the Falcon LogScale ingest token as a variable named falconToken. This is for demo purposes only. For any production code, be sure to properly secure your API keys and tokens!
The example Python script below performs the following basic business logic:
- Prompts the user for input.
- Based on the user input, sends either one or two API requests to the Spoonacular API, using our Spoonacular API key.
- Sends the response(s) from Spoonacular to Falcon Logscale via an HTTP post to the
/api/v1/ingest/rawendpoint using our Falcon LogScale ingest token.
def main():import os
import pprint
import requests
import json
# Fetch keys and tokens from environment variables
spoonKey = os.environ["spoonKey"]
falconToken = os.environ["falconToken"]
# Prompt user to tell us what they want
food = input("What's for breakfast?")
# Variables for API calls
baseUrl = "https://api.spoonacular.com/"
searchPath = "recipes/complexSearch"
ingredientsPath = "recipes/findByIngredients"
# Files we will save json data to
cookFile = "cookBreakfast.json"
eatFile = "eatBreakfast.json"
#Ask user if they also want to see recipes that use their food as an item
legit_answers = ['Yes', 'yes', 'No', 'no']
while True:
ingredients = input(f'Do you want to know where a recipe has {food} in the ingredients too? Type "Yes" or "No"')
print(ingredients)
if ingredients in legit_answers: break
print("Need a 'Yes' or a 'No'. Try again.")
# Build parameters for 1st call
spoonParams = "apiKey=" + spoonKey + "&query=" + food
# Make 1st call
r = baseUrl + searchPath + "?" + spoonParams
response = requests.get(r)
#Print and save the 1st response
print(f'Here are all the recipes starring {food}.')
pprint.pprint(response.json())
with open(eatFile, 'wb') as outfile:
outfile.write(response.content)
# If user asked us to, request, print, and save ingredients search
if ingredients == "Yes" or ingredients == "yes":
# Build parameters for 2nd call
ingredientParams = "apiKey=" + spoonKey + "&ingredients=" + food
r = baseUrl + ingredientsPath + "?" + ingredientParams
print(r)
response = requests.get(r)
print(f'Here are all the recipes with {food} as an ingredient.')
pprint.pprint(response.json())
with open(cookFile, 'wb') as outfile:
outfile.write(response.content)
falconURL = 'https://cloud.community.humio.com/api/v1/ingest/raw'
# HTTP auth headers for Falcon LogScale
falconHeaders = {
'Authorization': 'Bearer' + falconToken,
}
# Send the 1st response data to Falcon LogScale
with open(cookFile, 'rb') as f:
data = f.read()
response = requests.post(falconURL, headers=falconHeaders, data=data)
# Send the 2nd response data to Falcon LogScale
with open(eatFile, 'rb') as f:
data = f.read()
response = requests.post(falconURL, headers=falconHeaders, data=data)
if __name__ == "__main__":
main()
You can tweak the script as needed for your own testing. Once your modifications are complete, save and execute the script.
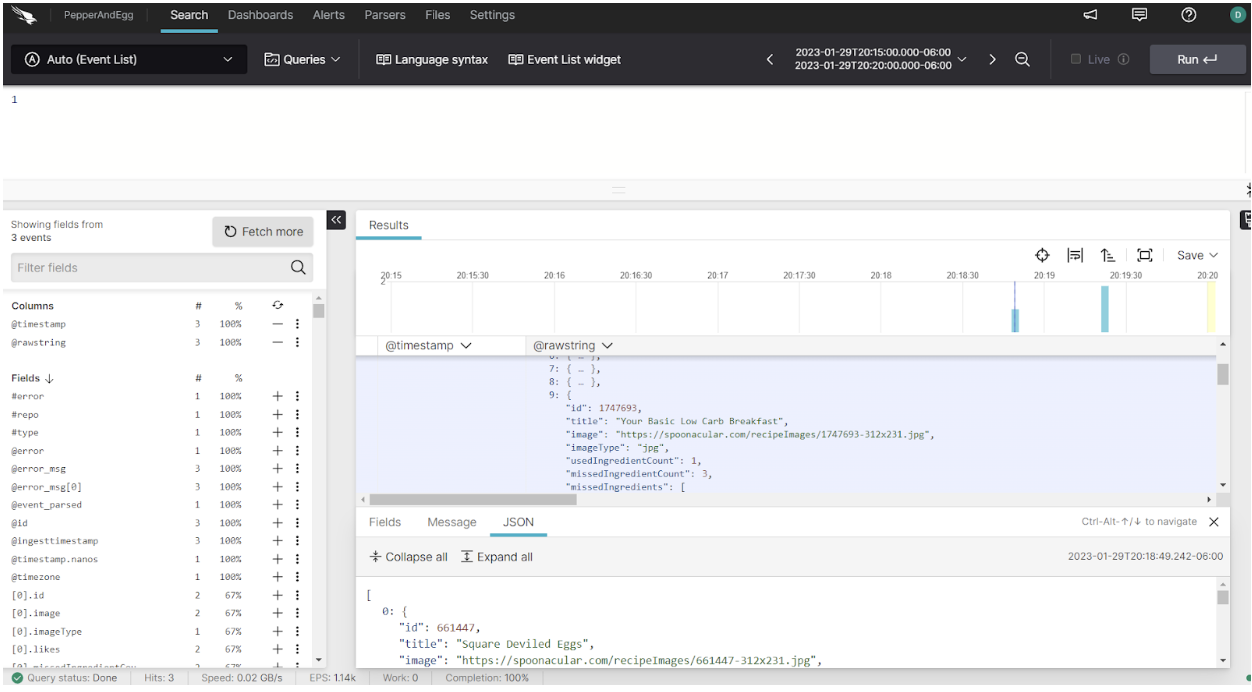
Step 4: View your Logs in Falcon LogScale
Now you can log in to your Falcon LogScale account, access your log repository, and view the log messages from your Python program.
Log your data with CrowdStrike Falcon Next-Gen SIEM
Elevate your cybersecurity with the CrowdStrike Falcon® platform, the premier AI-native platform for SIEM and log management. Experience security logging at a petabyte scale, choosing between cloud-native or self-hosted deployment options. Log your data with a powerful, index-free architecture, without bottlenecks, allowing threat hunting with over 1 PB of data ingestion per day. Ensure real-time search capabilities to outpace adversaries, achieving sub-second latency for complex queries. Benefit from 360-degree visibility, consolidating data to break down silos and enabling security, IT, and DevOps teams to hunt threats, monitor performance, and ensure compliance seamlessly across 3 billion events in less than 1 second.
Arfan Sharif is a product marketing lead for the Observability portfolio at CrowdStrike. He has over 15 years experience driving Log Management, ITOps, Observability, Security and CX solutions for companies such as Splunk, Genesys and Quest Software. Arfan graduated in Computer Science at Bucks and Chilterns University and has a career spanning across Product Marketing and Sales Engineering.