


![Helping Non-Security Stakeholders Understand ATT&CK in 10 Minutes or Less [VIDEO]](https://assets.crowdstrike.com/is/image/crowdstrikeinc/video-ATTCK2-1?wid=530&hei=349&fmt=png-alpha&qlt=95,0&resMode=sharp2&op_usm=3.0,0.3,2,0)
![Qatar’s Commercial Bank Chooses CrowdStrike Falcon®: A Partnership Based on Trust [VIDEO]](https://assets.crowdstrike.com/is/image/crowdstrikeinc/Edward-Gonam-Qatar-Blog2-1?wid=530&hei=349&fmt=png-alpha&qlt=95,0&resMode=sharp2&op_usm=3.0,0.3,2,0)


?wid=2048&hei=1350&fmt=png-alpha&qlt=95,0&resMode=sharp2&op_usm=3.0,0.3,2,0)


Although the world of mineware is not new to the security industry, it continues to grow as adversaries develop new capabilities to compromise systems and turn them into bots used for mining cryptocurrency. In this blog, we hope to provide some deeper insight into the world of mineware. We will discuss in-depth one of the most notorious mineware malware variants out there, “WannaMine.”WannaMine v4.0 Analysis and Remediation Overview
Like its predecessors, WannaMine v4.0 leverages the EternalBlue exploit to spread and compromise vulnerable hosts. Its design is similar to WannaMine v3.0 in that it stores the EternalBlue exploit binaries in a directory located in C:\Windows; however, the directory in version 4.0 has been renamed "NetworkDistribution.” Instead of leveraging a single hard-coded service name like WannaMine v3.0, version 4.0 will randomly generate a .dll and service name based on a list of hard-coded strings. It does this in order to maintain persistence on the host.
We will start with a quick high-level overview of the remediation steps that are needed, and then follow with a more detailed step-by-step walk-through.
The remediation of WannaMine v4.0 can be broken into the following three steps:
 Figure 1. Process execution tree indicating svchost.exe as the parent process of dllhostex.exe
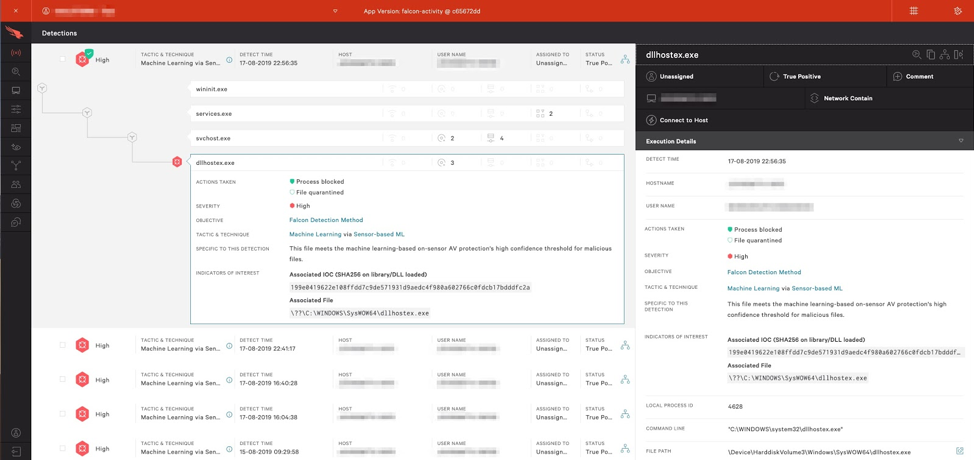 Figure 2. Further detail of specific process information within the UIBy looking over the process details within Falcon, we can quickly grab the process ID associated with the svchost.exe that is running the malicious WannaMine DLL.
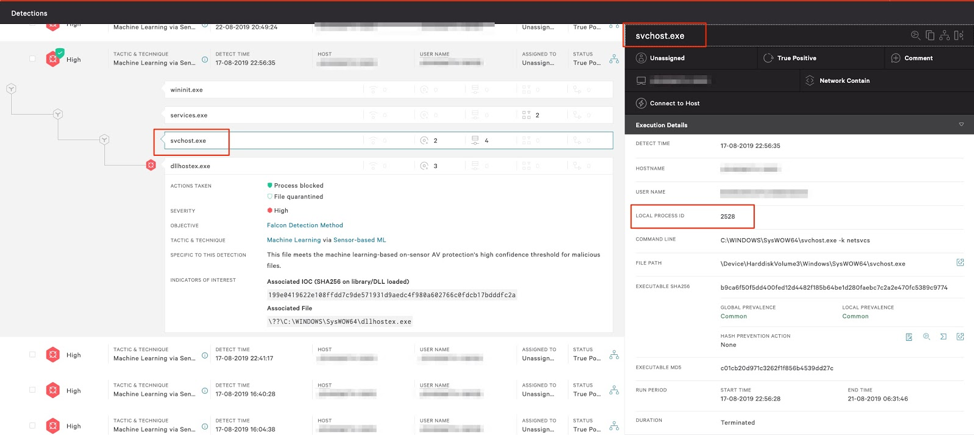
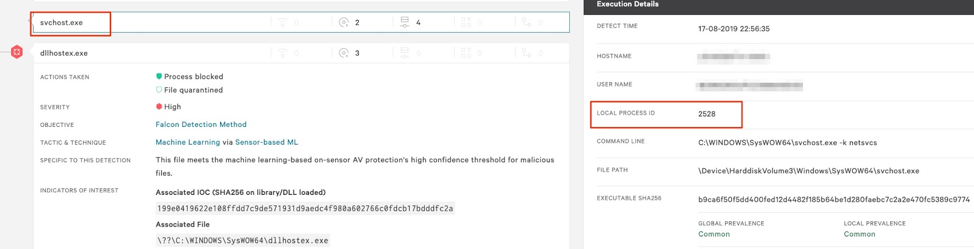 Figure 3-4. Process execution tree provides process ID information
From there, we can query that specific svchost.exe process, via the process ID obtained from the Falcon UI, in order to gather the service group name being used for the malicious service, in this case the netsvcs service group.
Figure 3-4. Process execution tree provides process ID information
From there, we can query that specific svchost.exe process, via the process ID obtained from the Falcon UI, in order to gather the service group name being used for the malicious service, in this case the netsvcs service group.
 Figure 5. PowerShell query to output svchost service group name. Note: This must be run within the "EDIT & RUN SCRIPTS" tab
Note: Depending on whether the SVCHOST is grouped (Microsoft refactored the way SVCHOST groups services in Windows 10 1703; read about that here) or if it is a single process, the removal process will vary. Windows 10, by default, will spawn an individual SVCHOST process per module but Windows 7 will group. Killing the grouped PID is not an option here as we want to minimize downtime for the clients we work with.
Figure 5. PowerShell query to output svchost service group name. Note: This must be run within the "EDIT & RUN SCRIPTS" tab
Note: Depending on whether the SVCHOST is grouped (Microsoft refactored the way SVCHOST groups services in Windows 10 1703; read about that here) or if it is a single process, the removal process will vary. Windows 10, by default, will spawn an individual SVCHOST process per module but Windows 7 will group. Killing the grouped PID is not an option here as we want to minimize downtime for the clients we work with. Figure 6. Tasklist output to display associated service name. Note: This must be run within the "EDIT & RUN SCRIPTS" tab.
As an extra step, you can also query the registry key that SVCHOST based on the service group name of “netsvcs” found in the image above.
From the output below, we can see the “MicrosoftNetBIOSManager” DLL module that was added to the netsvcs service group. This has the same name we found previously, using the commands above.
Figure 6. Tasklist output to display associated service name. Note: This must be run within the "EDIT & RUN SCRIPTS" tab.
As an extra step, you can also query the registry key that SVCHOST based on the service group name of “netsvcs” found in the image above.
From the output below, we can see the “MicrosoftNetBIOSManager” DLL module that was added to the netsvcs service group. This has the same name we found previously, using the commands above.
 Figure 7. Registry query output showing newly added malicious dll module name
Based on that information we can pivot and check the registry key where Windows services are stored to see if we find an associated service named “MicrosoftNetBIOSManager.” As expected, we see that there is such an entry. Looking at the values stored within the Parameters key we find the exact path to the malicious .dll:
Figure 7. Registry query output showing newly added malicious dll module name
Based on that information we can pivot and check the registry key where Windows services are stored to see if we find an associated service named “MicrosoftNetBIOSManager.” As expected, we see that there is such an entry. Looking at the values stored within the Parameters key we find the exact path to the malicious .dll:
 Figure 8. Registry query command to output path location to .dll on disk
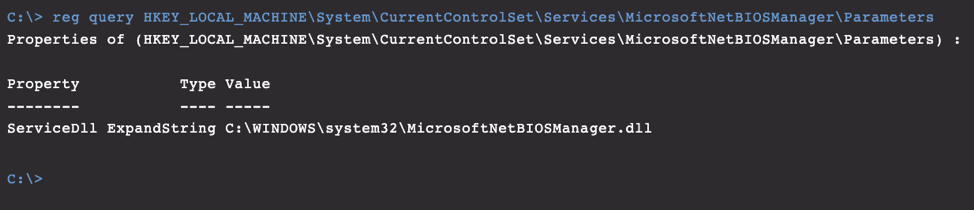 Figure 9. Output of registry query command showing path location to the malicious .dllTo confirm that this is the malicious DLL we are looking for, we can calculate the hash for the binary
 Figure 10. Built-in RTR command to gather filehash information.
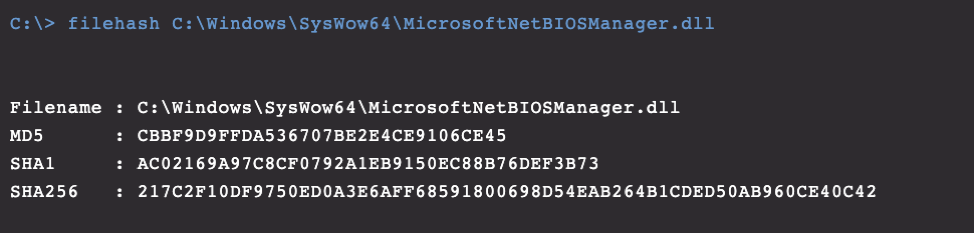 Figure 11. Output of the filehash command for the malicious .dll
Once we have the hash of the DLL, we notice that this has not been seen in VirusTotal, which is abnormal for a legitimate Windows dll stored in the System32 or SysWow64 directories.
In our lab environment, we infected a Windows 10 host at a specific date and time. Once infected, we inspected the creation timestamp of the malicious DLL. The time stamp provided was invalid, stating the DLL was created months prior to the initial infection. This indicated timestomping techniques had been used.
Figure 11. Output of the filehash command for the malicious .dll
Once we have the hash of the DLL, we notice that this has not been seen in VirusTotal, which is abnormal for a legitimate Windows dll stored in the System32 or SysWow64 directories.
In our lab environment, we infected a Windows 10 host at a specific date and time. Once infected, we inspected the creation timestamp of the malicious DLL. The time stamp provided was invalid, stating the DLL was created months prior to the initial infection. This indicated timestomping techniques had been used.

 Figure 12-13. Shows a creation date that pre-dated the in-lab installation
A clearer indication is seen on a Windows 7 host where the timestomping goes back to 2009. (See A.2 Timestomping Example.)
Figure 12-13. Shows a creation date that pre-dated the in-lab installation
A clearer indication is seen on a Windows 7 host where the timestomping goes back to 2009. (See A.2 Timestomping Example.)
 Figure 14. Another image showing timestomping being used on a Windows 7 host
Reviewing the compiler timestamp for the binary, you can see that it was created recently — in 2019 and not 2009.
Figure 14. Another image showing timestomping being used on a Windows 7 host
Reviewing the compiler timestamp for the binary, you can see that it was created recently — in 2019 and not 2009.
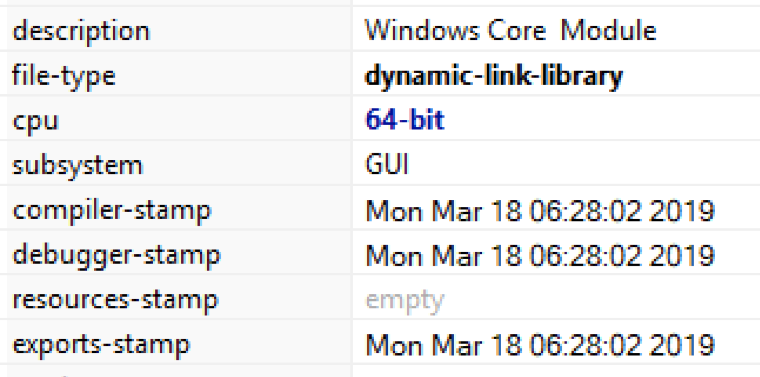 Figure 15. Reviewing compiler timestamp information that proves timestomping is in fact being used
Another method to highlight the malicious dll being loaded by SVCHOST comes from outlier analysis (Figure 16.). We see the hard-coded path for MicrosoftNetBIOSManager (Figure 17.) which is odd and adds context to the above indicating this isn’t native to the OS.
Figure 15. Reviewing compiler timestamp information that proves timestomping is in fact being used
Another method to highlight the malicious dll being loaded by SVCHOST comes from outlier analysis (Figure 16.). We see the hard-coded path for MicrosoftNetBIOSManager (Figure 17.) which is odd and adds context to the above indicating this isn’t native to the OS.
 Figure 16. Registry query used to show further outlier information indicating the difference between the known legitimate and malicious .dll. Note: This must be run within the "EDIT & RUN SCRIPTS" tab.
An example of the many ServiceDLL fields and what they look like before filtering again on the hard-coded path C:\Windows\System32\ as opposed to %systemroot%.
Figure 16. Registry query used to show further outlier information indicating the difference between the known legitimate and malicious .dll. Note: This must be run within the "EDIT & RUN SCRIPTS" tab.
An example of the many ServiceDLL fields and what they look like before filtering again on the hard-coded path C:\Windows\System32\ as opposed to %systemroot%.
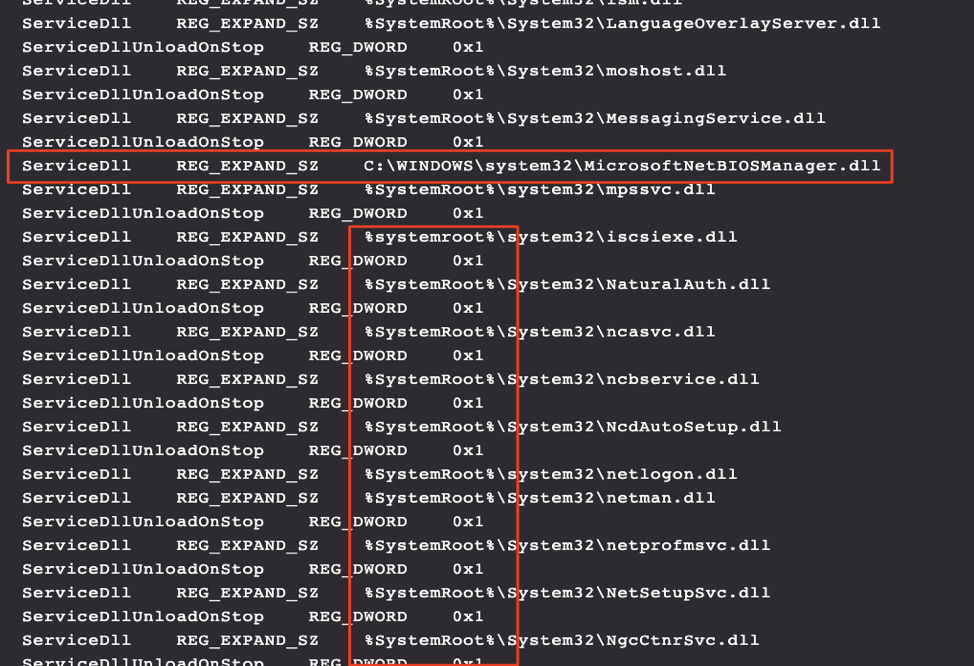 Figure 17. Output of the registry command indicating the differences
Now that we have confirmed the SVCHOST process is indeed the one associated with the malicious WannaMine service, let’s kill the process. Gracefully stopping the service will end the process.
Figure 17. Output of the registry command indicating the differences
Now that we have confirmed the SVCHOST process is indeed the one associated with the malicious WannaMine service, let’s kill the process. Gracefully stopping the service will end the process.
 Figure 18. PowerShell command to stop the malicious service. Note: This must be run within the "EDIT & RUN SCRIPTS" tab.
 Figure 19. Powershell command to remove the service after it has been stopped. Note: This must be run within the "EDIT & RUN SCRIPTS" tab.
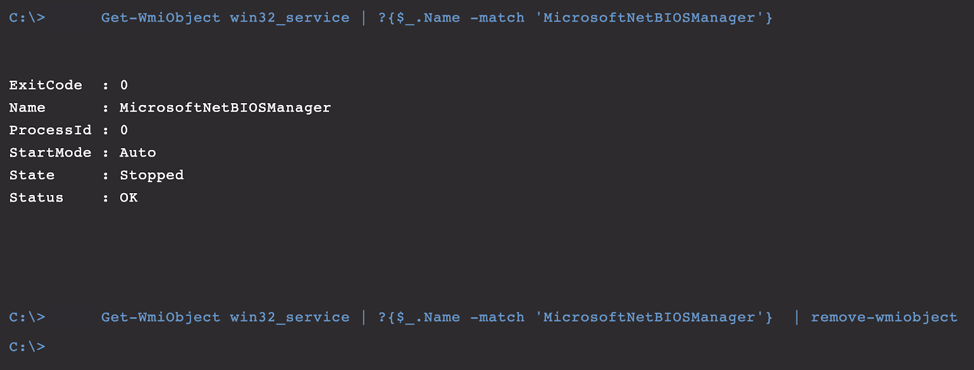 Figure 20. Output provided after running the service removal command
Just like that, we have removed the malicious service and relinquished WannaMine v4.0’s persistence!
Figure 20. Output provided after running the service removal command
Just like that, we have removed the malicious service and relinquished WannaMine v4.0’s persistence!
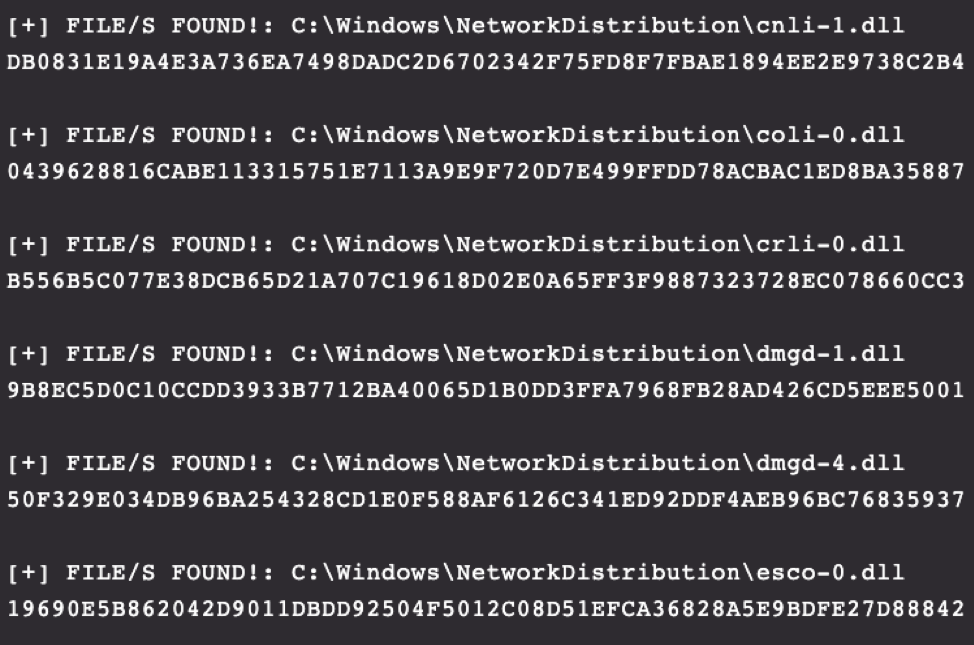 Figure 21. Depicts the folder named “NetworkDistribution” and some of its contents
 Figure 22. Command used to remove the entire directory
The next artifact to remove is the malicious DLL that we discovered in step one. This is located in C:\Windows\System32.
Figure 22. Command used to remove the entire directory
The next artifact to remove is the malicious DLL that we discovered in step one. This is located in C:\Windows\System32.
 Figure 23. Built-in RTR command used to remove the malicious .dll
Next, we have the dllhostex.exe that is the binary that WannaMine v4.0 uses to run the XMRig miner module. As seen Figure 1, Falcon quarantines this binary; however, if it was not quarantined you can find it in C:\Windows\System32.
Figure 23. Built-in RTR command used to remove the malicious .dll
Next, we have the dllhostex.exe that is the binary that WannaMine v4.0 uses to run the XMRig miner module. As seen Figure 1, Falcon quarantines this binary; however, if it was not quarantined you can find it in C:\Windows\System32.
 Figure 24. Built-in RTR command used to remove the XMRig miner module binary
Lastly, a registry entry that contains the descriptive text for the service.
Figure 24. Built-in RTR command used to remove the XMRig miner module binary
Lastly, a registry entry that contains the descriptive text for the service.
 Figure 25. PowerShell command to remove the remaining registry artifact. Note: This must be run within the "EDIT & RUN SCRIPTS" tab.
 Figure 26. Image of the full PowerShell runscript
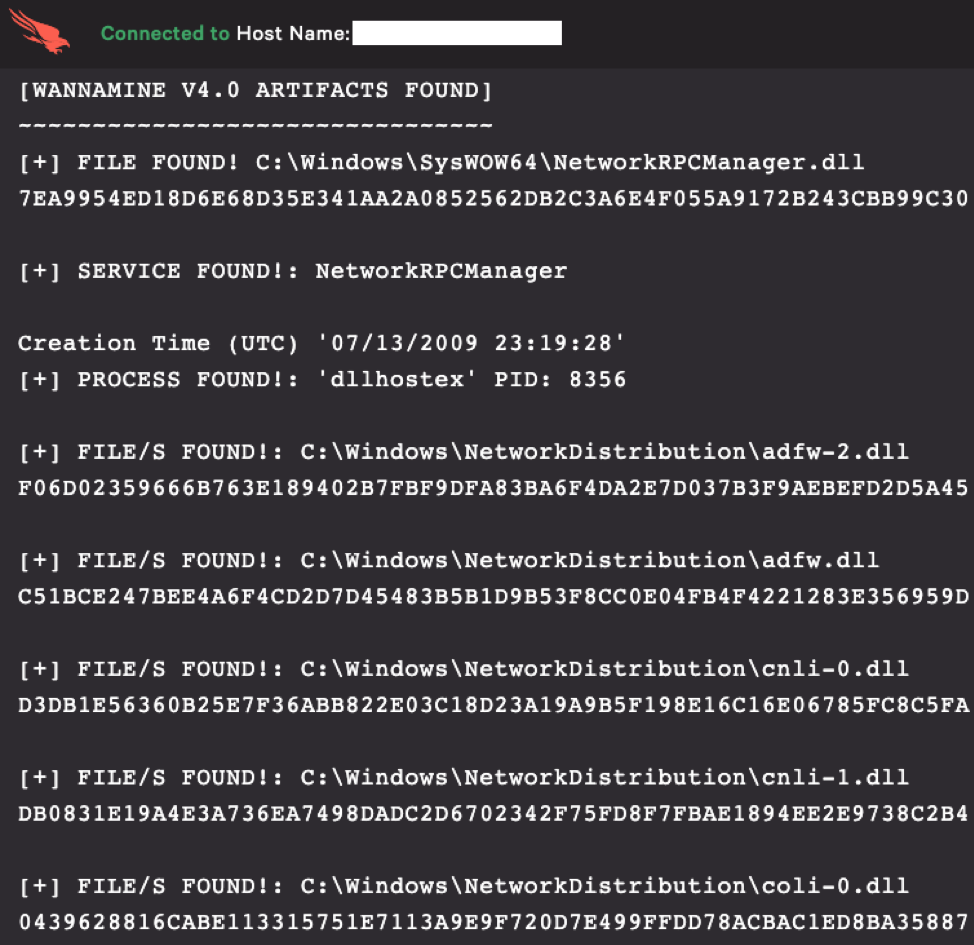 Figure 27. Output provided by the PowerShell runscript listing the artifacts found on the host
 Figure 28. Output provided by the PowerShell runscript listing the removal commands that you can use to completely remediate WannaMine v4.0
CROWDSTRIKE FALCON® INTELLIGENCE
CrowdStrike CROWDSTRIKE FALCON® INTELLIGENCE™ automates the threat analysis process and delivers actionable intelligence and custom IOCs specifically tailored for the threats encountered on your endpoints. With this level of automation, you can stop picking and choosing which threats to analyze and start analyzing all threats. In addition, with CrowdStrike Falcon® Intelligence Premium, you have the ability to escalate malware to a CrowdStrike expert for further research or a second opinion.
Learn more about CrowdStrike Falcon® Intelligence threat intelligence by visiting the webpage. Figure 29. Process execution information within the Falcon UI indicating network lateral movement
Newly infected victim (Figure 30)
Figure 29. Process execution information within the Falcon UI indicating network lateral movement
Newly infected victim (Figure 30)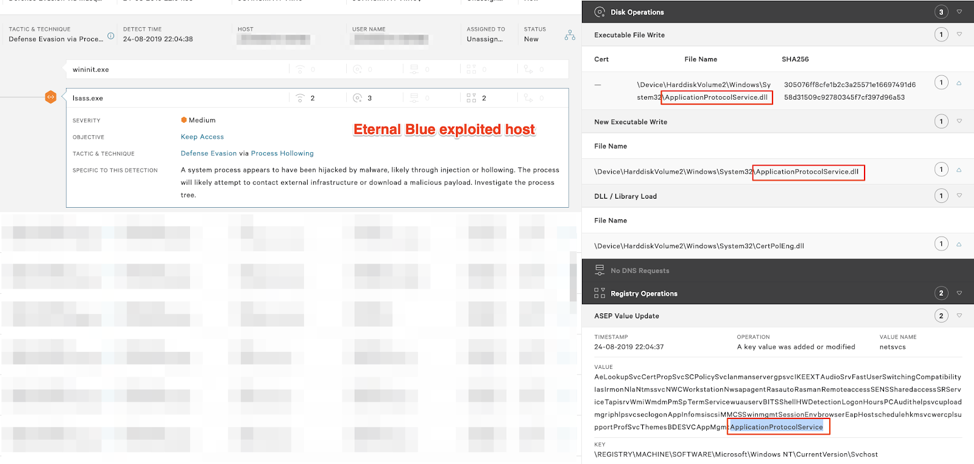 Figure 30. Process execution information within the Falcon UI showing signs of a newly infected victim that was exploited via Eternal Blue
 Figure 31. Runscript output indicating timestomping being used
 Figure 32. Native RTR output indicating timestomping being used
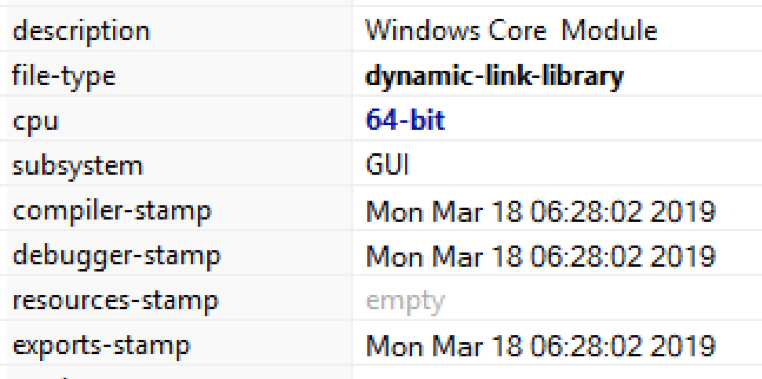 Figure 33. Image showing compiler timestamp for the binary
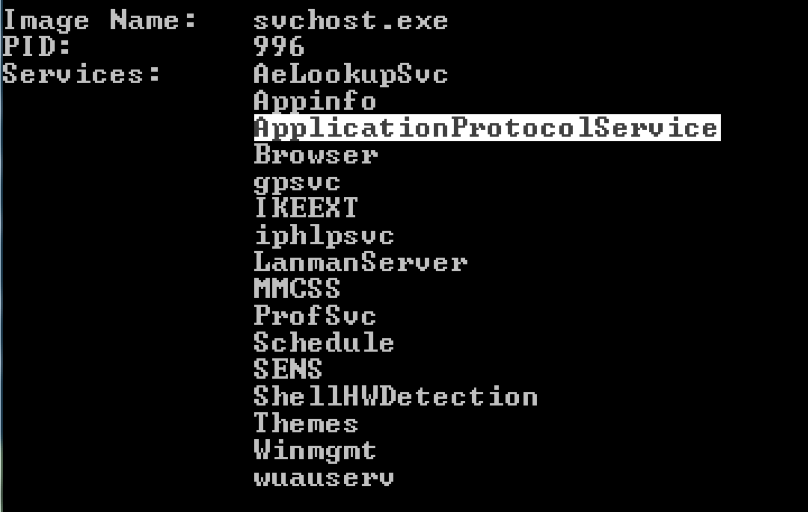 Figure 34. Image showing numerous services grouped with this specific svchost process
By stopping the service gracefully, we can see it no longer shows under PID 996.
Figure 34. Image showing numerous services grouped with this specific svchost process
By stopping the service gracefully, we can see it no longer shows under PID 996.
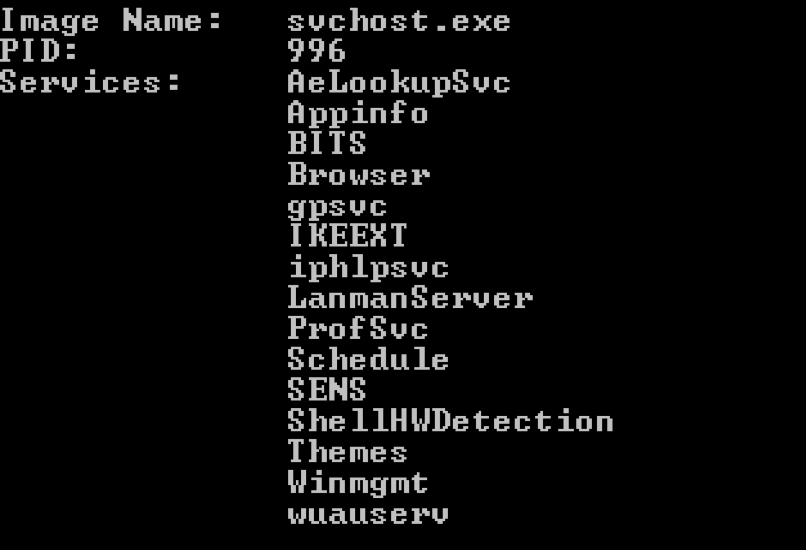 Figure 35. Image showing the malicious service has been removed from the process without killing other legitimate system services
Our deep dive will analyze the latest WannaMine variant currently being used in the wild, dubbed "WannaMine v4.0,” and outline how you can successfully identify and remediate a WannaMine v4.0 infected host.
Cryptojacking and WannaMine
In essence, cryptojacking is the unauthorized use of a computing device to mine cryptocurrency. It occurs when adversaries compromise an organization’s systems and use their resources to mine cryptocurrency, freeing them from having to purchase hardware and electricity (more detailed information can be found in previous blogs on cryptomining and cryptojacking). Many times, this malicious mining occurs without the victim ever realizing it due to a lack of security monitoring.As adversaries and cybercriminals searched for better ways to compromise hosts en masse, the creation of a malware dubbed “WannaMine” was born. WannaMine is a mineware malware variant created for the sole purpose of installing and running Monero software on a victim’s system and using its processing power to mine Monero for the adversary. WannaMine plays on the naming convention used for the notorious ransomware mentioned at the beginning of the article, WannaCry. This is likely because WannaMine leverages WannaCry's exploitation code, "EternalBlue," to compromise hosts and propagate the Monero mining software.
WannaMine v4.0 Analysis and Remediation Overview
Like its predecessors, WannaMine v4.0 leverages the EternalBlue exploit to spread and compromise vulnerable hosts. Its design is similar to WannaMine v3.0 in that it stores the EternalBlue exploit binaries in a directory located in C:\Windows; however, the directory in version 4.0 has been renamed "NetworkDistribution.” Instead of leveraging a single hard-coded service name like WannaMine v3.0, version 4.0 will randomly generate a .dll and service name based on a list of hard-coded strings. It does this in order to maintain persistence on the host.
We will start with a quick high-level overview of the remediation steps that are needed, and then follow with a more detailed step-by-step walk-through.
The remediation of WannaMine v4.0 can be broken into the following three steps:
- Killing the malicious processes (newly spawned or injected)
- Locating and removing the persistence mechanism (e.g., service)
- Removing artifacts (e.g., NetworkDistribution).
WannaMine v4.0 Step-by-Step Remediation
Note: there are 2 scenarios. Pre-infection (CrowdStrike Falcon®® is already installed and preventions are on) and post-infection detections where Falcon has been installed on the client’s endpoints after infection, therefore blocking it.In some of the examples shown below we have turned on DETECTIONS ONLY and PREVENTIONS off for illustrative purposes.
STEP 1. Killing the Malicious svchost.exe and dllhostex.exe Processes
As you can see in Figure 1 and 2. , Falcon will immediately block the launch of WannaMine’s main XMRig mining module (dllhostex.exe) and then quarantine the binary. Since the process has been killed and the binary removed, we must find the svchost.exe process that is being used to run the malicious service and kill it.Using Falcon’s process explorer, you can see that the parent process of dllhostex.exe is svchost.exe.
Figure 1. Process execution tree indicating svchost.exe as the parent process of dllhostex.exe Figure 2. Further detail of specific process information within the UIBy looking over the process details within Falcon, we can quickly grab the process ID associated with the svchost.exe that is running the malicious WannaMine DLL.
Figure 3-4. Process execution tree provides process ID information Figure 5. PowerShell query to output svchost service group name. Note: This must be run within the "EDIT & RUN SCRIPTS" tabReview Appendix A.3 for further insight into this grouping. To be more specific, we can actually query the SVCHOST process using “tasklist” to output the service name associated with it, which happens to be the exact name of the malicious WannaMine DLL.
Figure 6. Tasklist output to display associated service name. Note: This must be run within the "EDIT & RUN SCRIPTS" tab. Figure 7. Registry query output showing newly added malicious dll module name Figure 8. Registry query command to output path location to .dll on disk Figure 9. Output of registry query command showing path location to the malicious .dllTo confirm that this is the malicious DLL we are looking for, we can calculate the hash for the binary Figure 10. Built-in RTR command to gather filehash information. Figure 11. Output of the filehash command for the malicious .dll
Figure 12-13. Shows a creation date that pre-dated the in-lab installation Figure 14. Another image showing timestomping being used on a Windows 7 host Figure 15. Reviewing compiler timestamp information that proves timestomping is in fact being used Figure 16. Registry query used to show further outlier information indicating the difference between the known legitimate and malicious .dll. Note: This must be run within the "EDIT & RUN SCRIPTS" tab. Figure 17. Output of the registry command indicating the differencesSTEP 2. Removing the Persistence
While discovering and killing the svchost.exe process being used to launch the WannaMine service, we found and confirmed the service name being used for persistence. Now we remove the service so WannaMine v4.0 no longer has persistence in place. Figure 20. Output provided after running the service removal commandSTEP 3. Removing Remaining Artifacts
Now that we have killed the SVCHOST process and removed the persistence, it’s time to clean up and remove the remaining artifacts. Based on our research, WannaMine v4.0 has a few specific artifacts that it places on the host. The first one is the NetworkDistribution folder located in C:\Windows. This folder contains all of the Equation Group binaries (e.g., EternalBlue, Double Pulsar, etc.) and needs to be removed. Figure 21. Depicts the folder named “NetworkDistribution” and some of its contents Figure 23. Built-in RTR command used to remove the malicious .dll Figure 24. Built-in RTR command used to remove the XMRig miner module binaryCompletion
Congratulations! If you followed the above steps, you have successfully discovered and remediated the pesky WannaMine v4.0 malware.PowerShell Enumeration Script
In an effort to automate the remediation processing, we can leverage the RTR RUNSCRIPT feature of the Falcon agent to easily create and save re-runnable scripts to help identify and triage systems ready for remediation. Using a “query first then kill” methodology, you can confirm a host is infected prior to running any remediation kill scripts. This helps our analysts quickly remediate systems at scale.Remediation RTR Runscript Code
Figure 26. Image of the full PowerShell runscriptRTR Runscript Output Example
Figure 27. Output provided by the PowerShell runscript listing the artifacts found on the host Figure 28. Output provided by the PowerShell runscript listing the removal commands that you can use to completely remediate WannaMine v4.0Recommendations
- Gain advance visibility across your endpoints with an endpoint detection and response (EDR) solution such as the CrowdStrike® Falcon platform. Turn on next-gen antivirus (NGAV) preventative measures to stop malware.
- Keep systems up to date: Patch for MS17-010 to stop EternalBlue exploitation.
- Segregate the network where possible to limit lateral movement.
- Monitor / filter / block at the network level for known coinminer sites.
- Detect network scanning. Contain unapproved hosts as fast as you can.
CrowdStrike Solutions and Services
CrowdStrike provides a wide range of solutions and services to help you identify and protect your environment from the latest threats. The following is information on some of these solutions and services. CrowdStrike provides the technology and expertise you need to combat today’s advanced threats, including WannaMine v4.0.Falcon Sandbox
CrowdStrike Falcon® Sandbox™ performs deep analysis of evasive and unknown threats, enriches the results with threat intelligence, and delivers actionable indicators of compromise (IOCs), enabling your security team to better understand sophisticated malware attacks and strengthen their defenses. Learn more about Falcon Sandbox.
Try it free by visiting this website.
Falcon Complete
CrowdStrike Falcon Complete™ saves time and resources, and reduces cost by bringing customers to the highest level of endpoint security by combining CrowdStrike’s best protection technologies with the people and processes necessary to provide a total hands-off, turnkey approach to endpoint protection. The CrowdStrike Falcon® Complete Team reduces the time needed to remediate endpoints by providing the skills and expertise required to take proper action. The Team does the remediation for you, eliminating the arduous task of reimaging the endpoints and reducing the risk of a breach. The Falcon Complete Team has been following the numerous iterations of the WannaMine malware and are well-versed in the removal of the latest variant, WannaMine v4. This removal is done by taking a surgical approach and removing the many artifacts that WannaMine scatters on the host, all without having to reimage the system.For further details regarding CrowdStrike’s Falcon Complete, visit the
Falcon Complete webpage.
CROWDSTRIKE FALCON® INTELLIGENCE
CrowdStrike CROWDSTRIKE FALCON® INTELLIGENCE™ automates the threat analysis process and delivers actionable intelligence and custom IOCs specifically tailored for the threats encountered on your endpoints. With this level of automation, you can stop picking and choosing which threats to analyze and start analyzing all threats. In addition, with CrowdStrike Falcon® Intelligence Premium, you have the ability to escalate malware to a CrowdStrike expert for further research or a second opinion.
Learn more about CrowdStrike Falcon® Intelligence threat intelligence by visiting the webpage.
APPENDICES
A.1 LATERAL MOVEMENT
Please Note: In Figure 29, Falcon is configured to DETECT ONLY. Prevention was disabled to outline the lateral movement. If Falcon was in prevention mode, it would have prevented the post exploitation activity. On patient zero, the injected process, SearchIndexer.exe begins scanning the local subnet for EternalBlue vulnerable hosts. Figure 29. Process execution information within the Falcon UI indicating network lateral movementhas been found and exploited by EternalBlue. Notice LSASS process dropping out a new persistence SVCHOST service and newly generated dll.
Figure 30. Process execution information within the Falcon UI showing signs of a newly infected victim that was exploited via Eternal BlueA.2 TIMESTOMPING EXAMPLE
Again, timestomping on the dll has occurred — even more notably than previously on our patient zero — to further evade detection, setting it back into 2009. Figure 31. Runscript output indicating timestomping being used Figure 32. Native RTR output indicating timestomping being used
Figure 33. Image showing compiler timestamp for the binaryA.3 WINDOWS 7 SVCHOST GROUPING EXAMPLE
With a Windows 7 host, the SVCHOST grouping is also important: You should not kill off the PID as this would disrupt the OS and could cause instability with the host. Figure 34. Image showing numerous services grouped with this specific svchost process Figure 35. Image showing the malicious service has been removed from the process without killing other legitimate system servicesAdditional Resources
- Find out how CrowdStrike can help your organization answer its most important security questions: Visit the CrowdStrike Services webpage.
- Learn how any size organization can achieve optimal security with Falcon Complete by visiting the product webpage.
- Learn more about CrowdStrike Falcon® Intelligence threat intelligence by visiting the webpage.
- Learn about CrowdStrike’s comprehensive next-gen endpoint protection platform by visiting the Falcon products webpage.
- Test CrowdStrike next-gen AV for yourself: Start your free trial of Falcon Prevent™.