In the preceding section of this guide, we considered the importance of monitoring a Kafka cluster for optimal performance, looking at different Kafka metrics and how to manage performance logs effectively. In this section, we’ll cover security issues, including:
- Best practices for data security inside the cluster
- How to harden data at the server level by using cloud-supported volume encryption and truststore for self-managed security
- Encryption at the transition state
Learn More
Explore the complete Kafka Logging Guide series:
- Part 1: The Basics
- Part 2: Advanced Concepts
- Part 3: Managing Performance Logs
- Part 4: Securing Kafka Logs
Overview of key security measures
By default, all logs in Kafka are stored in plain text format. Furthermore, no authentication or authorization is enabled, leaving the data open to adverse security breaches. To secure your data, Kafka supports multiple security practices.
Authentication
Producer and consumer authentication is essential for securing data accessibility against unwanted sources. Kafka supports authentication using mTLS and SASL. In addition, either PEM keys or truststores and keystores generate client-side certificates to verify identities among brokers, producers, and consumers.
Authorization
Enabling access-limiting control policies to Kafka topics is a vital authorization practice. Kafka implements access control lists (ACLs) using principals that are entities defined by a name and type (such as user, group, or role).
Encryption at rest and in transit
Kafka supports data encryption at rest, but the encryption of records in transit is also crucial for data integrity. If malicious actors can intercept the connection between the client and broker, they can gain access to sensitive data unless that data is properly encrypted.
Configure encryption at Kafka brokers
Kafka ensures data durability by replicating logs across brokers on persistent disks. Securing the disk at the broker level is possible in several ways.
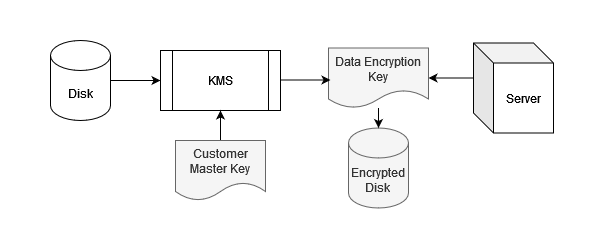
1. The disk is encrypted using volume encryption solutions provided by cloud service providers, such as AWS Key Management Service (KMS). KMS generates a Data Encryption Key (DEK) used by the server to encrypt its files and data, as shown below:
2. Privacy Enhanced Mail (PEM) keys encrypt data and can ensure data integrity in inter-broker communication and data replication.
3. The use of keystores and truststores is another excellent method, as these offer encryption in a different format, similar to the PEM keys. The keystore contains the certificate and key needed to validate the broker’s authenticity to servers, and the truststore confirms the authenticity of other brokers when connecting with the server. The entire communication is encrypted using SSL certificates, as shown below.
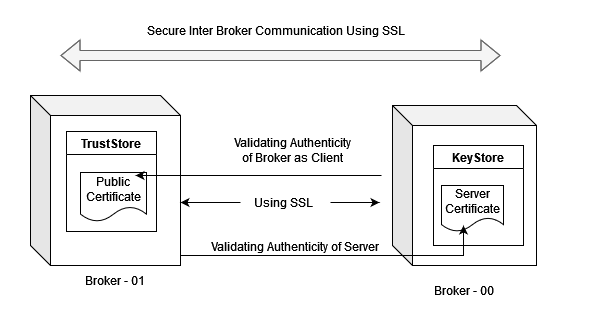
When the broker acts as the server, it uses the truststore to validate the authenticity of connecting brokers, and uses the keystore to prove its authenticity to the connecting brokers.
Commands to set up encryption
Begin by generating a self-signed certificate authority (CA) with the following command.
$ openssl req -new -x509 -keyout /tmp/certificate-authority-key -out /tmp/certificate-authority-key -days 334
Set up the keystore and SSL certificate
Follow this keystore procedure for every broker inside the cluster. The command below initializes the keystore with a validity of 11 months after inputting the fully qualified domain name of the broker. The keytool utility can be found inside the bin folder of your Java home directory. The output will generate the keystore and the certificate files, along with the password.
$ keytool -keystore /tmp/certs/key-store.jks -alias broker-server -validity 334 -genkey -keyalg RSA
Next, export and sign the certificate with your CA.
$ keytool -keystore /tmp/key-store.jks -alias broker-server -certreq -file /tmp/certificate-authority-key$ openssl x509 -req -CA /tmp/ca-cert -CAkey /tmp/certificate-authority-key -in /tmp/cert-file -out /tmp/cert-signed -days 334 -CAcreateserial -extfile ./openssl.cnf -extensions req_ext
Finally, import the certificates into the keystore.
$ keytool -keystore /tmp/key-store.jks -alias RootCA -import -file /tmp/certificate-authority-cert$ keytool -keystore /tmp/key-store.jks -alias broker-server -import -file /tmp/cert-signed
Set up the truststore
Importing the CA certificate with the following command will automatically configure your truststore for the server.
keytool -keystore /tmp/trust-store.jks -alias RootCA -import -file ca-cert -storepass your-keystore-password
Finally, configure SSL on each client, and activate ACLs to secure your cluster from end to end.
Encrypt Kafka records in transition state
To enable data encryption for the producer and consumer, generate the keystore and truststore for every client.
Commands to set up encryption at the client
The steps below show how to set up encryption at the client using a keystore, SSL certificate, and truststore.
Set up the keystore and SSL certificate
First, initialize the keystore and the SSL certificate.
$ keytool -keystore /tmp/certs/key-store-client.jks -alias client -validity 334 -genkey -keyalg RSA
Next, export and sign the certificate.
$ keytool -keystore /tmp/key-store-client.jks -alias client -certreq -file /tmp/certificate-authority-key$ openssl x509 -req -CA /tmp/ca-cert -CAkey /tmp/certificate-authority-key -in /tmp/cert-file -out /tmp/cert-signed -days 334 -CAcreateserial
Then, import the signed certificates into the keystore.
$ keytool -keystore /tmp/key-store-client.jks -alias RootCA -import -file /tmp/certificate-authority-cert$ keytool -keystore /tmp/key-store-client.jks -alias client -import -file /tmp/cert-signed
Set up the truststore
Import the server authority certificate file to configure your client’s truststore with the following command.
$ keytool -keystore /tmp/trust-store-client.jks -alias RootCA -import -file certificate-authority-cert -storepass your-keystore-password
Enable in-transit encryption
The steps below outline the setup of in-transit encryption with SSL on the broker and on the client.
Set up SSL on the broker
Update the following SSL listeners’ properties in the server.propertiesfile located inside the configfolder of Kafka home directory.
$ cat $KAFKA_HOME/server.propertieslisteners=SSL://hostname_server_here:443
ssl.keystore.location=/tmp/certs/key-store.jks
ssl.keystore.password=password_here
ssl.key.password=password_here
ssl.truststore.location=/tmp/trust-store.jks
ssl.truststore.password=password_here
security.inter.broker.protocol=SSL
ssl.client.auth=required
Set up SSL on the client
Update the following properties inside the connect-distributed.propertiesfile.
$ cat connect-distributed.propertiesbootstrap.serverslisteners=SSL://hostname_server_here:443
ssl.keystore.location=/tmp/certs/key-store-client.jks
ssl.keystore.password=password_here
ssl.key.password=password_here
ssl.truststore.location=/tmp/trust-store-client.jks
ssl.truststore.password=password_here
security.protocol=SSL
producer.ssl.keystore.location=/tmp/certs/key-store-client.jks
producer.ssl.keystore.password=password_here
producer.ssl.key.password=password_here
Then, update the properties inside the kafkabatch.propertiesfile.
$ cat kafkabatch.propertiesenableSSLMessaging=true
security.protocol=SSL
kafkaconnect.ssl.keystore.location=/tmp/certs/key-store-client.jks
kafkaconnect.ssl.keystore.password=password_here
kafkaconnect.ssl.key.password=password_here
kafkaconnect.ssl.truststore.location=/tmp/trust-store-client.jks
kafkaconnect.ssl.truststore.password=password_here
Finally, update the following properties inside the kafkaruntime.propertiesfile.
$ cat kafkaruntime.propertieskafkaconnect.ssl.keystore.location=/tmp/certs/key-store-client.jks
kafkaconnect.ssl.keystore.password=password_here
kafkaconnect.ssl.key.password=password_here
Flow of encrypted data
Understanding the flow of encrypted data is important in Apache Kafka. Encryption and decryption occur in multiple stages, as illustrated in the Kafka cluster data flow below.
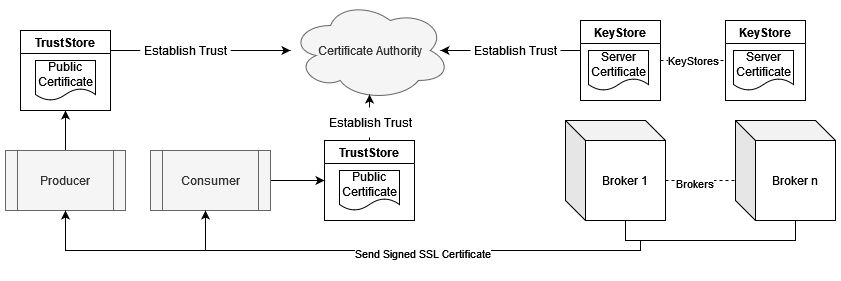
The encrypted data flow diagram above demonstrates the following:
- All brokers, producers, and consumers first establish trust inside the cluster using their respective truststores.
- Consumers and producers send requests to the broker.
- The broker sends the signed SSL certificate, verified through the client’s truststore.
- The client encrypts its message using the public key and certificate provided by the server.
- The broker decrypts the message and handles the request accordingly.
Authorization using ACL
After authenticating your clients and brokers, the next step is to set access limitations using the Authorizer server plugin provided by Apache Kafka.
Enable Authorizer by updating the server.propertiesfile with the following property.
$ cat $KAFKA_HOME/server.propertiesauthorizer.class.name=kafka.security.authorizer.AclAuthorizer
The Authorizer plugin uses resource patterns where principals perform certain actions on defined resources. Principals are entities that are allowed by the Authorizer.
Set up a rule to use the console API, such as in the example below. This code allocates admin rights on the topic topic-001to the user crowdstrike.
$ kafka-acls --bootstrap-server server:443 --command-config client-configs.conf --add --allow-principal User:crowdstrike --operation All --topic topic-001
Take advantage of wild card characters to configure complex rules with simplicity.
$ kafka-acls --bootstrap-server server:443 --command-config client-configs.conf --add --allow-principal User:* --operation All --topic topic-002
Leverage the Kafka ecosystem for stronger security
The Kafka ecosystem uses security techniques and practices that ensure data reliability and consistency. With the help of monitoring metrics, preventing your cluster from facing adverse scenarios—such as data loss or performance issues—significantly boosts your cluster’s performance.
Log your data with CrowdStrike Falcon Next-Gen SIEM
Elevate your cybersecurity with the CrowdStrike Falcon® platform, the premier AI-native platform for SIEM and log management. Experience security logging at a petabyte scale, choosing between cloud-native or self-hosted deployment options. Log your data with a powerful, index-free architecture, without bottlenecks, allowing threat hunting with over 1 PB of data ingestion per day. Ensure real-time search capabilities to outpace adversaries, achieving sub-second latency for complex queries. Benefit from 360-degree visibility, consolidating data to break down silos and enabling security, IT, and DevOps teams to hunt threats, monitor performance, and ensure compliance seamlessly across 3 billion events in less than 1 second.
Arfan Sharif is a product marketing lead for the Observability portfolio at CrowdStrike. He has over 15 years experience driving Log Management, ITOps, Observability, Security and CX solutions for companies such as Splunk, Genesys and Quest Software. Arfan graduated in Computer Science at Bucks and Chilterns University and has a career spanning across Product Marketing and Sales Engineering.